

Jellyfin Media Server lets you organize and stream movies, TV shows, music, photos, and live TV recordings to any device on your network or over the internet. To install Jellyfin on Linux Mint, you can use the official APT repository that provides automatic updates and the latest stable releases. Common use cases include building a home media library to replace commercial streaming services, setting up DVR recording for over-the-air broadcasts, and providing family members remote access to your media collection. By the end of this guide, you will have Jellyfin running and accessible via web browser at port 8096, along with optional configurations for firewall rules, file permissions, and secure remote access.
This guide walks through repository setup, service verification, media library configuration through the web interface, and advanced topics including backup automation, DLNA network discovery for smart TVs, hardware-accelerated transcoding (Intel QSV, NVIDIA NVENC, VAAPI), SSH tunneling, reverse proxy setup with Apache or Nginx, and Let’s Encrypt SSL certificate automation.
Update Linux Mint Before Installation
Open a terminal from the applications menu or by pressing the keyboard shortcut configured on your system. Then, update all packages before installing Jellyfin to prevent compatibility issues with outdated system libraries:
sudo apt update && sudo apt upgradeInstall Required Packages
Install packages required for adding third-party repositories and downloading GPG keys:
sudo apt install software-properties-common ca-certificates curl gpg -yThese packages provide add-apt-repository for PPA management, SSL certificate handling for secure connections, curl for downloading files, and gpg for cryptographic key operations.
Import Jellyfin GPG Key
Jellyfin packages require GPG key verification to ensure authenticity and integrity. Therefore, import the official Jellyfin Team signing key into a dedicated keyring file that the repository configuration will reference.
Download and install the GPG key:
curl -fsSL https://repo.jellyfin.org/ubuntu/jellyfin_team.gpg.key | sudo gpg --dearmor -o /usr/share/keyrings/jellyfin.gpgThis command downloads the ASCII-armored GPG key from Jellyfin’s official repository and converts it to binary format in /usr/share/keyrings/jellyfin.gpg, where the repository configuration will reference it for package signature verification. Subsequently, verify the key file was created:
ls -l /usr/share/keyrings/jellyfin.gpg-rw-r--r-- 1 root root 2212 Jan 1 10:15 /usr/share/keyrings/jellyfin.gpg
The file should exist with approximately 2-3 KB size. However, if the file is missing or empty, the curl command failed silently and should be run again.
Import Jellyfin APT Repository
Jellyfin offers two repository channels with different stability and feature trade-offs:
| Channel | Stability | Updates | Best For |
|---|---|---|---|
| Stable (main) | Production-ready | Monthly releases | Home servers, family use, reliable operation |
| Unstable | Pre-release | Nightly builds | Testing new features, development, bug reporting |
Most users should choose the stable repository. In contrast, the unstable channel provides early access to features but may introduce breaking changes or temporary bugs between releases.
Important: Linux Mint uses its own codenames (vanessa, wilma), but Jellyfin’s repository expects the underlying Ubuntu codenames (jammy, noble). Use the correct command block below based on your Linux Mint version; do not modify the codename.
The following table shows which Ubuntu codename to use for each Linux Mint version:
| Linux Mint Version | Mint Codename | Ubuntu Base | Repository Codename |
|---|---|---|---|
| Linux Mint 22.x | Wilma, Xia | Ubuntu 24.04 LTS | noble |
| Linux Mint 21.x | Vanessa, Vera, Victoria, Virginia | Ubuntu 22.04 LTS | jammy |
To check your Linux Mint version, run cat /etc/linuxmint/info or look in Menu → About This Computer.
Add Jellyfin Stable Repository
The stable repository delivers thoroughly tested releases suitable for production media servers. Copy the command block that matches your Linux Mint version:
Linux Mint 22.x (Ubuntu 24.04 noble):
cat <<'EOF' | sudo tee /etc/apt/sources.list.d/jellyfin.sources
Types: deb
URIs: https://repo.jellyfin.org/ubuntu
Suites: noble
Components: main
Architectures: amd64
Signed-By: /usr/share/keyrings/jellyfin.gpg
EOF
Linux Mint 21.x (Ubuntu 22.04 jammy):
cat <<'EOF' | sudo tee /etc/apt/sources.list.d/jellyfin.sources
Types: deb
URIs: https://repo.jellyfin.org/ubuntu
Suites: jammy
Components: main
Architectures: amd64
Signed-By: /usr/share/keyrings/jellyfin.gpg
EOF
The single quotes around
'EOF'prevent shell variable expansion, ensuring the configuration is written exactly as shown. Both Linux Mint 21.x and 22.x support the modern DEB822.sourcesformat, which provides better readability than legacy one-line.listfiles.
Add Jellyfin Unstable Repository (Optional)
The unstable repository provides pre-release features and nightly builds for testing and development. Only use this option if you specifically need features not yet available in stable releases and accept the risk of occasional breakage.
Linux Mint 22.x (Ubuntu 24.04 noble), Unstable:
cat <<'EOF' | sudo tee /etc/apt/sources.list.d/jellyfin.sources
Types: deb
URIs: https://repo.jellyfin.org/ubuntu
Suites: noble
Components: unstable
Architectures: amd64
Signed-By: /usr/share/keyrings/jellyfin.gpg
EOF
Linux Mint 21.x (Ubuntu 22.04 jammy), Unstable:
cat <<'EOF' | sudo tee /etc/apt/sources.list.d/jellyfin.sources
Types: deb
URIs: https://repo.jellyfin.org/ubuntu
Suites: jammy
Components: unstable
Architectures: amd64
Signed-By: /usr/share/keyrings/jellyfin.gpg
EOF
Then, after adding the repository configuration, refresh the package index to recognize the new Jellyfin packages:
sudo apt updateLook for the Jellyfin repository in the output to confirm it was added correctly. The output differs based on which codename you configured:
Linux Mint 22.x (noble):
Hit:1 http://archive.ubuntu.com/ubuntu noble InRelease
Get:2 https://repo.jellyfin.org/ubuntu noble InRelease [3,412 B]
Get:3 https://repo.jellyfin.org/ubuntu noble/main amd64 Packages [9,890 B]
Linux Mint 21.x (jammy):
Hit:1 http://archive.ubuntu.com/ubuntu jammy InRelease
Get:2 https://repo.jellyfin.org/ubuntu jammy InRelease [3,412 B]
Get:3 https://repo.jellyfin.org/ubuntu jammy/main amd64 Packages [9,733 B]
The repo.jellyfin.org lines confirm APT is reading the new repository. If you see GPG errors or the repository is missing, verify the keyring file exists at /usr/share/keyrings/jellyfin.gpg and that the codename in your .sources file matches your Linux Mint version.
Install Jellyfin
Install the Jellyfin package from the official repository:
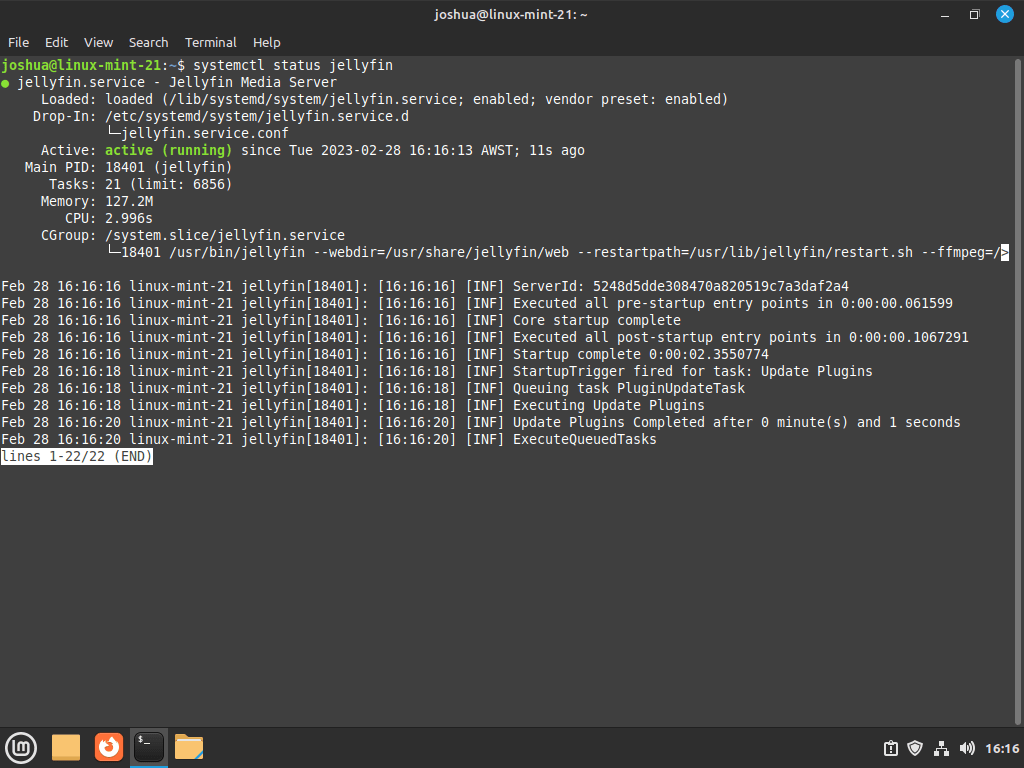
sudo apt install jellyfin -yThe package installation automatically starts the Jellyfin service and enables it to launch at system boot. To confirm everything is working, verify the service is running:
systemctl status jellyfin● jellyfin.service - Jellyfin Media Server
Loaded: loaded (/lib/systemd/system/jellyfin.service; enabled; preset: enabled)
Active: active (running) since Wed 2026-01-01 10:15:32 EST; 2min ago
The Active: active (running) status confirms Jellyfin is operational and ready to accept connections on port 8096.
However, if the service shows inactive (dead) or failed status, start it manually and verify the enable status:
sudo systemctl start jellyfin
sudo systemctl enable jellyfin
systemctl is-enabled jellyfin
enabled
The enabled output confirms the service will start automatically at boot. Conversely, if it shows disabled, the enable command did not complete successfully and should be run again.
Jellyfin Initial Setup
To access the Jellyfin Web UI, open your internet browser and enter the IP address of your server, followed by the default port 8096. Specifically, if you’re accessing the Jellyfin server on the same machine where it’s installed, use 127.0.0.1 as the IP address.
For example, you can type the following address into your browser’s address bar to access the Jellyfin Web UI:
http://127.0.0.1:8096When you enter the above address, the welcome screen for the initial server setup directs you. From here, the setup screen provides the necessary steps for configuring Jellyfin for the first time.
Preferred Display Language
During the initial setup of your Jellyfin server, the interface will ask you to select your preferred display language.

Once you’ve selected, simply click the “Next ->” button to move on to the next step.
Create Jellyfin Account Username and Password
After you select your preferred display language, the system will prompt you to create a Jellyfin account username and password. Importantly, your account grants administrative access to the Jellyfin server, where you can manage media libraries, user accounts, and server settings.
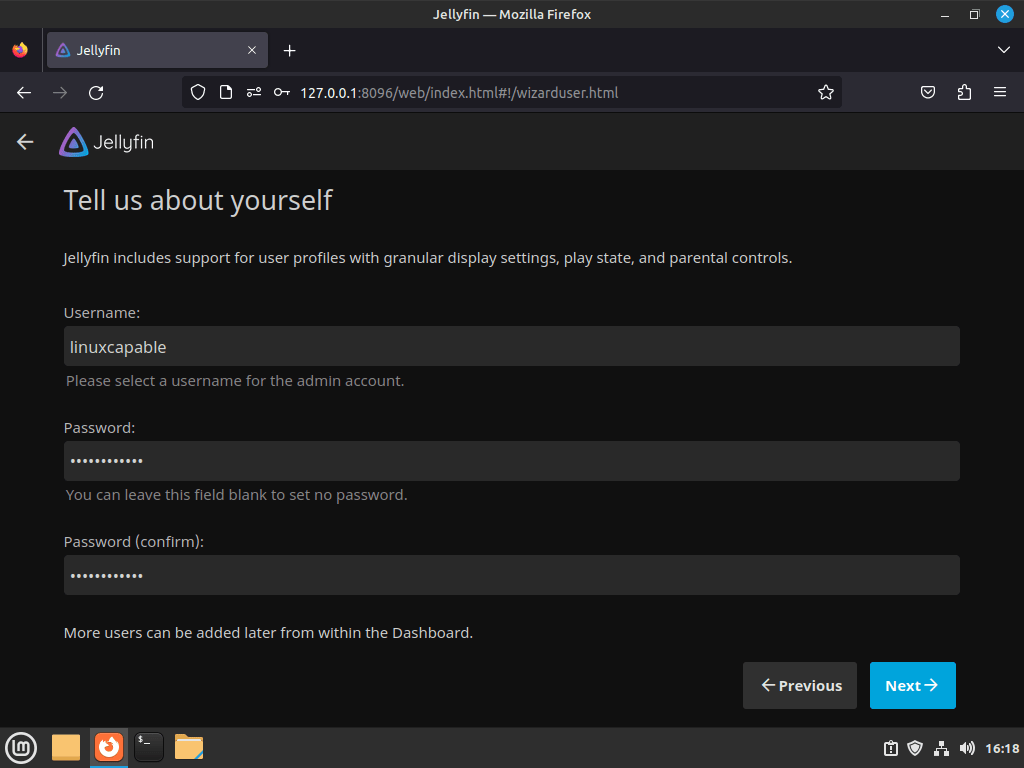
Note: To secure your Jellyfin server effectively, always create a strong, unique password that combines uppercase and lowercase letters, numbers, and symbols.
Once you’ve created your username and password, click on the “Next ->” button to proceed to the next step of the initial server setup.
Media Libraries
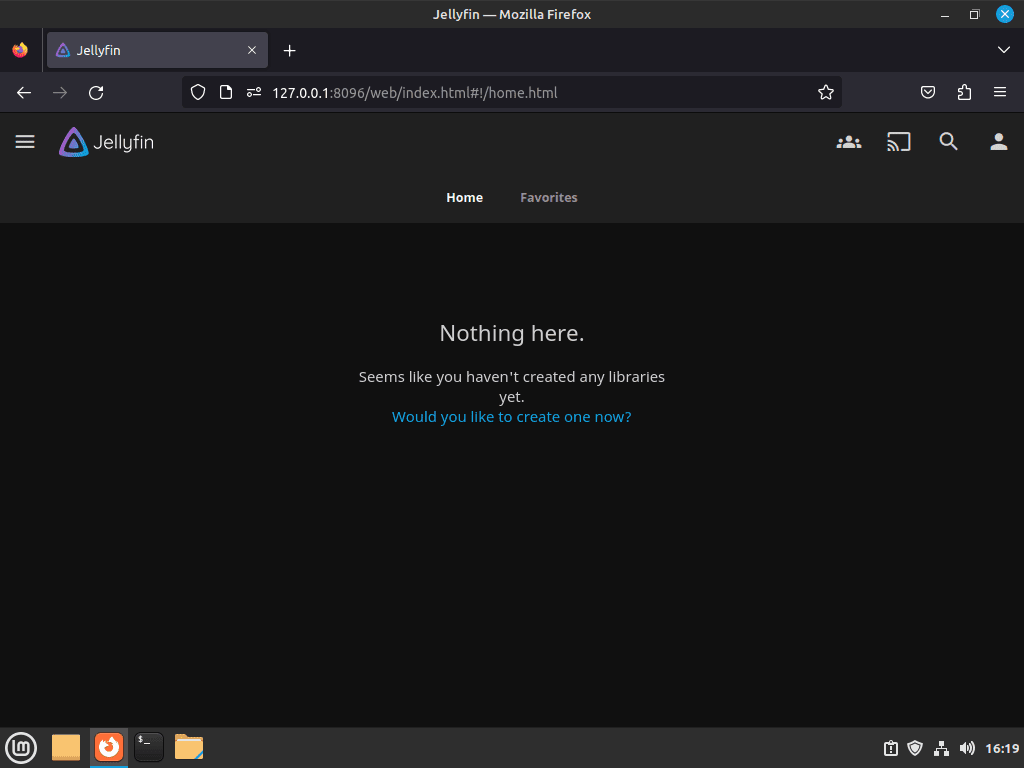
After creating your Jellyfin account, the next step in setting up your server is configuring your media libraries. Media libraries allow you to add your media content to Jellyfin and organize it in a structured manner. Furthermore, you can create multiple libraries for different media types, such as movies, TV shows, and music.
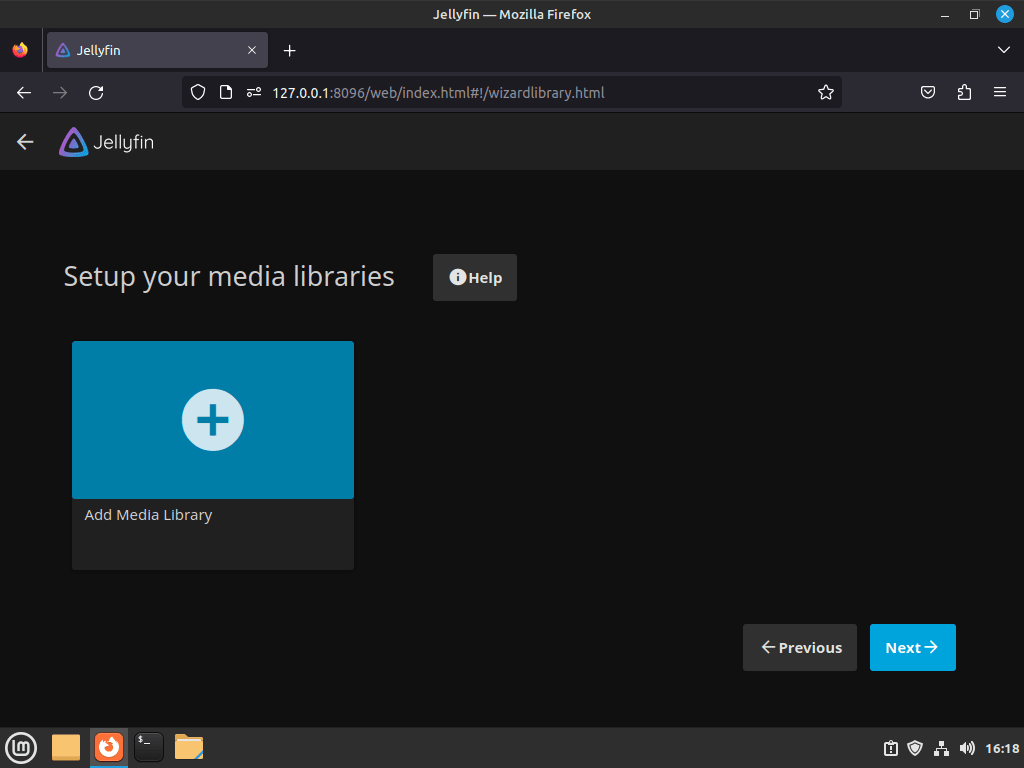
To organize and display media content in Jellyfin, add your content to media libraries. Click the big “+” or “Add Media Library” button on the Jellyfin dashboard. This click will redirect you to the Media Library setup screen to input your media folder.
Adding media content to Jellyfin is straightforward:
- If you have used Plex Media Server, you will find the process familiar.
- Select the “Add Media Library” button.
- Choose the type of media to add: movies, TV shows, or music.
- Follow the prompts to input your media folder.
- Set the metadata language, which provides episode descriptions, actor biographies, and album artwork.
After populating your media libraries, you can efficiently organize and browse content through Jellyfin. Click “Next ->” after adding media libraries to proceed to the Metadata Language screen. Here, select a language for your content’s metadata. This selection enriches your content with valuable information like cast and crew details, plot summaries, and reviews.
Preferred Metadata Language
After setting up your media libraries and selecting your preferred metadata language, configure remote access for your Jellyfin media server. As a result, this lets you view media content from different locations or devices, not just your local network.
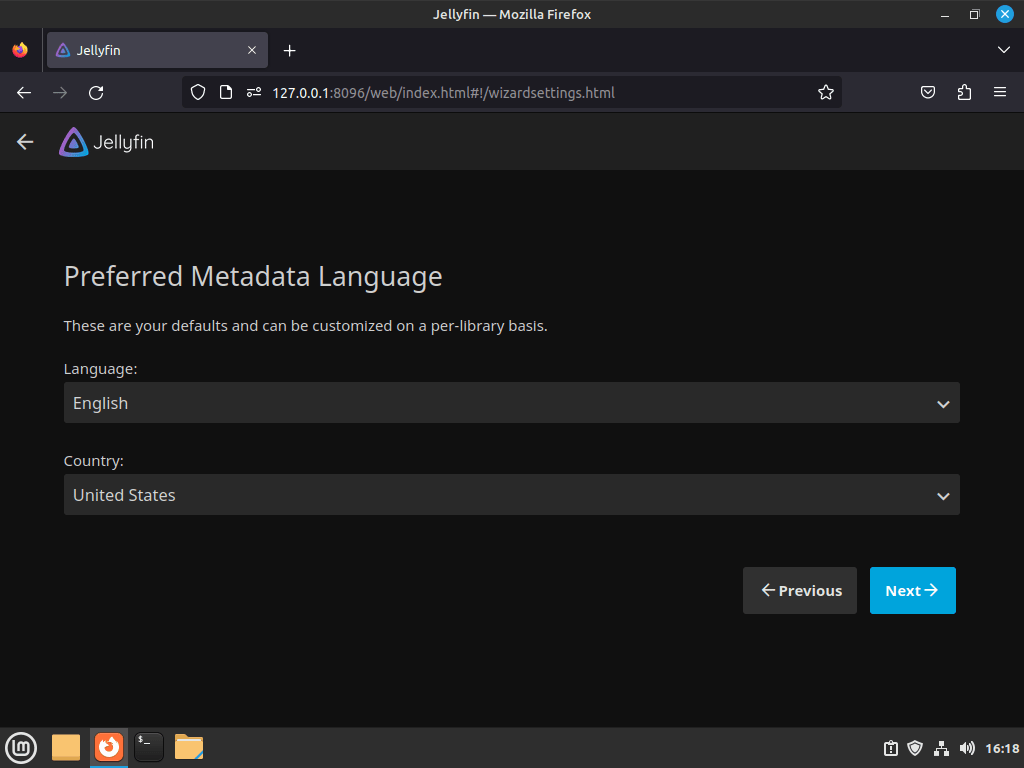
Once you have selected your preferred metadata language, click the “Next ->” button to proceed.
Enable Jellyfin Remote Connections
Enable remote access by allowing connections to your Jellyfin media server and activating automatic port mapping. Allowing remote connections lets you access media content from anywhere with an internet connection. Meanwhile, automatic port mapping opens the necessary ports, ensuring incoming traffic can reach your Jellyfin server.
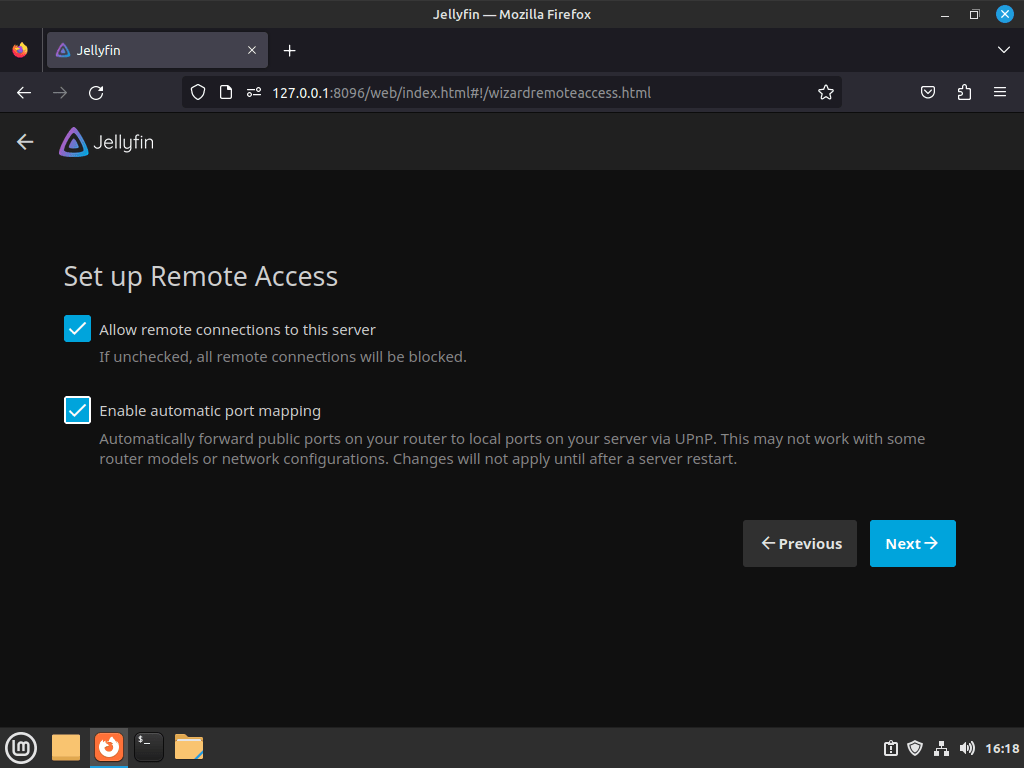
Once you have configured remote access to your Jellyfin Media Server, click the “Next ->” button to proceed.
Proceed to Jellyfin Dashboard
Finally, once you complete the initial setup of your Jellyfin media server, the following screen confirms that the installation process has finished and your server is ready for use.
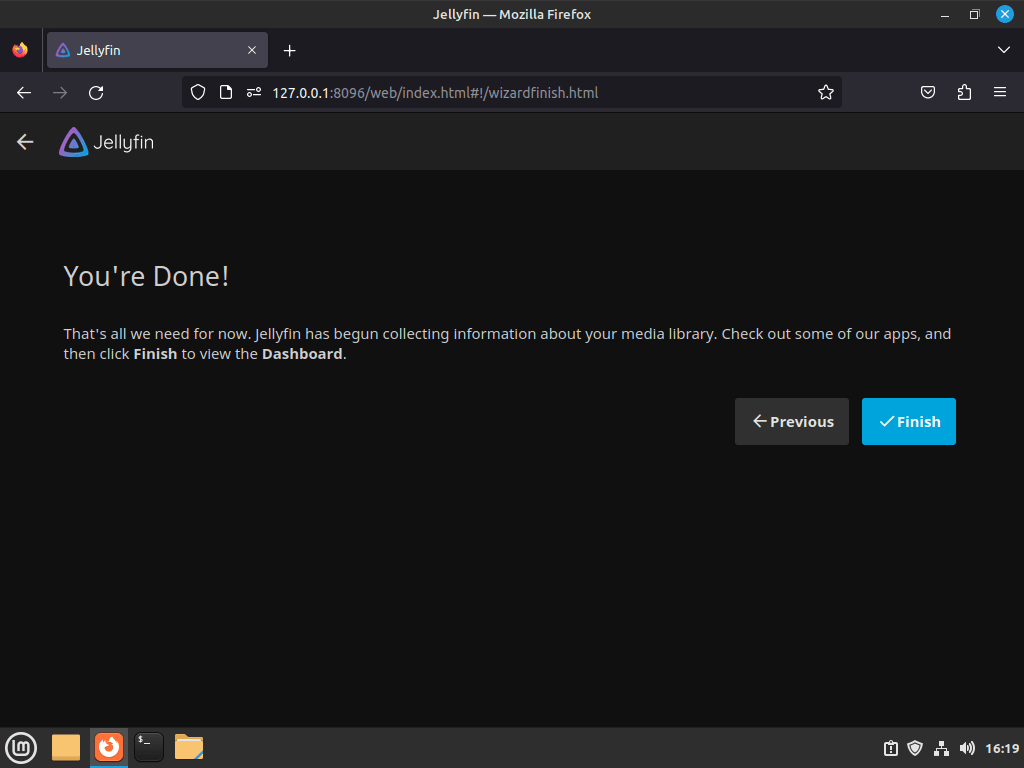
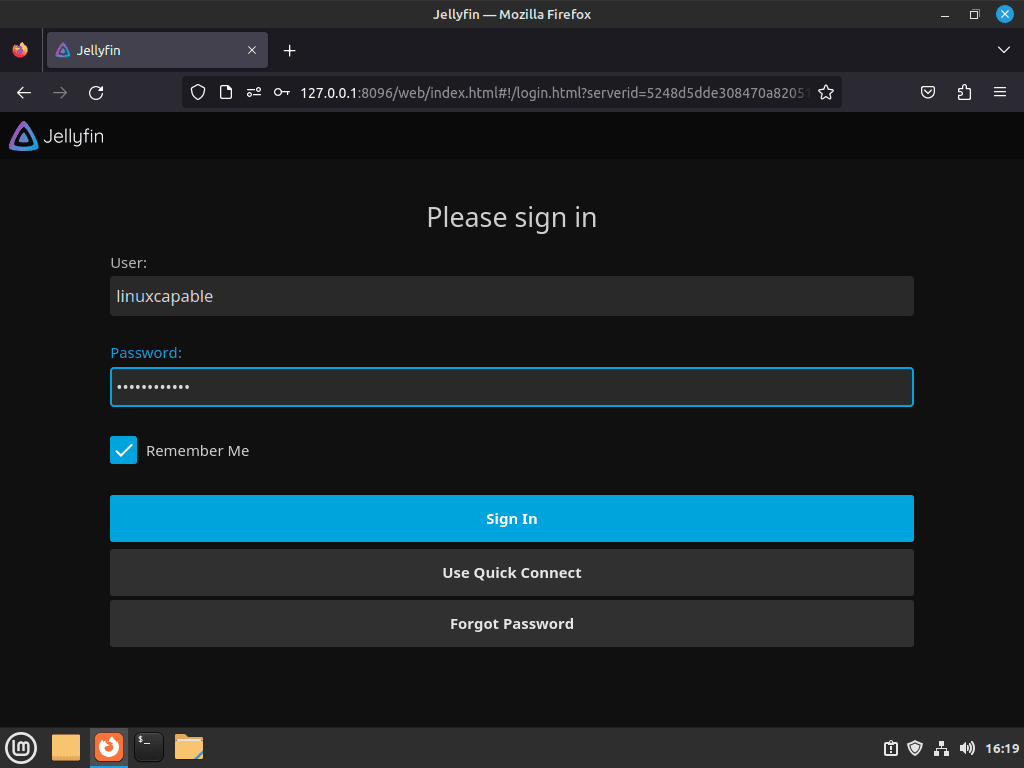
After accessing the Jellyfin Web UI, enter the username and password created during the initial setup process and click the “Sign in” button. Subsequently, this action will take you to the Jellyfin dashboard, where you can access your media libraries and manage content.
Customize Your Jellyfin Server
After logging in to the Jellyfin dashboard, you should configure these common settings to optimize your media server:
Configure Libraries and Users
- Add media libraries: Navigate to Dashboard → Libraries → Add Media Library. First, select the content type (movies, TV shows, music), then point to your media folder, and finally configure metadata sources. Jellyfin scans the folder automatically.
- Configure appearance: Access Dashboard → General to change the server name, or Dashboard → Display to modify themes and layout. Additionally, custom CSS can be added under Dashboard → General → Custom CSS.
- Create user accounts: Navigate to Dashboard → Users → Add User. Assign library access, set parental controls, and configure streaming quality limits per user.
Set Up Scheduled Tasks and Plugins
For ongoing maintenance, Jellyfin provides automation tools:
- Schedule library scans: Dashboard → Scheduled Tasks lets you automate metadata refreshes and library scans during off-peak hours.
- Install plugins: Dashboard → Plugins → Catalog provides subtitle downloaders, anime metadata providers, and integration with services like Trakt.
Reset Jellyfin Initial Setup Wizard
Occasionally, if you need to rerun the initial setup wizard (to create a new admin account, reconfigure libraries, or recover from configuration errors), modify the startup wizard flag in Jellyfin’s configuration file.
Open the system configuration file:
sudo nano /etc/jellyfin/system.xmlThen, locate the following line:
<IsStartupWizardCompleted>true</IsStartupWizardCompleted>Change true to false:
<IsStartupWizardCompleted>false</IsStartupWizardCompleted>Save the file (Ctrl+O, then Enter) and exit (Ctrl+X). Restart the Jellyfin service to apply the change:
sudo systemctl restart jellyfinAccess http://127.0.0.1:8096 in your browser to run through the setup wizard again.
Configure Permissions For Media Drives
After installing Jellyfin on your Linux Mint system, setting up the permissions for the media server to access and read your media directories is essential. For this purpose, you should use the setfacl command, which offers more detailed access control than the chown and chgrp commands.
Initially, ensure you have the ACL package installed before setting up permissions:
sudo apt install acl -yTo give Jellyfin access to your media directory and all its subdirectories, use the following command with the -R (recursive) flag:
sudo setfacl -R -m u:jellyfin:rx /media/mymediadriveAfterward, verify the permissions were applied correctly:
getfacl /media/mymediadrive# file: media/mymediadrive # owner: youruser # group: yourgroup user::rwx user:jellyfin:r-x group::r-x mask::r-x other::r-x
The user:jellyfin:r-x line confirms the Jellyfin user has read and execute permissions on the directory.
If you need to assign permissions to individual media directories or files, use the following command:
sudo setfacl -m u:jellyfin:rx /media/mymediadrive/example-name-of-file-or-directoryConfigure Remote Access and Security
Configure SSH for Remote Access
SSH (Secure Shell) enables encrypted remote access to your Linux Mint server, allowing you to manage Jellyfin and create secure tunnels for accessing the web interface over untrusted networks. To get started, install OpenSSH Server to enable remote connections. For detailed SSH configuration including key-based authentication and security hardening, see our SSH installation guide for Ubuntu (compatible with Linux Mint).
Install the SSH server on your Linux Mint machine using the following command:
sudo apt install openssh-serverVerify SSH is running after installation:
systemctl status ssh● ssh.service - OpenBSD Secure Shell server
Active: active (running)
Once the SSH server is installed, you can connect to your Jellyfin Media Server remotely through an SSH tunnel. Replace {server-ip-address} (including the braces) with your server’s actual IP address:
ssh {server-ip-address} -L 8096:localhost:8096Essentially, this command creates an SSH tunnel that forwards local port 8096 to the remote server’s Jellyfin port. For example, if your server IP is 192.168.1.100, the command becomes ssh 192.168.1.100 -L 8096:localhost:8096.
After creating the SSH tunnel, you can access the Jellyfin Media Server through the following link in your web browser:
http://localhost:8096/web/index.html#/wizardstart.htmlThe SSH tunnel forwards your local port 8096 to the remote server’s Jellyfin instance. While the tunnel is active, all traffic is encrypted through SSH. For ongoing access without a VPN, consider setting up a reverse proxy with SSL as described later in this guide. Without SSL, use http://{server-ip-address}:8096 when accessing Jellyfin directly over your local network.
Configure UFW Firewall for Jellyfin
Configuring UFW (Uncomplicated Firewall) restricts incoming network traffic to only the ports Jellyfin requires for streaming and web interface access. Unlike Ubuntu, Linux Mint does not enable UFW by default, so you must install and activate it manually. For comprehensive UFW configuration beyond basic port rules, see our guide on configuring UFW on Ubuntu (compatible with Linux Mint).
If you access this system remotely via SSH, allow SSH (port 22) before enabling UFW. Otherwise, skipping this step will immediately lock you out of the remote session and may require physical console access to recover. Add the rule with
sudo ufw allow OpenSSHbefore runningsudo ufw enable.
First, enable the UFW firewall:
sudo ufw enableFirewall is active and enabled on system startup
Once enabled, allow incoming traffic on port 8096 for Jellyfin web interface access:
sudo ufw allow 8096Rule added Rule added (v6)
Verify the rule was added correctly:
sudo ufw statusStatus: active To Action From -- ------ ---- 8096 ALLOW Anywhere 8096 (v6) ALLOW Anywhere (v6)
The ALLOW entries for port 8096 confirm Jellyfin traffic can pass through the firewall.
If you don’t have UFW installed, use the following command to install it:
sudo apt install ufwSet Up Apache or Nginx as a Reverse Proxy
Additionally, setting up a reverse proxy for Jellyfin allows you to access the media server from a remote computer or network using a custom domain name.
Apache Reverse Proxy Configuration
If you want to access your Jellyfin media server from a remote computer or network, you can set up a reverse proxy using Apache or Nginx. This section covers setting up Apache as a reverse proxy on Linux Mint.
First, install the Apache web server using the following command:
sudo apt install apache2 -yBy default, Apache should be active. Otherwise, start it manually:
sudo systemctl start apache2Next, enable the necessary Apache modules for proxying and WebSocket support:
sudo a2enmod proxy proxy_http headers proxy_wstunnelEnabling module proxy. Enabling module proxy_http. Enabling module headers. Enabling module proxy_wstunnel. To activate the new configuration, you need to run: systemctl restart apache2
Then, create a new virtual host configuration file for Jellyfin:
sudo nano /etc/apache2/sites-available/jellyfin.confAdd the following virtual host configuration, replacing jellyfin.example.com with your actual domain or subdomain. The SSL section references Let’s Encrypt certificates, which you will obtain using Certbot in the next section after enabling this configuration:
<VirtualHost *:80>
    ServerName jellyfin.example.com

    # Redirect HTTP to HTTPS
    Redirect permanent / https://jellyfin.example.com

    ErrorLog /var/log/apache2/jellyfin-error.log
    CustomLog /var/log/apache2/jellyfin-access.log combined
</VirtualHost>

<IfModule mod_ssl.c>
<VirtualHost *:443>
    ServerName jellyfin.example.com

    ProxyPreserveHost On

    ProxyPass "/socket" "ws://localhost:8096/socket"
    ProxyPassReverse "/socket" "ws://localhost:8096/socket"

    ProxyPass "/" "http://localhost:8096/"
    ProxyPassReverse "/" "http://localhost:8096/"

    SSLEngine on
    SSLCertificateFile /etc/letsencrypt/live/jellyfin.example.com/fullchain.pem
    SSLCertificateKeyFile /etc/letsencrypt/live/jellyfin.example.com/privkey.pem
    Protocols h2 http/1.1

    SSLCipherSuite HIGH:RC4-SHA:AES128-SHA:!aNULL:!MD5
    SSLHonorCipherOrder on

    SSLProtocol all -SSLv2 -SSLv3 -TLSv1 -TLSv1.1

    ErrorLog /var/log/apache2/jellyfin-error.log
    CustomLog /var/log/apache2/jellyfin-access.log combined
</VirtualHost>
</IfModule>
Save the file (Ctrl+O, then Enter) and exit (Ctrl+X).
Before proceeding, test the Apache configuration for syntax errors before enabling the virtual host:
sudo apache2ctl configtestSyntax OK
The Syntax OK output confirms the configuration file contains no errors. However, if you see error messages, review the virtual host configuration for typos or missing directives before proceeding.
Afterward, enable the virtual host configuration:
sudo a2ensite jellyfin.confEnabling site jellyfin. To activate the new configuration, you need to run: systemctl reload apache2
Enable Apache to start at boot and restart the service to apply the new virtual host configuration:
sudo systemctl enable apache2
sudo systemctl restart apache2
The restart command stops and starts Apache, loading the Jellyfin virtual host configuration and making the reverse proxy operational.
Nginx Server Block Configuration
Nginx can also serve as a reverse proxy to enable remote access to your Jellyfin media server. This lightweight, high-performance web server is commonly used for this purpose.
To begin, install Nginx using the following command:
sudo apt install nginx -yStart the Nginx service:
sudo systemctl start nginxAdditionally, enable Nginx to start automatically at boot:
sudo systemctl enable nginx
systemctl is-enabled nginx
Synchronizing state of nginx.service with SysV service script with /lib/systemd/systemd-sysv-install. Executing: /lib/systemd/systemd-sysv-install enable nginx enabled
The enabled status confirms Nginx will start automatically at system boot.
Next, create a new server block file for Jellyfin at /etc/nginx/conf.d/jellyfin.conf:
sudo nano /etc/nginx/conf.d/jellyfin.confAdd the following server block configuration. Replace jellyfin.example.com with your actual domain name:
server {
    listen 80;
    server_name jellyfin.example.com;

    access_log /var/log/nginx/jellyfin.access;
    error_log /var/log/nginx/jellyfin.error;

    # Security / XSS Mitigation Headers
    add_header X-Frame-Options "SAMEORIGIN";
    add_header X-XSS-Protection "0";
    add_header X-Content-Type-Options "nosniff";

    location = / {
        return 302 http://$host/web/;
    }

    location / {
        # Proxy main Jellyfin traffic
        proxy_pass http://127.0.0.1:8096;
        proxy_set_header Host $host;
        proxy_set_header X-Real-IP $remote_addr;
        proxy_set_header X-Forwarded-For $proxy_add_x_forwarded_for;
        proxy_set_header X-Forwarded-Proto $scheme;
        proxy_set_header X-Forwarded-Protocol $scheme;
        proxy_set_header X-Forwarded-Host $http_host;

        # Disable buffering for media streaming
        proxy_buffering off;
    }

    # Aesthetics: /web/ redirects to the index
    location = /web/ {
        proxy_pass http://127.0.0.1:8096/web/index.html;
        proxy_set_header Host $host;
        proxy_set_header X-Real-IP $remote_addr;
        proxy_set_header X-Forwarded-For $proxy_add_x_forwarded_for;
        proxy_set_header X-Forwarded-Proto $scheme;
        proxy_set_header X-Forwarded-Protocol $scheme;
        proxy_set_header X-Forwarded-Host $http_host;
    }

    location /socket {
        # Proxy Jellyfin WebSocket traffic
        proxy_pass http://127.0.0.1:8096;
        proxy_http_version 1.1;
        proxy_set_header Upgrade $http_upgrade;
        proxy_set_header Connection "upgrade";
        proxy_set_header Host $host;
        proxy_set_header X-Real-IP $remote_addr;
        proxy_set_header X-Forwarded-For $proxy_add_x_forwarded_for;
        proxy_set_header X-Forwarded-Proto $scheme;
        proxy_set_header X-Forwarded-Protocol $scheme;
        proxy_set_header X-Forwarded-Host $http_host;
    }
}
Save the file (Ctrl+O, then Enter) and exit (Ctrl+X).
Test and Activate Nginx Configuration
Subsequently, test the Nginx configuration for syntax errors before reloading:
sudo nginx -tnginx: the configuration file /etc/nginx/nginx.conf syntax is ok nginx: configuration file /etc/nginx/nginx.conf test is successful
Both lines must show success before proceeding. If you see errors instead, review the server block configuration file (/etc/nginx/conf.d/jellyfin.conf) for typos, missing semicolons, or incorrect directive names.
To apply the changes to Nginx, you need to reload the service. You can do this by running the following command:
sudo systemctl reload nginxAfter adequately configuring Nginx as a reverse proxy for Jellyfin and setting up your domain and DNS records to point to your server IP, you can now access your Jellyfin Media Server at jellyfin.example.com. With Nginx acting as the intermediary, remote users can now access Jellyfin by visiting the subdomain, and Nginx will direct their requests to Jellyfin’s web interface.
Create Let’s Encrypt SSL Certificate
This section guides you through securing your Apache or Nginx server using a free Let’s Encrypt SSL certificate. Essentially, an SSL certificate ensures that communication between the user’s browser and the server is secure, making it ideal for running your server on HTTPS.
To install the certbot package, you must match the reverse proxy you installed. In particular, if you’re using Apache, install python3-certbot-apache; if you’re using Nginx, install python3-certbot-nginx.
Install Certbot for Apache:
sudo apt install python3-certbot-apache -yInstall Certbot for Nginx:
sudo apt install python3-certbot-nginx -yThen, run the certbot command with options for automatic HTTPS configuration. Replace you@example.com and jellyfin.example.com with your actual email and domain:
Run Certbot for Apache for Jellyfin:
sudo certbot --apache --agree-tos --redirect --hsts --staple-ocsp --email you@example.com -d jellyfin.example.comRun Certbot for Nginx for Jellyfin:
sudo certbot --nginx --agree-tos --redirect --hsts --staple-ocsp --email you@example.com -d jellyfin.example.comThe URL changes from HTTP to HTTPS upon creating the SSL certificate. Users should establish a cron job that conducts daily checks to guarantee automatic certificate renewal. Certbot offers a script for automatic certificate renewal. Users should test the script with a dry run before setting up the cron job, using the following command:
sudo certbot renew --dry-runSaving debug log to /var/log/letsencrypt/letsencrypt.log Certificate not yet due for renewal Congratulations, all simulated renewals succeeded:
The all simulated renewals succeeded message confirms automatic renewal will work. After verifying the dry run succeeds, set up a cron job to automate the renewal process:
sudo crontab -eThis command opens the user’s cron table in edit mode. From there, the user can add the following line to the end of the file to schedule a daily renewal check at 2:30 am:
30 2 * * * /usr/bin/certbot renew --quietOnce the user saves and exits the file, cron will automatically check the certificates daily and renew them if necessary.
Manage Jellyfin Installation
Update Jellyfin
Repository-based installations receive updates through the standard APT upgrade process alongside other system packages:
sudo apt update && sudo apt upgradeAlternatively, to update only Jellyfin without upgrading other packages:
sudo apt update
sudo apt install --only-upgrade jellyfin
Jellyfin updates appear in the upgrade list when the repository publishes new versions. The service automatically restarts after package upgrades to load the new version. Verify the updated version with:
dpkg -l jellyfin | grep jellyfinRemove Jellyfin
Uninstall the Jellyfin package while preserving configuration files and media libraries:
sudo apt remove jellyfinAlternatively, to completely remove Jellyfin including all configuration files and database:
The following commands permanently delete all Jellyfin configuration files, user accounts, media library databases, watch history, transcoding cache, and server settings. This action cannot be undone. Export any data you need to preserve (user lists, library configurations, playback positions) before proceeding.
sudo apt purge jellyfin
sudo rm -rf /var/lib/jellyfin /var/cache/jellyfin /etc/jellyfin
Finally, remove the repository configuration and GPG keyring to complete the cleanup:
sudo rm /etc/apt/sources.list.d/jellyfin.sources
sudo rm /usr/share/keyrings/jellyfin.gpg
sudo apt autoremove
sudo apt update
The autoremove command removes any orphaned dependencies that were automatically installed with Jellyfin. The final apt update refreshes the package index to reflect all repository changes.
Backup and Restore Jellyfin Configuration
Regular backups protect your Jellyfin configuration, user accounts, watch history, and library metadata from system failures or accidental deletion. Fortunately, Jellyfin stores all configuration data in /var/lib/jellyfin and /etc/jellyfin, making backup straightforward.
Back Up Configuration and Database
Stop Jellyfin before backing up to ensure data consistency:
sudo systemctl stop jellyfinCreate a compressed backup archive containing all Jellyfin data and configuration:
sudo tar -czvf jellyfin-backup-$(date +%Y%m%d).tar.gz /var/lib/jellyfin /etc/jellyfintar: Removing leading `/' from member names /var/lib/jellyfin/ /var/lib/jellyfin/data/ /var/lib/jellyfin/data/library.db ... /etc/jellyfin/ /etc/jellyfin/system.xml /etc/jellyfin/network.xml
The backup includes user accounts, watch history, playback positions, library metadata, server settings, and plugin configurations. Therefore, to confirm success, verify the backup archive was created:
ls -lh jellyfin-backup-*.tar.gz-rw-r--r-- 1 root root 156M Jan 1 14:30 jellyfin-backup-20260101.tar.gz
Afterward, restart Jellyfin after the backup completes:
sudo systemctl start jellyfinMove backups to external storage or a remote location for disaster recovery. The backup does not include actual media files, only Jellyfin’s configuration and database.
Restore from Backup Archive
To restore from a backup (after a fresh Jellyfin installation or to recover from corruption), stop the service and extract the archive:
sudo systemctl stop jellyfin
sudo tar -xzvf jellyfin-backup-20260101.tar.gz -C /
Then, restore correct ownership after extraction:
sudo chown -R jellyfin:jellyfin /var/lib/jellyfin /etc/jellyfinFinally, start Jellyfin and verify the restoration:
sudo systemctl start jellyfin
systemctl status jellyfin
● jellyfin.service - Jellyfin Media Server
Active: active (running)
Afterward, access the web interface to confirm user accounts, libraries, and settings restored correctly.
Schedule Automated Backups
To automate this process, create a backup script for automated scheduling:
sudo nano /usr/local/bin/jellyfin-backup.shAdd the following script content:
#!/bin/bash
BACKUP_DIR="/var/backups/jellyfin"
BACKUP_FILE="$BACKUP_DIR/jellyfin-backup-$(date +%Y%m%d-%H%M%S).tar.gz"
RETENTION_DAYS=30

mkdir -p "$BACKUP_DIR"
sudo systemctl stop jellyfin
tar -czvf "$BACKUP_FILE" /var/lib/jellyfin /etc/jellyfin
sudo systemctl start jellyfin

# Remove backups older than retention period
find "$BACKUP_DIR" -name "jellyfin-backup-*.tar.gz" -mtime +$RETENTION_DAYS -delete

echo "Backup completed: $BACKUP_FILE"
Next, make the script executable and test it:
sudo chmod +x /usr/local/bin/jellyfin-backup.sh
sudo /usr/local/bin/jellyfin-backup.sh
Then, schedule weekly backups via cron:
sudo crontab -eAdd the following line to run backups every Sunday at 3 AM:
0 3 * * 0 /usr/local/bin/jellyfin-backup.sh >> /var/log/jellyfin-backup.log 2>&1Enable Network Discovery and DLNA
DLNA (Digital Living Network Alliance) allows smart TVs, game consoles, and other media devices to discover and stream content from Jellyfin without installing dedicated client apps. In essence, network discovery broadcasts Jellyfin’s presence on your local network.
Enable DLNA in Jellyfin
Access the Jellyfin dashboard and navigate to Dashboard → DLNA. Enable the following options:
- Enable DLNA Server: Allows DLNA-compatible devices to discover and browse your media libraries.
- Enable Play To: Lets Jellyfin push content to DLNA renderers (smart TVs, speakers) from the web interface.
- Enable debug logging: Only enable temporarily for troubleshooting DLNA device discovery issues.
Click Save to apply the settings. Notably, DLNA uses UDP port 1900 for discovery (SSDP) and TCP port 8096 for content streaming.
Open Firewall Ports for DLNA
DLNA requires additional firewall rules for device discovery. Therefore, add rules for SSDP multicast and the DLNA server port:
sudo ufw allow 1900/udp comment 'DLNA SSDP discovery'
sudo ufw allow 7359/udp comment 'Jellyfin client discovery'
Rule added Rule added (v6)
Afterward, verify the rules were added:
sudo ufw statusStatus: active To Action From -- ------ ---- 8096 ALLOW Anywhere 1900/udp ALLOW Anywhere # DLNA SSDP discovery 7359/udp ALLOW Anywhere # Jellyfin client discovery
DLNA devices on your local network should now discover Jellyfin automatically. Typically, on smart TVs, look for Jellyfin in the media server or DLNA section of the TV’s app menu.
Troubleshoot DLNA Discovery Issues
If devices cannot discover Jellyfin, initially verify DLNA service is listening:
sudo ss -tulnp | grep -E '1900|7359'udp UNCONN 0 0 0.0.0.0:1900 0.0.0.0:* users:(("jellyfin",pid=5678,fd=55))
udp UNCONN 0 0 0.0.0.0:7359 0.0.0.0:* users:(("jellyfin",pid=5678,fd=58))
If the ports are not listening, restart Jellyfin after enabling DLNA in the dashboard. For devices that still cannot discover the server, check your router settings. Some routers block multicast traffic between wired and wireless networks by default. To resolve this, enable “IGMP Snooping” or “Multicast” in your router’s advanced settings if available.
Configure Hardware Acceleration
Hardware acceleration offloads video transcoding from the CPU to dedicated GPU hardware, dramatically reducing CPU usage and enabling simultaneous streams at higher resolutions. Specifically, Jellyfin supports Intel Quick Sync (QSV), NVIDIA NVENC, and AMD/Intel VAAPI for hardware-accelerated transcoding. For comprehensive codec support matrices and advanced configuration options, refer to Jellyfin’s official hardware selection guide.
Encoder quality varies significantly between vendors. According to Jellyfin’s documentation, the ranking is: Intel ≥ NVIDIA >>> AMD. Intel provides easier driver setup on Linux, while NVIDIA offers competitive quality but requires proprietary drivers. AMD hardware encoding quality has historically lagged behind, though their AV1 encoder on RX 7000 series shows improvement.
Identify GPU Hardware
Identify your graphics hardware to determine which acceleration method applies:
lspci | grep -iE 'vga|3d|display'00:02.0 VGA compatible controller: Intel Corporation CoffeeLake-H GT2 [UHD Graphics 630] 01:00.0 3D controller: NVIDIA Corporation TU117M [GeForce GTX 1650 Mobile]
This example shows both Intel integrated graphics (supports QSV and VAAPI) and an NVIDIA discrete GPU (supports NVENC). Accordingly, based on this output, choose the acceleration method that matches your hardware.
Intel Quick Sync Video (QSV) Setup
Intel QSV provides excellent transcoding performance on systems with Intel integrated graphics. QSV support begins with Broadwell (5th gen Core) processors, while newer 11th gen and later processors use the improved OneVPL runtime instead of the deprecated MediaSDK. For detailed codec support by generation, see Jellyfin’s Intel hardware acceleration guide.
Intel processors ending with “F” (like i5-12400F) do not have integrated graphics and cannot use QSV. Additionally, Ice Lake, Jasper Lake, and Elkhart Lake processors are losing QSV support as Intel deprecated the MediaSDK runtime. Consider using VAAPI instead on these platforms.
Install the required Intel media driver packages:
sudo apt install intel-media-va-driver-non-free vainfo -yThen, verify VAAPI (the backend QSV uses on Linux) is working:
vainfolibva info: VA-API version 1.14.0
libva info: Trying to open /usr/lib/x86_64-linux-gnu/dri/iHD_drv_video.so
libva info: Found init function __vaDriverInit_1_14
libva info: va_openDriver() returns 0
vainfo: VA-API version: 1.14 (libva 2.12.0)
vainfo: Driver version: Intel iHD driver for Intel(R) Gen Graphics - 22.3.1
vainfo: Supported profile and entrypoints
VAProfileH264Main : VAEntrypointVLD
VAProfileH264Main : VAEntrypointEncSlice
VAProfileHEVCMain : VAEntrypointVLD
VAProfileHEVCMain : VAEntrypointEncSlice
The VAEntrypointEncSlice entries indicate hardware encoding support. Subsequently, add the jellyfin user to the render and video groups for GPU access:
sudo usermod -aG render jellyfin
sudo usermod -aG video jellyfin
Afterward, restart Jellyfin to apply group membership:
sudo systemctl restart jellyfinIn the Jellyfin dashboard, navigate to Dashboard → Playback → Transcoding. Set Hardware acceleration to Intel QuickSync (QSV) and enable the codecs your hardware supports. Codec availability varies by generation:
- H.264: All QSV-capable processors
- HEVC 8-bit: Skylake (6th gen) and newer
- HEVC 10-bit: Kaby Lake (7th gen), Apollo Lake, Gemini Lake and newer
- AV1 decoding: Tiger Lake (11th gen) and newer
- AV1 encoding: Intel ARC A-series, Meteor Lake (14th gen mobile/Core Ultra) and newer
NVIDIA NVENC Setup
NVIDIA NVENC provides hardware transcoding on Maxwell architecture GPUs and newer (GeForce GTX 750 and later). However, this requires proprietary NVIDIA drivers with NVENC support. Jellyfin 10.10 requires minimum driver version 520.56.06 on Linux. For the complete codec support matrix, see Jellyfin’s NVIDIA hardware acceleration guide and the NVIDIA GPU Codec Support Matrix.
Certain low-end NVIDIA GPUs like the GT 1030 and MX450 lack NVENC encoding hardware entirely. Additionally, consumer GeForce cards limit simultaneous NVENC sessions (typically 3-5 concurrent streams). The nvidia-patch project provides workarounds if you need more concurrent transcoding sessions.
Initially, check if NVIDIA drivers are installed:
nvidia-smi+-----------------------------------------------------------------------------+ | NVIDIA-SMI 535.154.05 Driver Version: 535.154.05 CUDA Version: 12.2 | |-------------------------------+----------------------+----------------------+ | GPU Name Persistence-M| Bus-Id Disp.A | Volatile Uncorr. ECC | | Fan Temp Perf Pwr:Usage/Cap| Memory-Usage | GPU-Util Compute M. | |===============================+======================+======================| | 0 NVIDIA GeForce ... Off | 00000000:01:00.0 Off | N/A | | N/A 45C P8 5W / 50W | 10MiB / 4096MiB | 0% Default | +-------------------------------+----------------------+----------------------+
If nvidia-smi fails, install NVIDIA drivers. For detailed driver installation including CUDA and codec support, see our NVIDIA driver installation guide for Linux Mint.
After confirming drivers are installed, subsequently add the jellyfin user to the video group:
sudo usermod -aG video jellyfin
sudo systemctl restart jellyfin
In the Jellyfin dashboard, navigate to Dashboard → Playback → Transcoding. Set Hardware acceleration to NVIDIA NVENC and enable the supported codecs based on your GPU generation:
- H.264: All NVENC-capable GPUs
- HEVC 8-bit: Maxwell 2nd Gen (GM206) and newer
- HEVC 10-bit encoding: Pascal and newer
- AV1 decoding: Ampere (RTX 30 series) and newer
- AV1 encoding: Ada Lovelace (RTX 40 series) and newer
VAAPI Setup (AMD and Intel)
VAAPI (Video Acceleration API) works with both AMD and Intel GPUs on Linux. AMD uses the open-source Mesa Gallium RadeonSI driver, while Intel users can use either the newer intel-media-va-driver (iHD) for Broadwell+ or legacy i965-va-driver for older hardware. For AMD GPU performance optimization including driver updates, see our Mesa drivers guide for Linux Mint and Jellyfin’s AMD hardware acceleration guide.
AMD encoder quality has historically been lower than Intel and NVIDIA. While AMD’s H.264 encoder lacks B-frame support on older GPUs, their AV1 encoder on RX 7000 series (VCN 4.0) shows significant improvement. Note that RX 6400/6500 series GPUs lack video encoding hardware entirely.
For AMD GPUs, install Mesa VAAPI drivers:
sudo apt install mesa-va-drivers vainfo -yThen, verify VAAPI is functional:
vainfoLook for VAEntrypointEncSlice entries to confirm encoding support. Afterward, add jellyfin to the required groups:
sudo usermod -aG render jellyfin
sudo usermod -aG video jellyfin
sudo systemctl restart jellyfin
In the Jellyfin dashboard, set Hardware acceleration to Video Acceleration API (VAAPI). Under VA-API Device, enter the render device path (typically /dev/dri/renderD128). Additionally, verify the device exists:
ls -l /dev/dri/crw-rw----+ 1 root render 226, 0 Jan 1 10:00 card0 crw-rw----+ 1 root render 226, 128 Jan 1 10:00 renderD128
The renderD128 device is the hardware renderer Jellyfin will use for transcoding. AMD codec support varies by GPU generation:
- H.264: All AMD GPUs with VA-API support
- HEVC 8-bit decoding: Fiji (R9 Fury) and newer
- HEVC 8-bit encoding: Polaris (RX 400/500) and newer
- HEVC 10-bit encoding: Renoir APU (Ryzen 4000), Navi 1x (RX 5000) and newer
- AV1 decoding: Navi 2x (RX 6000, except RX 6400/6500), Ryzen 6000 mobile and newer
- AV1 encoding: Navi 3x (RX 7000), Ryzen 7000/8000 mobile APU and newer
Verify Hardware Acceleration is Working
To confirm hardware acceleration is working, play a video that requires transcoding (different resolution or codec than the client supports) and check GPU usage. For Intel/VAAPI:
sudo apt install intel-gpu-tools -y
sudo intel_gpu_top
For NVIDIA:
watch -n 1 nvidia-smiLook for video encode/decode activity during playback. However, if CPU usage remains high during transcoding and GPU shows no activity, review the Jellyfin transcoding logs at /var/log/jellyfin/ for error messages indicating why hardware acceleration failed.
Troubleshooting Common Jellyfin Issues
This section covers common installation and configuration problems along with diagnostic steps, fixes, and verification commands. Specifically, each issue follows the pattern: error description, diagnostic command with output, fix command, and verification.
Jellyfin Service Fails to Start
If systemctl status jellyfin shows failed or inactive (dead) after installation, immediately check the service journal for specific error messages:
sudo journalctl -xeu jellyfin --no-pager | tail -30Below are common error patterns and fixes:
Port 8096 already in use: Another service is listening on Jellyfin’s default port. Therefore, check what process owns the port:
sudo ss -tulnp | grep :8096tcp LISTEN 0 128 0.0.0.0:8096 0.0.0.0:* users:(("emby-server",pid=1234,fd=10))
Stop the conflicting service (in this example, Emby) or change Jellyfin’s port in /etc/jellyfin/network.xml before starting Jellyfin again.
Permission denied on /var/lib/jellyfin: The jellyfin user lacks ownership of its data directory. Fix permissions:
sudo chown -R jellyfin:jellyfin /var/lib/jellyfin /var/cache/jellyfin /etc/jellyfin /var/log/jellyfin
sudo systemctl restart jellyfin
systemctl status jellyfin
Active: active (running)
Web Interface Shows “Unable to Connect to Server”
First, verify Jellyfin is listening on port 8096:
sudo ss -tulnp | grep jellyfintcp LISTEN 0 128 0.0.0.0:8096 0.0.0.0:* users:(("jellyfin",pid=5678,fd=42))
If no output appears, Jellyfin is not running. Check systemctl status jellyfin for service status and journalctl -xeu jellyfin for errors. Alternatively, if Jellyfin is running but the browser still cannot connect, check UFW firewall rules:
sudo ufw status numberedStatus: active
To Action From
-- ------ ----
[ 1] 8096 ALLOW IN Anywhere
If rule is missing, add it with sudo ufw allow 8096 and test access again.
Media Files Not Visible in Library
Permission errors prevent Jellyfin from reading media files. Accordingly, test if the jellyfin user can access your media directory:
sudo -u jellyfin ls -lh /media/mymediadriveIf you see Permission denied, apply ACL permissions as described in the “Configure Permission For Media Drives” section. Subsequently, after fixing permissions, trigger a library scan from the Jellyfin dashboard (Dashboard → Libraries → Scan All Libraries) or via the command line:
sudo systemctl restart jellyfinFinally, check the scan progress in Dashboard → Libraries and watch for errors in /var/log/jellyfin/ log files.
Reverse Proxy Returns 502 Bad Gateway
The reverse proxy cannot reach Jellyfin on localhost:8096. First, verify Jellyfin is running and listening locally:
curl -I http://localhost:8096HTTP/1.1 302 Found Location: /web/index.html
If curl fails or times out, Jellyfin is not running or not listening on the expected port. Check service status and port bindings with systemctl status jellyfin and sudo ss -tulnp | grep 8096. However, if Jellyfin responds correctly to curl but the reverse proxy still fails, review proxy configuration:
For Apache: Ensure proxy modules are enabled (sudo a2enmod proxy proxy_http) and ProxyPass directives point to http://localhost:8096. Test configuration with sudo apache2ctl configtest before restarting.
For Nginx: Verify proxy_pass http://$jellyfin:8096; and resolver settings in /etc/nginx/conf.d/jellyfin.conf. Test with sudo nginx -t and check error logs at /var/log/nginx/jellyfin.error.
Let’s Encrypt Certificate Renewal Fails
First, test certificate renewal manually with verbose output:
sudo certbot renew --dry-runCongratulations, all simulated renewals succeeded: /etc/letsencrypt/live/jellyfin.example.com/fullchain.pem (success)
The all simulated renewals succeeded message confirms the renewal process works correctly. If you see errors instead, review the diagnostic output for specific failure reasons.
Common failure causes include:
- Port 80 blocked: Let’s Encrypt requires HTTP (port 80) access for domain validation. Ensure
sudo ufw allow 80and your router forwards port 80 to the server. - DNS records outdated: Verify your domain’s A record points to your current public IP with
dig jellyfin.example.com +short. - Web server not running: Certbot uses your web server (Apache or Nginx) for validation. Confirm the service is active with
systemctl status apache2orsystemctl status nginx.
After fixing issues, run sudo certbot renew to attempt actual renewal. Additionally, check certificates are valid with sudo certbot certificates to see expiry dates.
Conclusion
You now have Jellyfin Media Server installed on Linux Mint with repository-based automatic updates, verified service operation, and access to the web interface at http://localhost:8096. Throughout this guide, you learned DEB822 repository configuration for modern APT integration, ACL-based media permissions, UFW firewall rules for port 8096 access, and optional reverse proxy setups with Apache or Nginx for domain-based access and SSL encryption. For ongoing maintenance, use the backup script to protect your configuration, enable DLNA for smart TV compatibility, and configure hardware acceleration (Intel QSV, NVIDIA NVENC, or VAAPI) to reduce CPU load when streaming to multiple clients. Finally, set up Let’s Encrypt automatic certificate renewal for production deployments and schedule regular library scans through Jellyfin’s scheduled tasks dashboard.

Great script, worked well for me. I’d struggled for ages with Plex, never managed to get it to work and gave up because it seemed over the top for what I wanted. By comparison, this was straightforward and worked pretty well straightaway – with one exception: DLNA. I’m guessing that many users will want to use the server via DLNA / uPNP, but this isn’t mentioned at all – and only alluded to in the “Plugins” section. Once I’d discovered the DLNA Plugin and installed it everything worked fine. Maybe it’s ‘cos I’m a newbie that I hadn’t realised it, but just another sentence under Plugins that mentions DLNA would do it.
Thanks for the feedback, BilboJ. Glad the guide helped you get Jellyfin running after your Plex struggles. You make a good point about DLNA visibility for newcomers.
The guide has since been expanded with a dedicated “Enable Network Discovery and DLNA” section covering Dashboard settings, firewall rules for SSDP discovery (port 1900/udp), and smart TV detection. For anyone else reading, the DLNA server option is now found under Dashboard > DLNA rather than requiring a separate plugin installation.
Thanks for taking the time to share what tripped you up. Feedback like this helps improve the guide for other readers.
Thanks for your clear, one step tutorial. If I made it (in the end) anyone can ! Could be even better if you could please include real examples of various CLI commands that must be entered and how to connect f.eg from an Android smartphone to the platform or a SmartTV on the same network.
Thanks for the kind words, Ciribyte. Congrats on getting it working!
For Android, install the official Jellyfin app from Google Play or F-Droid, then enter your server address when prompted:
For Smart TVs, the guide now covers DLNA setup under “Enable Network Discovery and DLNA,” which lets most TVs discover Jellyfin automatically without installing anything.
Samsung, LG, and Android TV also have dedicated Jellyfin apps in their app stores. Just search for “Jellyfin” and connect using the same server address.
Great tutorial! Thank you so much.