
MariaDB 是一個強大的開源關聯式資料庫管理系統,是 MySQL 的熱門替代品。它提供高效能、可擴展性和豐富的功能集,使其適用於從小型個人專案到大型企業環境的各種應用程式。 MariaDB 提供長期支援 (LTS) 版本,確保長時間的穩定性和可靠性,還提供短期版本,更頻繁地引入新功能和改進。
在 Ubuntu 24.04、22.04 或 20.04 上,您可以使用 mariadb.org 提供的官方 apt 儲存庫安裝 MariaDB。該儲存庫包含 MariaDB 長期版本的最新版本,包括版本 10.5、10.6、10.11 和 11.4。如果您喜歡使用短期版本,則適用相同的安裝方法,讓您可以選擇最適合您需求的版本。本指南將引導您完成使用官方 apt 儲存庫在 Ubuntu 系統上設定 MariaDB 的過程,確保您能夠存取最新功能和安全性更新。
MariaDB 預先安裝步驟
在安裝 MariaDB 之前更新 Ubuntu
在安裝 MariaDB 之前,更新您的 Ubuntu 系統至關重要。此步驟可確保所有現有套件都是最新的,從而最大限度地減少潛在的衝突。
執行以下命令來更新軟體包清單:
sudo apt update更新清單後,繼續升級所有過時的軟體包。此步驟對於系統穩定性和安全性至關重要:
sudo apt upgrade安裝原先需要的套件
MariaDB 安裝需要特定的依賴項。這些是 MariaDB 正常運作所需的基本套件。使用以下命令安裝它們:
sudo apt install dirmngr ca-certificates software-properties-common apt-transport-https curl -y導入 MariaDB APT 儲存庫
下一步涉及匯入包含您將安裝的 MariaDB 軟體包的 MariaDB APT 儲存庫。提供不同的分支:長期支援(LTS),由於其穩定性而推薦用於生產環境;以及短期發布,適合定期更新系統的用戶,例如 WordPress 等內容管理系統。
導入 GPG 金鑰
首先,導入GPG金鑰來驗證MariaDB包的真實性:
curl -fsSL http://mirror.mariadb.org/PublicKey_v2 | sudo gpg --dearmor | sudo tee /usr/share/keyrings/mariadb.gpg > /dev/null選擇 MariaDB 版本儲存庫
根據您的需求選擇合適的 MariaDB 版本:
選項 1:MariaDB 10.5(LTS)
生命終止日期:2025 年 6 月 24 日。
echo "deb [arch=amd64,arm64,ppc64el signed-by=/usr/share/keyrings/mariadb.gpg] http://mirror.mariadb.org/repo/10.5/ubuntu/ $(lsb_release -cs) main" | sudo tee /etc/apt/sources.list.d/mariadb.list選項 2:MariaDB 10.6(LTS)
停產日期:2026 年 7 月。
echo "deb [arch=amd64,arm64,ppc64el signed-by=/usr/share/keyrings/mariadb.gpg] http://mirror.mariadb.org/repo/10.6/ubuntu/ $(lsb_release -cs) main" | sudo tee /etc/apt/sources.list.d/mariadb.list選項 3:MariaDB 10.11(LTS)
生命終止日期:2028 年 2 月。
echo "deb [arch=amd64,arm64,ppc64el signed-by=/usr/share/keyrings/mariadb.gpg] http://mirror.mariadb.org/repo/10.11/ubuntu/ $(lsb_release -cs) main" | sudo tee /etc/apt/sources.list.d/mariadb.list選項 4:MariaDB 11.4(長期版本)
生命終止日期:2030 年 2 月。
echo "deb [arch=amd64,arm64,ppc64el signed-by=/usr/share/keyrings/mariadb.gpg] http://mirror.mariadb.org/repo/11.4/ubuntu/ $(lsb_release -cs) main" | sudo tee /etc/apt/sources.list.d/mariadb.listMariaDB 儲存庫導入後刷新 APT 套件索引
選擇並匯入所需的儲存庫版本後,刷新 APT 儲存庫以識別新來源:
sudo apt update此步驟可確保系統識別新新增的 MariaDB 儲存庫並準備好安裝。
完成 MariaDB 安裝
安裝 MariaDB 伺服器和用戶端
要在您的系統上設定 MariaDB,您必須安裝伺服器套件和客戶端套件。此安裝整合了管理資料的資料庫伺服器和提供與伺服器互動的介面的客戶端。
執行以下命令來安裝這些軟體包:
sudo apt install mariadb-server mariadb-client -y驗證 MariaDB 安裝
安裝後,必須確認 MariaDB 已正確安裝。使用以下命令檢查已安裝的 MariaDB 版本和建置:
mariadb --version如果安裝成功,您將看到類似以下的輸出:
mariadb Ver x.xx Distrib xx.xx.x-MariaDB, for debian-linux-gnu (x86_64) using EditLine wrapper啟用 MariaDB 服務
檢查MariaDB服務狀態
安裝後,驗證 MariaDB 服務的狀態。此命令檢查 MariaDB 是否處於活動狀態並且正在執行:
systemctl status mariadb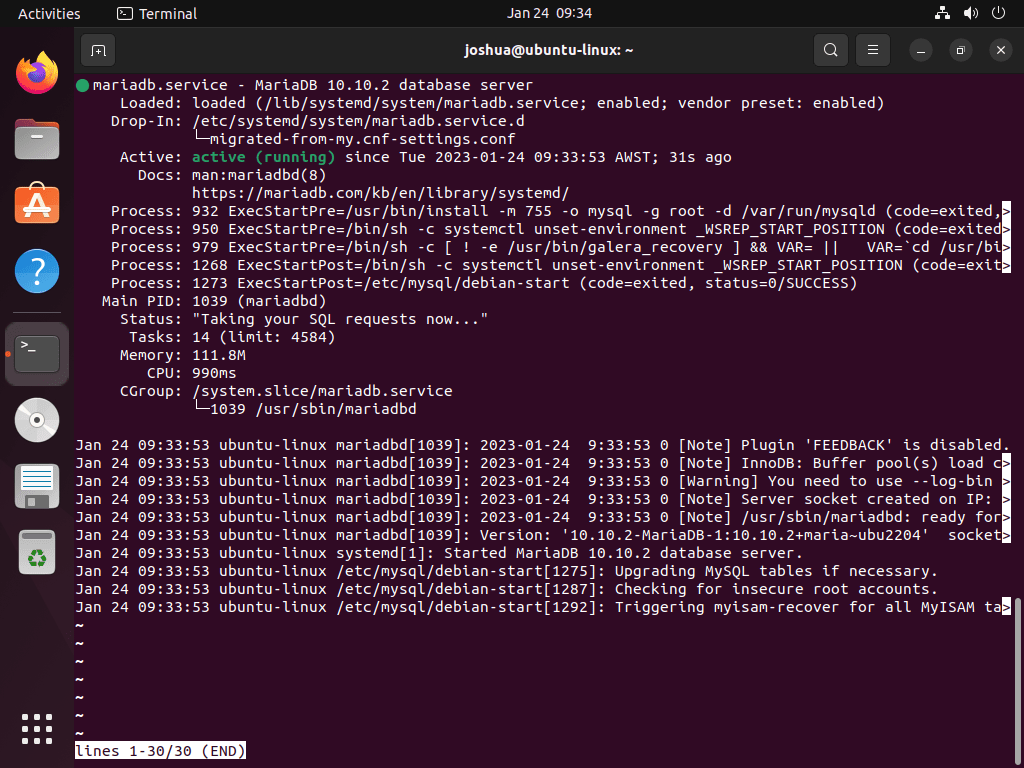
啟動 MariaDB 服務
雖然 MariaDB 通常在安裝後自動激活,但您可以根據需要手動啟動它:
sudo systemctl start mariadb停止 MariaDB 服務
若要停止 MariaDB 服務,請使用下列命令:
sudo systemctl stop mariadb在系統啟動時啟用 MariaDB
讓 MariaDB 在系統啟動時自動啟動:
sudo systemctl enable mariadb在系統啟動時停用 MariaDB
若要防止 MariaDB 自動啟動:
sudo systemctl disable mariadb重新啟動 MariaDB 服務
配置更改後通常需要重新啟動服務。使用此命令重新啟動 MariaDB:
sudo systemctl restart mariadb運行 MariaDB 安全腳本
運行 MariaDB 安全腳本的重要性
設定 MariaDB 時,必須加強其預設配置,這些配置通常被認為是不安全的。此步驟對於保護資料庫免受未經授權的存取和漏洞至關重要。運行 mysql_secure_installation script 是 MariaDB 安裝過程中廣泛認可的業界實務。它增強了 MariaDB 安裝的安全性並降低了與潛在惡意攻擊相關的風險。
執行安全腳本
若要啟動此安全性增強過程,請執行 mysql_secure_installation 腳本。該腳本執行多個與安全相關的操作,確保為您的 MariaDB 安裝提供更安全的環境:
sudo mysql_secure_installation配置安全設定
運行腳本後,系統將引導您完成幾個步驟來提高 MariaDB 安裝的安全性:
- 設定根密碼:系統會提示您為 MariaDB 的根使用者建立強密碼。此步驟至關重要,因為它可以防止未經授權的資料庫存取。
- 禁止遠端根訪問:該腳本將詢問您是否要停用遠端根登錄,建議的做法是僅限製本地用戶的存取。
- 刪除匿名用戶帳戶:這些帳戶無需密碼即可訪問,存在安全風險。刪除它們是保護資料庫安全的重要一步。
- 刪除測試資料庫:MariaDB 有一個任何人都可以存取的預設測試資料庫。刪除此資料庫可以減少未經授權的使用者的潛在進入點。
遵循這些步驟可以顯著改善 Ubuntu 上 MariaDB 安裝的安全性。
NOTE: RUNNING ALL PARTS OF THIS SCRIPT IS RECOMMENDED FOR ALL MariaDB
      SERVERS IN PRODUCTION USE!  PLEASE READ EACH STEP CAREFULLY!

In order to log into MariaDB to secure it, we'll need the current
password for the root user. If you've just installed MariaDB, and
haven't set the root password yet, you should just press enter here.

Enter current password for root (enter for none):
OK, successfully used password, moving on...

Setting the root password or using the unix_socket ensures that nobody
can log into the MariaDB root user without the proper authorisation.

You already have your root account protected, so you can safely answer 'n'.

Switch to unix_socket authentication [Y/n] Y <---- Type Y then press the ENTER KEY.
Enabled successfully!
Reloading privilege tables..
 ... Success!


You already have your root account protected, so you can safely answer 'n'.

Change the root password? [Y/n] Y <---- Type Y then press the ENTER KEY.
New password:
Re-enter new password:
Password updated successfully!
Reloading privilege tables..
 ... Success!


By default, a MariaDB installation has an anonymous user, allowing anyone
to log into MariaDB without having to have a user account created for
them.  This is intended only for testing, and to make the installation
go a bit smoother.  You should remove them before moving into a
production environment.

Remove anonymous users? [Y/n] Y <---- Type Y then press the ENTER KEY.
 ... Success!

Normally, root should only be allowed to connect from 'localhost'.  This
ensures that someone cannot guess at the root password from the network.

Disallow root login remotely? [Y/n] Y <---- Type Y then press the ENTER KEY.
 ... Success!

By default, MariaDB comes with a database named 'test' that anyone can
access.  This is also intended only for testing, and should be removed
before moving into a production environment.

Remove test database and access to it? [Y/n] Y <---- Type Y then press the ENTER KEY.
 - Dropping test database...
 ... Success!
 - Removing privileges on test database...
 ... Success!

Reloading the privilege tables will ensure that all changes made so far
will take effect immediately.

Reload privilege tables now? [Y/n] Y <---- Type Y then press the ENTER KEY.
 ... Success!

Cleaning up...

All done!  If you've completed all of the above steps, your MariaDB
installation should now be secure.

Thanks for using MariaDB!
管理 MariaDB
運行 MariaDB 資料庫表升級工具
如果您已將 MariaDB 升級到較新的版本(例如,從 10.5 升級到 10.10),請確保您的資料庫表與新版本相容至關重要。 「mariadb-upgrade」工具就是為此目的而設計的。它檢查並更新表以符合升級版本的要求。
若要啟動此程序或檢查資料庫表的目前狀態,請執行:
sudo mariadb-upgrade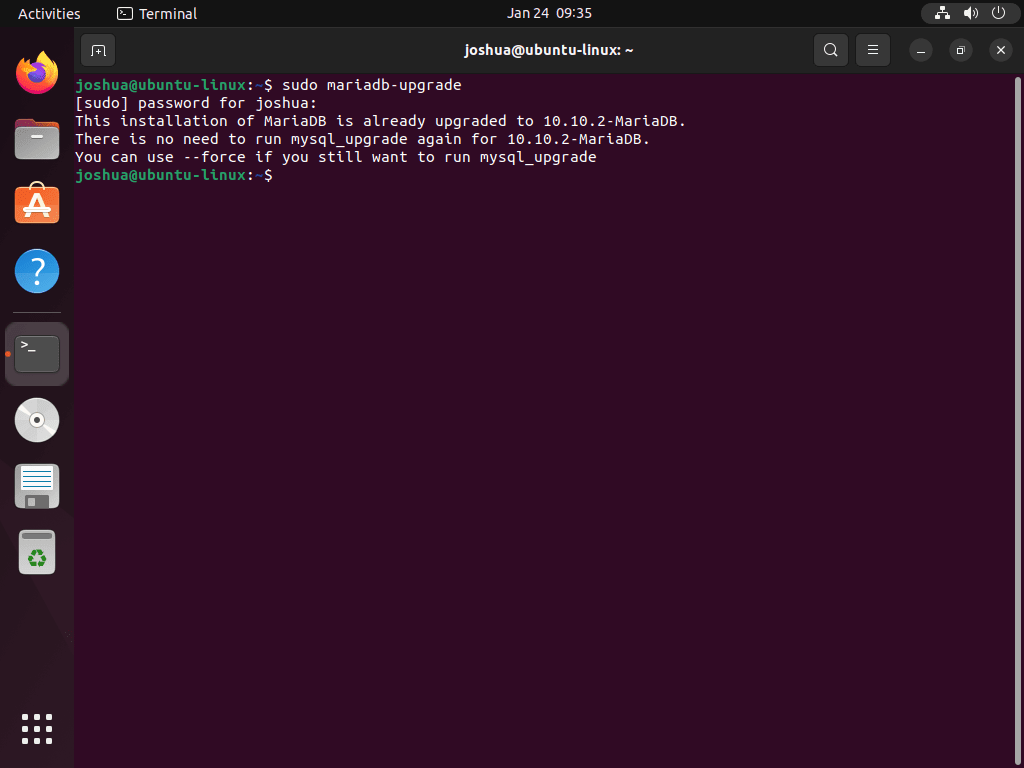
即使您認為升級已成功,也建議執行此命令。如果工具已經執行,該工具將確認這一點。否則,它將提供有關所檢查表格的詳細報告以及任何必要的更新。
刪除 MariaDB
若要從系統中完全刪除 MariaDB,請使用下列命令:
sudo apt autoremove mariadb-server mariadb-client --purge -y請注意,使用「-purge」標誌不僅會刪除 MariaDB,還會刪除所有關聯的資料庫資料。如果您打算保留數據,請省略“-purge”標誌。
刪除 MariaDB 後,刪除儲存庫和 GPG 金鑰也很重要,以防止將來對 MariaDB 儲存庫進行任何更新。這可以透過以下命令來完成:
sudo rm /etc/apt/sources.list.d/mariadb.list /usr/share/keyrings/mariadb.gpg結論
透過官方 apt 儲存庫在 Ubuntu 上安裝 MariaDB,無論您選擇長期版本還是短期版本,都可以確保您的資料庫系統是最新的最新版本。此方法提供了靈活性和安全性,可讓您根據特定要求自訂資料庫環境。 mariadb.org 儲存庫的定期更新將使您的安裝保持安全和最佳化,為您的資料驅動應用程式提供可靠的基礎。
有用的連結
以下是一些與使用 MariaDB 相關的有價值的連結:
- MariaDB 官方網站:請造訪 MariaDB 官方網站,以了解有關資料庫、功能和下載選項的資訊。
- MariaDB 知識庫:造訪 MariaDB 知識庫以取得全面的文件、教學和使用者指南。
- MariaDB基金會:瀏覽 MariaDB 基金會網站,了解有關 MariaDB 社群、開發和最新新聞的資訊。
- MariaDB 基金會文檔:尋找 MariaDB 基金會提供的有關使用和配置 MariaDB 的詳細文件。
- MariaDB GitHub 儲存庫:您可以存取 MariaDB GitHub 儲存庫來查看原始程式碼、報告問題並為開發做出貢獻。
