Rootkits are stealthy malware designed to hide unauthorized access to your system, often evading standard security tools. Chkrootkit scans your Debian system for signs of these threats by checking system binaries, network interfaces, and log files for known rootkit signatures. Whether you manage a personal server, monitor a VPS, or maintain workstations on a local network, regular rootkit scanning helps detect compromises early. By the end of this guide, you will have Chkrootkit installed and configured for automated daily scans, with the knowledge to interpret scan results and investigate potential infections.
Check For Updates Before Chkrootkit Installation
First, update the package lists on your Debian Linux system before installing Chkrootkit. Additionally, updating the package lists gives your system the latest information on available packages, their versions, and the newest security patches and software updates.
Run this command in the terminal to update the package lists:
sudo apt update && sudo apt upgradeThis command retrieves the most recent package information from the repositories. Furthermore, it upgrades any installed packages to the latest versions if available.
Method 1: Install Chkrootkit via Debian’s Default Repository
Install Chkrootkit via APT Command
The APT package manager is Debian’s default software management system. Consequently, it makes software installation straightforward and efficient. Use the following command to install Chkrootkit with APT:
sudo apt install chkrootkitConfirm Chkrootkit Installation on Debian via APT
Once the installation completes, check if Chkrootkit was set up correctly. This verification step ensures that everything is working properly. To do this, enter the Chkrootkit version command in the terminal:
chkrootkit -VYou should see output showing the installed version:
chkrootkit version 0.57
Debian 13 (Trixie stable) provides version 0.58b, Debian 12 (Bookworm oldstable) ships 0.57, and Debian 11 (Bullseye oldoldstable) includes 0.54. The repository version is suitable for most users. If you need the absolute latest features such as BPFDoor malware detection and the
-Toption for skipping network-mounted filesystems, use the source installation method below.
Method 2: Install Chkrootkit via source
Download Chkrootkit Source
To begin, download the Chkrootkit source code from its official website. This approach ensures you get the latest version, which may have new features or security updates. First, open the terminal and navigate to the directory where you want to save the source code. Then, run the command below to download the Chkrootkit source code archive:
wget ftp://chkrootkit.org/pub/seg/pac/chkrootkit.tar.gzThis command fetches the Chkrootkit source code in a compressed archive format, storing it in your specified directory.
Extract Chkrootkit Source Archive
Once the download finishes, the next step is to extract the source code. This step is essential because it allows you to access the files and directories needed for compiling and installing.
To extract the source code, run this command:
tar -xvzf chkrootkit.tar.gzConfigure and Build Chkrootkit
Before compiling Chkrootkit, you must ensure your Debian Linux system has the necessary packages. Specifically, for the compilation process, you need the GNU Compiler Collection (GCC) and the make utility.
To install them, use the following command:
sudo apt install gcc make build-essentialPlease note that the correct package name is build-essential and not build-essentials.
After installing the build tools, navigate to the directory containing the extracted Chkrootkit source code. Use the cd command as shown below, but make sure to replace {your-version-number} with the actual version number of the downloaded Chkrootkit source code:
cd chkrootkit-{your-version-number}
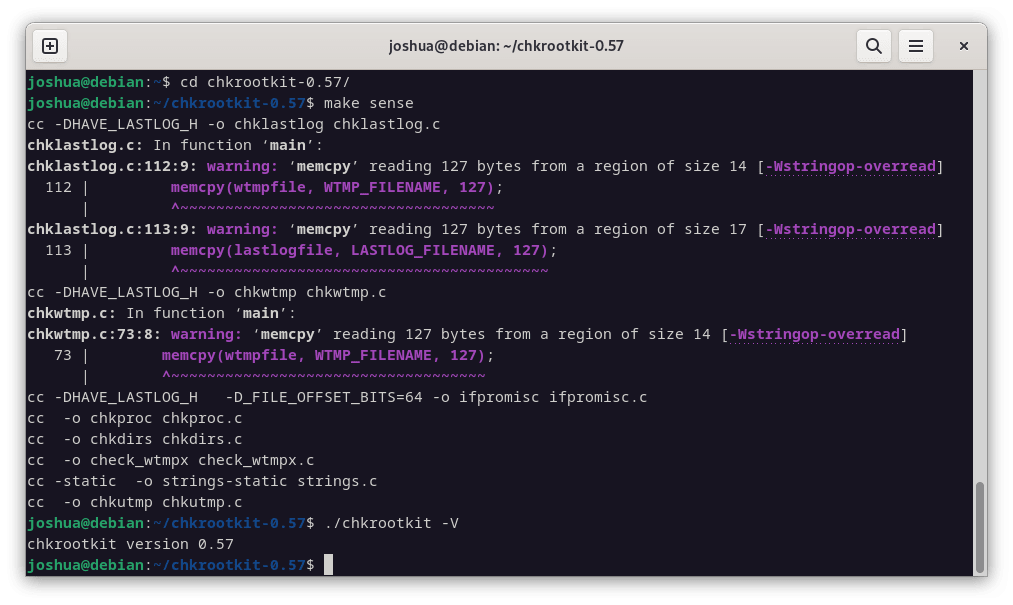
make sense
This command compiles the Chkrootkit source code, generating an executable binary file. Successful compilation produces output like:
gcc -DHAVE_LASTLOG_H -o chklastlog chklastlog.c
gcc -DHAVE_LASTLOG_H -o chkwtmp chkwtmp.c
gcc -DHAVE_LASTLOG_H -o ifpromisc ifpromisc.c
gcc -o chkproc chkproc.c
gcc -o chkdirs chkdirs.c
gcc -o strings strings.c
Confirm Chkrootkit Installation
Once the compilation completes, verify the installation was successful. Run the version command to confirm the binary works correctly:
./chkrootkit -VYou should see output similar to:
chkrootkit version 0.58b

Move Chkrootkit for System Global Access on Debian
Following compilation, it’s best to move Chkrootkit to a standard location in the file system and make the executable accessible system-wide. As a result, a common practice is to place such software in /usr/local/bin for global accessibility.
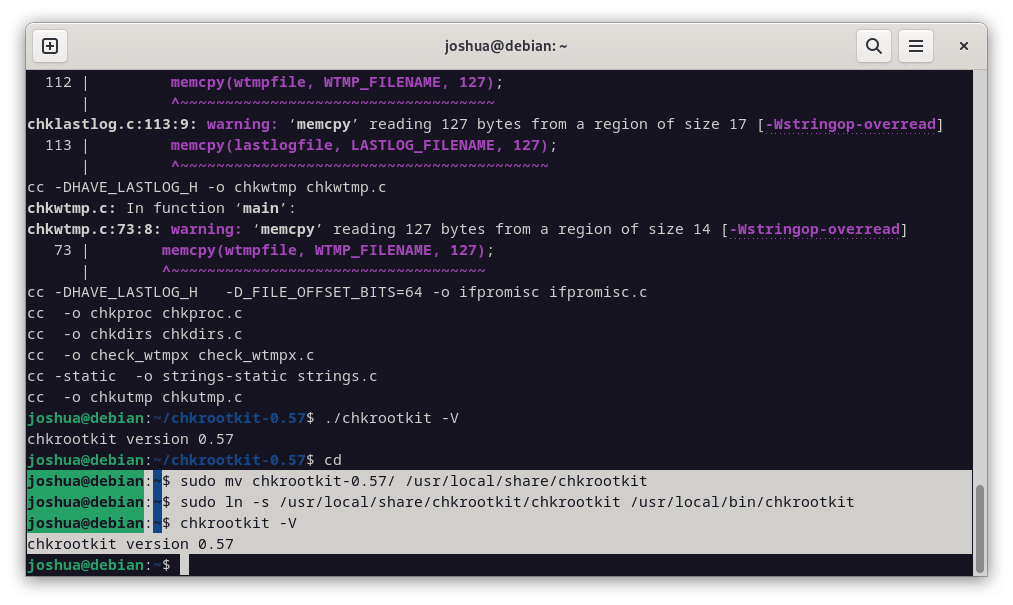
Start by moving the Chkrootkit directory to /usr/local/share. First, make sure you are in the parent directory of the Chkrootkit directory (one level above chkrootkit-{your-version-number}). Then, run the following command:
sudo mv chkrootkit-{your-version-number} /usr/local/share/chkrootkitAfter moving the directory, create a symbolic link to the Chkrootkit executable in /usr/local/bin. As a result, this makes Chkrootkit accessible anywhere in the system without navigating to its directory.
Execute the following command to create the symbolic link:
sudo ln -s /usr/local/share/chkrootkit/chkrootkit /usr/local/bin/chkrootkitAt this point, Chkrootkit is globally accessible. You can verify this by simply running the Chkrootkit version command from anywhere in the terminal:
chkrootkit -VThis step makes using Chkrootkit simple and standard for managing software on Linux systems.

Basic Commands with Chkrootkit for Rootkit Detection
Chkrootkit requires root privileges to access all system areas. Always run scans with sudo.
Initiate Rootkit Scanning Using Chkrootkit
With Chkrootkit properly installed, you can now scan your system for rootkits. Run a full scan with:
sudo chkrootkitDuring the scan, Chkrootkit checks system binaries, network interfaces, and log files. Typically, a clean system produces output like:
ROOTDIR is `/'
Checking `amd'... not found
Checking `basename'... not infected
Checking `biff'... not found
Checking `chfn'... not infected
Checking `chsh'... not infected
Checking `cron'... not infected
Checking `crontab'... not infected
Checking `ifpromisc'... not infected
Checking `login'... not infected
Checking `ls'... not infected
Checking `netstat'... not infected
Checking `ps'... not infected
Checking `sshd'... not infected
Each test reports “not infected”, “not found” (if the binary does not exist), or “INFECTED” if a rootkit signature is detected.
Alternatively, for a condensed view that only displays potential problems, use quiet mode:
sudo chkrootkit -qIn quiet mode, no output means no infections were detected. Conversely, any output indicates items requiring investigation.
Create an Automatic Scanning Regimen with Chkrootkit
Since maintaining a secure environment requires continuous vigilance, configure Chkrootkit to perform daily scans automatically by tweaking its configuration file.
The automatic daily scan configuration applies only to repository-installed Chkrootkit packages. If you installed from source, skip to the manual cron setup section below.
To begin configuration, open the configuration file using this command:
sudo nano /etc/chkrootkit/chkrootkit.confWithin this file, search for the RUN_DAILY attribute and make sure its value is set to true. Although this typically is the default setting, confirming ensures that automated daily scans are active.
RUN_DAILY="true"
After editing, save the file by pressing CTRL + O and exit the editor by pressing CTRL + X.
However, if you installed Chkrootkit from source, as opposed to installing it from the Debian repositories, it does not come with a default configuration file like chkrootkit.conf. Indeed, the chkrootkit.conf file is generally part of the packaged version of Chkrootkit that comes with Debian repositories.
When manually installing Chkrootkit from the source, you can run the tool directly without a configuration file. Nevertheless, if you want to automate or configure the scans, you must create your own script or cron job.
For instance, if you want to create a daily cron job to run Chkrootkit, you could create a simple shell script to run the desired chkrootkit command. Subsequently, schedule this script using cron.
Here’s an example of how you can do it:
To implement this, create a script file in /usr/local/bin:
sudo nano /usr/local/bin/daily_chkrootkit.shNext, add the following content:
#!/bin/bash
/usr/local/bin/chkrootkit
After creating the script, make it executable:
sudo chmod +x /usr/local/bin/daily_chkrootkit.shFollowing this, edit the crontab file to schedule the script to run daily:
sudo crontab -eOnce the editor opens, add the following line to run daily at 3:00 AM and email the results to root:
0 3 * * * /usr/local/bin/daily_chkrootkit.sh 2>&1 | mail -s "chkrootkit daily scan" rootThe email functionality requires the
mailutilspackage. Install it withsudo apt install mailutilsif you want scan results emailed to root. Alternatively, remove the/var/log/sysloginstead.
After adding the cron entry, verify the cron job was created successfully:
sudo crontab -lYou should see your scheduled task:
0 3 * * * /usr/local/bin/daily_chkrootkit.sh 2>&1 | mail -s "chkrootkit daily scan" root
This way, you can effectively automate Chkrootkit scans even when installing from source.
Chkrootkit Command Reference
To explore additional options, view all available options with:
chkrootkit -hAlternatively, for detailed documentation, consult the man page:
man chkrootkitAdvanced Scanning Options
Instead of running a full scan, you can run specific tests by naming the test:
sudo chkrootkit wormscanThis runs only the worm-related tests instead of a full scan.
Furthermore, to list all available tests, use:
chkrootkit -lAdditionally, if your system has NFS or other network-mounted filesystems, skip scanning them with the -T option (available in version 0.58 and later):
sudo chkrootkit -TMoreover, if you suspect your system binaries are compromised, run chkrootkit using trusted binaries from an alternate path:
sudo chkrootkit -p /cdrom/bin:/mnt/trusted/binThis tells chkrootkit to use binaries from the specified paths instead of the potentially compromised system binaries.
Troubleshooting Common Chkrootkit Issues
False Positives
Chkrootkit occasionally reports false positives. Common causes include:
- bindshell test: If you run PortSentry, klaxon, or other software that binds to unused ports, chkrootkit may flag ports like 1524/tcp, 31337/tcp, or 27374/tcp as suspicious. This is expected behavior, not an infection.
- suckit test: Short-lived processes created and killed during the scan can trigger false positives because chkproc compares
psoutput with/proccontents. - Suspicious files: Files like
.packlistor.cvsignoremay appear suspicious but are typically legitimate development artifacts.
Example false positive output:
Checking `bindshell'... INFECTED (PORTS: 31337)
Checking `suckit'... Warning: /sbin/init INFECTED
When investigating a potential false positive, verify the flagged binary’s integrity against the original package:
sudo debsums -cIf debsums returns no output, all installed packages match their original checksums. Therefore, this confirms the flagged binary is unchanged and the chkrootkit result is a false positive. However, if modified files exist, debsums shows:
debsums: changed file /usr/bin/suspicious-binary (from package-name)
Alternatively, for deeper analysis, use expert mode to examine suspicious strings:
sudo chkrootkit -x | moreWhat to Do If INFECTED Appears
If chkrootkit reports a genuine infection, you will see output like:
Checking `ls'... INFECTED
Checking `netstat'... INFECTED
Checking `ps'... INFECTED
Checking `lkm'... You have 2 process hidden for readdir command
When chkrootkit reports a genuine infection, take these steps immediately:
- Disconnect the system from the network immediately
- Boot from a live USB and run chkrootkit against the mounted filesystem using
chkrootkit -r /mnt - Compare binaries against known-good copies or reinstall affected packages
- Review logs in
/var/logfor signs of unauthorized access - Consider a full system reinstall if the compromise is confirmed
Compilation Errors
If make sense fails, you may see errors like:
chkproc.c:1:10: fatal error: linux/sched.h: No such file or directory
 #include <linux/sched.h>
          ^~~~~~~~~~~~~~~
compilation terminated.
This error indicates missing kernel headers. To resolve this, install build dependencies:
sudo apt install build-essential linux-headers-$(uname -r)Additional Security Tools
Chkrootkit works best as part of a layered security approach. Consider combining it with Fail2ban for brute-force protection, UFW for firewall management, proper SSH hardening, and ModSecurity for web application firewall protection. For containerized environments, pair rootkit detection with Docker security best practices.
Conclusion
At this point, you now have Chkrootkit installed on Debian, configured for automated daily scanning, and understand how to interpret scan results. For ongoing security, schedule regular scans via cron, investigate any “INFECTED” results promptly, and combine rootkit detection with firewall rules and intrusion prevention tools like Fail2ban.

