Installing OpenJDK 17 on Ubuntu opens the door to building and running Java applications with the reliability and features of a long-term support (LTS) release. As a cornerstone of modern Java development, OpenJDK 17 is favored by developers and enterprises alike for its emphasis on performance and stability. This guide ensures you can seamlessly set up OpenJDK 17 on Ubuntu 24.04, 22.04, or 20.04, catering to users of various skill levels.
Whether you prefer the simplicity of Ubuntu’s APT repository or the flexibility of manual installation, this article walks you through both methods step-by-step. Additionally, you’ll learn how to manage multiple Java versions on your system, so switching environments is hassle-free. By the end, you’ll be equipped with everything you need to leverage OpenJDK 17 effectively.
Update Ubuntu Before Installing OpenJDK 17
Before installing OpenJDK 17, it is essential to update your Ubuntu system to ensure all packages are current. This step prevents potential installation conflicts and guarantees compatibility with the latest package versions.
To update your system, open the terminal and run the following commands:
sudo apt update
sudo apt upgrade
sudo apt update: Refreshes the list of available packages and their versions.sudo apt upgrade: Installs the latest updates for all packages currently installed on your system.
After completing the update process, it’s recommended to restart your system. While not always required, a reboot ensures that any recently updated components, such as the kernel or system services, are loaded correctly. To restart your system, run:
sudo rebootUpdating your Ubuntu system ensures compatibility with OpenJDK 17, applies security patches, and minimizes installation errors. This step provides a stable foundation for a smooth installation process.
How to Install OpenJDK 17 on Ubuntu
Ubuntu has available two methods for installing OpenJDK 17: using the default APT repository for a quick setup or manually downloading the archive for more control. Choose the method that suits your needs based on ease of use or specific version requirements.
Method 1: Install OpenJDK 17 Using the APT Repository
This is the easiest and most straightforward way to install OpenJDK 17.
Step 1: Search for Available OpenJDK Packages
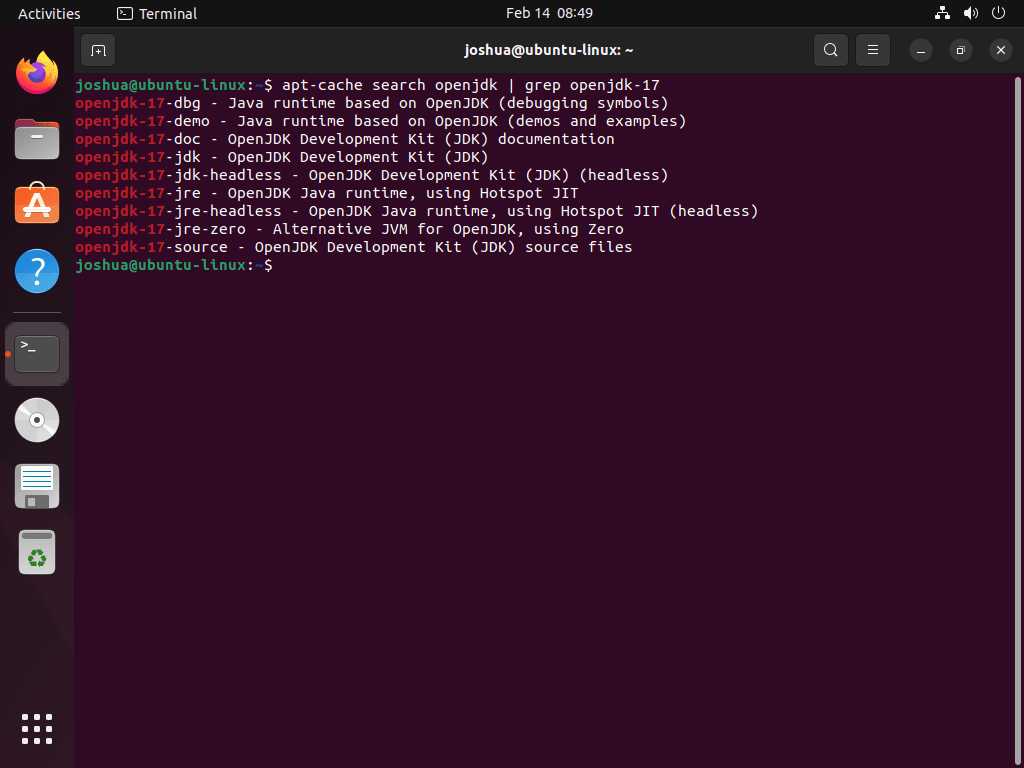
To verify the availability of OpenJDK 17 in your version of Ubuntu, run the following command:
apt-cache search openjdk | grep openjdk-17Example output:

This will display a list of OpenJDK-related packages.
Step 2: Install OpenJDK 17
Install the Java Runtime Environment (JRE) or the Java Development Kit (JDK) as needed. Use the following commands:
- To install the JRE:
sudo apt install openjdk-17-jre- To install the JDK:
sudo apt install openjdk-17-jdkThe JRE is sufficient for running Java applications, while the JDK is required for development purposes.
Step 3: Verify Installation
After installation, confirm that OpenJDK 17 is successfully installed by running:
java --versionThe output should display the installed OpenJDK version.
Example:
sudo apt remove openjdk-17-jre openjdk-17-jdk --purgeMethod 2: Install OpenJDK 17 Manually .tar.gz
This method is suitable for users who need the latest OpenJDK version or prefer manual control over the installation process.
Step 1: Download the OpenJDK Archive
Visit the JDK downloads page and download the latest .tar.gz archive for OpenJDK 17. Alternatively, you can use the wget command to download it directly:
Here’s an example of downloading OpenJDK 17 version 17.0.12 for x64 (however, it is recommended to obtain a new link from the downloads page rather than copying this example):
wget https://download.oracle.com/java/17/archive/jdk-17.0.12_linux-x64_bin.tar.gzTo download
jdk-17.0.13_linux-x64_bin.tar.gz, you must first review and accept the updated license agreements provided by Oracle before the download link becomes accessible.
Step 2: Extract and Move Files
Once the download is complete, extract the archive and move the files to a suitable directory:
tar -xvf jdk-17_linux-x64_bin.tar.gz
sudo mkdir -p /usr/local/java
sudo mv jdk-17* /usr/local/java/jdk-17
Step 3: Configure Environment Variables
Set up the JAVA_HOME environment variable and update the PATH:
echo "export JAVA_HOME=/usr/local/java/jdk-17" >> ~/.bashrc
echo "export PATH=\$JAVA_HOME/bin:\$PATH" >> ~/.bashrc
source ~/.bashrc
Step 4: Verify the Installation
Check the installed Java version and the JAVA_HOME variable to ensure everything is configured correctly:
java --version
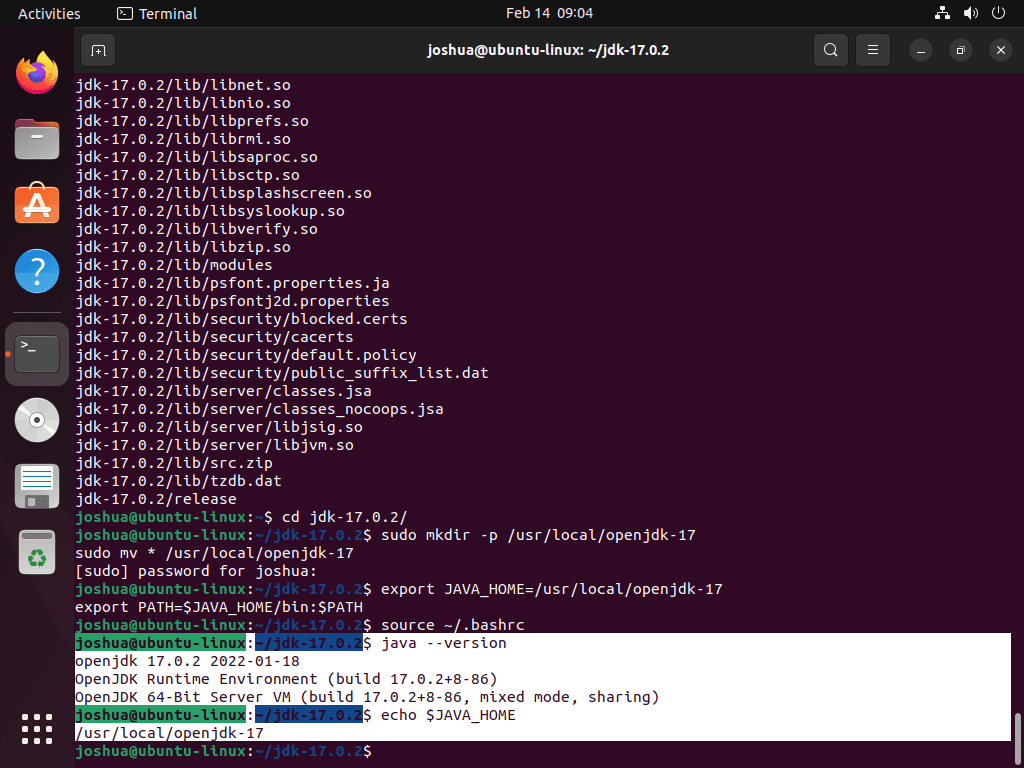
echo $JAVA_HOME
If installed correctly, you should see the following output:

The installation is complete if the output displays the correct Java version and path.
Switching Between Java Versions on Ubuntu
If you have multiple Java versions installed, you may need to switch between them to match specific application requirements. This section explains how to manage and configure the default Java version on your system.
Step 1: List Installed Java Versions
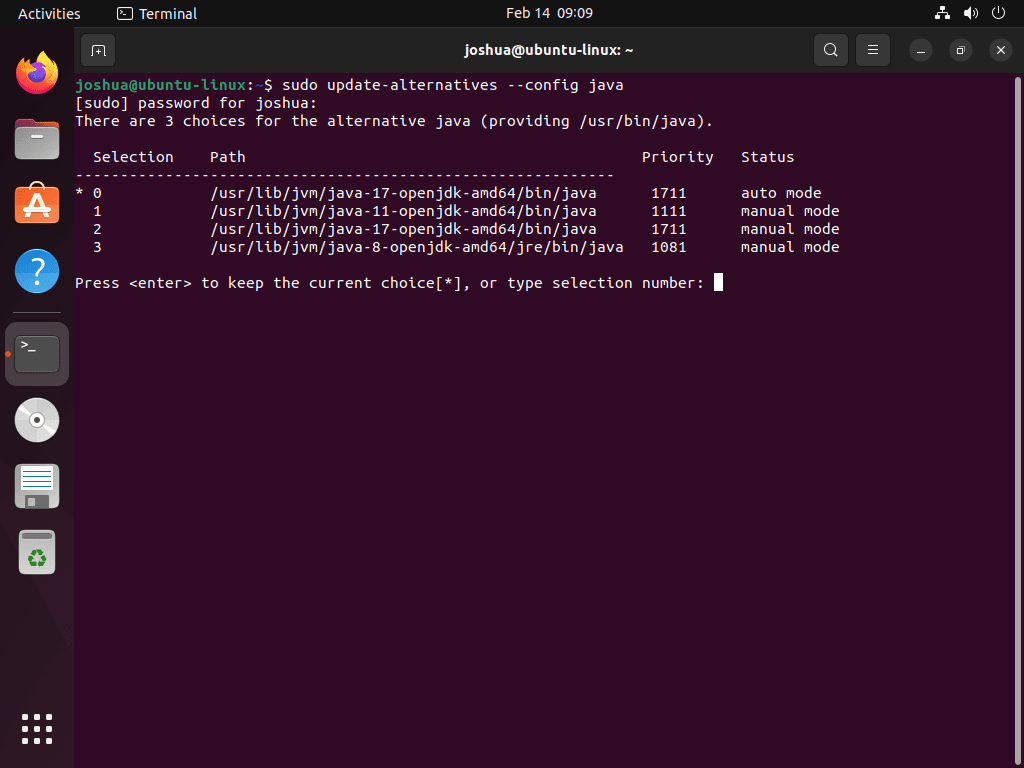
To see all Java versions installed on your system, use the following command:
sudo update-alternatives --config javaThis command displays a list of all available Java installations, similar to the example below:

Step 2: Select the Default Java Version
From the displayed list, choose the selection number corresponding to the desired Java version. Type the number and press Enter. For instance, to switch to Java 17, enter 2 and confirm.
After completing this step, the selected Java version becomes the default system-wide.
Step 3: Verify the Active Java Version
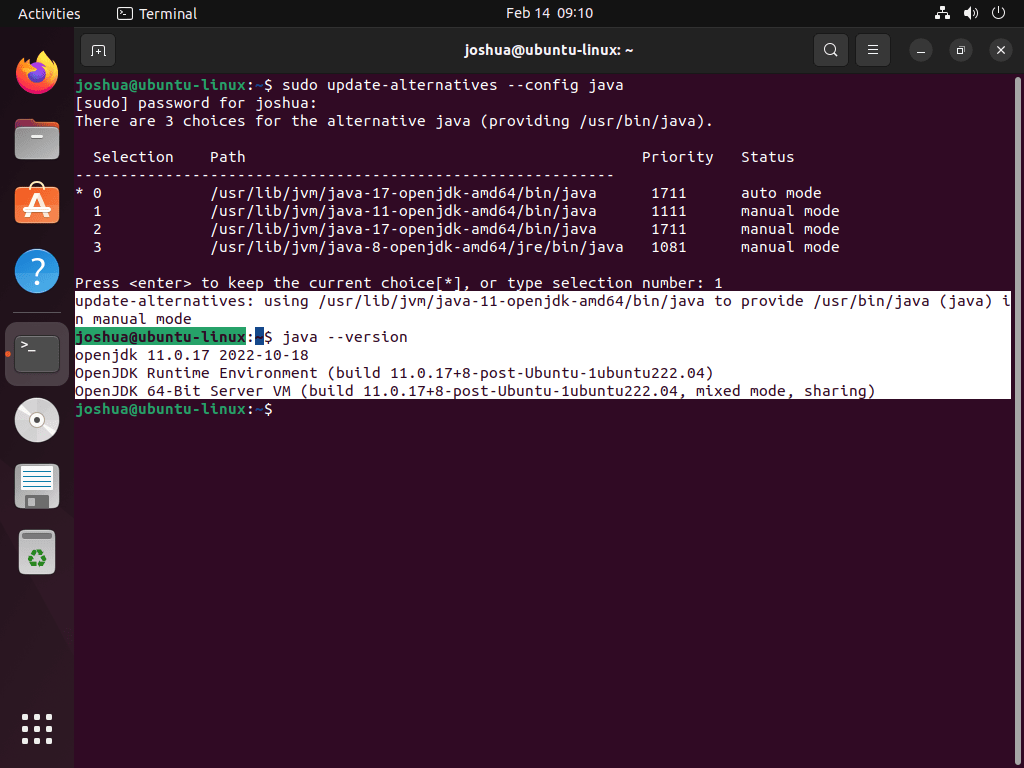
To confirm the current default Java version, use the following command:
java --versionThe output should show the active Java version, such as:

This verifies that the switch was successful.
Step 4: Modify the JAVA_HOME Environment Variable (Optional)
If you need to switch to a different Java version, you’ll need to update the JAVA_HOME environment variable to point to the correct installation directory.
Edit the bashrc File
Open the .bashrc file in a text editor to modify the JAVA_HOME variable:
nano ~/.bashrcUpdate the JAVA_HOME Variable
Locate the existing JAVA_HOME line in the file. Replace it with the path to the new Java version. For example, if you’ve installed jdk-17.0.13_linux-x64_bin.tar.gz, the updated line should look like this:
export JAVA_HOME=/usr/lib/jvm/java-17-openjdk-amd64Apply the Changes
Save and close the file. To apply the changes, run the following command:
source ~/.bashrcVerify the Updated JAVA_HOME Setting
To confirm that the JAVA_HOME variable has been updated successfully, use this command:
echo $JAVA_HOMEThe output should display the updated path, such as:
/usr/local/java/jdk-17.0.13Conclusion
Installing OpenJDK 17 or Oracle JDK 17 on Ubuntu is a straightforward process when you have clear steps and the right tools. Whether you used the APT repository for convenience or opted for manual installation, you now have a fully configured Java environment ready for development or running applications. Managing multiple versions and setting up JAVA_HOME ensures you’re prepared for any project requirements.
Java 17’s long-term support status provides the stability and reliability developers and organizations rely on. With your system set up, you’re ready to explore its features and capabilities.
Frequently Asked Questions (FAQs)
A: Yes, OpenJDK 17 can be installed on Ubuntu 18.04, but you may need to use a third-party repository or manually download and install the archive since it may not be available in the default APT repository.
A: Yes, you can have multiple Java versions installed. Use the update-alternatives command to switch between versions as needed.
A: Setting the JAVA_HOME environment variable ensures that applications and development tools use the correct Java version. It points to the directory where Java is installed.
Useful Resources for Java Installation and Downloads
Throughout this guide, we’ve covered how to install and manage OpenJDK or Oracle JDK 17 on Ubuntu. If you’d like to explore more about Java or need to download specific versions, the following resources may help:
- Oracle JDK 17 Archive Downloads (17.0.13 and later)
This page provides the latest updates for Oracle JDK 17, including recent releases like version 17.0.13. It’s ideal for users seeking the newest Oracle JDK builds. - Oracle JDK 17 Full Archive Downloads
Access the complete archive of Oracle JDK 17 releases, making it easier to locate older versions if needed for compatibility purposes. - OpenJDK Project Page for JDK 17
Explore the OpenJDK 17 project to learn more about its features, specifications, and updates directly from the official project site. - OpenLogic OpenJDK Downloads
For users preferring OpenJDK builds with additional support options, OpenLogic offers downloads and enterprise-grade support.
Share Your Feedback
We hope this guide was helpful and easy to follow. If you have any questions, feedback, or suggestions, feel free to leave a comment below. Your input helps us improve and provide more valuable content for the community.

