
AppArmor confines programs through mandatory access control profiles that restrict file access, capabilities, and network permissions regardless of user identity. Profiles run in enforce mode (blocking violations) or complain mode (logging only). Ubuntu 23.10 introduced unprivileged user namespace restrictions and Ubuntu 24.04 LTS enables them by default, so sandboxed applications like Docker, Firefox, and local development tooling now need profiles that explicitly grant userns permissions.
Canonical’s recently updated Understanding AppArmor user namespace restriction guidance, published after Qualys documented three bypass techniques, lays out the hardening steps administrators should follow. The walkthrough below mirrors that upstream playbook for Ubuntu 24.04 by showing how to check AppArmor status, manage profile states (enable, disable, enforce, complain), create custom profiles with aa-genprof, and configure unprivileged user namespace permissions plus the sysctl-based hardening Canonical recommends.
Prerequisites for Managing AppArmor on Ubuntu
Before proceeding, ensure AppArmor ships with your supported Ubuntu release, including both LTS and interim builds. You need:
- A user account with sudo privileges
- Terminal access
- Ubuntu 22.04 LTS or newer (namespace restrictions in this guide apply to Ubuntu 24.04 LTS and newer)
Version compatibility: This guide supports Ubuntu 22.04 LTS, 24.04 LTS, and 26.04 LTS. Core AppArmor functionality (profiles, modes, status commands) works identically across all versions. The unprivileged user namespace restrictions covered in the first sections apply specifically to Ubuntu 23.10 and newer, including 24.04 LTS and 26.04 LTS.
Understanding Ubuntu 23.10+ AppArmor Changes (New Standard)
Ubuntu 23.10 and every release that followed (Ubuntu 24.04 LTS, Ubuntu 26.04 LTS, and all supported interim builds in between) introduced a fundamental security architecture change that significantly differs from Ubuntu 22.04. If you run any of these newer releases you must understand unprivileged user namespace restrictions before working with containerized applications, web browsers, or development environments. This section covers the new behavior that now defines AppArmor’s security model going forward.
Ubuntu 23.10 introduced a major architectural shift in AppArmor’s handling of unprivileged user namespaces, and Ubuntu 24.04 LTS now ships it as the default experience. Prior to these releases, applications could create user namespaces without any AppArmor mediation, allowing processes to construct isolated environments freely. Consequently, this created security gaps where compromised applications could abuse namespace isolation to escalate privileges or evade monitoring.
Starting with Ubuntu 23.10 (continuing through Ubuntu 24.04 LTS and later), the kernel restricts unprivileged user namespace creation through the apparmor_restrict_unprivileged_userns policy knob. When this restriction is active (default on 23.10+), applications must either have an AppArmor profile that explicitly grants userns permissions or run under an existing profile that already includes the necessary namespace rules.
This architectural change primarily impacts three categories of software:
- Web browsers: Firefox, Chromium, Chrome, Edge, Brave (all use namespace-based content sandboxing)
- Containerization tools: Docker, Podman, LXC, systemd-nspawn (rely on namespaces for isolation)
- Development environments: Build systems, test frameworks, CI/CD runners that construct isolated namespaces
What Changed Between Versions
Ubuntu 22.04 behavior (legacy model): Applications could create unprivileged user namespaces freely without any AppArmor mediation. Processes simply called unshare(CLONE_NEWUSER) and the kernel granted the request without checking AppArmor profiles. This meant web browsers, containers, and development tools worked out-of-the-box but created potential security vulnerabilities where compromised processes could abuse namespace isolation.
Ubuntu 23.10+ behavior (new standard): The kernel parameter apparmor_restrict_unprivileged_userns defaults to enabled, requiring applications to explicitly request user namespace capabilities through their AppArmor profiles. Applications without proper permissions encounter “Operation not permitted” errors when attempting unshare(CLONE_NEWUSER), immediately breaking functionality for any sandboxed application that relies on namespace isolation.
Critical difference: On Ubuntu 22.04, Docker and Firefox work immediately after installation. On Ubuntu 24.04 LTS and newer, these same applications require either snap packaging (which ships AppArmor profiles that already include
usernspermissions) or manual AppArmor profile configuration with explicitusernspermissions. This catches many users by surprise when migrating from older Ubuntu versions.
Ubuntu addressed this for most users by ensuring bundled profiles already declare namespace permissions for critical software. Snap packages, for example, ship their own AppArmor policies through the snap manifest, so snap-delivered Firefox, Chromium, and other sandboxed applications function without manual intervention. Traditional deb packages or custom applications require explicit profile configuration to regain user namespace access.
Checking User Namespace Restrictions (Ubuntu 23.10+ Only)
This section applies only to Ubuntu 23.10 and newer (including Ubuntu 24.04 LTS and 26.04 LTS). Ubuntu 22.04 users can skip this because your system does not have unprivileged user namespace restrictions enabled by default.
To verify whether unprivileged user namespace restrictions are active on your Ubuntu 23.10+ system, check the kernel parameter:
cat /proc/sys/kernel/apparmor_restrict_unprivileged_usernsExpected output on Ubuntu 23.10+: 1 (restrictions enabled by default)
Expected output on Ubuntu 22.04: File does not exist or returns 0 (no restrictions)
If the file doesn’t exist on your Ubuntu 23.10 or 24.04 system, your kernel may be outdated. First, run uname -r to verify you’re running a 6.5+ kernel on Ubuntu 23.10 or a 6.8+ kernel on Ubuntu 24.04 LTS. Additionally, check which profile mode an application currently uses:
cat /proc/$(pidof firefox)/attr/currentExample outputs:
snap.firefox.firefox (enforce)= Snap-delivered Firefox profile that already includesusernspermissionsfirefox (enforce)= Confined profile from a deb or source install that may block namespace creationunconfined= Manual override that disables AppArmor mediation entirely
Troubleshooting tip: If Docker or Podman fails with “Operation not permitted” when creating containers on Ubuntu 23.10+, check
cat /proc/$(pidof dockerd)/attr/current. If the output shows a confined profile lacking the necessaryusernsrule (for example,/usr/bin/dockerd (enforce)), create a custom AppArmor profile withusernspermissions or temporarily run the service in an intentionalunconfinedprofile while testing.
Configuring Profiles for User Namespace Access (Ubuntu 24.04+ Only)
When you need this: Only relevant for Ubuntu 24.04 LTS and newer when running deb-installed applications (not snaps) requiring user namespace creation. Ubuntu 22.04 users do not need custom namespace permissions since the kernel allows unrestricted namespace creation.
For custom applications or deb-installed software requiring user namespace capabilities on Ubuntu 24.04+, create or modify the AppArmor profile to include the userns permission. Profiles reside in /etc/apparmor.d/ and follow a path-based naming convention where slashes become periods (e.g., /usr/local/bin/myapp becomes /etc/apparmor.d/usr.local.bin.myapp).
Common scenarios requiring custom profiles:
- Docker or Podman installed via deb packages (not snap)
- Chromium/Firefox installed from upstream tarballs or third-party repositories
- Custom build systems, test runners, or CI/CD tools that create containers
- Development tools that use
unshareorbwrap(Bubblewrap)
Example profile structure granting user namespace access to a custom application:
cat <<'EOF' | sudo tee /etc/apparmor.d/usr.local.bin.myapp
#include <tunables/global>

/usr/local/bin/myapp {
  #include <abstractions/base>

  # Grant user namespace creation
  capability sys_admin,
  userns,

  # Application-specific paths
  /usr/local/bin/myapp mr,
  /usr/local/lib/myapp/** mr,
  /home/*/myapp/** rw,

  # Network access
  network inet stream,
  network inet dgram,
}
EOF
After creating the profile, load it into the kernel and set the desired enforcement mode:
sudo apparmor_parser -r /etc/apparmor.d/usr.local.bin.myapp
sudo aa-enforce /usr/local/bin/myapp
Line-by-line breakdown:
apparmor_parser -r= Reload profile into the kernel (overwrites existing if present)aa-enforce= Switch profile to enforce mode (blocks violations immediately)
Testing workflow recommendation: Always start with complain mode first using
sudo aa-complain /usr/local/bin/myappinstead ofaa-enforce. Next, run the application through typical workflows (create containers, open browser tabs, run test suites) and monitor/var/log/syslogorjournalctl -xefor denied operations. Once you’ve granted all necessary permissions, switch to enforce mode.
The userns permission explicitly allows user namespace creation (critical for Ubuntu 24.04+), while capability sys_admin may be required depending on the application’s privilege requirements. The mr flag means “map for reading” (executable code), rw allows read/write access to data files, and network rules grant socket creation for both TCP (stream) and UDP (dgram) protocols.
Security note: The
capability sys_adminline grants significant privileges (mount operations, namespace management, system configuration). Only include it if the application genuinely requires these capabilities. Many applications needusernsalone withoutsys_admin. Test in complain mode to determine the minimum permissions required.
Disabling Restrictions System-Wide (Not Recommended for Ubuntu 23.10+)
Ubuntu 23.10+ systems: Disabling unprivileged user namespace restrictions removes a critical security boundary that Ubuntu intentionally added. Only consider this for development systems or when troubleshooting specific issues temporarily.
Ubuntu 22.04 systems: This section is irrelevant since 22.04 does not have unprivileged user namespace restrictions enabled by default.
While possible to disable unprivileged user namespace restrictions entirely, this approach removes an important security boundary and contradicts Ubuntu 23.10+’s security model. Therefore, only consider this for development systems or when troubleshooting specific issues:
echo 0 | sudo tee /proc/sys/kernel/apparmor_restrict_unprivileged_usernsThis change persists only until reboot. To make it permanent, add the kernel parameter to /etc/sysctl.d/ (using a descriptive filename for clarity):
echo 'kernel.apparmor_restrict_unprivileged_userns = 0' | sudo tee /etc/sysctl.d/20-apparmor-donotrestrict.conf
sudo sysctl --load /etc/sysctl.d/20-apparmor-donotrestrict.conf
When this is actually needed: Primarily for AppImage applications (Etcher, Obsidian, etc.) that fail with “SUID sandbox helper binary was found but is not configured correctly” errors. Electron-based AppImages and other self-contained applications often require user namespaces for their sandbox mechanisms. Consider creating specific AppArmor profiles for individual AppImages instead of disabling restrictions globally.
Important LXD caveat: If you have LXD installed and running, it automatically disables unprivileged user namespace restrictions entirely, making the sysctl setting above irrelevant. Check with
systemctl status lxdto determine if LXD is active on your system. LXD’s architecture requires unrestricted namespace creation for container management.
Production systems should maintain the default restrictions and configure per-application profiles instead. Disabling restrictions system-wide exposes the kernel to privilege escalation vulnerabilities that unprivileged user namespace isolation was designed to prevent. Ubuntu 24.04’s security model assumes restrictions remain enabled, and disabling them reverts your system to Ubuntu 22.04’s security posture where any application can freely create namespaces without mediation.
Real-World Impact: Firefox Snap Example
Firefox on Ubuntu 24.04 ships as a snap package with the snap.firefox.firefox AppArmor profile, which already includes the namespace permissions required for its content sandbox while still running in enforce mode. To check the profile status:
snap info firefox | grep tracking
ps aux | grep firefox | head -1
cat /proc/$(pidof firefox)/attr/current
Expected output (last command):
snap.firefox.firefox (enforce)
The output shows Firefox running under its snap-provided profile instead of unconfined, granting the required namespace access without manual configuration. Users who install Firefox via deb packages or compile from source must create custom profiles with userns permissions to restore sandbox functionality. This demonstrates why Ubuntu transitioned Firefox to snap packaging, because the snap framework handles AppArmor profile complexity automatically while maintaining security boundaries.
Key takeaway for Ubuntu 24.04+ users: The unprivileged user namespace restrictions represent Ubuntu’s long-term security direction. Snap packages provide the smoothest path forward since they handle profile complexity automatically. For deb packages or custom applications, invest time in creating proper AppArmor profiles with explicit
usernspermissions rather than disabling restrictions system-wide. Ubuntu 22.04 users can ignore namespace restrictions because 22.04 follows the legacy unrestricted model where applications create namespaces freely without AppArmor mediation.
Advanced Hardening Options (Ubuntu 24.04+ Only)
Ubuntu 24.04+ provides additional sysctl settings and profile configurations to further tighten AppArmor’s unprivileged user namespace restrictions. Canonical highlights these steps in its namespace restriction guidance because they blunt the first two bypass techniques Qualys described. Only apply them if you understand the tradeoffs between security and functionality.
Restrict Unprivileged Profile Switching
Prevent unprivileged processes from using aa-exec to switch to more permissive profiles. This closes a bypass vector where confined processes could transition to unconfined profiles with namespace permissions:
echo 'kernel.apparmor_restrict_unprivileged_unconfined = 1' | sudo tee /etc/sysctl.d/10-apparmor-hardening.conf
sudo sysctl --load /etc/sysctl.d/10-apparmor-hardening.confImpact: Unprivileged users and confined applications can no longer switch to unconfined profiles dynamically. This prevents a common bypass technique but may break workflows that legitimately rely on profile transitions.
If LXD is installed and running, this sysctl has no effect because LXD disables all unprivileged user namespace restrictions for its container management architecture.
Remove Broad Default Profiles
Ubuntu ships with unconfined profiles for busybox and nautilus that allow user namespace creation. However, these profiles exist for legitimate functionality but also provide bypass opportunities. Disable them if you don’t require their namespace-dependent features:
Disable busybox profile (general-purpose shell and utilities):
sudo ln -s /etc/apparmor.d/busybox /etc/apparmor.d/disable/
sudo apparmor_parser -R /etc/apparmor.d/busybox
Disable nautilus profile (GNOME file manager, affects thumbnail generation):
sudo ln -s /etc/apparmor.d/nautilus /etc/apparmor.d/disable/
sudo apparmor_parser -R /etc/apparmor.d/nautilusConsequence: Nautilus thumbnail generation for certain file types stops working since it relies on bwrap (Bubblewrap) with user namespace isolation. Busybox commands that need namespace features (like unshare) fail with permission errors.
Verification tip: List every unconfined profile currently loaded with the following command:
sudo aa-status --filter.mode=unconfinedNote: The
--filter.modeflag requires Ubuntu 24.04 LTS or newer. On Ubuntu 22.04, usesudo aa-status | grep -A20 "unconfined"instead to find unconfined profiles.This upstream-supported flag prints both the unconfined profiles and any processes currently attached to them. If no entries appear, your system has no unconfined profiles loaded.
Create Specific bwrap Profile
If you disable the nautilus profile above but still need GNOME functionality to work (thumbnails, file previews), alternatively create a purpose-built bwrap (Bubblewrap) profile that grants only the minimum permissions required. This allows Flatpak, libgnome-desktop, and bubblejail to function with namespace capabilities while maintaining tighter restrictions than the broad nautilus profile:
# Download the reference bwrap profile from AppArmor's official repository
sudo wget -O /etc/apparmor.d/bwrap https://gitlab.com/apparmor/apparmor/-/raw/master/profiles/apparmor/profiles/extras/bwrap-userns-restrict

# Load the profile into the kernel
sudo apparmor_parser -r /etc/apparmor.d/bwrap
sudo aa-enforce bwrap
If the wget command fails, check the AppArmor GitLab profiles directory for the current file location, as repository structures may change over time.
Upstream caution: Canonical warns in the namespace restriction guidance that manually installing this profile can interfere with future AppArmor package updates once the file ships by default, so only apply it if you are comfortable maintaining custom profiles.
Critical limitation: Running Nautilus with administrative privileges (as root) will not retain elevated privileges for operations requiring user namespaces when this profile is active. Ubuntu strongly recommends never running file managers as root, so use
sudofor individual file operations instead.
These hardening measures represent the direction Ubuntu’s security team is taking, and future releases will enable some or all of these restrictions by default. Implementing them now gives you Ubuntu’s future security posture on your current 24.04 installation.
Legacy Ubuntu 22.04 Workflow (No Namespace Restrictions)
Ubuntu 22.04 LTS (Jammy Jellyfish) retains the legacy AppArmor model where unprivileged user namespaces stay unrestricted. Tools such as Docker, Firefox, and Chromium work immediately after installation without custom profiles because the kernel does not gate namespace creation.
Ubuntu 22.04 still benefits from every other section in this article: checking aa-status, switching profiles between enforce/complain/disabled modes, and generating custom policies with aa-genprof. The only feature you can skip is the Ubuntu 24.04+ namespace configuration, because the kernel parameter /proc/sys/kernel/apparmor_restrict_unprivileged_userns either returns 0 or does not exist on 22.04 systems.
- Default behavior: Namespace-friendly workloads succeed without extra policy changes, so focus on standard profile hygiene (limiting file paths, network sockets, and Linux capabilities).
- Optional hardening: You can still apply the advanced sysctl settings from the previous section if you want 22.04 to mirror the Ubuntu 24.04+ security posture.
- Support lifecycle: Ubuntu 22.04 receives security updates until 2027. Factor that timeline into your AppArmor maintenance planning.
Running older releases does not remove the need for AppArmor hygiene. Continue auditing logs, pruning unused profiles, and enforcing policies so that migrating to Ubuntu 24.04 or newer later simply adds the namespace layer on top of a disciplined baseline.
Understanding AppArmor Basics (All Ubuntu Versions)
The following sections apply universally across supported Ubuntu releases (LTS and interim). These core concepts remain consistent across versions, and only the Ubuntu 24.04+ unprivileged user namespace restrictions covered above represent version-specific behavior.
Before managing profiles, understanding AppArmor’s security model helps contextualize how profiles restrict applications. Specifically, AppArmor implements mandatory access control (MAC), contrasting with Linux’s traditional discretionary access control (DAC). Under DAC, file permissions depend on user identity; if you own a file or have group access, you can read it. MAC adds an additional layer where even root-owned processes cannot access resources unless their AppArmor profile explicitly permits it. Ubuntu defaults to AppArmor for MAC, though administrators migrating from Red Hat-based systems may prefer SELinux as an alternative framework.
This architecture prevents compromised applications from escalating privileges or accessing unrelated system resources. A web server with a restrictive profile cannot read SSH private keys even if running as root, because the profile confines the process to web-related paths and capabilities only. AppArmor complements network-level defenses like UFW firewall, creating layered security where perimeter controls block external threats while mandatory access control limits application-level damage.
Profile Modes Explained
AppArmor profiles operate in three distinct modes that determine enforcement behavior:
| Mode | Behavior | Use Case |
|---|---|---|
| Enforce | Blocks policy violations and logs them | Production systems with tested profiles |
| Complain | Logs violations without blocking | Profile development and testing |
| Disabled | Profile exists but is not loaded | Troubleshooting or permanent exemption |
Enforce mode delivers active protection, complain mode reveals what an application attempts without interference, and disabled mode removes all restrictions. When developing custom profiles, therefore start in complain mode to capture the full permission set an application needs, then transition to enforce mode once the profile covers legitimate use cases.
Profile Storage and Structure
Profiles reside in /etc/apparmor.d/ with filenames matching the absolute path of the confined executable, using periods instead of slashes. For example, /usr/sbin/nginx has a profile at /etc/apparmor.d/usr.sbin.nginx. This naming convention allows quick identification of which profile confines which binary.
Each profile defines allowed file paths (with read/write/execute permissions), network access (protocols and ports), Linux capabilities (like CAP_NET_BIND_SERVICE), and special permissions (like user namespace creation). Profiles can include abstractions from /etc/apparmor.d/abstractions/ that provide common permission sets for DNS resolution, SSL certificates, or basic system libraries.
When AppArmor loads, it reads profiles from /etc/apparmor.d/ and skips any with corresponding symlinks in /etc/apparmor.d/disable/. This directory-based disablement mechanism persists across reboots without requiring profile deletion.
Pre-Steps Before Managing AppArmor
Before managing individual profiles, ensure you have the necessary utilities installed and verify the AppArmor service is running properly.
Install Additional Apparmor Packages
To fully leverage AppArmor’s capabilities, first ensure that the apparmor-utils package is installed on your system. This package is essential as it provides various commands for managing AppArmor effectively.
Begin by opening your terminal and executing the installation command:
sudo apt install apparmor-utils apparmor-notify apparmor-profiles apparmor-profiles-extraThis command installs AppArmor’s basic utilities, additional profiles, and notification support, enhancing its functionality.
How to Check AppArmor Service Status
AppArmor typically comes pre-installed and activated on Ubuntu systems. To confirm its current status, use the command:
systemctl status apparmorExample output:
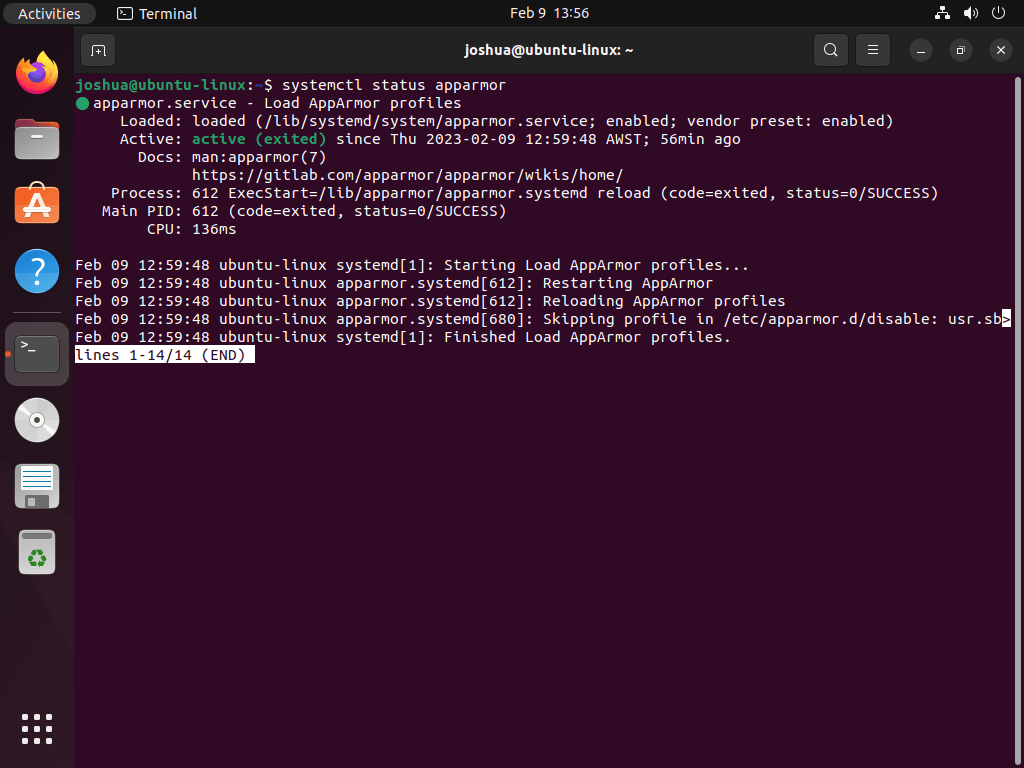
The key lines to look for are Active: active (exited) which confirms AppArmor loaded profiles successfully and Loaded: loaded showing the service unit is recognized. The “exited” status is normal because AppArmor loads profiles at boot and exits after completing its work; it does not run as a persistent daemon.
Managing Systemd Commands for AppArmor
After verifying AppArmor runs properly, you can control the service through standard systemd commands for maintenance or troubleshooting scenarios.
Stopping AppArmor
To stop the AppArmor service, execute:
sudo systemctl stop apparmorDisabling AppArmor on System Boot
If you wish to prevent AppArmor from starting automatically at boot, use:
sudo systemctl disable apparmorStarting AppArmor
To start the AppArmor service, particularly after stopping it, run:
sudo systemctl start apparmorEnabling AppArmor on System Boot (Default)
To revert to the default setting where AppArmor starts at boot, execute:
sudo systemctl enable apparmorRestarting AppArmor
For changes to take effect or to reset the service, restart AppArmor:
sudo systemctl restart apparmorReloading AppArmor
To apply configuration changes without restarting the service, reload AppArmor:
sudo systemctl reload apparmorThe reload command reparses profile files and updates active policies without terminating running processes or interrupting active enforcement. Use restart only when the AppArmor service itself malfunctions or after kernel parameter changes that require re-initialization. Most profile modifications (enable, disable, mode changes) only need reload to take effect.
How to Check AppArmor Profile Status and Modes
Once AppArmor is running, examining individual profile states reveals which applications are confined and their enforcement modes.
Reviewing Current AppArmor Profiles
Before adjusting AppArmor settings, first examine the status of its profiles. The apparmor_status command provides a detailed view of the loaded profiles and their operational modes.
Use the following command in the terminal:
sudo apparmor_statusThis command outputs information such as the number of loaded profiles, enforce mode profiles, and associated processes. The enforce mode indicates active profiles restricting application behaviors according to their specific rules. This overview is vital for understanding the security posture before making any modifications.
Example output:
apparmor module is loaded.
63 profiles are loaded.
45 profiles are in enforce mode.
   /snap/snapd/17883/usr/lib/snapd/snap-confine
   /snap/snapd/17883/usr/lib/snapd/snap-confine//mount-namespace-capture-helper
   /snap/snapd/17950/usr/lib/snapd/snap-confine
   /snap/snapd/17950/usr/lib/snapd/snap-confine//mount-namespace-capture-helper
   /usr/bin/evince
   /usr/bin/evince-previewer
   /usr/bin/evince-previewer//sanitized_helper
   /usr/bin/evince-thumbnailer
   /usr/bin/evince//sanitized_helper
   /usr/bin/man
   /usr/bin/pidgin
   /usr/bin/pidgin//sanitized_helper
   /usr/bin/totem
   /usr/bin/totem-audio-preview
   /usr/bin/totem-video-thumbnailer
   /usr/bin/totem//sanitized_helper
   /usr/lib/NetworkManager/nm-dhcp-client.action
   /usr/lib/NetworkManager/nm-dhcp-helper
   /usr/lib/connman/scripts/dhclient-script
   /usr/lib/snapd/snap-confine
   /usr/lib/snapd/snap-confine//mount-namespace-capture-helper
   /usr/sbin/cups-browsed
   /{,usr/}sbin/dhclient
   apt-cacher-ng
   lsb_release
   man_filter
   man_groff
   nvidia_modprobe
   nvidia_modprobe//kmod
   snap-update-ns.firefox
   snap-update-ns.snap-store
   snap-update-ns.snapd-desktop-integration
   snap.firefox.firefox
   snap.firefox.geckodriver
   snap.firefox.hook.configure
   snap.firefox.hook.connect-plug-host-hunspell
   snap.firefox.hook.disconnect-plug-host-hunspell
   snap.firefox.hook.post-refresh
   snap.snap-store.hook.configure
   snap.snap-store.snap-store
   snap.snap-store.ubuntu-software
   snap.snap-store.ubuntu-software-local-file
   snap.snapd-desktop-integration.hook.configure
   snap.snapd-desktop-integration.snapd-desktop-integration
   tcpdump
18 profiles are in complain mode.
   /usr/bin/irssi
   avahi-daemon
   dnsmasq
   dnsmasq//libvirt_leaseshelper
   identd
   klogd
   mdnsd
   nmbd
   nscd
   php-fpm
   ping
   samba-bgqd
   smbd
   smbldap-useradd
   smbldap-useradd///etc/init.d/nscd
   syslog-ng
   syslogd
   traceroute
0 profiles are in kill mode.
0 profiles are in unconfined mode.
3 processes have profiles defined.
3 processes are in enforce mode.
   /usr/sbin/cups-browsed (1025)
   /snap/snapd-desktop-integration/49/usr/bin/snapd-desktop-integration (1632) snap.snapd-desktop-integration.snapd-desktop-integration
   /snap/snapd-desktop-integration/49/usr/bin/snapd-desktop-integration (1717) snap.snapd-desktop-integration.snapd-desktop-integration
0 processes are in complain mode.
0 processes are unconfined but have a profile defined.
0 processes are in mixed mode.
0 processes are in kill mode.
The output will detail the loaded profiles, showing which actively enforce security policies and which are in a more permissive complain mode. For instance, you might see profiles for network services like dnsmasq or applications like snapd. This visibility is key for system administrators aiming to maintain or enhance security measures.
Alternative Status Check: Using aa-status
Another method to check AppArmor profiles is by using the aa-status command. This offers a more in-depth look at the profiles:
sudo aa-statusThis command, similar to apparmor_status, lists all profiles and statuses, including those in enforced, complain, and unconfined modes. Understanding these modes is essential when troubleshooting or optimizing AppArmor’s functionality.
Backing Up AppArmor Profiles
Before making changes to AppArmor, creating a backup of its profiles is a recommended best practice. This ensures that you can revert to a known configuration if needed. Execute the following command to back up the profiles:
sudo cp -R /etc/apparmor.d /etc/apparmor.d.bakThis command duplicates the current AppArmor profiles into a backup directory /etc/apparmor.d.bak safeguarding your original configuration. This backup is a safety net, allowing you to experiment with or modify AppArmor settings without the risk of losing your original configuration.
How to Disable AppArmor Profile
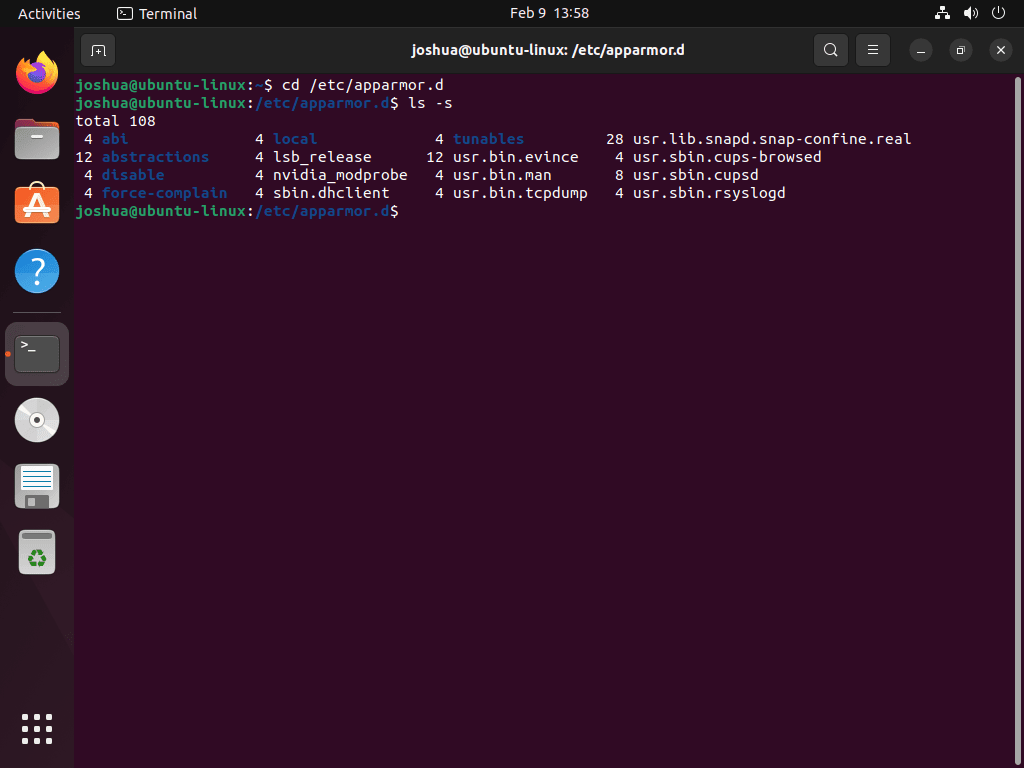
Navigating to the AppArmor Profiles Directory
Begin by accessing the directory where AppArmor profiles are stored. This is done by navigating to /etc/apparmor.d:
cd /etc/apparmor.dListing Available AppArmor Profiles
Next, list the profiles within this directory to identify the one you intend to disable:
ls -sThis command displays all profiles stored in the /etc/apparmor.d directory. You can select the specific profile you wish to disable from this list.
Disabling a Specific AppArmor Profile
To disable a chosen profile, use the aa-disable command. This command allows you to disable individual profiles without impacting the overall functionality of AppArmor. For instance, to disable the usr.sbin.cupsd profile:
sudo aa-disable /etc/apparmor.d/<profile-name>Example of Command Execution
Executing this command will turn off the usr.sbin.cupsd profile. This action is immediate, allowing you to quickly address any issues caused by this specific profile while retaining AppArmor’s protection for other applications.
sudo aa-disable /etc/apparmor.d/usr.sbin.cupsdExample output:
Disabling /etc/apparmor.d/usr.sbin.cupsd
Viewing Disabled AppArmor Profiles
After disabling a profile, you can verify which profiles are currently disabled by checking the /etc/apparmor.d/disable directory:
ls /etc/apparmor.d/disable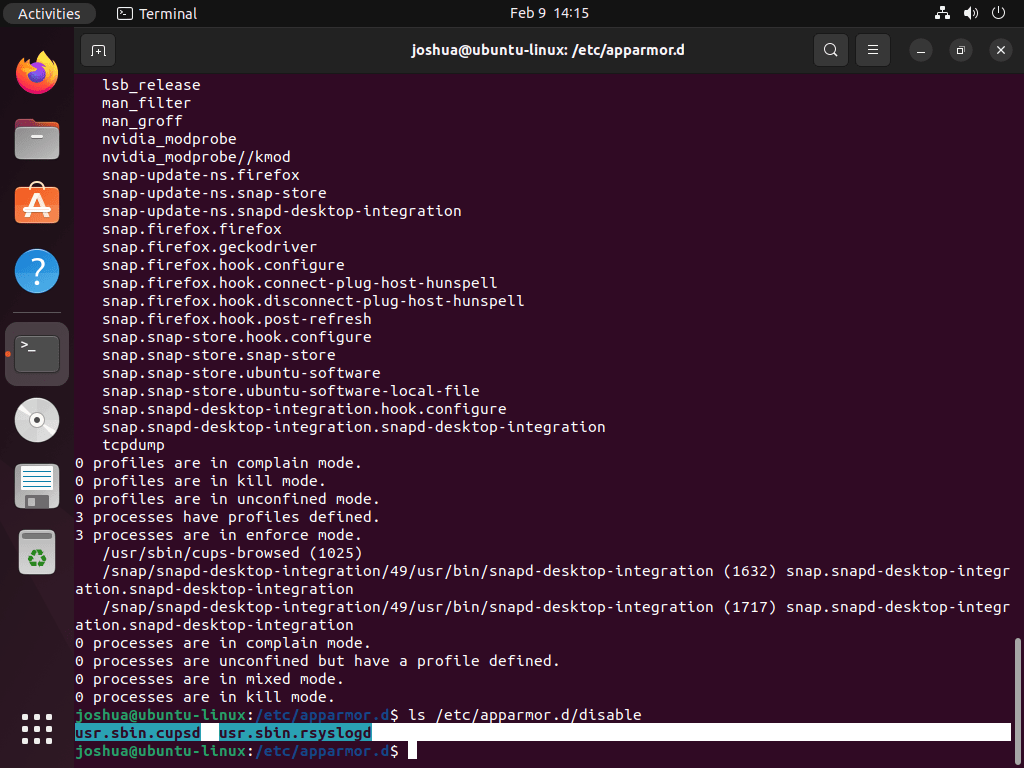
This command provides a list of all profiles that are currently disabled in AppArmor.
How to Enable AppArmor Profile
Re-Enabling a Disabled AppArmor Profile
When a previously disabled AppArmor profile needs to be reactivated, you must remove the symlink from the disable directory, reload the profile into the kernel, and set the desired enforcement mode. There is no aa-enable command in AppArmor; instead, use this three-step workflow:
Step 1: Remove the symlink that disabled the profile:
sudo rm /etc/apparmor.d/disable/<profile-name>Step 2: Reload the profile into the kernel:
sudo apparmor_parser -r /etc/apparmor.d/<profile-name>Step 3: Set the profile to enforce mode:
sudo aa-enforce /etc/apparmor.d/<profile-name>Replace <profile-name> with the actual filename of the profile you want to enable.
Example: Re-Enabling the usr.sbin.cupsd Profile
If you previously disabled the usr.sbin.cupsd profile, the complete re-enablement sequence is:
sudo rm /etc/apparmor.d/disable/usr.sbin.cupsd
sudo apparmor_parser -r /etc/apparmor.d/usr.sbin.cupsd
sudo aa-enforce /etc/apparmor.d/usr.sbin.cupsd
Expected output:
Setting /etc/apparmor.d/usr.sbin.cupsd to enforce mode.
After these steps, verify the profile is active by checking sudo aa-status | grep cupsd. The profile should appear in the enforce mode section, confirming that the security policies are actively applied.
AppArmor Profile Management Commands
Using the aa-genprof Command
The aa-genprof command generates new AppArmor profiles by monitoring an application’s system calls in real-time. It captures file access, network activity, and capability requirements, then prompts you to approve or deny each permission. This interactive approach works best for custom scripts, daemons, or in-house applications where existing profiles do not exist.
Example: Creating a Profile for a Custom Backup Script
Consider a custom backup daemon (/usr/local/bin/backup-daemon) that needs confined access to specific directories. Start profile generation:
sudo aa-genprof /usr/local/bin/backup-daemonThe tool enters monitoring mode and prompts you to run the application in another terminal. Next, execute your backup daemon with typical workload scenarios:
/usr/local/bin/backup-daemon --source /var/lib/myapp --dest /backupAs the daemon runs, aa-genprof intercepts its system calls and presents permission requests. Choose whether to allow file reads from /var/lib/myapp/, writes to /backup/, network socket creation, or capability grants. After the daemon completes a representative workload, press S in the aa-genprof terminal to save the profile.
The generated profile appears in /etc/apparmor.d/ with path-based naming. Review the profile for overly broad permissions (like /** r) and refine manually before enforcement. Start in complain mode initially to catch permissions missed during profiling without breaking functionality.
Applying the aa-enforce Command
The aa-enforce command is used to enforce AppArmor profiles actively. Additionally, it is convenient after modifying profiles, as it immediately applies new policies without a system restart.
Example: Enforcing All AppArmor Profiles
To enforce all available profiles:
sudo aa-enforce /etc/apparmor.d/*Alternatively, enforce a specific profile:
sudo aa-enforce /etc/apparmor.d/<profile-name>Utilizing the aa-disable Command
The aa-disable command deactivates a specific AppArmor profile by creating a symlink in /etc/apparmor.d/disable/ that points to the original profile. When AppArmor loads, it skips any profiles with corresponding symlinks in this directory, making the disablement persist across reboots. Removing the symlink and reloading AppArmor re-enables the profile without requiring service restarts.
Example: Disabling the Evince Profile
To disable the Evince profile:
sudo aa-disable /etc/apparmor.d/usr.bin.evinceNext, verify the symlink creation:
ls -l /etc/apparmor.d/disable/The output shows a symlink pointing to the original profile file. To re-enable, remove the symlink manually with sudo rm /etc/apparmor.d/disable/<profile-name>, then reload the profile with sudo apparmor_parser -r and set enforce mode with aa-enforce. See the “Re-Enabling a Disabled Profile” section above for the complete workflow.
Implementing the aa-complain Command
The aa-complain command switches a profile to “complain mode.” AppArmor logs restricted actions instead of blocking them in this mode, aiding in testing and debugging.
Example: Switching to Complain Mode
To switch the usr.sbin.cupsd profile to complain mode:
sudo aa-complain /etc/apparmor.d/usr.sbin.cupsdReplace usr.sbin.cupsd with the desired profile name to observe its potential restrictions without enforcing them.
Executing the aa-remove-unknown Command
The aa-remove-unknown command effectively cleans up AppArmor profiles related to unknown or unused applications.
Example: Removing Unknown Profiles
To purge unknown profiles:
sudo aa-remove-unknownThis action streamlines your AppArmor profiles, ensuring your system maintains an organized and current security stance.
Troubleshooting Common AppArmor Issues
This section addresses the most frequent AppArmor errors and their resolutions.
Profile Fails to Load
If a profile fails to load after editing or creating it, check for syntax errors:
sudo apparmor_parser -Q /etc/apparmor.d/<profile-name>The -Q (skip-kernel-load) flag parses the profile without loading it, showing syntax errors if any exist. Common issues include missing semicolons, unclosed braces, or invalid file path patterns. Fix the identified errors and reload with:
sudo apparmor_parser -r /etc/apparmor.d/<profile-name>Operation Not Permitted (Ubuntu 24.04+)
Applications failing with “Operation not permitted” when creating containers or sandboxes on Ubuntu 24.04+ typically need userns permissions. First, confirm the restriction is active:
cat /proc/sys/kernel/apparmor_restrict_unprivileged_usernsIf the output is 1, the restriction is enabled. Either install the snap version of the application (which includes proper AppArmor profiles), create a custom profile with userns permission, or temporarily disable restrictions for testing as shown in the “Disabling Restrictions System-Wide” section above.
aa-genprof Appears to Hang
The aa-genprof command waits for you to run the target application in another terminal while it monitors system calls. It is not frozen; it is waiting for input. Follow these steps:
- Open a second terminal
- Run the application with typical usage patterns
- Return to the aa-genprof terminal and press S to scan for events
- Answer permission prompts as they appear
- Press S again to save the profile
Application Blocked Unexpectedly
When an application suddenly stops working after profile changes, check the AppArmor logs for denied operations:
sudo journalctl -xe | grep apparmor | tail -20Look for lines containing DENIED which indicate blocked operations. To quickly restore functionality while investigating, switch the profile to complain mode:
sudo aa-complain /etc/apparmor.d/<profile-name>This logs violations without blocking, allowing the application to run while you identify which permissions to add. Once fixed, return to enforce mode with sudo aa-enforce.
Conclusion
AppArmor delivers mandatory access control that confines applications to predefined security policies regardless of user permissions. The workflow covers checking profile status, managing enforcement modes (enforce, complain, disabled), creating custom profiles with aa-genprof, and configuring Ubuntu 24.04’s unprivileged user namespace restrictions for sandboxed applications. Your Ubuntu system now maintains application-level security boundaries that complement traditional firewall and user permission models.
Useful Links
Here are some valuable links related to using AppArmor:
- Ubuntu AppArmor Wiki: The Ubuntu AppArmor Wiki provides information on installing, configuring, and managing AppArmor on Ubuntu.
- AppArmor Official Website: Visit the official AppArmor website for general information, features, and news.
- AppArmor Documentation: Explore the comprehensive documentation for detailed guides and technical details on using AppArmor.
- AppArmor GitLab Wiki: Access the AppArmor GitLab Wiki for additional resources, community contributions, and project information.

Formatting tips for your comment
You can use basic HTML to format your comment. Useful tags currently allowed:
<code>command</code>command<strong>bold</strong><em>italic</em><a href="URL">link</a><blockquote>quote</blockquote>