ClamAV is an open-source antivirus engine designed to detect trojans, viruses, malware, and other malicious threats. Widely used on Linux systems, it provides essential protection for servers, email scanning, and system security. Equipped with a command-line scanner, automatic database updates, and a multi-threaded daemon for improved performance, ClamAV is a reliable tool for safeguarding your system.
On Ubuntu, ClamAV is readily available via the default repositories, ensuring quick and straightforward installation. This guide covers installation on Ubuntu, configuring automatic updates, scheduling regular scans, and essential security best practices. Additionally, for comprehensive system security, consider pairing ClamAV with UFW firewall and chkrootkit for rootkit detection.
Update Ubuntu Packages Before Installing ClamAV
Before proceeding with the installation, it is essential to update your Ubuntu system to ensure a smooth installation of ClamAV and avoid potential conflicts. Keeping your system up-to-date resolves dependency issues, applies critical security patches, and ensures compatibility with the latest software versions.
Refresh and Upgrade Ubuntu Packages
Open a terminal (Ctrl + Alt + T on desktop) and run the following command to refresh the package list and install updates:
sudo apt update && sudo apt upgradeThis refreshes package metadata and upgrades installed packages. Enter your password when prompted.
Reboot if Required
Kernel updates require a reboot before continuing. Check if one is needed:
[ -f /var/run/reboot-required ] && echo "Restart required"If prompted, reboot before proceeding:
sudo rebootInstall ClamAV Antivirus on Ubuntu With APT
ClamAV is included in Ubuntu’s default repositories, making installation straightforward through APT.
These steps work identically on Ubuntu 26.04 LTS, 24.04 LTS, and 22.04 LTS. All supported releases provide ClamAV 1.4.x from the default repositories with the same package names and service configuration.
Check if ClamAV Is Already Installed
Standard Ubuntu desktops sometimes include ClamAV out of the box. Run a quick version check so you do not reinstall an existing package:
clamscan --versionIf the command returns a version number, you can move on to the database update and scanning sections; otherwise continue with the installation steps below.
Install ClamAV Scanner and Daemon Packages
Install ClamAV and its background daemon:
sudo apt install clamav clamav-daemonThis command installs:
- ClamAV: The antivirus scanner to detect and eliminate malware.
- ClamAV Daemon: The persistent
clamdscanning service that powers on-demand scans and integrates with file servers or mail gateways. (Definition updates are handled separately by theclamav-freshclamservice.)
Verify the ClamAV Installation
After installation, confirm that ClamAV is installed and functioning correctly by checking the version:
clamscan --versionExpected output showing a successful installation:
ClamAV 1.4.3
This confirms ClamAV is installed and ready for virus scanning. The version number may differ slightly based on when you install, but any recent 1.x version provides full functionality.
Install ClamTK for a Simple GUI (Optional)
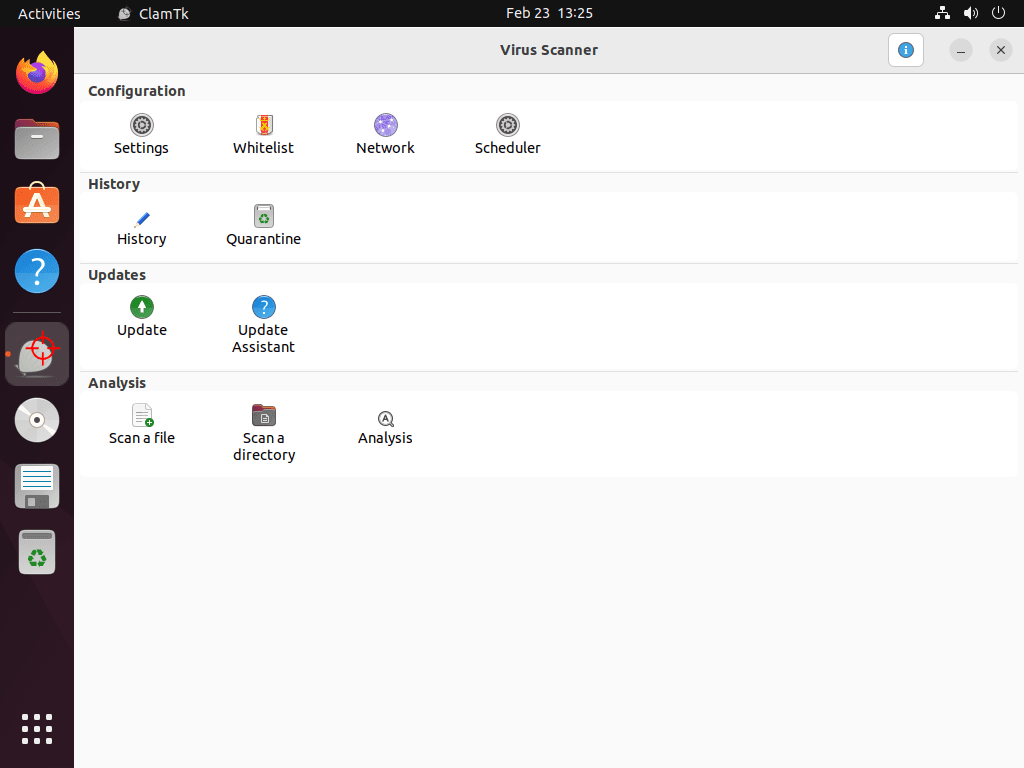
Alternatively, for users who prefer a graphical interface, ClamTK simplifies managing ClamAV. It’s particularly helpful for those less familiar with the command line.
Install the ClamTK Package
To install the graphical user interface for ClamAV, run the following command:
sudo apt install clamtkLaunch ClamTK from the Menu or Terminal
After installation, you can open ClamTK in two ways:
- From the Terminal: Run the following command:
- From the Applications Menu: Search for “ClamTK” and select it.
clamtkWhy Use the ClamTK Interface
ClamTK provides a user-friendly way to:
- Access essential antivirus functionality without relying on command-line tools.
- Perform on-demand virus scans with a few clicks.
- Configure automatic updates and schedule regular scans.

Update the ClamAV Virus Database on Ubuntu
ClamAV relies on virus definitions to detect threats. Run a manual database update immediately after installation to ensure you have the latest signatures.
Stop the clamav-freshclam Service
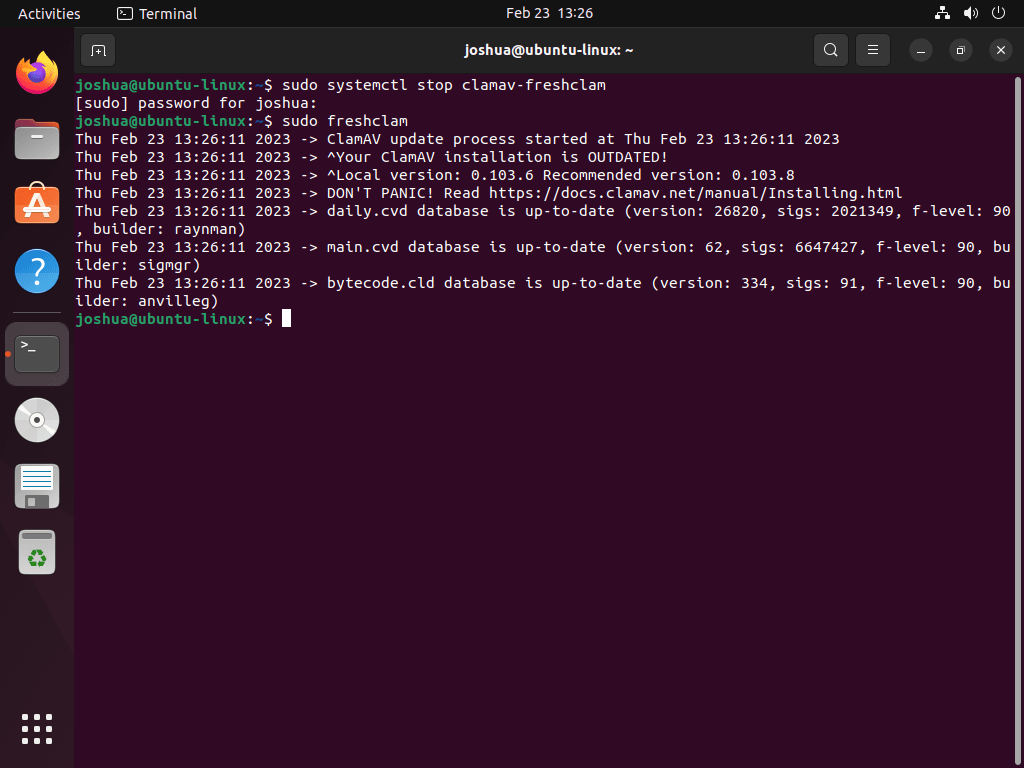
Before manually updating the virus definitions, you need to stop the clamav-freshclam service, which runs in the background. This prevents any conflicts during the update process. Open the terminal and run:
sudo systemctl stop clamav-freshclamThis command halts the automatic updates temporarily, allowing you to proceed with the manual update.

Update Virus Definitions with freshclam
Use the freshclam command to download the latest virus definitions:
sudo freshclamThis command updates the virus definitions in the /var/lib/clamav directory, ensuring your ClamAV scanner is equipped to handle the latest security threats.
Restart and Enable clamav-freshclam
After the database update is complete, restart the clamav-freshclam service and enable it to run automatically on system boot. Use the following command:
sudo systemctl enable clamav-freshclam --nowVerify Updated ClamAV Definitions
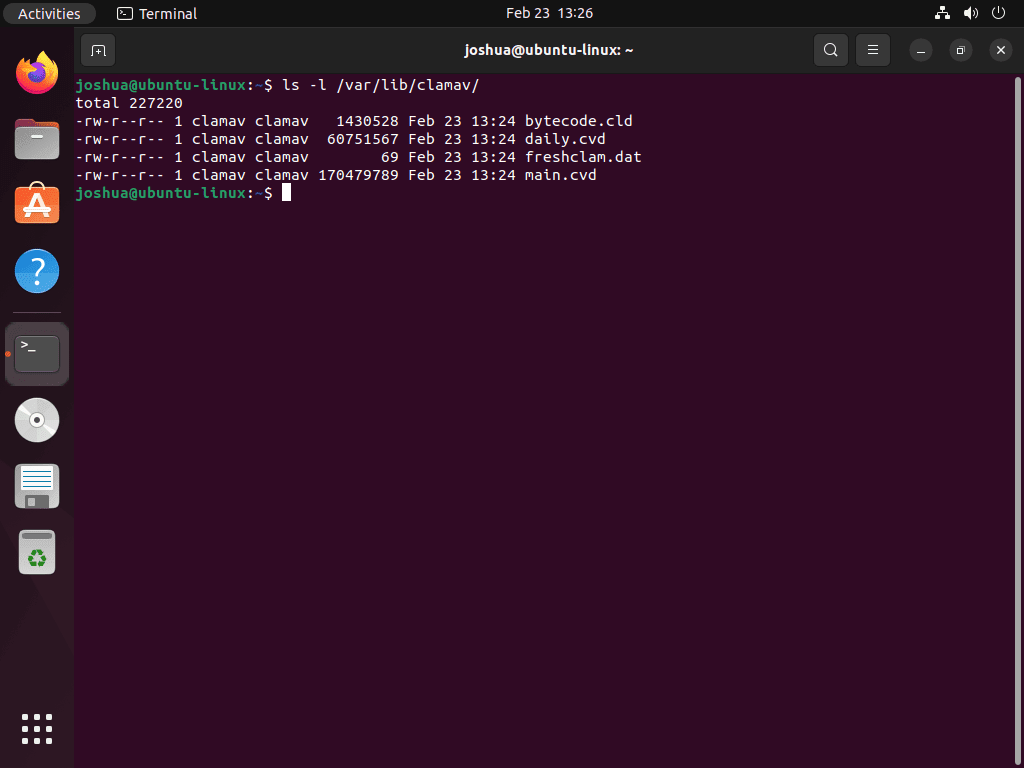
To confirm the updated definitions, you can view the files in the /var/lib/clamav/ directory. Run the following command:
ls -l /var/lib/clamav/This will list the contents of the directory, displaying details like file permissions, ownership, and the last modification dates. Subsequently, verify that the dates correspond to the most recent updates.

Disable Automatic freshclam Updates (Optional)
If you need to disable the automatic updates provided by clamav-freshclam in the future, run the following command:
sudo systemctl disable clamav-freshclam --nowThis stops the service and prevents it from starting automatically on boot. Use this option only if you prefer manual updates or have specific system requirements.
Run ClamAV Virus Scans from the Terminal
ClamAV’s primary purpose is to scan files and directories for viruses and malware. By using ClamAV’s command-line interface, you can efficiently secure your system. Below are some essential ClamAV commands and their use cases.
Scan a Single File for Malware
To scan an individual file, use the following command:
clamscan /path/to/fileThis command checks the specified file for viruses and malware. Replace /path/to/file with the file’s actual path.
Recursively Scan a Directory Tree
To scan an entire directory, including all subdirectories, use the -r option for recursive scanning:
clamscan -r /path/to/directoryThe -r option enables recursive scanning, ensuring that all files within the directory and its subdirectories are checked for threats. Replace /path/to/directory with the actual directory path.
Log ClamAV Scan Results to Files
To document scan results for later review or troubleshooting, ClamAV allows you to output the results into a log file. This is particularly useful for long scans or when managing multiple systems.
Log a Single-File Scan
To save the scan results of a specific file to a log file, use the following command:
clamscan /path/to/file --log=/path/to/logfile- Replace
/path/to/filewith the full path to the file you want to scan. - Replace
/path/to/logfilewith the full path where you want the log file to be saved.
Example:
clamscan /home/user/documents/sample.txt --log=/home/user/logs/clamav.logThis will scan sample.txt and save the results to clamav.log in the /home/user/logs/ directory.
Log a Directory Scan
To save the results of scanning a directory (including subdirectories) to a log file:
clamscan -r /path/to/directory --log=/path/to/logfile- The
-roption enables recursive scanning, ensuring all files in the directory and its subdirectories are scanned. - The
--logoption specifies the log file path.
Example:
clamscan -r /home/user/downloads --log=/home/user/logs/downloads_scan.logThis command will scan the /home/user/downloads directory recursively and save the results to downloads_scan.log.
Review the Contents of a ClamAV Log
Following the scan, you can verify the contents of the log file by opening it with a text editor or using the cat command in the terminal. For example:
cat /home/user/logs/clamav.logThis will display the scan results, including details about scanned files, infected files (if any), and actions taken.
Automatically Remove Infected Files While Scanning
To automatically remove any infected files during a scan, use the --remove option:
clamscan /path/to/file --removeUse this option carefully, as it will permanently delete any files identified as infected.
View All Available ClamAV Command Options
For a comprehensive list of all available commands and options in ClamAV, run the following command in your terminal:
clamscan --helpThis will display a detailed help guide, providing insights into additional options and advanced configurations for ClamAV.
Understand ClamAV Scan Output
After running scans, ClamAV provides detailed output that helps you interpret results and decide on appropriate actions. Understanding these messages prevents confusion and unnecessary alarm over false positives.
Interpret Common ClamAV Scan Messages
ClamAV scan output typically includes four main status indicators:
- FOUND: ClamAV detected malware or a suspicious file matching virus definitions. The output shows the file path and the specific threat signature identified.
- OK: The file passed inspection and contains no known threats. This is the normal result for clean files.
- Empty file: The file contains no data. ClamAV skips empty files during scanning but reports them in the summary.
- Symbolic link: ClamAV reports symbolic links separately and skips them unless you enable following with options like
--follow-dir-symlinksor--follow-file-symlinks.
Decide When to Investigate Scan Results
Not every “FOUND” result requires immediate action. ClamAV occasionally flags legitimate files as threats (false positives), particularly compressed installers, cryptographic tools, or password-protected archives. Before deleting flagged files, verify the threat by checking the signature name against ClamAV’s database or submitting suspicious files to VirusTotal for multi-engine analysis. Preserve quarantined files for 30 days in case you need to restore false positives after investigation.
Read the ClamAV Scan Summary
At the end of each scan, ClamAV displays summary statistics showing total files scanned, infected count, data processed, and scan duration. These metrics help you track scanning efficiency and identify performance bottlenecks on large filesystems. Comparing scan times across sessions reveals whether recent file additions or virus definition updates impact performance.
Limit ClamAV CPU Usage During Scans
Why Lower ClamAV’s CPU Priority
ClamAV scans can be resource-intensive, especially on systems with limited hardware capabilities. Limiting ClamAV’s CPU usage ensures better system performance while running scans alongside other tasks.
Lower ClamAV Priority with the nice Command
The nice command lowers the priority of ClamAV processes, ensuring they consume fewer system resources. By default, processes run with a priority level of zero (normal priority). The following command sets ClamAV to priority 15, which reduces CPU contention:
sudo nice -n 15 clamscan --bell -i -r /home-n 15sets the priority to 15, reducing resource usage.--bellsounds a bell when an infected file is found.-idisplays only infected files in the output.-r /homeperforms a recursive scan of the/homedirectory.
This setup ensures that ClamAV runs with lower priority, freeing up CPU cycles for other tasks.
Schedule Automatic ClamAV Scans with Cron
Plan Automated ClamAV Scans with Cron
Scheduling ClamAV scans ensures consistent security checks without manual effort. Automating the process with cron allows you to define when and how often scans occur, improving system security.
Create a Shell Script That Runs ClamAV
Create a shell script to define the scan task:
nano clamscan.shAdd the following script to scan the /home directory:
#!/bin/bash
clamscan -r /home
Save and exit (Ctrl + X, then Y, then Enter). Make the script executable:
chmod +x clamscan.shSchedule the ClamAV Cron Job
Open the crontab editor to create a schedule for the script:
crontab -eAdd the following line to run the scan daily at 3:00 a.m.:
0 3 * * * /path/to/clamscan.shReplace /path/to/clamscan.sh with the full path to your shell script. Save and exit.
Verify the Cron Schedule
To confirm the cron job is correctly set up, list all active cron jobs with:
crontab -lThis will display the list of cron jobs on your system.
Apply ClamAV Security Best Practices
Effective antivirus protection requires more than just installation. Follow these best practices to maximize ClamAV’s security benefits on your Ubuntu system.
Tune ClamAV Scan Schedules for Ubuntu Servers
Tailor your scan schedule based on system usage and risk level. General-purpose servers or workstations benefit from daily scans during off-peak hours (3:00 a.m. works well). High-traffic servers handling file uploads or email should scan critical directories every 6-12 hours, while development or testing environments with controlled file sources can scan weekly. Use the nice command to prevent scans from impacting system performance.
Handle Infected Files Safely
When ClamAV detects infected files, avoid using the --remove option automatically. Instead, log scan results and review infected files manually to prevent false positives from deleting legitimate files. For confirmed threats, either move infected files to a quarantine directory with --move=/path/to/quarantine or use --remove selectively on high-risk directories. Always maintain backups before enabling automated removal in cron jobs.
sudo clamscan -r /srv/uploads --move=/srv/quarantineThis command recursively scans /srv/uploads and relocates infected files into /srv/quarantine, keeping them isolated until you finish reviewing the results.
Monitor and Rotate ClamAV Logs
Maintain organized scan logs using the --log option with dated filenames like /var/log/clamav/scan-$(date +%Y%m%d).log. Review logs weekly for patterns indicating recurring threats or compromised file sources. Implement log rotation to prevent disk space issues, keeping 30-60 days of scan history. Consider setting up email alerts for detected threats using mail utilities in your cron scripts.
Integrate ClamAV with Other Server Security Tools
For Ubuntu servers exposed to external networks, secure remote access with SSH by implementing key-based authentication, disabling root login, and changing default ports. Combine SSH hardening with Fail2ban monitoring to automatically block repeated authentication failures. This defense-in-depth strategy ensures malware detection through ClamAV complements network-level and authentication-layer protections.
Build a Layered Ubuntu Security Stack with ClamAV
ClamAV works best as part of a layered security approach. Combine antivirus scanning with firewall rules through UFW or Ubuntu’s firewall to block suspicious network traffic. Use chkrootkit for rootkit detection alongside ClamAV’s malware scanning, and deploy Fail2ban to protect SSH and other services from brute-force attacks. For servers handling email, configure ClamAV with mail transfer agents like Postfix to scan attachments automatically. Keep all security tools updated through unattended upgrades to maintain protection against emerging threats. Harden access controls using AppArmor to restrict application capabilities and reduce attack surfaces.
Troubleshoot Common ClamAV Issues
Despite ClamAV’s reliability, users occasionally encounter configuration challenges or operational issues. The following solutions address the most frequently reported problems.
Run a 60-Second ClamAV Health Check
New to Linux? Start with these quick checks. They show whether services run, databases exist, and system resources are adequate.
# Service status
systemctl status clamav-freshclam --no-pager
systemctl status clamav-daemon --no-pager

# Virus database files present?
ls -lh /var/lib/clamav/

# Manual update (verbose)
sudo freshclam -v

# Engine + definitions version
clamscan --version

# Disk + memory sanity
df -h /var/lib/clamav
free -h
Example healthy outputs:
● clamav-freshclam.service - ClamAV virus database updater
	Loaded: loaded (/lib/systemd/system/clamav-freshclam.service; enabled)
	Active: active (running) since Mon 2025-11-10 10:12:45 UTC; 3min ago
...
$ ls -lh /var/lib/clamav/
-rw-r--r-- 1 clamav clamav 251M Nov 10 10:13 daily.cld
-rw-r--r-- 1 clamav clamav 134M Nov 10 10:13 main.cvd
-rw-r--r-- 1 clamav clamav 2.0K Nov 10 10:13 freshclam.dat
$ df -h /var/lib/clamav
Filesystem      Size  Used Avail Use% Mounted on
/dev/sda1       100G   40G   60G  40% /
If a service shows “failed” or disk space is almost full (less than 1-2 GB free), fix that before anything else.
Fix freshclam Database Update Failures
If freshclam fails to update virus definitions, check your internet connectivity and verify that port 443 (HTTPS) is not blocked by your firewall. Temporary ClamAV mirror outages can also cause update failures—wait 10-15 minutes and retry, or manually specify a different mirror in /etc/clamav/freshclam.conf by adding DatabaseMirror db.local.clamav.net. Check disk space in /var/lib/clamav/ as full disks prevent database downloads.
Typical error output when mirrors or connectivity fail:
$ sudo freshclam
ERROR: Download failed (28) ERROR: database.clamav.net:80 is down.
ERROR: Update failed for database: daily
ERROR: Database update process failed: HTTP GET failed (28)
Step-by-step recovery:
Check updater status:
systemctl status clamav-freshclam --no-pagerRestart and enable if inactive:
sudo systemctl enable clamav-freshclam --nowRequest a verbose manual update:
sudo freshclam -vCheck disk space for the database directory:
df -h /var/lib/clamavSuccessful update snippet:
daily.cvd updated (version: 26987, sigs: 2041234)
Database updated (123456 signatures) from database.clamav.net
Force a specific mirror (optional):
echo "DatabaseMirror db.local.clamav.net" | sudo tee -a /etc/clamav/freshclam.conf
sudo systemctl restart clamav-freshclam
Resolve Permission Denied Errors During Scans
When ClamAV reports “Permission denied” for certain files or directories, run scans with sudo to grant root privileges:
sudo clamscan -r /pathAlternatively, add your user account to the clamav group so the scanner can reach protected directories without elevating every command. Log out and back in after running the following command:
sudo usermod -aG clamav $USERHowever, avoid granting broad filesystem access to the clamav user on multi-tenant or untrusted systems.
Example output (no sudo):
$ clamscan -r /etc
/etc/ssl/private: Permission denied
/etc/shadow: Permission denied
...
----------- SCAN SUMMARY -----------
Scanned files: 800
Infected files: 0
Fix: Use sudo to include protected files:
sudo clamscan -r /etcResult: Permission denied lines disappear and the scan covers system configuration files.
Only scan system directories with sudo on trusted machines; avoid scanning untrusted external drives as root.
Reduce ClamAV Memory Usage
On systems with limited RAM, ClamAV scans may consume significant memory, especially when scanning large files or archives. Limit memory usage by adding --max-filesize=100M and --max-scansize=200M to skip files exceeding these thresholds. Additionally, disable archive scanning with --scan-archive=no if your workflow does not require extracting compressed files. For persistent memory issues, use clamscan instead of clamdscan, as the daemon caches definitions in memory while the command-line scanner loads them on demand.
Resource-friendly scan example (adds logging and skips huge files):
sudo clamscan -r /home \
	--max-filesize=100M --max-scansize=200M \
	--scan-archive=no \
	--log=/var/log/clamav/scan-$(date +%F).log
Sample warnings you may see (normal):
WARNING: Skipping file /home/user/Videos/big.iso: Size limit reached
WARNING: Skipping file /home/user/Archives/backup.tar.gz: Archive scanning disabled
If the system starts swapping (very slow), scan fewer directories at a time or reduce limits further (for example, 50M).
Speed Up Scans on Large Filesystems
Scanning millions of files takes considerable time. Improve performance by excluding unnecessary directories with --exclude-dir patterns (e.g., --exclude-dir="^/proc" --exclude-dir="^/sys") to skip system pseudo-filesystems that do not contain executable threats. Schedule scans during off-peak hours and use the nice command to lower CPU priority, preventing interference with production workloads.
Performance-tuned example (low priority + common excludes):
sudo nice -n 15 clamscan -r / \
	--exclude-dir="^/proc" --exclude-dir="^/sys" \
	--exclude-dir="^/run"  --exclude-dir="^/dev" \
	--exclude-dir="^/snap" --exclude-dir="^/var/cache" \
	--log=/var/log/clamav/scan-$(date +%F).log
Example summary after a large scan:
----------- SCAN SUMMARY -----------
Scanned directories: 15234
Scanned files: 987654
Infected files: 0
Data scanned: 12.34 GB
Time: 01:42:17
Recover When the ClamAV Service Fails to Start
If systemctl status clamav-daemon shows startup failures, check /var/log/clamav/clamav.log for specific error messages. Common causes include missing or corrupted virus definitions (re-run sudo freshclam), configuration syntax errors in /etc/clamav/clamd.conf, or insufficient disk space in /var/lib/clamav/. Additionally, verify that the clamav user has read access to definition files with ls -la /var/lib/clamav/.
Diagnose quickly with status + last log lines:
systemctl status clamav-daemon --no-pager -l
sudo tail -n 40 /var/log/clamav/clamav.log
Example failure (missing definitions):
clamd[12345]: ERROR: Can't open file /var/lib/clamav/daily.cld: No such file or directory
systemd[1]: clamav-daemon.service: Main process exited, status=1/FAILURE
Fix sequence:
sudo systemctl stop clamav-daemon
sudo freshclam
sudo systemctl start clamav-daemon
If you edited
clamd.conf, compare it with the packaged default to rule out syntax errors.
Handle False Positive Detections
When ClamAV incorrectly flags legitimate software as malware, verify the file’s authenticity by checking its SHA-256 hash against official sources. If confirmed as a false positive, report it to ClamAV maintainers at https://www.clamav.net/reports/fp with detailed file information. Meanwhile, exclude the file from future scans by adding its path to a whitelist file and using clamscan --exclude-dir=/path/to/legitimate/file in your scanning scripts.
Safe test example (EICAR): create a harmless file ClamAV should detect:
cat > /tmp/eicar.txt <<'EOF'
X5O!P%@AP[4\PZX54(P^)7CC)7}$EICAR-STANDARD-ANTIVIRUS-TEST-FILE!$H+H*
EOF
clamscan /tmp/eicar.txt
Expected detection:
/tmp/eicar.txt: Eicar-Test-Signature FOUND
----------- SCAN SUMMARY -----------
Scanned files: 1
Infected files: 1
Quarantine instead of deletion while reviewing:
sudo mkdir -p /srv/quarantine
sudo clamscan /tmp --move=/srv/quarantine -i
sha256sum /srv/quarantine/eicar.txt
Prefer
--moveover--removein automated scans to avoid losing legitimate files to false positives.
Remove ClamAV from Ubuntu
Disable ClamAV Services Before Removal
Before removing ClamAV, stop and disable its services to avoid interference during uninstallation:
sudo systemctl disable clamav-daemon clamav-freshclam --nowThis ensures ClamAV is no longer running or starting automatically on boot.
Uninstall ClamAV Packages
Remove ClamAV, its daemon, and the FreshClam updater:
sudo apt remove clamav clamav-daemon clamav-freshclamThis command removes the packages but leaves configuration files in /etc/clamav/ and /etc/apparmor.d/ intact. If you want to remove configuration files as well, use --purge instead:
sudo apt remove --purge clamav clamav-daemon clamav-freshclamClear orphaned libraries and systemd units that are no longer needed:
sudo apt autoremoveRemove ClamTK if You Installed It
If you installed the ClamTK graphical interface, remove it separately:
sudo apt remove clamtkRemove Residual Virus Definitions (Optional)
If you want a completely clean system, delete the old signature database after removing the packages. The virus definition files are quite large (several hundred megabytes) and serve no purpose once ClamAV is uninstalled.
This command permanently deletes the
/var/lib/clamavdirectory. If you reinstall ClamAV later, freshclam will download fresh virus definitions automatically. Verify the path before running.
sudo rm -rf /var/lib/clamavConclusion: Keep Ubuntu Secure with ClamAV
ClamAV delivers reliable open-source antivirus protection for Ubuntu systems through straightforward repository installation. The installation process covers automatic virus definition updates via freshclam, command-line scanning with clamscan, optional GUI management through ClamTK, and scheduled scanning automation with cron jobs. Your Ubuntu server now runs effective malware detection that integrates naturally with system administration workflows while maintaining low resource overhead.
Frequently Asked Questions About ClamAV on Ubuntu
Linux desktops rarely suffer from malware targeting end users, but servers handling untrusted files benefit from antivirus scanning. ClamAV is valuable for mail servers, file sharing services, and web servers that process user uploads. It detects Windows malware in shared files, preventing your Linux server from inadvertently spreading infections to Windows clients.
clamscan is a standalone scanner that loads virus definitions into memory each time it runs, making it slower but suitable for occasional scans. clamdscan connects to the clamav-daemon service, which keeps definitions loaded in memory, resulting in much faster scans for repeated or scheduled operations. For production servers scanning many files, use clamdscan with the daemon running.
The ClamAV project releases new virus definitions multiple times per day. By default, the clamav-freshclam service checks for updates every hour. You can adjust this frequency in /etc/clamav/freshclam.conf by modifying the Checks directive, though hourly updates provide a good balance between protection and bandwidth.
ClamAV loads its entire virus signature database into memory for fast pattern matching. The database currently exceeds 300 MB, and the scanning engine adds overhead during operation. On systems with limited RAM, use memory limits with the --max-filesize and --max-scansize flags, scan fewer directories at once, or schedule scans during low-usage periods.
Useful Links for ClamAV Users
Here are some helpful resources to complement this guide and enhance your understanding and use of ClamAV:
- Official ClamAV Website: Explore the official ClamAV site for downloads, news, and updates on the antivirus software.
- ClamAV Documentation: Dive deeper into ClamAV’s features, configuration options, and advanced usage with detailed documentation.
- ClamAV GitHub Repository: Access the source code, report issues, or contribute to the development of ClamAV.
- ClamAV Development Mailing List: Join the developer community to discuss ClamAV’s development and share insights with other contributors.
- ClamAV Virus Database Updates Mailing List: Stay updated on the latest virus definition updates for ClamAV by subscribing to this mailing list.
These resources are directly related to installing, configuring, and maintaining ClamAV, providing additional support and information for both beginners and advanced users.


This article is very much helpful in installing clamav.
Thanks Ahmad.