balenaEtcher simplifies creating bootable USB drives for Linux distributions, writing SD card images for Raspberry Pi projects, and flashing firmware to embedded devices. Unlike command-line tools like dd, Etcher provides automatic verification to catch write failures, visual device selection to prevent accidentally overwriting system drives, and a simple interface that makes disk imaging accessible to newcomers. By the end of this guide, you will have balenaEtcher installed on Fedora with checksum verification, ready to flash images safely with automatic validation.
balenaEtcher is an Electron-based application distributed as pre-built packages (RPM/DEB/ZIP/DMG/EXE) via GitHub releases. For Fedora, installing the upstream RPM and verifying its checksum is a practical approach.
Install balenaEtcher via RPM Download
Installing balenaEtcher on Fedora means downloading the RPM from GitHub releases and installing it locally with DNF. The RPM is large (over 100MB), and on minimal Fedora installations it can pull a lot of dependencies, so give it a few minutes.
Architecture and Disk Space Requirements
This guide uses the x86_64 RPM (Intel/AMD 64-bit): balena-etcher-[version]-1.x86_64.rpm. Upstream lists GNU/Linux support as Intel 64-bit, so on aarch64 (ARM) this exact RPM will not install and you may need to use a different flashing tool for your platform.
Update Fedora System
Before installing balenaEtcher, first update your Fedora system to ensure all existing packages are up-to-date. Run the following command:
sudo dnf upgrade --refreshThis reduces the risk of conflicts during the installation process by ensuring your system has the latest updates.
Install curl and wget Utilities
This guide uses curl to check the latest release metadata and wget to download the RPM. Additionally, on Fedora Workstation these utilities are typically present, but minimal installs may omit them.
sudo dnf install -y curl wgetAfter installing these utilities, proceed to download the balenaEtcher RPM.
Download balenaEtcher RPM
Download the latest balenaEtcher RPM file automatically using the GitHub API. The command below detects the most recent version and downloads it:
VERSION=$(curl -s https://api.github.com/repos/balena-io/etcher/releases/latest | grep -oP '"tag_name": "v\K[0-9.]+') && wget https://github.com/balena-io/etcher/releases/download/v${VERSION}/balena-etcher-${VERSION}-1.x86_64.rpmThe download shows progress as it completes:
--2026-01-03 14:30:00--  https://github.com/balena-io/etcher/releases/download/v2.1.4/balena-etcher-2.1.4-1.x86_64.rpm
Resolving github.com... 140.82.121.4
Connecting to github.com|140.82.121.4|:443... connected.
HTTP request sent, awaiting response... 302 Found
HTTP request sent, awaiting response... 200 OK
Length: 127926272 (122M) [application/octet-stream]
Saving to: 'balena-etcher-2.1.4-1.x86_64.rpm'

balena-etcher-2.1.4-1.x86_64.rpm  100%[==================>] 122.00M  8.50MB/s    in 15s

2026-01-03 14:30:15 (8.50 MB/s) - 'balena-etcher-2.1.4-1.x86_64.rpm' saved [127926272/127926272]
This command queries the GitHub API, extracts the latest version number, and downloads the matching RPM automatically. If you prefer to pin a specific version, replace ${VERSION} with the version number you want (for example, 2.1.4).
If you prefer to download a specific version manually, visit the balenaEtcher GitHub releases page and copy the direct link to the RPM file for your desired version.
Verify the Download (Checksum)
Before installing the RPM, verify its SHA256 checksum using the checksum file published with the release. This confirms the file you downloaded matches what upstream published.
curl -sL -o SHA256SUMS.Linux.x64.txt https://github.com/balena-io/etcher/releases/download/v${VERSION}/SHA256SUMS.Linux.x64.txtgrep "balena-etcher-${VERSION}-1.x86_64.rpm$" SHA256SUMS.Linux.x64.txt | sha256sum -c -balena-etcher-2.1.4-1.x86_64.rpm: OK
Install balenaEtcher via DNF
After downloading the RPM file completes, proceed to install balenaEtcher using DNF. The command below installs the downloaded package:
sudo dnf install ./balena-etcher-*.rpmDNF installs from the local RPM (the ./ prefix), then resolves any dependencies it needs. On Fedora Workstation you likely already have most desktop dependencies installed, but on minimal installs this can pull a large set of packages.
During installation, DNF may display a warning about skipping OpenPGP checks for packages from
@commandline. This is expected when installing a local RPM; use the checksum verification step above as your integrity check.
Verify balenaEtcher Installation
Finally, confirm that balenaEtcher installed successfully by checking the package status:
dnf list installed balena-etcherInstalled packages balena-etcher.x86_64 2.1.4-1 @commandline
The output confirms the installed version and shows that the package came from a local file (@commandline).
If you want to confirm the command you will use to launch Etcher, check where the binary was installed:
command -v balena-etcher/usr/bin/balena-etcher
Launching balenaEtcher
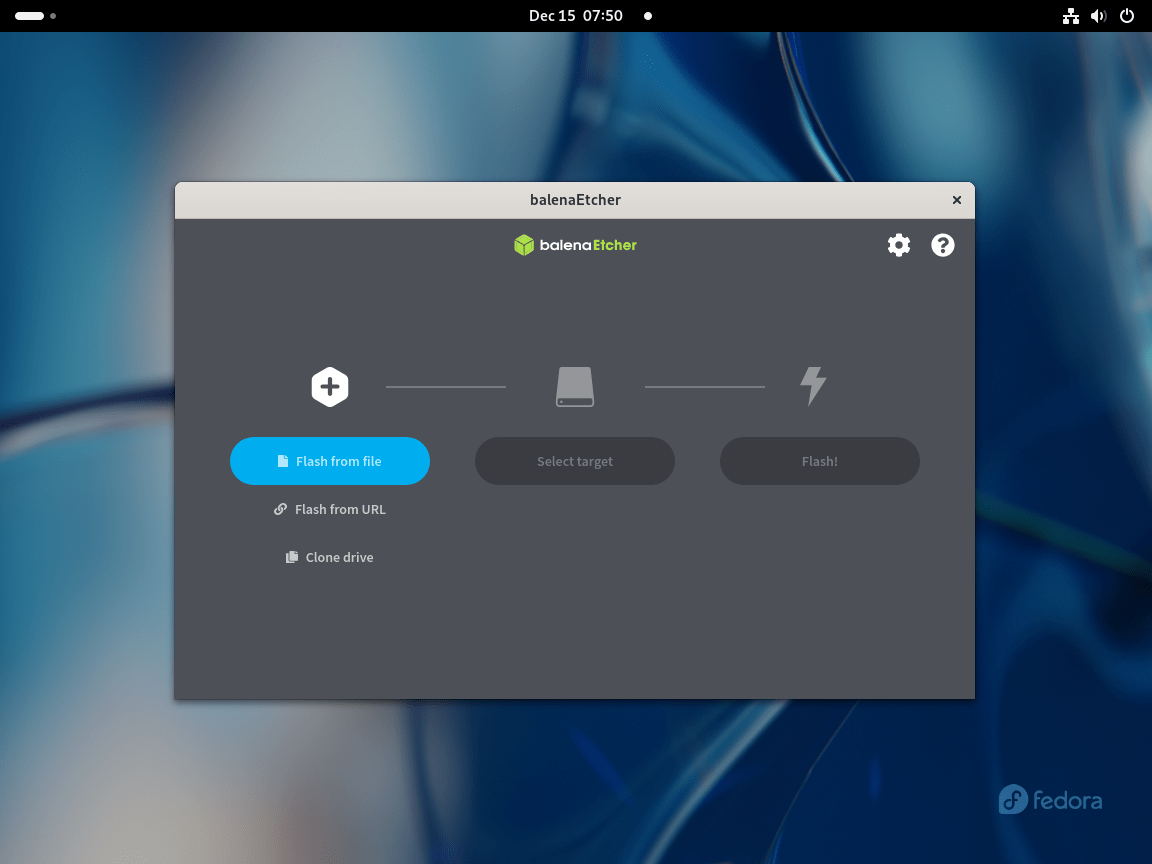
Once balenaEtcher is installed, launch it using either the terminal or the Fedora desktop environment. Both methods open the same graphical interface for flashing images to USB drives.
Launch balenaEtcher from the Terminal
Open a terminal and run the following command to start balenaEtcher:
balena-etcherThe application window opens and guides you through selecting an image, selecting a target drive, and flashing. On Fedora, balena-etcher should be available in your PATH after installation.
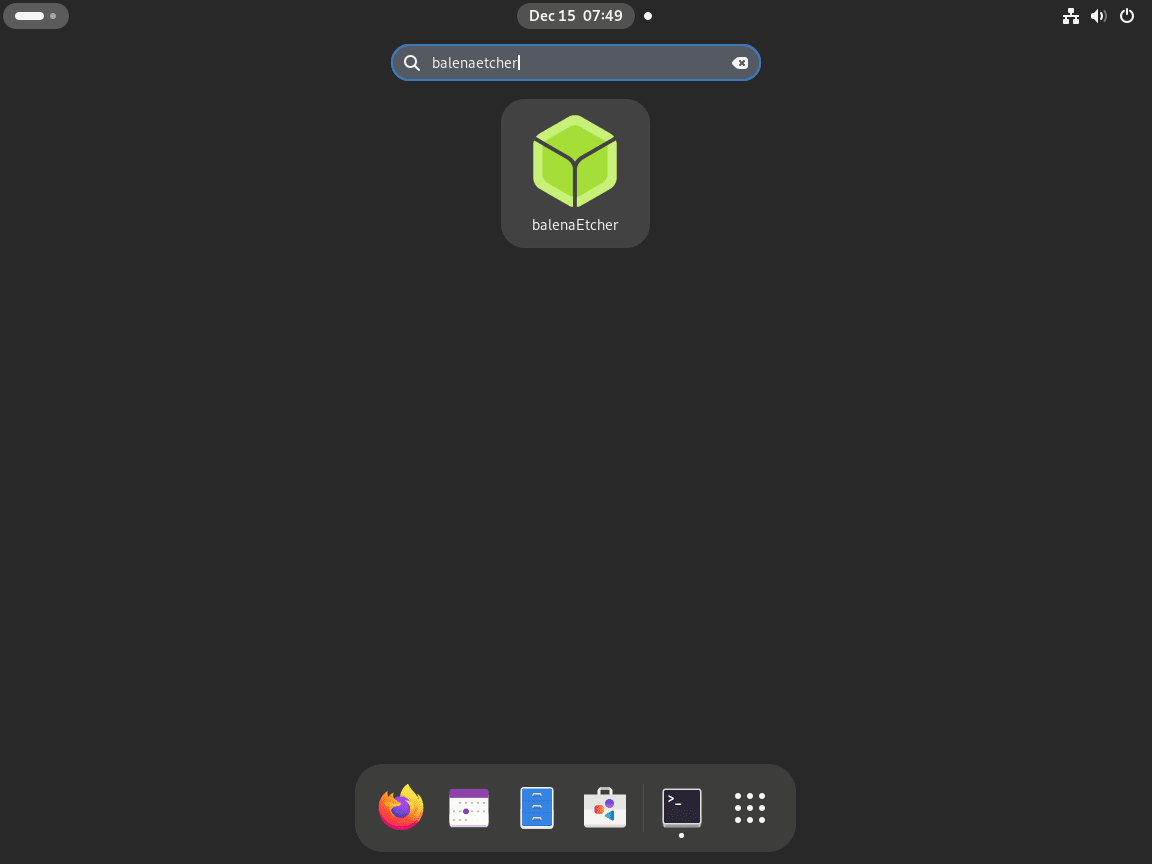
Launch balenaEtcher from Applications Menu
Alternatively, if you prefer using the Fedora desktop environment, follow these steps:
- Click on Activities in the top-left corner of the screen.
- Select Show Applications to display all installed applications.
- Use the search bar or scroll through the application menu to locate balenaEtcher.
- Click on the balenaEtcher icon to launch the application.
Once launched, the application is ready for use, and you can begin flashing image files onto USB drives.

Pre-Flash Safety Checklist
Etcher is designed to be safe and predictable, but a few quick checks can prevent the most common mistakes.
What Etcher protects you from
- Etcher tries to protect you from accidentally writing to your system drives by making target selection explicit.
- After writing, Etcher verifies the target so you can catch common write errors early.
Windows ISOs and persistence caveats
Etcher writes images byte-for-byte. As a result, images that require special processing to become bootable, such as Microsoft Windows ISOs, generally will not work out of the box. If you need a Windows installer USB, use a Windows-specific tool like Rufus or the official Windows Media Creation Tool.
In addition, Etcher does not provide a built-in “persistent storage” option for live USBs. If you need persistence, use a tool that explicitly supports it.

Verify Images and Target Drives Before Flashing
Etcher makes flashing simple, but the two places people get burned are (1) using a corrupted download and (2) selecting the wrong target drive. This quick workflow helps you avoid both.
1) Verify the image you plan to flash
Etcher validates the write to the USB/SD card, but it cannot magically fix a broken ISO/IMG download. Always verify your image checksum using the instructions from the image publisher (for example, Fedora, Ubuntu, Raspberry Pi OS, etc.).
2) Identify your target drive before you click Flash
Before opening Etcher (or before selecting the target), plug in the USB drive and confirm its device name and size in a terminal:
lsblkIn the output, match the removable drive by size (for example, a 16GB USB stick). If you are unsure, stop and re-check; selecting the wrong disk can destroy data.
Troubleshooting Common Issues
If something fails, the quickest way to diagnose Etcher problems is to confirm Fedora can see the drive and then run Etcher from a terminal to capture any error messages.
USB Drive Not Detected
When Etcher doesn’t show your USB drive, first confirm Fedora actually sees it at the block-device level:
lsblkNAME MAJ:MIN RM SIZE RO TYPE MOUNTPOINTS sdb 8:16 1 14.9G 0 disk
Should the drive not appear in lsblk at all, unplug it, try a different USB port/cable, and watch kernel messages while reconnecting the drive:
sudo journalctl -k -fFor drives that appear in lsblk but still don’t show in Etcher, close Etcher and relaunch it. Avoid common advice that adds your user to the disk group; that grants broad raw-disk access and is not a good default on Fedora. Also avoid launching the GUI with sudo on Wayland, as root GUI apps can fail to start; run Etcher as your normal user and let it request privileges when needed.
Application Fails to Launch
When balenaEtcher does not start after clicking it from the applications menu, launch it from the terminal to see error messages:
balena-etcher 2>&1 | head -20On Wayland sessions where Etcher fails to open, make sure XWayland is installed (Electron apps commonly rely on it for compatibility):
sudo dnf install -y xorg-x11-server-XwaylandAny errors you see should be noted first, as they usually point to missing libraries or sandbox/permission issues. Should you need to repair the installation, do not rely on dnf reinstall for Etcher: because you installed from a local RPM, the package is not available from Fedora repositories, so dnf reinstall balena-etcher can fail.
Instead, re-download the RPM (and checksum) and run the local install command again. Installing the newer RPM over the old one is also how you perform upgrades.
“No polkit authentication agent found” error
Etcher uses Polkit to request elevation securely. If you see a message about a missing Polkit authentication agent, it usually means you are running a minimal Fedora installation (such as Fedora Server), a lightweight desktop environment, or a custom window manager without an authentication agent. Install an agent that matches your desktop environment (for example, xfce-polkit for Xfce, polkit-kde for KDE Plasma, mate-polkit for MATE, or lxpolkit for lightweight setups), then log out and back in.
GPG Signature Warning During Installation
When installing the RPM file, DNF displays a warning about skipping OpenPGP checks:
Warning: skipped OpenPGP checks for 1 package from repository: @commandline
This warning appears because you are installing from a local file rather than a configured repository. It’s expected for @commandline installs; treat the upstream SHA256SUMS verification step as your integrity check before installing.
Flashing Process Fails or Hangs
If the flash fails mid-way or verification fails, the most common causes are a bad USB stick, a flaky port/cable, or a corrupted ISO/IMG. Re-verify your image checksum from the publisher, then try a different USB drive and a different port. If you want to see what the kernel thinks is happening during the write, watch the kernel log while reproducing the problem:
sudo journalctl -k -fIn addition, ensure your ISO or IMG file is not corrupted by verifying its checksum against the official source before attempting to flash again.
Writer Process Ended Unexpectedly
Some users encounter an error message stating “The writer process ended unexpectedly” after balenaEtcher completes flashing. This usually appears at the verification stage, not during the actual write. Even when Etcher displays this error, the flash may have completed successfully.
First, verify what was actually written to the device:
sudo fdisk -l /dev/sdXReplace /dev/sdX with your USB device identifier (for example, /dev/sdb). If the output shows an ISO9660 filesystem (common for Linux installer media) or the correct partition layout, the write completed successfully despite the error. To confirm, test the USB by attempting to boot from it.
Windows Corrupts USB After Flashing
If you flash a Linux installer USB on Windows, Windows may prompt you to format the drive the next time you insert it. Decline this prompt—accepting will overwrite the bootable image. If you accidentally allow Windows to format the USB, simply reflash the image.
When you are done flashing, always use “Safely remove”/eject in Windows before unplugging to avoid partial writes or filesystem confusion on removable media.
Updating balenaEtcher
Since balenaEtcher does not provide a Fedora repository, updates require downloading the newest RPM release and installing it locally. This follows the same workflow as the initial installation. However, you can create an update script that automates version checking, downloading, and checksum verification to simplify future updates.
Create the Update Script
First, create a dedicated directory for the update script and downloaded files:
mkdir -p ~/balena-etcher-updates
cd ~/balena-etcher-updates
Create the update script with your preferred text editor:
nano update-balenaetcher.shAdd the following content to the script:
#!/bin/bash
set -e

# balenaEtcher Update Script for Fedora
# This script checks for the latest version and updates balenaEtcher

echo "Checking current balenaEtcher version..."
CURRENT_VERSION=$(dnf list installed balena-etcher 2>/dev/null | grep balena-etcher | awk '{print $2}' | cut -d'-' -f1 || echo "none")
echo "Current installed version: $CURRENT_VERSION"

echo "Fetching latest version from GitHub..."
LATEST_VERSION=$(curl -s https://api.github.com/repos/balena-io/etcher/releases/latest | grep -oP '"tag_name": "v\K[0-9.]+')

if [ -z "$LATEST_VERSION" ]; then
    echo "Error: Could not fetch latest version from GitHub."
    echo "Check your internet connection or try again later."
    exit 1
fi

echo "Latest available version: $LATEST_VERSION"

if [ "$CURRENT_VERSION" = "$LATEST_VERSION" ]; then
    echo "Already up to date."
    exit 0
fi

echo ""
read -p "Update from $CURRENT_VERSION to $LATEST_VERSION? (y/n) " -n 1 -r
echo ""

if [[ ! $REPLY =~ ^[Yy]$ ]]; then
    echo "Update cancelled."
    exit 0
fi

echo "Downloading balenaEtcher $LATEST_VERSION..."
cd ~/balena-etcher-updates
rm -f balena-etcher-*.rpm SHA256SUMS.Linux.x64.txt

wget -q --show-progress "https://github.com/balena-io/etcher/releases/download/v${LATEST_VERSION}/balena-etcher-${LATEST_VERSION}-1.x86_64.rpm"
wget -q -O SHA256SUMS.Linux.x64.txt "https://github.com/balena-io/etcher/releases/download/v${LATEST_VERSION}/SHA256SUMS.Linux.x64.txt"

echo "Verifying checksum..."
if grep "balena-etcher-${LATEST_VERSION}-1.x86_64.rpm" SHA256SUMS.Linux.x64.txt | sha256sum -c - > /dev/null 2>&1; then
    echo "Checksum verification: OK"
else
    echo "Checksum verification failed. Aborting update."
    exit 1
fi

echo "Installing balenaEtcher $LATEST_VERSION..."
sudo dnf install -y ./balena-etcher-${LATEST_VERSION}-1.x86_64.rpm

echo ""
echo "Update complete!"
dnf list installed balena-etcher
Save the file by pressing Ctrl+O, then Enter, then exit with Ctrl+X. Next, make the script executable:
chmod +x ~/balena-etcher-updates/update-balenaetcher.shRun the Update Script
Execute the script whenever you want to check for and install updates:
~/balena-etcher-updates/update-balenaetcher.shThe script shows your current version and the latest available version, then asks for confirmation before downloading and installing. Example output when an update is available:
Checking current balenaEtcher version...
Current installed version: 2.1.3
Fetching latest version from GitHub...
Latest available version: 2.1.4

Update from 2.1.3 to 2.1.4? (y/n) y

Downloading balenaEtcher 2.1.4...
balena-etcher-2.1.4-1.x86_64.rpm  100%[==================>] 122M  8.50MB/s    in 15s
Verifying checksum...
Checksum verification: OK
Installing balenaEtcher 2.1.4...

Update complete!
Installed packages
balena-etcher.x86_64 2.1.4-1 @commandline
When already up to date, the script exits early without downloading anything:
Checking current balenaEtcher version...
Current installed version: 2.1.4
Fetching latest version from GitHub...
Latest available version: 2.1.4
Already up to date.
The script stores downloads in
~/balena-etcher-updates/and automatically cleans up old RPM files before each update. This prevents accumulation of outdated packages.
Remove balenaEtcher Package
If you no longer need balenaEtcher, remove it using DNF:
sudo dnf remove balena-etcherAfter removal, DNF may report orphaned dependencies that were automatically installed with balenaEtcher. Remove them with:
sudo dnf autoremoveVerify that balenaEtcher is completely removed:
dnf list installed balena-etcherNo matching packages to list
Clean Up Downloaded Files
Additionally, remove the downloaded RPM files and update script directory to free up disk space:
rm -rf ~/balena-etcher-updates/If you downloaded files to your Downloads folder instead, remove those as well:
rm -f ~/Downloads/balena-etcher*.rpm ~/Downloads/SHA256SUMS.Linux.x64.txtThis completes the removal process. Both the application and its installation files are now removed from your system.
Useful Links
Explore these resources to expand your Fedora Linux knowledge and troubleshoot system issues:
- balenaEtcher GitHub Repository: Access the source code, report issues, and check for new releases.
- balenaEtcher Releases Page: Download the latest RPM packages and review version changelogs.
- balenaEtcher Community Forums: Ask questions, share experiences, and connect with other users.
- Install Firewalld on Fedora: Configure firewall rules to control network access on your Fedora system.
- Install Docker on Fedora: Set up containerized environments for testing and development.
Conclusion
You now have balenaEtcher installed on Fedora Linux with automatic checksum verification protecting against corrupted downloads. The update script automates version checking and upgrades, while the removal commands ensure complete cleanup when you no longer need the application. Use the checksum verification steps for any ISO or firmware image you plan to flash, not just the balenaEtcher RPM itself.

