
A photo library gets hard to manage once folders, RAW files, duplicates, and metadata start piling up. digiKam gives Linux Mint a full desktop workflow for tagging, searching, and editing that collection in one place. You can install digiKam on Linux Mint from the default repositories, Flathub, or the official upstream AppImage.
Linux Mint 22.x, based on Ubuntu 24.04 (noble), currently ships digiKam 8.2.x, while Linux Mint 21.x, based on Ubuntu 22.04 (jammy), stays on 7.5.x. Flathub and the official AppImage track the newer upstream stable build, so the best method depends on whether you want Mint-managed packages, Flatpak updates, or a portable upstream bundle.
Install digiKam on Linux Mint
Open a terminal from the applications menu or with the shortcut configured on your Mint desktop, then choose one install path and keep the matching update and removal commands with it.
Choose a digiKam Installation Method on Linux Mint
| Method | Source or Channel | Update Behavior | Best For | Trade-offs |
|---|---|---|---|---|
| APT | Linux Mint / Ubuntu repositories | Included with normal APT upgrades | Users who want the distro-packaged build and the least maintenance | Mint 22.x ships 8.2.x, while Mint 21.x ships 7.5.x |
| Flatpak | Flathub stable | Updated with sudo flatpak update | Users who want the newer Flathub build on either supported Mint base | Uses Flatpak runtimes and Flatpak’s separate app data path |
| Official AppImage | digiKam download page | Updated by rerunning the helper in this section | Users who want the official portable x86_64 bundle with a local launcher | Requires host compatibility libraries and manual AppImage lifecycle cleanup |
APT is the safer default when you want Mint-packaged libraries and routine system updates. Flatpak is usually the simplest newer-build path on stock Mint desktops because Flathub is already enabled. Use the AppImage when you specifically want the official upstream portable bundle and are comfortable maintaining a user-local launcher.
Source builds are not a normal stock-Mint install method for this workflow. Current digiKam source builds follow upstream Qt6 and KDE Frameworks requirements, so treat them as a development setup rather than a routine desktop install path.
Update Linux Mint Before Installing digiKam
sudo apt update && sudo apt upgradeThese commands use
sudofor tasks that need elevated privileges. If your account is not configured forsudo, follow the LinuxCapable guide on how to create and add users to sudoers on Linux Mint.
Install digiKam with APT on Linux Mint
APT is the lowest-maintenance option on Linux Mint, and it pulls the KDE and Qt libraries digiKam needs automatically. You do not need to track down a separate kdelibs package first.
sudo apt install digikamVerify the APT digiKam Package
Check the installed package version with dpkg-query.
dpkg-query -W -f='${Package} ${Version}\n' digikamOn Linux Mint 22.x, relevant output includes:
digikam 4:8.2.0-0ubuntu6.2
On Linux Mint 21.x, relevant output includes:
digikam 4:7.5.0-3fakesync1
Install digiKam with Flatpak on Linux Mint
Standard Linux Mint desktop installs already include Flatpak with Flathub enabled at system scope. Confirm that the Flathub remote exists before installing the app.
flatpak remotes --columns=name,optionsflathub system
Install digiKam from Flathub. Review the listed app and runtime changes before confirming the prompt.
sudo flatpak install flathub org.kde.digikamVerify the Flatpak digiKam Package
Confirm the installed Flatpak app ID, branch, and installation scope.
flatpak info org.kde.digikam | sed -n '/^[[:space:]]*ID:/p;/^[[:space:]]*Ref:/p;/^[[:space:]]*Version:/p;/^[[:space:]]*Runtime:/p;/^[[:space:]]*Installation:/p'Relevant output should show the org.kde.digikam app ID, the stable Flathub ref, and Installation: system for the system-scope install.
Install the Official digiKam AppImage on Linux Mint
The official AppImage method uses digiKam’s current x86_64 Qt6 AppImage, verifies the upstream SHA256 file, installs the bundle under ~/Applications/digikam/, creates the stable ~/Applications/digiKam.AppImage launcher path, extracts a 256px icon, and writes a menu entry named digiKam AppImage.
This AppImage path is for x86_64 Linux Mint systems. Use APT or Flatpak if you do not want to maintain a direct upstream download in your home directory.
Install AppImage Runtime Dependencies
Linux Mint 22.x needs the renamed FUSE 2 compatibility package plus the Qt xcb cursor library required by the current Qt6 AppImage.
sudo apt install libfuse2t64 libxcb-cursor0 curlLinux Mint 21.x uses the older FUSE 2 package name, but the same Qt xcb cursor package is still required.
sudo apt install libfuse2 libxcb-cursor0 curlCreate the digiKam AppImage Update Helper
Create a helper named update-digikam-appimage. The helper resolves the newest stable digiKam folder from KDE’s download server, downloads the matching Qt6 x86_64 AppImage and SHA256 file, verifies the checksum, refreshes the stable launcher symlink, extracts the icon, and rewrites the user-local desktop entry. The guard refuses to replace an unrelated file at the same helper path.
helper_path="/usr/local/bin/update-digikam-appimage"
helper_marker="linuxcapable-managed-digikam-appimage-helper"
replace_helper=1
if [ -e "${helper_path}" ] || [ -L "${helper_path}" ]; then
  if ! grep -q "${helper_marker}" "${helper_path}" 2>/dev/null; then
    echo "Refusing to replace ${helper_path} because it is not managed by this workflow." >&2
    replace_helper=0
  fi
fi

if [ "${replace_helper}" -eq 1 ]; then
  sudo tee "${helper_path}" > /dev/null <<'EOF'
#!/usr/bin/env bash
# linuxcapable-managed-digikam-appimage-helper
set -euo pipefail

base_url="https://download.kde.org/stable/digikam"
app_dir="${HOME}/Applications/digikam"
launcher="${HOME}/Applications/digiKam.AppImage"
desktop_dir="${HOME}/.local/share/applications"
icon_dir="${HOME}/.local/share/icons/hicolor/256x256/apps"
desktop_file="${desktop_dir}/digikam-appimage.desktop"
icon_file="${icon_dir}/digikam-appimage.png"

version="$(curl -fsSL "${base_url}/" | grep -Eo 'href="[0-9]+(\.[0-9]+){2}/"' | sed -E 's/href="([^/]+)\/"/\1/' | sort -V | tail -n 1)"
if [ -z "${version}" ]; then
  echo "Could not resolve the latest stable digiKam AppImage version." >&2
  exit 1
fi

file_name="digiKam-${version}-Qt6-x86-64.appimage"
file_url="${base_url}/${version}/${file_name}"
sha_url="${file_url}.sha256"

mkdir -p "${app_dir}" "$(dirname "${launcher}")" "${desktop_dir}" "${icon_dir}"
cd "${app_dir}"

curl -fsSL -o "${file_name}.sha256" "${sha_url}"
if [ -f "${file_name}" ] && sha256sum -c "${file_name}.sha256" > /dev/null 2>&1; then
  chmod +x "${file_name}"
  echo "digiKam AppImage ${version} is already current."
else
  curl -fsSL -o "${file_name}" "${file_url}"
  sha256sum -c "${file_name}.sha256"
  chmod +x "${file_name}"
  echo "Installed digiKam AppImage ${version}."
fi

if [ -e "${launcher}" ] && [ ! -L "${launcher}" ]; then
  echo "${launcher} exists and is not a symlink; move it before rerunning this helper." >&2
  exit 1
fi
ln -sfn "${app_dir}/${file_name}" "${launcher}"

tmp_dir="$(mktemp -d)"
trap 'rm -rf "${tmp_dir}"' EXIT
(
  cd "${tmp_dir}"
  "${app_dir}/${file_name}" --appimage-extract usr/share/icons/hicolor/256x256/apps/digikam.png > /dev/null
)
install -m 0644 "${tmp_dir}/squashfs-root/usr/share/icons/hicolor/256x256/apps/digikam.png" "${icon_file}"

cat > "${desktop_file}" <<DESKTOP
[Desktop Entry]
Type=Application
Name=digiKam AppImage
Comment=Photo management with digiKam
Exec=${launcher}
Icon=digikam-appimage
Terminal=false
Categories=Graphics;Photography;Qt;
StartupNotify=true
DESKTOP
chmod +x "${desktop_file}"
update-desktop-database "${desktop_dir}" > /dev/null 2>&1 || true
gtk-update-icon-cache -q "${HOME}/.local/share/icons/hicolor" > /dev/null 2>&1 || true

launcher_display="~${launcher#"${HOME}"}"
desktop_display="~${desktop_file#"${HOME}"}"
icon_display="~${icon_file#"${HOME}"}"
echo "Launcher: ${launcher_display}"
echo "Desktop entry: ${desktop_display}"
echo "Icon: ${icon_display}"
EOF
  sudo chmod +x "${helper_path}"
else
  false
fi
Confirm that the helper is available on your shell path.
command -v update-digikam-appimage/usr/local/bin/update-digikam-appimage
Run the helper once to install the current AppImage and create the launcher files.
update-digikam-appimageExample output from the current stable AppImage includes the checksum result, installed version, launcher path, desktop entry, and icon path.
digiKam-9.0.0-Qt6-x86-64.appimage: OK
Installed digiKam AppImage 9.0.0.
Launcher: ~/Applications/digiKam.AppImage
Desktop entry: ~/.local/share/applications/digikam-appimage.desktop
Icon: ~/.local/share/icons/hicolor/256x256/apps/digikam-appimage.png
Verify the AppImage Launcher and Icon
Confirm that the stable launcher symlink, desktop entry, and extracted icon exist.
readlink -f "$HOME/Applications/digiKam.AppImage" | sed "s|^$HOME|~|"
grep -E '^(Name|Exec|Icon|Categories)=' "$HOME/.local/share/applications/digikam-appimage.desktop" | sed "s|$HOME|~|"
file "$HOME/.local/share/icons/hicolor/256x256/apps/digikam-appimage.png" | sed "s|^$HOME|~|"
Relevant output includes:
~/Applications/digikam/digiKam-9.0.0-Qt6-x86-64.appimage
Name=digiKam AppImage
Exec=~/Applications/digiKam.AppImage
Icon=digikam-appimage
Categories=Graphics;Photography;Qt;
~/.local/share/icons/hicolor/256x256/apps/digikam-appimage.png: PNG image data, 256 x 256, 8-bit/color RGBA, non-interlaced
Launch digiKam on Linux Mint
All three methods need an active graphical desktop session. APT and Flatpak add the normal digiKam launcher, while the AppImage helper adds a separate digiKam AppImage menu entry.
Open digiKam from the Linux Mint Menu
Search for digiKam in the Mint menu. On Cinnamon, MATE, and Xfce editions, the APT and Flatpak launcher appears in the Graphics category. If you used the helper, search for digiKam AppImage instead.
Start digiKam from a Terminal on Linux Mint
Use the launch command that matches the install method.
digikamflatpak run org.kde.digikam"$HOME/Applications/digiKam.AppImage"Complete the digiKam First-Run Setup on Linux Mint
The first launch opens a short wizard for your library, database, and optional machine-learning components. The same first-run flow applies to APT, Flatpak, and AppImage installs.
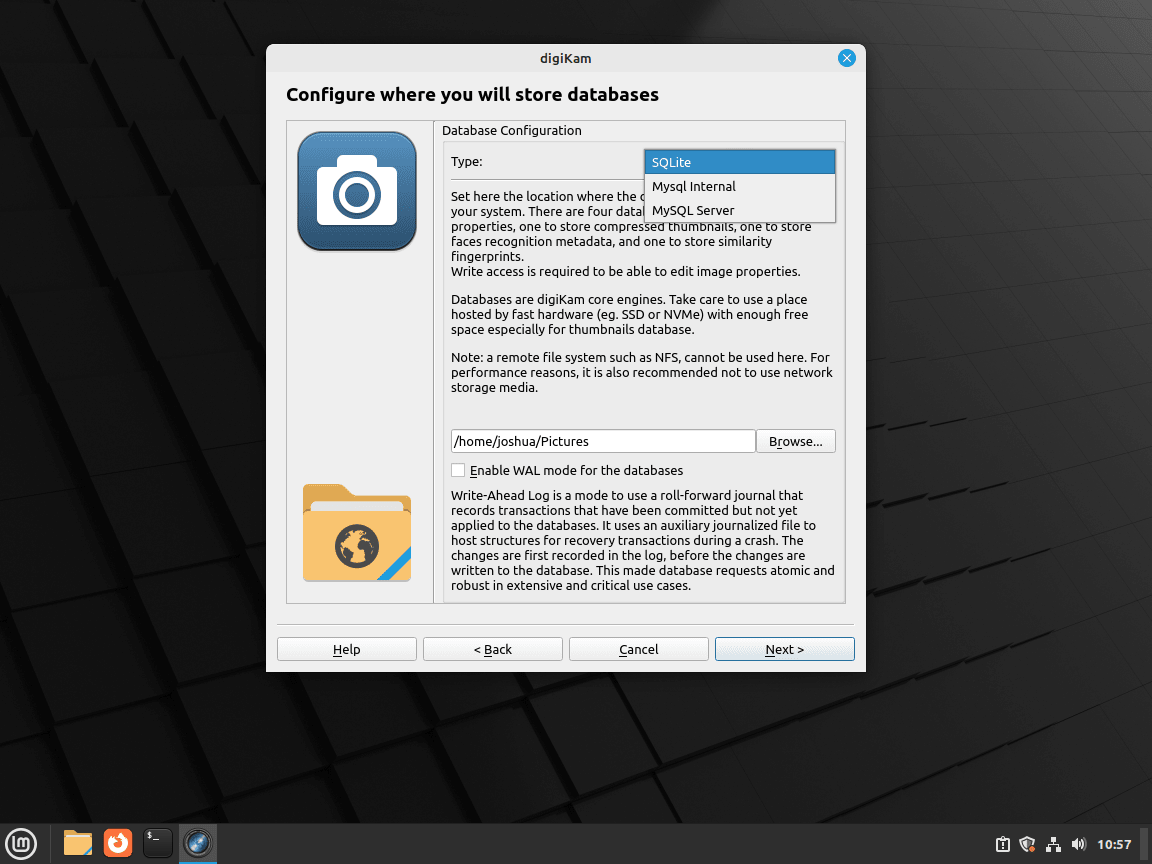
Choose the digiKam Collection and Database Location on Linux Mint
Point digiKam at the folder that holds your photos, then pick where the database should live. The default path works well for most local libraries, and you can add more collection folders later.
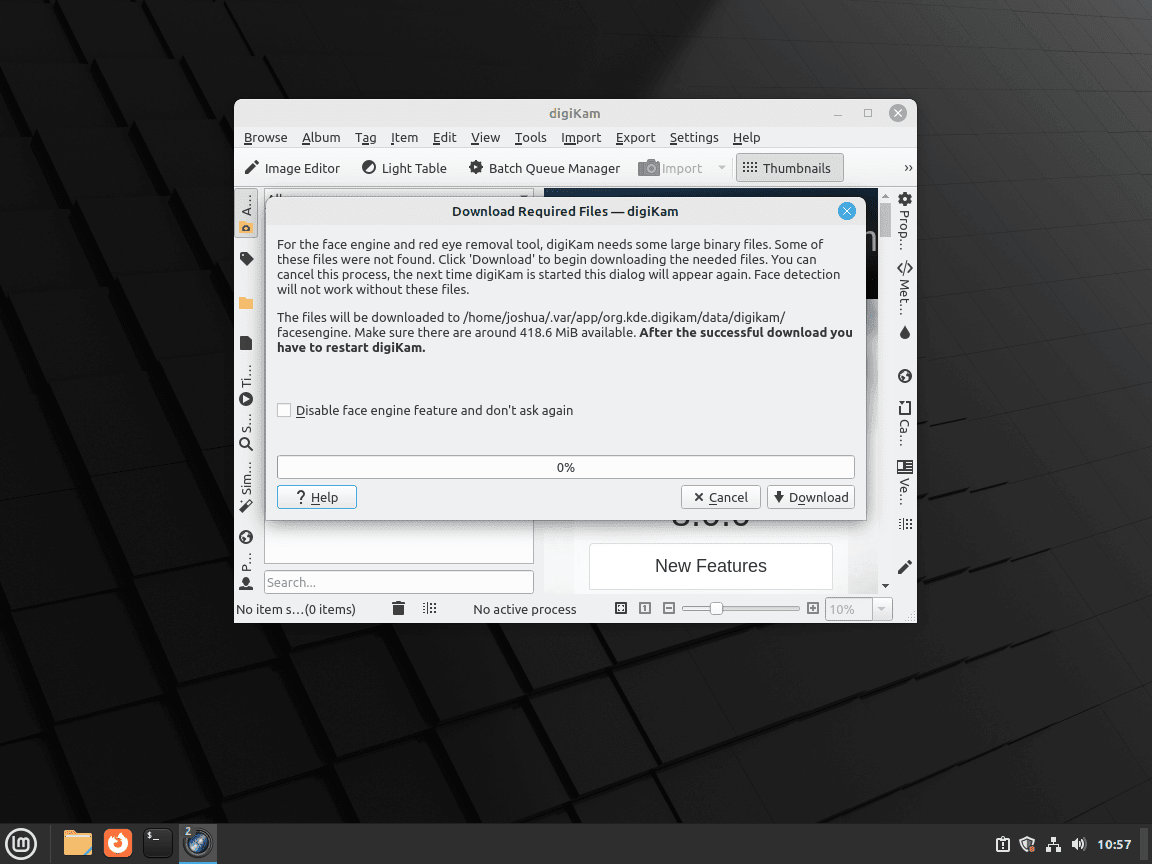
Download Optional digiKam Components on Linux Mint
digiKam can download optional models and helper files for features such as face detection. If you do not want them yet, skip this step and add them later from the application settings.
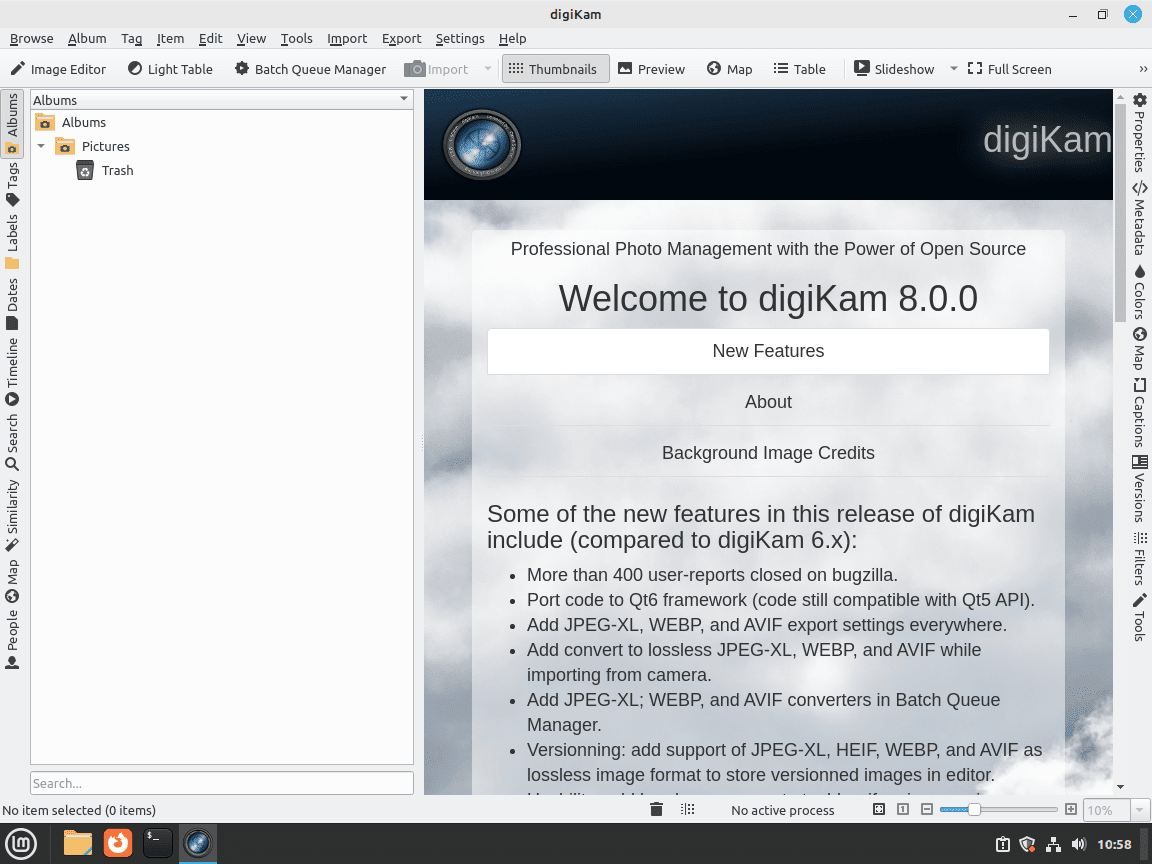
Finish in the digiKam Main Window on Linux Mint
Once the first scan finishes, digiKam opens into the main library view so you can sort albums, tags, ratings, and searches from one catalog.
Update or Remove digiKam on Linux Mint
The maintenance commands depend on the install path you chose. Do not mix package-manager removal with AppImage cleanup unless you installed more than one method deliberately.
Update the APT digiKam Package on Linux Mint
Refresh package metadata, then upgrade digiKam only if a newer Mint-packaged build is available.
sudo apt update && sudo apt install --only-upgrade digikamUpdate the Flatpak digiKam Package on Linux Mint
Update the Flathub package and its required runtimes through Flatpak.
sudo flatpak update org.kde.digikamFor broader Flatpak maintenance, including runtime cleanup and remote checks, see the LinuxCapable guide on how to upgrade Flatpak on Linux Mint.
Update the AppImage digiKam Package on Linux Mint
Rerun the helper to check KDE’s stable digiKam directory, verify the checksum, and refresh the launcher files.
update-digikam-appimageIf your installed AppImage already matches the current checksum, the helper keeps the existing file and refreshes the launcher and icon paths.
digiKam AppImage 9.0.0 is already current.
Launcher: ~/Applications/digiKam.AppImage
Desktop entry: ~/.local/share/applications/digikam-appimage.desktop
Icon: ~/.local/share/icons/hicolor/256x256/apps/digikam-appimage.png
Remove the APT digiKam Package on Linux Mint
Remove the distro package first. If APT later offers orphaned dependencies for autoremove, review that list before confirming it.
sudo apt remove digikamConfirm that the package is no longer installed.
if dpkg-query -W -f='${db:Status-Abbrev}\n' digikam 2>/dev/null | grep -q '^ii '; then
  echo "INSTALLED"
else
  echo "NOT_INSTALLED"
fi
NOT_INSTALLED
Remove the Flatpak digiKam Package on Linux Mint
Remove the system-scope Flatpak package. Leave --delete-data for the separate data cleanup step unless you already backed up the catalog state.
sudo flatpak uninstall org.kde.digikamConfirm that the app ID is no longer installed.
flatpak list --app --columns=application | grep -Fx org.kde.digikam || echo NOT_INSTALLEDNOT_INSTALLED
Remove the AppImage digiKam Package on Linux Mint
Review the files created by the AppImage helper before removing them.
ls -1 /usr/local/bin/update-digikam-appimage \
  "$HOME/Applications/digiKam.AppImage" \
  "$HOME"/Applications/digikam/digiKam-*-Qt6-x86-64.appimage* \
  "$HOME/.local/share/applications/digikam-appimage.desktop" \
  "$HOME/.local/share/icons/hicolor/256x256/apps/digikam-appimage.png" 2>/dev/null
Remove only the article-managed AppImage helper, launcher, downloaded AppImage files, desktop entry, and extracted icon.
helper_path="/usr/local/bin/update-digikam-appimage"
helper_marker="linuxcapable-managed-digikam-appimage-helper"
if [ -e "${helper_path}" ] || [ -L "${helper_path}" ]; then
  if grep -q "${helper_marker}" "${helper_path}" 2>/dev/null; then
    sudo rm -f "${helper_path}"
  else
    echo "Skipped ${helper_path} because it is not managed by this workflow."
  fi
fi

rm -f "$HOME/Applications/digiKam.AppImage"
rm -f "$HOME"/Applications/digikam/digiKam-*-Qt6-x86-64.appimage
rm -f "$HOME"/Applications/digikam/digiKam-*-Qt6-x86-64.appimage.sha256
rm -f "$HOME/.local/share/applications/digikam-appimage.desktop"
rm -f "$HOME/.local/share/icons/hicolor/256x256/apps/digikam-appimage.png"
rmdir "$HOME/Applications/digikam" 2>/dev/null || true
update-desktop-database "$HOME/.local/share/applications" >/dev/null 2>&1 || true
gtk-update-icon-cache -q "$HOME/.local/share/icons/hicolor" >/dev/null 2>&1 || true
Confirm that the article-managed helper and stable launcher path are gone.
if [ -e /usr/local/bin/update-digikam-appimage ] || [ -e "$HOME/Applications/digiKam.AppImage" ]; then
  echo "APPIMAGE_FILES_STILL_PRESENT"
else
  echo "APPIMAGE_REMOVED"
fi
APPIMAGE_REMOVED
Check for Remaining digiKam Data on Linux Mint
Package removal does not necessarily remove per-user databases, thumbnails, settings, or Flatpak sandbox data. Check those paths before deleting anything.
find "$HOME/.config" "$HOME/.cache" "$HOME/.local/share" "$HOME/.var/app" -maxdepth 1 \
  \( -name 'digikam*' -o -name 'org.kde.digikam' \) -print 2>/dev/null
These paths can contain your digiKam database, tags, ratings, thumbnails, and local settings. Back up the catalog or export metadata before deleting them.
rm -rf "$HOME/.config/digikamrc" "$HOME/.config/digikam"
rm -rf "$HOME/.cache/digikam" "$HOME/.local/share/digikam"
rm -rf "$HOME/.var/app/org.kde.digikam"
These removals do not delete your original photo files unless you deliberately stored your photo library inside one of the deleted digiKam data paths.
Troubleshoot digiKam on Linux Mint
Fix AppImage FUSE or Qt xcb Errors on Linux Mint
If the AppImage fails before the digiKam window opens, first reinstall the AppImage compatibility packages for your Mint series. Missing FUSE prevents the AppImage from mounting, while missing libxcb-cursor0 can stop the Qt xcb platform plugin.
sudo apt install libfuse2t64 libxcb-cursor0 curlUse the older FUSE package name on Linux Mint 21.x.
sudo apt install libfuse2 libxcb-cursor0 curlRetest the AppImage from the stable launcher path.
"$HOME/Applications/digiKam.AppImage"Fix Missing digiKam AppImage Menu Entry
If the AppImage opens from the terminal but the Mint menu does not show digiKam AppImage, verify the desktop entry and refresh the user menu database.
grep -E '^(Name|Exec|Icon)=' "$HOME/.local/share/applications/digikam-appimage.desktop"
update-desktop-database "$HOME/.local/share/applications" >/dev/null 2>&1 || true
gtk-update-icon-cache -q "$HOME/.local/share/icons/hicolor" >/dev/null 2>&1 || true
If the entry still does not appear, sign out and sign back in so Cinnamon, MATE, or Xfce reloads the user-local application database.
Fix digikam Command Not Found
The plain digikam command belongs to the APT package. Flatpak and AppImage installs use different launch commands.
bash: digikam: command not found
flatpak run org.kde.digikam"$HOME/Applications/digiKam.AppImage"If you intended to use the APT package, reinstall it and verify the command path.
sudo apt install digikam
command -v digikam
Conclusion
digiKam is available on Linux Mint through APT, Flathub, or the official AppImage, with each path tied to its own update and cleanup model. For a fuller KDE desktop around the app, install KDE Plasma on Linux Mint. For drawing, annotations, and layered artwork beside your photo workflow, install Krita on Linux Mint.

Formatting tips for your comment
You can use basic HTML to format your comment. Useful tags currently allowed in published comments:
<code>command</code>command<strong>bold</strong><em>italic</em><a href="https://example.com">link</a><blockquote>quote</blockquote>