
Heavy IDEs are not always the right fit when you only need a fast editor that can open a project, highlight code, and run build commands without taking over the desktop. To install Geany on Ubuntu, use the Ubuntu APT package for the lowest-maintenance setup, the Flathub package for the same Geany version on every supported release, or a source build when you specifically need a local compile from the official Geany release tarball.
Ubuntu 26.04 (Resolute), Ubuntu 24.04 (Noble), and Ubuntu 22.04 (Jammy) can use the same three install paths. Ubuntu packages Geany through the Universe repository, while Flathub and upstream source releases provide version-consistent alternatives. If you searched for a Geany download for Ubuntu, you usually do not need a manual .deb file; managed APT and Flatpak installs are easier to update and remove.
Install Geany on Ubuntu
Choose one Geany installation method before you start. APT integrates with Ubuntu updates, Flatpak provides Geany 2.1.0 across supported Ubuntu releases, and source builds are best reserved for users who are comfortable compiling and maintaining software under /usr/local.
| Method | Current Ubuntu result | Best fit |
|---|---|---|
| APT package | Geany 2.1 on Ubuntu 26.04, 2.0 on Ubuntu 24.04, and 1.38 on Ubuntu 22.04 | Most users who want Ubuntu-managed updates |
| Flatpak from Flathub | Geany 2.1.0 on Ubuntu 26.04, 24.04, and 22.04 from an unverified Flathub listing | Users who accept Flathub packaging for the same app version across releases |
| Source build | Geany 2.1.0 from the official upstream release tarball | Advanced users who need a local compile or custom build options |
Pick one install method unless you deliberately want multiple copies. APT and source builds both provide a
geanycommand, and the one that opens depends on yourPATH. Flatpak uses the separateflatpak run org.geany.Geanylauncher.
Install Geany with APT
The APT method installs Geany from Ubuntu’s Universe repository. Standard Ubuntu desktop installations usually have Universe enabled; minimal systems may need the repository activated first.
Repository note: If APT cannot locate the package, enable Universe with the steps in our Ubuntu Universe and Multiverse guide, then rerun the update command below.
Update Ubuntu Packages
Refresh the package index before installing Geany:
sudo apt updateSudo note: These commands use
sudobecause package installation changes system files. If your account is not allowed to use sudo, follow our guide on adding a user to sudoers on Ubuntu first.
Apply available upgrades if you want the system fully current before adding the editor:
sudo apt upgrade -yInstall Geany from the Terminal
Install Geany on Ubuntu from the terminal with the following APT command:
sudo apt install geany -yConfirm the installed command and version:
command -v geany
geany --version
Expected APT package results by Ubuntu release:
| Ubuntu release | APT package revision | Expected command path and version |
|---|---|---|
| Ubuntu 26.04 | 2.1-2 | /usr/bin/geany, Geany 2.1 |
| Ubuntu 24.04 | 2.0-1build2 | /usr/bin/geany, Geany 2.0 |
| Ubuntu 22.04 | 1.38-1 | /usr/bin/geany, Geany 1.38 |
Install Geany Plugins from APT
Ubuntu also packages common Geany plugins. Search the available plugin names if you want to install only specific extensions:
apt-cache search '^geany-plugin-'For example, the following command installs Git change markers, a project tree browser, and spell checking:
sudo apt install geany-plugin-git-changebar geany-plugin-treebrowser geany-plugin-spellcheck -yAfter installation, open Tools > Plugin Manager inside Geany and enable the plugins you want to use.
Install Geany with Flatpak
The Flatpak method installs Geany from Flathub. This is useful on Ubuntu 24.04 and 22.04 when you want Geany 2.1.0 without compiling it yourself, but treat it as a Flathub packaging path rather than a stronger official or sandboxing claim.
Flathub trust note: The current Flathub page lists Geany as unverified and medium risk. It can still be useful for version consistency, but readers who prefer Ubuntu-maintained packages should use APT instead.
Flatpak prerequisite: If Flatpak is not configured yet, our Flatpak on Ubuntu guide explains the desktop integration details. The commands below add the system-wide Flathub remote.
Install Flatpak and Add Flathub
sudo apt install flatpak -y
sudo flatpak remote-add --if-not-exists flathub https://dl.flathub.org/repo/flathub.flatpakrepo
Verify that the Flathub remote is available before installing the app:
flatpak remotes --columns=name,options | grep -E '^flathub[[:space:]]'flathub system
Install the Geany Flatpak
Install Geany from Flathub:
sudo flatpak install flathub org.geany.Geany -yConfirm the Flatpak package details:
flatpak info org.geany.Geany | grep -E '^[[:space:]]*(ID|Ref|Arch|Branch|Version|Origin|Installation|Runtime):' ID: org.geany.Geany
Ref: app/org.geany.Geany/x86_64/stable
Arch: x86_64
Branch: stable
Version: 2.1.0
Origin: flathub
Installation: system
Runtime: org.freedesktop.Sdk/x86_64/25.08
You can also review the app listing on the Geany page on Flathub.
Build Geany from Source
Use the source method only when you specifically need the current upstream release outside Ubuntu’s package cadence. The commands below download the latest GitHub release metadata, fetch the official source tarball, and install Geany under /usr/local.
Install Build Dependencies
Install the compiler toolchain, GTK development headers, VTE terminal support, and release-download tools:
sudo apt update
sudo apt install build-essential libgtk-3-dev libvte-2.91-dev intltool autoconf automake libtool gettext g++ curl jq ca-certificates -y
The libvte-2.91-dev package enables Geany’s embedded terminal support during the build.
Download the Latest Source Tarball
Create a working directory and read the current Geany release from GitHub:
mkdir -p ~/geany-source
cd ~/geany-source
GEANY_TAG=$(curl -fsSL https://api.github.com/repos/geany/geany/releases/latest | jq -r '.tag_name')
if [ -z "$GEANY_TAG" ] || [ "$GEANY_TAG" = "null" ]; then
  printf 'Could not detect the latest Geany release.\n'
  exit 1
fi
GEANY_VERSION=${GEANY_TAG#v}
GEANY_TARBALL_VERSION=${GEANY_VERSION%.0}
printf 'Latest Geany release: %s\n' "$GEANY_VERSION"
The command prints the current upstream release tag, such as 2.1.0.
Download the matching source archive:
curl -fsLO "https://github.com/geany/geany/releases/download/${GEANY_VERSION}/geany-${GEANY_TARBALL_VERSION}.tar.gz"
ls -lh "geany-${GEANY_TARBALL_VERSION}.tar.gz"
The listing should show a tarball named for the release returned by the previous command, such as geany-2.1.tar.gz.
The Geany project also publishes release archives on download.geany.org if you prefer to inspect upstream downloads directly.
Configure and Compile Geany
Extract the tarball and run the build configuration:
tar -xzf "geany-${GEANY_TARBALL_VERSION}.tar.gz"
cd "geany-${GEANY_TARBALL_VERSION}"
./configure --prefix=/usr/local
Relevant configuration output should confirm plugin and terminal support:
Build with plugin support          : yes
Use virtual terminal support (VTE) : yes
Configuration is done OK.
Compile and install the build:
make -j"$(nproc)"
sudo make install
Verify that the source build is the command your shell will run. The version line should begin with the release you built:
command -v geany
/usr/local/bin/geany --version
/usr/local/bin/geany geany 2.1
Create a Source Update Command
Source builds do not update through APT or Flatpak. Create a small helper command so future updates use the same official release workflow:
sudo tee /usr/local/bin/update-geany >/dev/null <<'EOF'
#!/usr/bin/env bash
set -euo pipefail

if [ "$(id -u)" -ne 0 ]; then
  printf 'Run this helper with sudo: sudo update-geany\n'
  exit 1
fi

for tool in curl jq make gcc g++; do
  if ! command -v "$tool" >/dev/null 2>&1; then
    printf 'Missing required build tool: %s\n' "$tool"
    exit 1
  fi
done

WORKDIR=/usr/local/src/geany-build
mkdir -p "$WORKDIR"
cd "$WORKDIR"

GEANY_TAG=$(curl -fsSL https://api.github.com/repos/geany/geany/releases/latest | jq -r '.tag_name')
if [ -z "$GEANY_TAG" ] || [ "$GEANY_TAG" = "null" ]; then
  printf 'Could not detect the latest Geany release.\n'
  exit 1
fi
GEANY_VERSION=${GEANY_TAG#v}
GEANY_TARBALL_VERSION=${GEANY_VERSION%.0}

CURRENT_VERSION=""
if [ -x /usr/local/bin/geany ]; then
  CURRENT_VERSION=$(/usr/local/bin/geany --version | awk 'NR==1 {print $2}')
fi

if [ "$CURRENT_VERSION" = "$GEANY_TARBALL_VERSION" ]; then
  printf 'Geany %s is already installed at /usr/local/bin/geany\n' "$CURRENT_VERSION"
  exit 0
fi

rm -rf "geany-${GEANY_TARBALL_VERSION}" "geany-${GEANY_TARBALL_VERSION}.tar.gz"
curl -fsLO "https://github.com/geany/geany/releases/download/${GEANY_VERSION}/geany-${GEANY_TARBALL_VERSION}.tar.gz"
tar -xzf "geany-${GEANY_TARBALL_VERSION}.tar.gz"
cd "geany-${GEANY_TARBALL_VERSION}"

./configure --prefix=/usr/local
make -j"$(nproc)"
make install
/usr/local/bin/geany --version
EOF

sudo chmod 0755 /usr/local/bin/update-geany
Confirm that the helper is available from the system path:
command -v update-geany/usr/local/bin/update-geany
Run the updater when you want to rebuild against the latest upstream release:
sudo update-geanyLaunch Geany on Ubuntu
How you launch Geany depends on the installation method. Use the APT or source command when Geany is installed on the system path:
geanyUse the Flatpak launcher when you installed the Flathub package:
flatpak run org.geany.GeanyFor desktop launching, open the applications menu, type geany in the search field, and select Geany when the launcher appears:
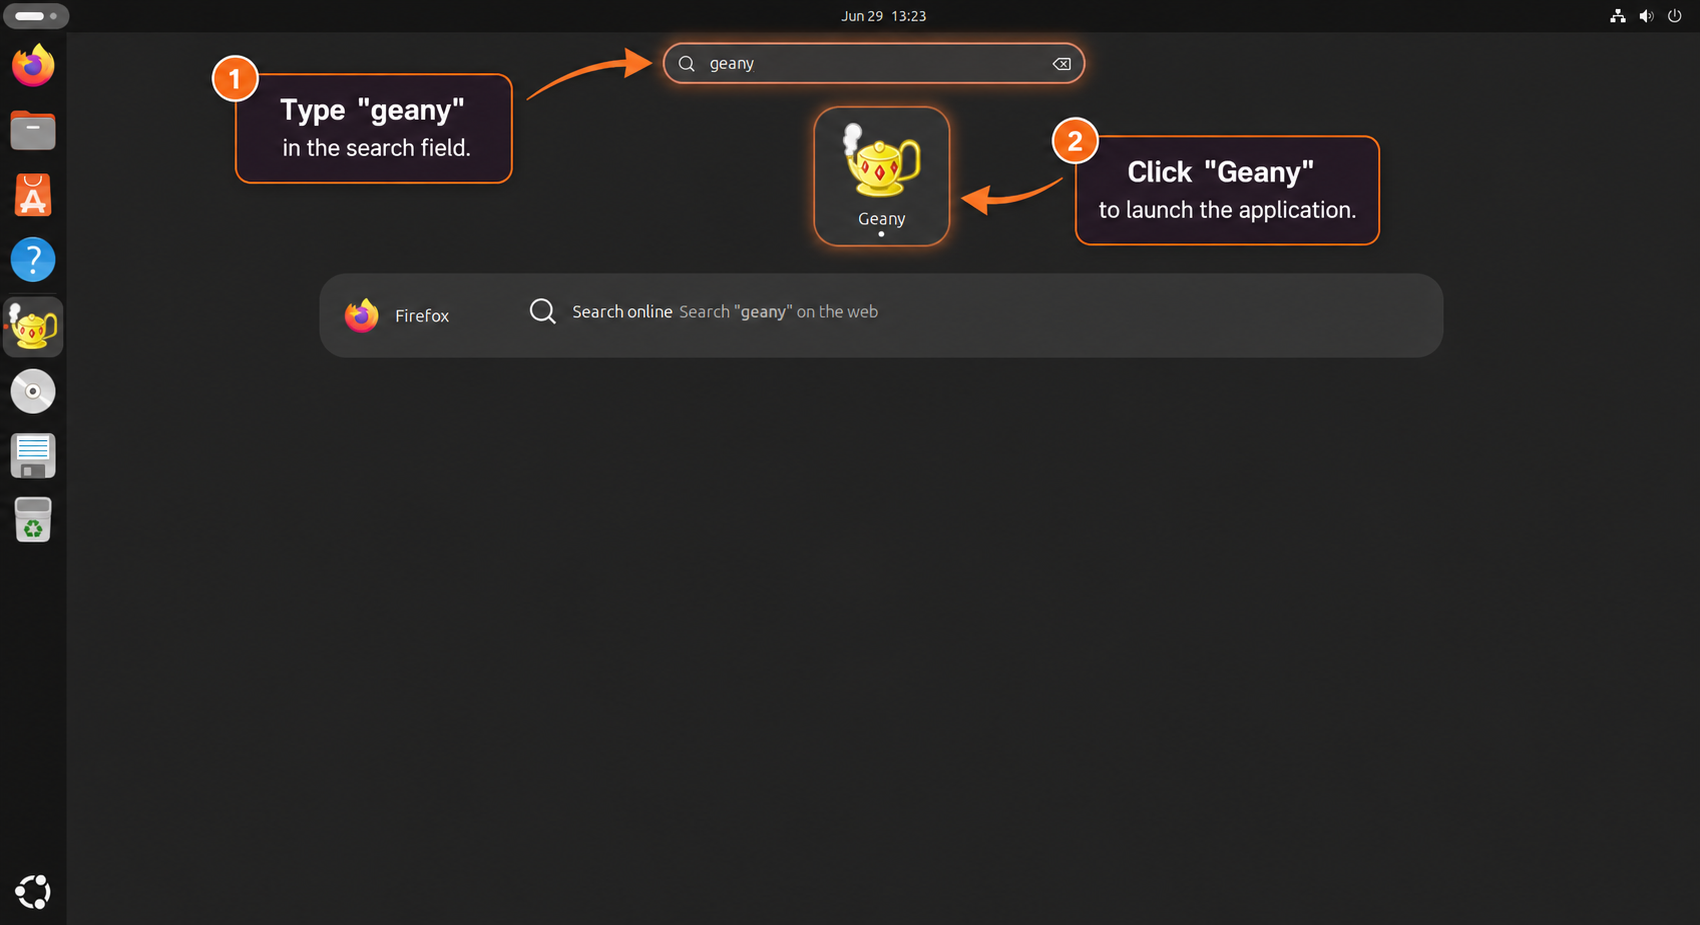
After launch, Geany opens to a normal coding workspace. The overview below highlights the symbols panel for quick navigation, the open file tab, the main editor pane, and the status output area:
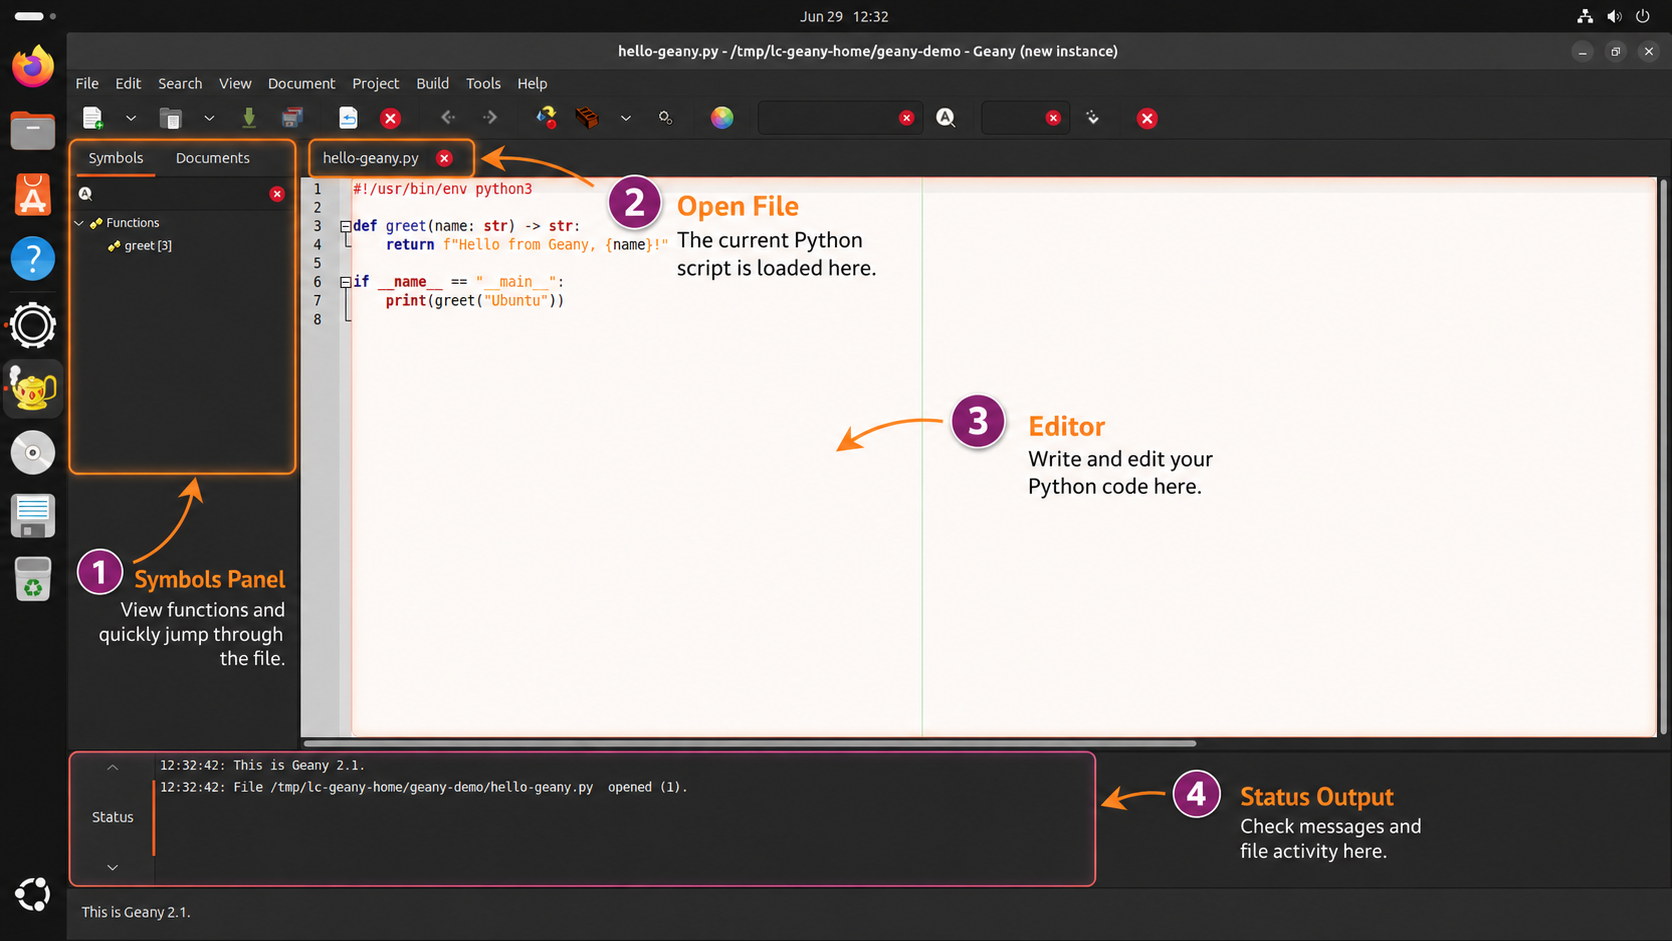
Use Edit > Preferences later if you want to adjust interface behavior, editor indentation, terminal integration, or plugin settings.
Update or Remove Geany
Use the update and removal commands that match the method you installed. Mixing commands from different methods can leave another copy of Geany behind.
Update an APT Install
sudo apt update
sudo apt install --only-upgrade geany geany-common -y
Update a Flatpak Install
sudo flatpak update org.geany.Geany -yUpdate a Source Build
sudo update-geanyRemove an APT Install
sudo apt remove geany geany-common geany-plugin-git-changebar geany-plugin-treebrowser geany-plugin-spellcheck -yAdd any other geany-plugin-* packages you installed to the same removal command. If APT reports orphaned dependencies afterward, review the dry run before removing anything else:
sudo apt autoremove --dry-runRun a real autoremove only after confirming the list does not include packages you still need for other desktop software.
Remove a Flatpak Install
sudo flatpak uninstall org.geany.Geany -yConfirm the Flatpak app is gone from the system installation:
flatpak list --system --app --columns=application | grep -Fx org.geany.Geany || echo "Geany Flatpak removed"Geany Flatpak removed
The uninstall command leaves your per-user Geany Flatpak settings under ~/.var/app/org.geany.Geany. Remove that directory only when you want to discard the Flatpak app data for the current account:
rm -rf "$HOME/.var/app/org.geany.Geany"Unused Flatpak runtimes can be cleaned separately after you review the prompt:
sudo flatpak uninstall --unusedRemove a Source Build
Keep the extracted source directory if you installed from source, because make uninstall uses it to remove the files installed under /usr/local. For the current Geany 2.1 source release, run:
if [ -d /usr/local/src/geany-build/geany-2.1 ]; then
  cd /usr/local/src/geany-build/geany-2.1
else
  cd ~/geany-source/geany-2.1
fi
sudo make uninstall
sudo rm -f /usr/local/bin/update-geany
sudo rm -rf /usr/local/src/geany-build
If you built a newer release later, replace geany-2.1 with the matching source directory name.
Troubleshooting Geany on Ubuntu
Geany Opens the Wrong Install
If you installed more than one method, check which command your shell finds first:
command -v geanyAn APT install normally returns /usr/bin/geany, while a source install under /usr/local normally returns /usr/local/bin/geany. Flatpak does not replace either command; launch it with flatpak run org.geany.Geany.
Configure Cannot Find GTK or VTE
If the source configure step reports missing GTK or VTE support, reinstall the build dependencies and rerun ./configure --prefix=/usr/local from the extracted source directory:
sudo apt install build-essential libgtk-3-dev libvte-2.91-dev intltool autoconf automake libtool gettext g++ curl jq ca-certificates -yFlatpak Geany Does Not Appear in the Menu
If the Flatpak app installs but does not appear in your desktop menu immediately, start it once from the terminal or sign out and back in so the desktop refreshes application launchers:
flatpak run org.geany.GeanyFlatpak Prints Setup Messages on First Launch
The Geany Flatpak can print wrapper setup lines for development-tool helpers such as NPM, Cargo, Python, or Ruby on first launch. Those messages are not a failed install when the Geany window opens afterward.
Conclusion
Geany works well on Ubuntu whether you prefer Ubuntu’s APT package, the Flathub build, or a source-compiled install under /usr/local. APT is the simplest long-term choice, Flatpak keeps Geany 2.1.0 consistent across older LTS releases when you accept Flathub packaging, and source builds make sense only when you are ready to maintain the build yourself. If you are comparing editors, Kate, Neovim, and Sublime Text are useful next checks.

Formatting tips for your comment
You can use basic HTML to format your comment. Useful tags currently allowed in published comments:
<code>command</code>command<strong>bold</strong><em>italic</em><a href="https://example.com">link</a><blockquote>quote</blockquote>