Installing MariaDB on Debian is straightforward and brings a powerful, flexible, and efficient database management system to your environment. This guide will walk you through the installation process, ensuring you have access to the latest stable builds of MariaDB.
Below is a quick overview of the features and benefits of utilizing MariaDB:
- High Performance: MariaDB offers superior speed and efficiency for database operations.
- Scalability: Easily handle large datasets and high traffic loads.
- Security: Advanced security features, including encryption and access controls.
- Compatibility: Seamless compatibility with MySQL makes switching or integrating easy.
- Flexibility: Supports various storage engines and plugins for diverse applications.
- Community Support: Extensive documentation and a strong community for support.
MariaDB’s cross-platform capabilities ensure a smooth experience, allowing you to leverage its powerful features on any system. Let’s dive into the technical steps of installing MariaDB on your Debian system.
Prerequisites for Installing MariaDB
To successfully install MariaDB on Debian, ensure you meet the following requirements:
System Requirements and Supported Debian Versions
| Component | Minimum Requirement |
|---|---|
| Processor | 2 GHz or faster dual-core processor |
| RAM | 4 GB or more |
| Disk Space | 25 GB of free space |
| Network | High-speed internet connection |
| Supported Versions | Debian 12 (Bookworm), Debian 11 (Bullseye), Debian 10 (Buster) |
Additional Requirements
| Requirement | Description |
|---|---|
| Internet Connection | Necessary for downloading MariaDB and applying updates. |
| Terminal Conventions | All terminal commands should be executed as a regular user with sudo privileges. |
| CLI Commands | Utilize the Command Line Interface (CLI) for installation and setup. |
| Database Management Tools | Recommended to use tools like phpMyAdmin for better database management. |
Method 1: Install MariaDB via Default Repository
Update the Package Index
First, in your terminal, update the package index to ensure you have the latest information on available packages:
sudo apt updateInstall MariaDB Server
Install the MariaDB server package from the default repository:
sudo apt install mariadb-serverThis command installs the default MariaDB version on your Debian Linux distribution version. To upgrade to the latest MariaDB that meets your requirements, check out method 2 below.
Method 2: Install MariaDB via PPA
Import MariaDB.org APT Repository
Install Initial Required Packages For MariaDB Installation
The initial step is to install the necessary dependencies. Execute the command below in your terminal.
sudo apt install dirmngr ca-certificates software-properties-common apt-transport-https curl -yProceeding with Adding MariaDB APT Repository
This section covers importing the Long-term Support (LTS) branches recommended for production use. A short-term release is an option for those who prefer using the latest versions of MariaDB on a Content Management System (CMS) like WordPress and don’t mind upgrading their versions every 6-12 months.
Before installing, import the GPG key to verify the MariaDB packages using the command below.
curl -fsSL http://mirror.mariadb.org/PublicKey_v2 | sudo gpg --dearmor | sudo tee /usr/share/keyrings/mariadb.gpg > /dev/nullAfter importing the GPG key, the next step is to import the repository. The commands will work with Debian 11 and Debian 10 distribution releases.
10.5 (Long-term release) EOL
End-of-life: 24 Jun 2025
echo "deb [signed-by=/usr/share/keyrings/mariadb.gpg] http://mirror.mariadb.org/repo/10.5/debian/ $(lsb_release -cs) main" | sudo tee /etc/apt/sources.list.d/mariadb.list10.6 (Long-term release)
End-of-life: 06 Jul 2026
echo "deb [signed-by=/usr/share/keyrings/mariadb.gpg] http://mirror.mariadb.org/repo/10.6/debian/ $(lsb_release -cs) main" | sudo tee /etc/apt/sources.list.d/mariadb.list10.11 (Long-Term release)
End-of-life: 16 Feb 2028
echo "deb [signed-by=/usr/share/keyrings/mariadb.gpg] http://mirror.mariadb.org/repo/10.11/debian/ $(lsb_release -cs) main" | sudo tee /etc/apt/sources.list.d/mariadb.list11.1 (Short-term Release)
End-of-life: 21 Aug 2024
echo "deb [arch=amd64,arm64,ppc64el signed-by=/usr/share/keyrings/mariadb.gpg] http://mirror.mariadb.org/repo/11.1/debian/ $(lsb_release -cs) main" | sudo tee /etc/apt/sources.list.d/mariadb.list11.2 (Short-term Release)
End-of-life: 21 Nov 2024
echo "deb [arch=amd64,arm64,ppc64el signed-by=/usr/share/keyrings/mariadb.gpg] http://mirror.mariadb.org/repo/11.2/debian/ $(lsb_release -cs) main" | sudo tee /etc/apt/sources.list.d/mariadb.listMariaDB 11.3 (Short-term release)
End-of-life date: February 2025.
echo "deb [arch=amd64,arm64,ppc64el signed-by=/usr/share/keyrings/mariadb.gpg] http://mirror.mariadb.org/repo/11.2/ubuntu/ $(lsb_release -cs) main" | sudo tee /etc/apt/sources.list.d/mariadb.listMariaDB 11.4 (Long-term release)
End-of-life date: February 2030.
echo "deb [arch=amd64,arm64,ppc64el signed-by=/usr/share/keyrings/mariadb.gpg] http://mirror.mariadb.org/repo/11.4/ubuntu/ $(lsb_release -cs) main" | sudo tee /etc/apt/sources.list.d/mariadb.listThe dates for the end of support for the versions are added. Always use an LTS version for production unless you are prepared to handle the updates of changing to a newer release.
Refresh APT Index
After importing the repository, update your APT repository using the command provided.
sudo apt updateFinalize the MariaDB Installation
Proceed to Install MariaDB on Debian After MariaDB.org Setup
Install the MariaDB client and server packages with an adequately configured repository and GPG key. Use the following command to install MariaDB:
sudo apt install mariadb-server mariadb-clientConfirm MariaDB Installation
Confirm the installation of MariaDB by checking the version and build.
mariadb --versionExample output with MariaDB 10.10 installed:
mariadb Ver x.x Distrib x.x.x-MariaDB, for debian-linux-gnu (x86_64) using EditLine wrapperEnable MariaDB Service and Status Check
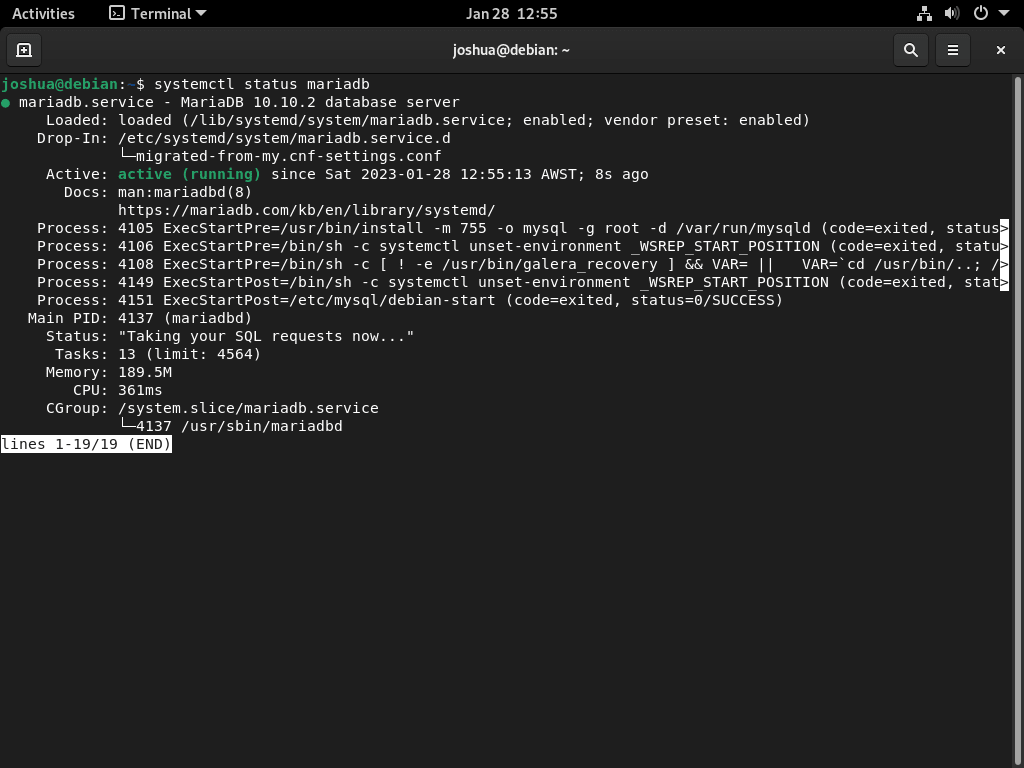
Verify MariaDB Service Status
After installing MariaDB, you can check the status of the database software using the following systemctl command:
systemctl status mariadb
If, by chance, you haven’t started the service, use the following command to enable it both immediately and upon system reboot:
sudo systemctl enable mariadb --nowMariaDB Systemd Service Commands
Below are the most common systemd service commands you need to note when working with MariaDB on your Debian system.
Start MariaDB:
sudo systemctl start mariadbStop MariaDB:
sudo systemctl stop mariadbEnable MariaDB on system startup:
sudo systemctl enable mariadbDisable MariaDB on system startup:
sudo systemctl disable mariadbRestart the MariaDB service:
sudo systemctl restart mariadbPost-Installation: Securing MariaDB
After installing a fresh version of MariaDB, it’s vital to understand that the out-of-the-box settings might not offer robust security. Thus, seasoned database administrators often suggest tightening these settings to prevent vulnerabilities.
Running the Security Script
MariaDB provides a handy script called mysql_secure_installation to help administrators secure their installations. Executing this script is not just a best practice; it’s a proactive step in fortifying your database against potential threats.
Execute the following command to run the script:
sudo mysql_secure_installationor
sudo mariadb-secure-installationConfiguring MariaDB for Enhanced Security
Upon initiating the mysql_secure_installation script, you’ll be guided through several steps to enhance the database’s security:
- Setting a Root Password: Choosing a strong and unique password for the root user is imperative to ensure that only authorized personnel can make critical changes.
- Restricting Remote Access: Denying direct root logins from external sources is good for added security. This minimizes the risk of unauthorized access attempts from remote locations.
- Removing Anonymous Users: MariaDB, by default, has anonymous user accounts that anyone can use to log in. Eliminating these accounts adds an extra layer of security, ensuring that only known and designated users can access the system.
- Deleting the Test Database: MariaDB has a test database that is accessible to everyone. While it might be helpful for initial tests, removing it in a production environment is safer to avoid any potential misuse.
Example of what you may similarly do inside your own terminal:
NOTE: RUNNING ALL PARTS OF THIS SCRIPT IS RECOMMENDED FOR ALL MariaDB
      SERVERS IN PRODUCTION USE!  PLEASE READ EACH STEP CAREFULLY!

In order to log into MariaDB to secure it, we'll need the current
password for the root user. If you've just installed MariaDB, and
haven't set the root password yet, you should just press enter here.

Enter current password for root (enter for none):
OK, successfully used password, moving on...

Setting the root password or using the unix_socket ensures that nobody
can log into the MariaDB root user without the proper authorisation.

You already have your root account protected, so you can safely answer 'n'.

Switch to unix_socket authentication [Y/n] Y <---- Type Y then press the ENTER KEY.
Enabled successfully!
Reloading privilege tables..
 ... Success!


You already have your root account protected, so you can safely answer 'n'.

Change the root password? [Y/n] Y <---- Type Y then press the ENTER KEY.
New password:
Re-enter new password:
Password updated successfully!
Reloading privilege tables..
 ... Success!


By default, a MariaDB installation has an anonymous user, allowing anyone
to log into MariaDB without having to have a user account created for
them.  This is intended only for testing, and to make the installation
go a bit smoother.  You should remove them before moving into a
production environment.

Remove anonymous users? [Y/n] Y <---- Type Y then press the ENTER KEY.
 ... Success!

Normally, root should only be allowed to connect from 'localhost'.  This
ensures that someone cannot guess at the root password from the network.

Disallow root login remotely? [Y/n] Y <---- Type Y then press the ENTER KEY.
 ... Success!

By default, MariaDB comes with a database named 'test' that anyone can
access.  This is also intended only for testing, and should be removed
before moving into a production environment.

Remove test database and access to it? [Y/n] Y <---- Type Y then press the ENTER KEY.
 - Dropping test database...
 ... Success!
 - Removing privileges on test database...
 ... Success!

Reloading the privilege tables will ensure that all changes made so far
will take effect immediately.

Reload privilege tables now? [Y/n] Y <---- Type Y then press the ENTER KEY.
 ... Success!

Cleaning up...

All done!  If you've completed all of the above steps, your MariaDB
installation should now be secure.

Thanks for using MariaDB!Additional Commands For MariaDB
Running the MariaDB Database Tables Upgrade Tool
If you’ve transitioned from an older version of MariaDB, like moving from 10.5 to 10.10, it’s prudent to ensure the smooth functionality of your database tables. MariaDB offers a specialized tool, mariadb-upgrade, tailored to scrutinize and rectify any discrepancies that might arise due to the version transition.
Initiate the process or review the current status of your database tables by keying in:
sudo mariadb-upgradeFor instance, if you encounter output like:
This installation of MariaDB is already upgraded to 10.10.2-MariaDB.
There is no need to run mysql_upgrade again for 10.10.2-MariaDB.
You can use --force if you still want to run mysql_upgrade
It indicates that the upgrade tool has already done its job for the mentioned version. But running this tool is still wise even if you haven’t recently executed an upgrade. It meticulously lists and updates tables to ensure they remain compatible with the current MariaDB installation.
Uninstalling MariaDB
Under certain circumstances, you might wish to uninstall MariaDB from your Debian system. If that’s your choice, it’s essential to do so cleanly to prevent lingering files or configurations.
Start by removing the core MariaDB components:
sudo apt auto mariadb-server mariadb-clientThen, to purge all references to MariaDB, delete the associated repository and GPG key.
sudo rm /etc/apt/sources.list.d/mariadb.list /usr/share/keyrings/mariadb.gpgConclusion
In wrapping up, this article offered a detailed, step-by-step guide on enhancing your Debian system with the latest MariaDB stable builds. We explored two methods: using the Debian default repository or the official mariadb.org repository for the latest supported versions. By importing the mariadb.org repository, you can install customized MariaDB builds in the 10.x or 11.x release series.
Additionally, we covered essential service commands that will help you effectively manage your MariaDB service. The guide also provided the necessary steps to upgrade your database smoothly after installing a newer version of MariaDB. For those needing to revert or make changes, we discussed removing MariaDB and its imported apt repository. With this knowledge, you can confidently manage, upgrade, and optimize your MariaDB installations on Debian.
Useful Links
Here are some valuable links related to using MariaDB:
- MariaDB GitHub Repository: Access the MariaDB GitHub repository to view the source code, report issues, and contribute to the development.
- MariaDB Knowledge Base: Explore the knowledge base for detailed articles, tutorials, and user guides on MariaDB.
- MariaDB Documentation: Access comprehensive documentation for detailed guides on installing, configuring, and using MariaDB.
- MariaDB Official Website: Visit the official MariaDB website for information about the database system, its features, and download options.
- MariaDB Product Page: Learn about the various products and services offered by MariaDB, including the community server and enterprise solutions.


Formatting tips for your comment
You can use basic HTML to format your comment. Useful tags currently allowed:
<code>command</code>command<strong>bold</strong><em>italic</em><a href="URL">link</a><blockquote>quote</blockquote>