Managing MariaDB or MySQL from a shell is fine until you need to inspect grants, import a dump, or compare table structures quickly. You can install phpMyAdmin with Nginx on Debian 13, 12, and 11 by pairing the upstream phpMyAdmin tarball with Debian’s Nginx, MariaDB, and PHP-FPM packages, then signing in with a regular database account instead of exposing socket-authenticated root over the web.
The upstream phpMyAdmin release keeps the file layout and manual upgrade path consistent across Debian releases. If you would rather build the stack one component at a time, see install LEMP on Debian, install Nginx on Debian, install MariaDB on Debian, and install PHP on Debian.
Install phpMyAdmin with Nginx on Debian
Start by installing the web stack packages, downloading the current phpMyAdmin release, and creating the small override file that phpMyAdmin needs for cookie authentication.
Debian’s default APT sources already include phpMyAdmin, but they currently package
5.2.2on Debian 13,5.2.1on Debian 12, and5.0.4on Debian 11. The upstream tarball keeps the Nginx layout predictable and makes it easier to move to newer upstream releases without waiting for the next Debian package refresh.
Update Debian system packages
Refresh the package index and install any pending security updates before you add the rest of the stack. Let APT show the transaction before you approve it, especially on servers that already host other web applications.
sudo apt update && sudo apt upgradeThese commands use
sudowhere root privileges are required. If your account does not have sudo access yet, follow the guide on how to add a user to sudoers on Debian.
Reboot before continuing if the upgrade pulled in a new kernel or critical system libraries.
Install Nginx, MariaDB, and PHP on Debian
Install the Nginx web server, MariaDB database server, PHP-FPM, and the extensions phpMyAdmin needs. Desktop installs may already include a few of these packages, but minimal and server images usually do not.
sudo apt install nginx mariadb-server mariadb-client php-fpm php-mbstring php-bcmath php-xml php-mysql php-common php-gd php-cli php-curl php-zip curl ca-certificates gpg opensslEnable and start Nginx, MariaDB, and the installed PHP-FPM service. The service-detection command keeps the next commands portable across Debian 13, 12, and 11.
PHP_FPM_SERVICE=$(systemctl list-unit-files 'php*-fpm.service' --no-legend | awk '{print $1}' | sort -V | tail -n 1)
sudo systemctl enable --now nginx mariadb "$PHP_FPM_SERVICE"
systemctl is-active nginx mariadb "$PHP_FPM_SERVICE"
active active active
Debian 13 uses
php8.4-fpm, Debian 12 usesphp8.2-fpm, and Debian 11 usesphp7.4-fpmfrom the default repositories. Keep that version match in mind for the Nginx socket path later, and choose the intended branch manually if your server has several PHP-FPM versions installed.
Run the MariaDB hardening script on Debian
Debian’s current MariaDB packages use mariadb-secure-installation for the initial hardening pass. Run it once to remove anonymous users, drop the test database, and confirm the local root access model.
sudo mariadb-secure-installationSwitch to unix_socket authentication [Y/n] Change the root password? [Y/n] Remove anonymous users? [Y/n] Disallow root login remotely? [Y/n] Remove test database and access to it? [Y/n] Reload privilege tables now? [Y/n]
The exact prompts vary a little by MariaDB release, but answering the cleanup questions with Y gives you the safer default state that phpMyAdmin should sit on top of.
Create a phpMyAdmin login on Debian
phpMyAdmin does not ship with its own username or password. Sign in with a MariaDB or MySQL account, and avoid using the socket-authenticated root account for browser access.
sudo mariadb <<'SQL'
CREATE USER 'pmaadmin'@'localhost' IDENTIFIED BY 'change-this-strong-password';
GRANT ALL PRIVILEGES ON *.* TO 'pmaadmin'@'localhost';
FLUSH PRIVILEGES;
SHOW GRANTS FOR 'pmaadmin'@'localhost';
SQL
This example creates a broad administrative login for phpMyAdmin without letting that user grant privileges to other MariaDB accounts. If you only need phpMyAdmin for one application database, replace the global grant with database-scoped privileges instead of giving this account full server access.
For Oracle MySQL instead of Debian’s MariaDB default, keep the same phpMyAdmin and Nginx setup after you install MySQL 8.0 on Debian, then create an equivalent MySQL account for browser access.
Verify that the new login can connect before you expose phpMyAdmin in a browser.
mariadb -u pmaadmin -p -e "SELECT VERSION();"VERSION() 11.8.6-MariaDB-0+deb13u1 from Debian
Download the latest phpMyAdmin release on Debian
Fetch the upstream release metadata first, then use the version number to build the tarball URLs. Keep using the same terminal session so the shell variables stay available for the next code block.
cd /tmp
curl -fsSL https://www.phpmyadmin.net/home_page/version.txt -o version.txt
sed -n '1p' version.txt
sed -n '2p' version.txt
sed -n '3p' version.txt
5.2.3 2025-10-08 https://files.phpmyadmin.net/phpMyAdmin/5.2.3/phpMyAdmin-5.2.3-all-languages.zip
The first line is the current phpMyAdmin version, and the second line is the upstream release date. The metadata file points to the ZIP archive on line three, but the commands below keep the
.tar.gzformat that fits the standard Linux extraction workflow.
VERSION=$(sed -n '1p' version.txt)
BASE_URL="https://files.phpmyadmin.net/phpMyAdmin/${VERSION}"

curl -fsSLo "phpMyAdmin-${VERSION}-all-languages.tar.gz" "$BASE_URL/phpMyAdmin-${VERSION}-all-languages.tar.gz"
curl -fsSLo "phpMyAdmin-${VERSION}-all-languages.tar.gz.sha256" "$BASE_URL/phpMyAdmin-${VERSION}-all-languages.tar.gz.sha256"
curl -fsSLo "phpMyAdmin-${VERSION}-all-languages.tar.gz.asc" "$BASE_URL/phpMyAdmin-${VERSION}-all-languages.tar.gz.asc"
Verify the phpMyAdmin release files on Debian
Import the official phpMyAdmin keyring into a temporary GnuPG home, confirm the SHA256 checksum, and then validate the detached signature. Using the project keyring avoids depending on public keyserver availability and keeps your normal GnuPG keyring untouched.
GNUPGHOME=$(mktemp -d)
chmod 700 "$GNUPGHOME"

curl -fsSLo phpmyadmin.keyring https://files.phpmyadmin.net/phpmyadmin.keyring
gpg --homedir "$GNUPGHOME" --batch --import phpmyadmin.keyring
sha256sum -c "phpMyAdmin-${VERSION}-all-languages.tar.gz.sha256"
gpg --homedir "$GNUPGHOME" --verify "phpMyAdmin-${VERSION}-all-languages.tar.gz.asc" "phpMyAdmin-${VERSION}-all-languages.tar.gz"
rm -rf "$GNUPGHOME"
phpMyAdmin-5.2.3-all-languages.tar.gz: OK gpg: Good signature from "Isaac Bennetch <bennetch@gmail.com>" [unknown]
The signature check can still warn that the key is not yet trusted locally. That warning is normal until you personally trust the key on your GnuPG keyring.
Install the phpMyAdmin files on Debian
Extract the upstream archive into /var/www/phpmyadmin and create a dedicated temp directory outside the web root. If an older manual install already exists at that path, the command moves it aside instead of deleting it.
tar -xzf "phpMyAdmin-${VERSION}-all-languages.tar.gz"
sudo install -d /var/www

if [ -e /var/www/phpmyadmin ]; then
    sudo mv /var/www/phpmyadmin "/var/www/phpmyadmin.backup.$(date +%Y%m%d%H%M%S)"
fi

sudo mv "phpMyAdmin-${VERSION}-all-languages" /var/www/phpmyadmin
sudo install -d -o www-data -g www-data -m 0750 /var/lib/phpmyadmin/tmp
Create the phpMyAdmin override config on Debian
Generate a secret for cookie authentication, then write a small config.user.inc.php override. The tee command is used because a plain > redirection would still run as your regular shell instead of writing the file as root.
BLOWFISH_SECRET=$(openssl rand -hex 16)

sudo tee /var/www/phpmyadmin/config.user.inc.php > /dev/null <<EOF
<?php
\$cfg['blowfish_secret'] = '${BLOWFISH_SECRET}';
\$cfg['TempDir'] = '/var/lib/phpmyadmin/tmp';
EOF
Check the file for syntax errors before you hand it to PHP-FPM.
sudo php -l /var/www/phpmyadmin/config.user.inc.phpNo syntax errors detected in /var/www/phpmyadmin/config.user.inc.php
Set phpMyAdmin permissions on Debian
Keep the phpMyAdmin application files owned by root, make the secret config readable by the web server group, and leave only the temp directory writable by www-data.
sudo chown -R root:root /var/www/phpmyadmin
sudo chown root:www-data /var/www/phpmyadmin/config.user.inc.php
sudo chmod -R u=rwX,go=rX /var/www/phpmyadmin
sudo chmod 0640 /var/www/phpmyadmin/config.user.inc.php
sudo chown -R www-data:www-data /var/lib/phpmyadmin
sudo chmod -R u=rwX,go= /var/lib/phpmyadmin
Configure Nginx for phpMyAdmin on Debian
Use a dedicated subdomain such as pma.example.com instead of exposing phpMyAdmin on the same path as a public site. That keeps the URL cleaner, makes SSL simpler, and reduces accidental routing conflicts with other PHP applications.
The server block below detects the PHP-FPM socket created by Debian’s default PHP package. If another stack such as iRedMail rewrites PHP-FPM to a TCP listener, replace the
fastcgi_passline with that address after you verify the listener withss -ltnp | grep 9999or the port your stack configured.
Create the phpMyAdmin server block on Debian
Find the active PHP-FPM socket before writing the Nginx site file. Standard Debian installs should print a release-specific path such as /run/php/php8.4-fpm.sock, /run/php/php8.2-fpm.sock, or /run/php/php7.4-fpm.sock.
PHP_FPM_SOCK=$(find /run/php -maxdepth 1 -type s -name 'php*-fpm.sock' | sort -V | tail -n 1)
printf '%s\n' "$PHP_FPM_SOCK"
/run/php/php8.4-fpm.sock
If the command prints no socket, start PHP-FPM before continuing. If it prints several sockets on a custom multi-PHP server, set PHP_FPM_SOCK to the socket that matches the PHP branch you want phpMyAdmin to use.
Create the Nginx site file with your real hostname. The heredoc is intentionally unquoted so the shell can insert $PHP_FPM_SOCK; the Nginx $uri variables are escaped so they stay in the config file.
sudo tee /etc/nginx/sites-available/phpmyadmin.conf > /dev/null <<EOF
server {
    listen 80;
    listen [::]:80;
    server_name pma.example.com;

    root /var/www/phpmyadmin;
    index index.php;

    access_log /var/log/nginx/phpmyadmin_access.log;
    error_log /var/log/nginx/phpmyadmin_error.log;

    location = / {
        return 302 /index.php;
    }

    location / {
        try_files \$uri \$uri/ =404;
    }

    location ~ \.php$ {
        include snippets/fastcgi-php.conf;
        fastcgi_pass unix:${PHP_FPM_SOCK};
    }

    location ~ /\.ht {
        deny all;
    }
}
EOF
The layout keeps the root request simple, passes PHP files to PHP-FPM, and blocks stray .ht requests without relying on Debian’s stock welcome page or a front-controller rewrite that does not add anything here.
Enable the phpMyAdmin site on Debian
Disable the stock default site if it is still enabled, then activate the phpMyAdmin site and test the configuration before you reload Nginx. The local request uses a Host header so it checks the named phpMyAdmin server block even before public DNS is live.
sudo rm -f /etc/nginx/sites-enabled/default
sudo ln -sf /etc/nginx/sites-available/phpmyadmin.conf /etc/nginx/sites-enabled/phpmyadmin.conf
sudo nginx -t
sudo systemctl reload nginx
curl --noproxy '*' -fsS -D - -o /dev/null -H 'Host: pma.example.com' http://127.0.0.1/index.php
nginx: the configuration file /etc/nginx/nginx.conf syntax is ok nginx: configuration file /etc/nginx/nginx.conf test is successful HTTP/1.1 200 OK Content-Type: text/html; charset=utf-8
Sign in to phpMyAdmin on Debian
Open your browser and visit http://pma.example.com after DNS points that name to the server. For local testing before DNS is ready, use the curl Host-header check from the previous section or add a temporary hosts-file entry on your workstation. Sign in with pmaadmin or another MariaDB account that already has the privileges you need.

Once the login page loads, the Nginx and PHP-FPM side is working. If you plan to use this stack for a CMS next, install WordPress with Nginx on Debian on the same base services.
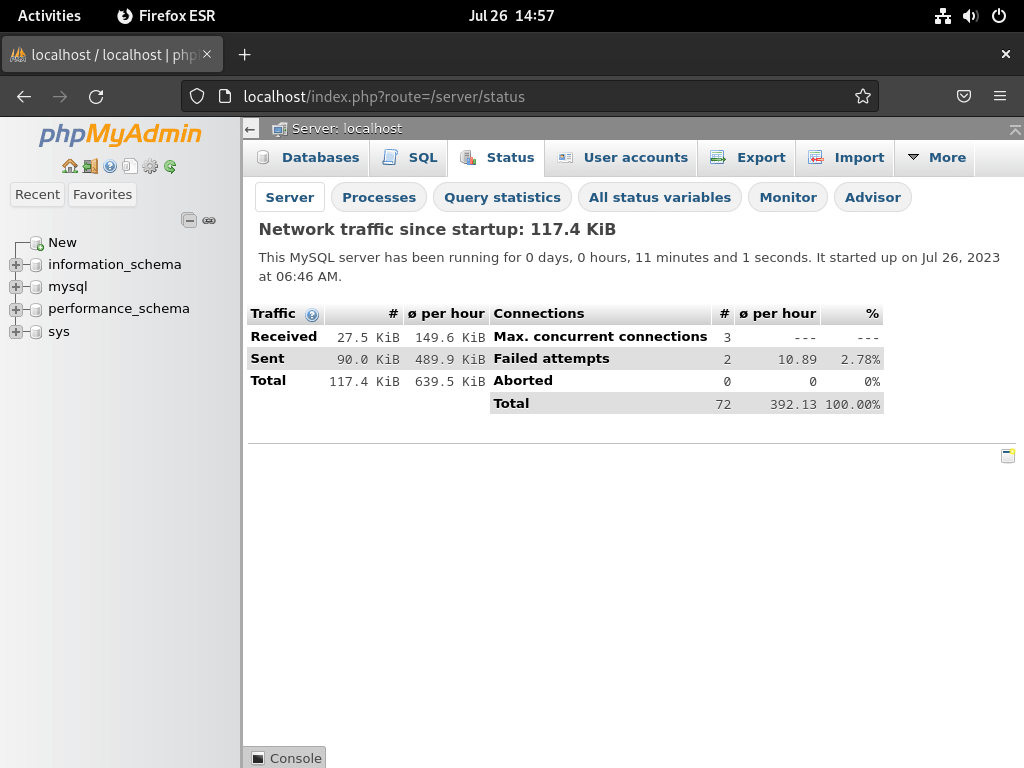
Review the phpMyAdmin dashboard on Debian
The Status page shows the server load, connection counts, and query activity in one place.
The Advisor page suggests database tuning changes after it has seen real workload data.
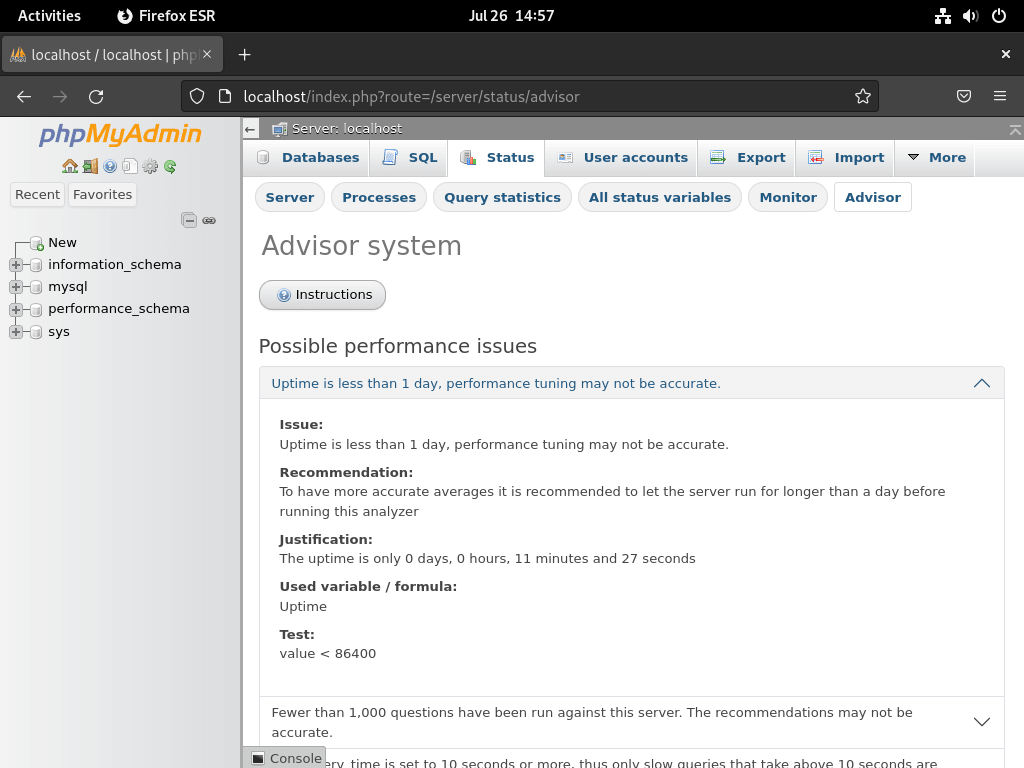
The advisor is most useful after the database has been under real load for a while. Test any suggested changes on staging before you apply them to production.
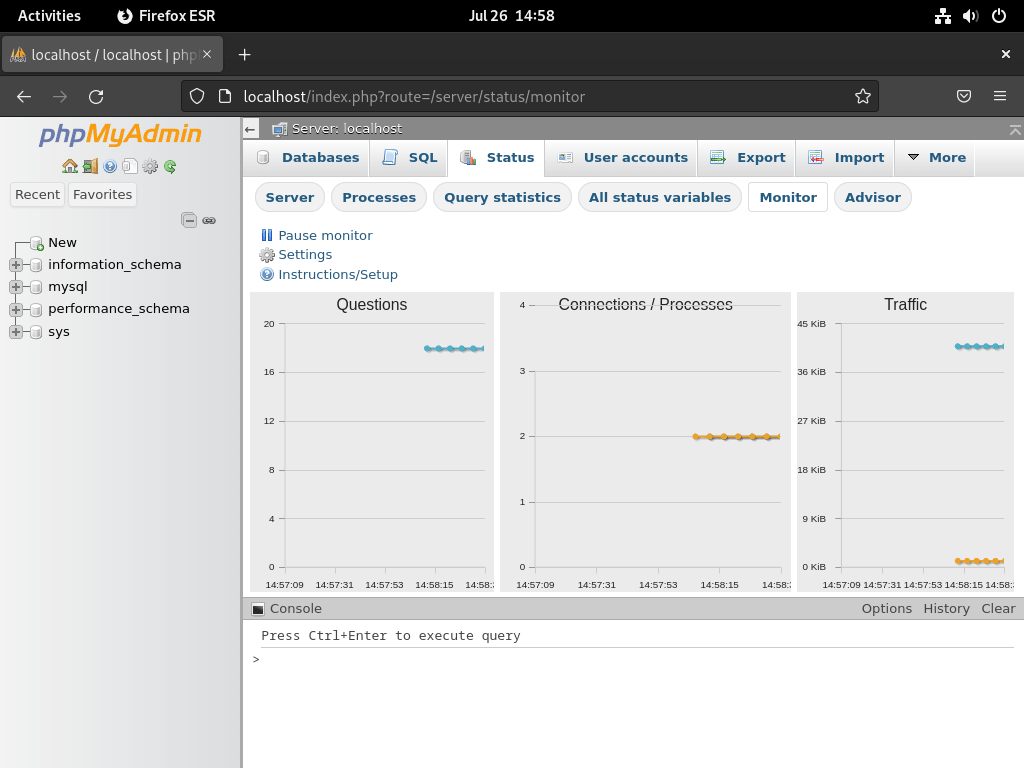
The Monitor page adds live graphs that make it easier to spot spikes and long-running activity.
Secure phpMyAdmin on Debian
After the login page works, tighten the web access path with HTTPS, firewall rules, and optional IP restrictions.
Add Let’s Encrypt SSL to phpMyAdmin on Debian
Use a real DNS name that points to your server and make sure port 80 is reachable before you ask Certbot to rewrite the Nginx site. If you want the deeper walkthrough, follow secure Nginx with Let’s Encrypt on Debian.
sudo apt install certbot python3-certbot-nginx
certbot --version
Request the certificate after DNS is live and the HTTP site is already responding.
sudo certbot --nginx --non-interactive --agree-tos --no-eff-email --redirect --hsts --staple-ocsp --email admin@example.com -d pma.example.comA successful Certbot run prints the saved certificate path and expiry date, then updates the Nginx server block for HTTPS. Once the first certificate is in place, confirm the packaged timer is enabled and active before you test renewal.
systemctl is-enabled certbot.timer
systemctl is-active certbot.timer
enabled active
sudo certbot renew --dry-runLimit phpMyAdmin access by IP on Debian
If you administer the server from a stable office or home IP, add an allowlist inside the phpMyAdmin server block and deny everything else.
allow 198.51.100.10;
deny all;
Place those directives inside the server { } block, then reload Nginx.
sudo nginx -t
sudo systemctl reload nginx
Open UFW ports for phpMyAdmin on Debian
If this host uses UFW, allow SSH first, then open HTTP and HTTPS. The full firewall workflow lives in install UFW on Debian.
Allow SSH before you enable or reload firewall rules from a remote session. If you already allowed the
Nginx Fullapplication profile, you do not need duplicate80/tcpand443/tcprules.
sudo ufw allow ssh
sudo ufw allow 80/tcp
sudo ufw allow 443/tcp
sudo ufw status verbose
Troubleshoot phpMyAdmin with Nginx on Debian
These checks cover the most common post-install problems: the stock Nginx page, PHP-FPM socket mismatches, root login failures, blocked assets, and missing cookie secrets.
Fix phpMyAdmin 404 errors or the Nginx welcome page on Debian
If you still land on the stock Nginx page, the default site is winning, the phpMyAdmin symlink is missing, or the request is not reaching the phpMyAdmin hostname.
ls -l /etc/nginx/sites-enabled/
curl --noproxy '*' -fsS -D - -o /dev/null -H 'Host: pma.example.com' http://127.0.0.1/index.php
phpmyadmin.conf -> /etc/nginx/sites-available/phpmyadmin.conf HTTP/1.1 200 OK Content-Type: text/html; charset=utf-8
If the symlink is missing or the default site is still enabled, restore the phpMyAdmin site and reload Nginx.
sudo rm -f /etc/nginx/sites-enabled/default
sudo ln -sf /etc/nginx/sites-available/phpmyadmin.conf /etc/nginx/sites-enabled/phpmyadmin.conf
sudo nginx -t
sudo systemctl reload nginx
Fix phpMyAdmin 502 Bad Gateway on Debian
A 502 error usually means the PHP-FPM service is stopped or the socket path in the Nginx site file does not match the PHP branch serving phpMyAdmin.
PHP_FPM_SERVICE=$(systemctl list-unit-files 'php*-fpm.service' --no-legend | awk '{print $1}' | sort -V | tail -n 1)
systemctl is-active "$PHP_FPM_SERVICE"
grep fastcgi_pass /etc/nginx/sites-available/phpmyadmin.conf
find /run/php -maxdepth 1 -type s -name 'php*-fpm.sock' -print
active fastcgi_pass unix:/run/php/php8.4-fpm.sock; /run/php/php8.4-fpm.sock
If the service is inactive, start it and reload Nginx after you confirm the socket name matches the version in your site file.
If your server stack uses a TCP listener instead of a Unix socket, confirm that PHP-FPM is actually bound to the same address and port before you blame the Nginx site file.
ss -ltnp | grep 9999LISTEN 0 4096 127.0.0.1:9999 0.0.0.0:*
sudo systemctl enable --now "$PHP_FPM_SERVICE"
sudo systemctl reload nginx
Fix Access denied for user ‘root’@’localhost’ in phpMyAdmin on Debian
MariaDB on Debian usually keeps root on local socket authentication, which works from the shell with sudo mariadb but not from a web form. Use the dedicated phpMyAdmin account instead.
sudo mariadb -e "SHOW GRANTS FOR 'pmaadmin'@'localhost';"If that account is missing, recreate it with the SQL block from the install section and sign in with that user instead of trying to reconfigure MariaDB root for web access.
Fix blank phpMyAdmin page with valid HTML source on Debian
If Firefox shows a blank page but View Source contains the full phpMyAdmin HTML, PHP is already rendering the page. In that case the usual problem is that JavaScript or CSS assets are not loading, so phpMyAdmin’s temporary cfs-style hide rule never gets removed.
One common cause on mail-server stacks such as iRedMail is a Content-Security-Policy header set at the Nginx http level. iRedMail ships default-src https: in its global headers.conf, which tells the browser to load scripts and stylesheets only over HTTPS. If you serve phpMyAdmin over plain HTTP, the browser obeys the policy and blocks every JS and CSS request silently. Since Nginx inherits add_header directives from the parent level only when the current level defines none, adding any add_header inside a location block stops that inheritance and removes the restrictive policy.
Check which headers the server is actually sending before you change the vhost.
curl --noproxy '*' -sI -H 'Host: pma.example.com' http://127.0.0.1/index.php | grep -iE 'content-security|x-frame|strict-transport'If the response includes Content-Security-Policy: default-src https: and the vhost serves phpMyAdmin over HTTP, that header is blocking assets. The cleanest fix is to serve phpMyAdmin over HTTPS so the policy is satisfied. If you need to keep HTTP access, override the global headers inside the phpMyAdmin server block with a policy that allows the correct scheme.
On iRedMail specifically, the stock subdomain templates include snippets from /etc/nginx/templates/. When you create a phpMyAdmin vhost alongside iRedMail, start from one of those working templates and change only the phpMyAdmin-specific directives (server_name, root, fastcgi_pass) so that template includes and header overrides stay in place.
curl --noproxy '*' -fsS -D - -o /dev/null -H 'Host: pma.example.com' http://127.0.0.1/index.php
curl --noproxy '*' -fsS -D - -o /dev/null -H 'Host: pma.example.com' http://127.0.0.1/js/vendor/jquery/jquery.min.js
curl --noproxy '*' -fsS -D - -o /dev/null -H 'Host: pma.example.com' http://127.0.0.1/themes/pmahomme/css/theme.css
sudo nginx -T | grep -nE 'phpmyadmin|fastcgi_pass|root /var/www/phpmyadmin'
HTTP/1.1 200 OK HTTP/1.1 200 OK HTTP/1.1 200 OK server_name pma.example.com; root /var/www/phpmyadmin; fastcgi_pass unix:/run/php/php8.4-fpm.sock;
If index.php returns 200 OK but one of the asset requests returns 404, 403, or the wrong content type, fix the Nginx root, alias, or include order before you keep changing PHP-FPM. If all three requests return 200 OK, check the browser Network and Console tabs for blocked or rewritten asset paths.
Fix phpMyAdmin blowfish_secret errors on Debian
If phpMyAdmin says the configuration file needs a secret passphrase, rewrite the override file with a fresh secret and reload the site.
NEW_SECRET=$(openssl rand -hex 16)

sudo tee /var/www/phpmyadmin/config.user.inc.php > /dev/null <<EOF
<?php
\$cfg['blowfish_secret'] = '${NEW_SECRET}';
\$cfg['TempDir'] = '/var/lib/phpmyadmin/tmp';
EOF

sudo chown root:www-data /var/www/phpmyadmin/config.user.inc.php
sudo chmod 0640 /var/www/phpmyadmin/config.user.inc.php
sudo php -l /var/www/phpmyadmin/config.user.inc.php
sudo systemctl reload nginx
Update or Remove phpMyAdmin on Debian
Keep the upstream files current with a repeatable helper, and remove the dedicated site cleanly if you no longer need phpMyAdmin.
Update phpMyAdmin on Debian
Never extract a new phpMyAdmin release over the existing directory. Back up
config.user.inc.php, unpack the new release into a fresh directory, and then swap the directory so old files do not linger behind.
Create a small root-owned helper so future updates reuse the same release lookup, checksum check, signature check, directory swap, permissions, and local HTTP probe. The helper exits without changes when the installed version already matches the upstream release.
sudo tee /usr/local/bin/update-phpmyadmin > /dev/null <<'EOF'
#!/usr/bin/env bash
set -euo pipefail

app_dir=/var/www/phpmyadmin
state_dir=/var/lib/phpmyadmin
host_header=${PHPMYADMIN_HOST_HEADER:-pma.example.com}
check_url=${PHPMYADMIN_CHECK_URL:-http://127.0.0.1/index.php}

if [ "$(id -u)" -ne 0 ]; then
    printf 'Run this helper with sudo: sudo update-phpmyadmin\n' >&2
    exit 1
fi

if [ ! -f "$app_dir/config.user.inc.php" ]; then
    printf 'Missing %s/config.user.inc.php; install phpMyAdmin first.\n' "$app_dir" >&2
    exit 1
fi

work_dir=$(mktemp -d)
gnupg_home=

cleanup() {
    rm -rf "$work_dir"
    if [ -n "${gnupg_home:-}" ]; then
        rm -rf "$gnupg_home"
    fi
}

restore_previous() {
    printf 'Post-update check failed; restoring the previous phpMyAdmin directory.\n' >&2
    rm -rf "$app_dir"
    mv "$backup_dir" "$app_dir"
}

trap cleanup EXIT

cd "$work_dir"
curl -fsSL https://www.phpmyadmin.net/home_page/version.txt -o version.txt
version=$(sed -n '1p' version.txt)

if [ -z "$version" ]; then
    printf 'Could not read the current phpMyAdmin version.\n' >&2
    exit 1
fi

current_version=unknown
if [ -f "$app_dir/libraries/classes/Version.php" ]; then
    current_version=$(sed -n "s/.*public const VERSION = '\([^']*\)'.*/\1/p" "$app_dir/libraries/classes/Version.php" | head -n 1)
fi
if [ -z "$current_version" ]; then
    current_version=unknown
fi

printf 'Installed version: %s\n' "$current_version"
printf 'Latest version: %s\n' "$version"

if [ "$current_version" = "$version" ]; then
    printf 'phpMyAdmin is already current.\n'
    exit 0
fi

base_url="https://files.phpmyadmin.net/phpMyAdmin/${version}"
curl -fsSLo "phpMyAdmin-${version}-all-languages.tar.gz" "$base_url/phpMyAdmin-${version}-all-languages.tar.gz"
curl -fsSLo "phpMyAdmin-${version}-all-languages.tar.gz.sha256" "$base_url/phpMyAdmin-${version}-all-languages.tar.gz.sha256"
curl -fsSLo "phpMyAdmin-${version}-all-languages.tar.gz.asc" "$base_url/phpMyAdmin-${version}-all-languages.tar.gz.asc"
curl -fsSLo phpmyadmin.keyring https://files.phpmyadmin.net/phpmyadmin.keyring

gnupg_home=$(mktemp -d)
chmod 700 "$gnupg_home"
gpg --homedir "$gnupg_home" --batch --import phpmyadmin.keyring
sha256sum -c "phpMyAdmin-${version}-all-languages.tar.gz.sha256"
gpg --homedir "$gnupg_home" --verify "phpMyAdmin-${version}-all-languages.tar.gz.asc" "phpMyAdmin-${version}-all-languages.tar.gz"
tar -xzf "phpMyAdmin-${version}-all-languages.tar.gz"

test -f "phpMyAdmin-${version}-all-languages/index.php"
test -f "phpMyAdmin-${version}-all-languages/js/vendor/jquery/jquery.min.js"
test -f "phpMyAdmin-${version}-all-languages/themes/pmahomme/css/theme.css"

cp "$app_dir/config.user.inc.php" "$work_dir/config.user.inc.php.backup"
backup_dir="/var/www/phpmyadmin-old-$(date +%Y%m%d%H%M%S)"
mv "$app_dir" "$backup_dir"
mv "phpMyAdmin-${version}-all-languages" "$app_dir"
cp "$work_dir/config.user.inc.php.backup" "$app_dir/config.user.inc.php"

chown -R root:root "$app_dir"
chown root:www-data "$app_dir/config.user.inc.php"
chmod -R u=rwX,go=rX "$app_dir"
chmod 0640 "$app_dir/config.user.inc.php"
chown -R www-data:www-data "$state_dir"
chmod -R u=rwX,go= "$state_dir"

if ! curl --noproxy '*' -fsS -D "$work_dir/headers" -o /dev/null -H "Host: ${host_header}" "$check_url"; then
    restore_previous
    exit 1
fi

status_line=$(sed -n '1s/\r$//p' "$work_dir/headers")
case "$status_line" in
*" 200 "* | *" 301 "* | *" 302 "*) ;;
*)
    printf 'Unexpected HTTP status after update: %s\n' "$status_line" >&2
    restore_previous
    exit 1
    ;;
esac

rm -rf "$backup_dir"
printf 'phpMyAdmin updated to %s.\n' "$version"
EOF

sudo chmod 0755 /usr/local/bin/update-phpmyadmin
command -v update-phpmyadmin
/usr/local/bin/update-phpmyadmin
If your Nginx server block uses a hostname other than pma.example.com, pass it with PHPMYADMIN_HOST_HEADER when you run the helper. If Certbot redirects HTTP to HTTPS and you want the helper to test the HTTPS URL instead, also set PHPMYADMIN_CHECK_URL.
sudo update-phpmyadminInstalled version: 5.2.3 Latest version: 5.2.3 phpMyAdmin is already current.
When a newer release exists, the helper prints the checksum and GPG verification output, swaps the directory, checks the configured local URL, and ends with phpMyAdmin updated to x.y.z.. It removes the temporary backup only after that post-update check succeeds.
Remove phpMyAdmin on Debian
Remove the phpMyAdmin files, its Nginx site, the update helper, and the temp directory if you no longer need the web interface. The database server, existing databases, Nginx package, PHP-FPM package, and MariaDB package stay installed because other applications may still use them.
The next removal command permanently deletes the phpMyAdmin application directory and its temporary runtime directory. Back up any local phpMyAdmin configuration files you still need before you run it.
sudo find /var/www/phpmyadmin /var/lib/phpmyadmin -maxdepth 0 -print 2>/dev/null
sudo rm -rf /var/www/phpmyadmin /var/lib/phpmyadmin
sudo rm -f /etc/nginx/sites-enabled/phpmyadmin.conf
sudo rm -f /etc/nginx/sites-available/phpmyadmin.conf
sudo rm -f /usr/local/bin/update-phpmyadmin
sudo nginx -t
sudo systemctl reload nginx
If you created a dedicated MariaDB login or issued a dedicated certificate for phpMyAdmin, remove those separately.
sudo mariadb -e "DROP USER IF EXISTS 'pmaadmin'@'localhost'; FLUSH PRIVILEGES;"
sudo certbot delete --cert-name pma.example.com
Conclusion
phpMyAdmin with Nginx is now running on Debian, with a dedicated MariaDB login, an upstream update path, and the option to lock the interface behind HTTPS and IP filtering. For the next hardening steps, secure Nginx with Let’s Encrypt on Debian, configure security headers in Nginx, or rate limit Nginx before you expose the server to wider traffic.

Hello,
I followed your tutorial and everything went fine on the fresh Debian Trixie server I installed.
Then I installed iRedMail to get the webmail solution to replace my old iRedMail server.
After the iRedMail installation the configuration file was not working due to the file ‘fastcgi_pass unix:/run/php/php8.4-fpm.sock;’ which was not available anymore, replaced with a PID file.
So I changed the fastcgi_pass command to ‘fastcgi_pass 127.0.0.1:9999’ as the iRedMail server modified the configuration files for php-fpm to use a TCP socket instead of a unix file.
When I try to access the servername, the page display is blank.
I have no error displayed, the phpmyadmin_error.log file is empty, and the CTRL+U in the Firefox wen browser displays html code generated by the php code.
What can be the reason for this blank page display with no errors ?
Laurent, you were right to flag this. When you commented, the guide still assumed Debian’s default Unix socket layout and did not cover iRedMail switching PHP-FPM to
127.0.0.1:9999. If Firefox View Source showed full phpMyAdmin HTML, your TCP change had likely already fixed the PHP side.That blank page usually means phpMyAdmin’s JavaScript or CSS assets are not loading, so the temporary
cfs-stylehide rule never gets removed. I have updated the article with a new troubleshooting section for TCP listeners and blank pages with valid HTML source, including asset checks andnginx -Tdiagnostics for stacks like iRedMail.In case someone is trying to use PhpMyAdmin on a debian 13 server with iRedMail installed on like on mine, here is the virtualhost code I had to modifiy to make it work with the nginx configuration modified after the iRedMail installation.
server {
listen 80;
listen [::]:80;
server_name pma.mydomain.ext;
root /var/www/phpmyadmin/;
index index.php;
access_log /var/log/nginx/phpmyadmin_access.log;
error_log /var/log/nginx/phpmyadmin_error.log;
location / {
try_files $uri $uri/ /index.php;
}
location ~ ^/(doc|sql|setup)/ {
deny all;
}
location ~ \\.php$ {
include fastcgi_params;
include /etc/nginx/templates/hsts.tmpl;
fastcgi_pass 127.0.0.1:9999;
include snippets/fastcgi-php.conf;
}
location ~ /\\.ht {
deny all;
}
allow 127.0.0.1;
deny all;
}
I had to add the ‘include /etc/nginx/templates/hsts.tmpl;’ which adds a header to the html page generated by the php code which allows the correct page display instead of a blank page.
Thanks for posting the full server block, Laurent. Looking at the iRedMail source on GitHub, I think I can see why the blank page happened and why the HSTS include fixed it, though I do not have access to your actual server config so take this as my best read of the situation.
iRedMail ships a global
headers.confat the Nginxhttplevel that includesContent-Security-Policy: default-src https:. If that file is active on your server, the browser would only load scripts and stylesheets over HTTPS. Since your phpMyAdmin vhost listens on port 80, the browser would silently block every JS and CSS file, leaving phpMyAdmin stuck on its startup hide rule and producing a blank page even though the HTML source renders fine.What I think happened with the HSTS include: Nginx only inherits
add_headerdirectives from the parent level when the current level defines none. By addinginclude /etc/nginx/templates/hsts.tmpl;inside the PHPlocationblock, you introduced anadd_headerat that level, which would have stopped the parent-level CSP (and the other security headers like X-Frame-Options) from being inherited. If that is what happened, anyadd_headerdirective at the location level would have had the same effect, and the HSTS header itself would not be the piece doing the work.You can check with
curl --noproxy '*' -sI -H 'Host: pma.example.com' http://127.0.0.1/index.php | grep -iE 'content-security|x-frame|strict-transport'to see which headers the phpMyAdmin server block is actually sending. Replacepma.example.comwith your phpMyAdmin hostname. If you see thedefault-src https:policy on the response, that confirms it. Either way, the cleanest long-term path is serving phpMyAdmin over HTTPS so the CSP policy is satisfied without losing the other security headers.I have updated the troubleshooting section with the CSP-inheritance explanation and a diagnostic command so other iRedMail users can identify the issue faster. Thanks for taking the time to post the full server block.
Thanks for a flawlessly working tutorial, but ….
at starting (with an empty screen) of phpmyadmin using Google developer tools I found problems with
Refused to execute script from because its MIME type (…) and strict MIME type (…)
file not founnd
autoload
I changed the setup as follows
moved php,yadmin to a subfolder of /var/www/
deleted phpmyadmin.conf
use 127.0.0.1:9000 instead of php8.2-fpm.sock
in /etc/nginx/sites_enabled/mylocal and in /etc/php/8.2/fpm/pool.d/www.conf
I did the setup on a fresh installed Raspberry Pi OS 64 bit for a Raspberry Pi 3B+
All is working fine now.
Thanks for sharing your setup and the detailed troubleshooting, Michael. The MIME type warnings you encountered back in August typically point to PHP-FPM not executing files properly. Your solution switching to TCP socket 127.0.0.1:9000 makes perfect sense for Raspberry Pi OS, where Unix socket permissions can behave differently than standard Debian.
The guide assumes standard Debian server environments where Unix sockets offer better performance, but TCP sockets are absolutely valid for embedded systems or when debugging permission issues. Good instincts moving phpMyAdmin to a subfolder and testing with different socket configurations until it worked.