
Saved sessions, PPK key conversion, and PuTTY’s companion tools still make it worth installing PuTTY on Ubuntu when a plain OpenSSH terminal is not the whole workflow. You can install PuTTY on Ubuntu from the distribution repositories for native shell integration or from Flathub when you want the same sandboxed desktop build across supported LTS releases.
If you are looking for a PuTTY download for Ubuntu 24.04, 22.04, or 26.04, use APT or Flathub instead of random third-party .deb files. The official PuTTY download page publishes Windows installers and a Unix source archive, not an Ubuntu-specific binary package. The Ubuntu package installs cleanly from a local terminal, an SSH session, or Ubuntu Server, but the main putty window still needs an active graphical session to open.
Install PuTTY on Ubuntu
APT fits most Ubuntu systems because the package and companion tools install directly into your shell. Flatpak is useful when you want the same current PuTTY desktop build across all supported Ubuntu LTS releases.
The APT packages come from Ubuntu’s community-maintained universe component. Normal desktop and server installs usually have Universe enabled already, but customized systems that cannot locate putty should enable Universe on Ubuntu before rerunning the install command.
| Method | Channel | Version | Updates | Best For |
|---|---|---|---|---|
| APT | Ubuntu universe repositories | 0.83.x on Ubuntu 26.04, 0.81.x on 24.04, 0.76.x on 22.04 | Ubuntu package updates | Most users, shell integration, direct access to plink, pscp, and puttygen |
| Flatpak | Flathub | Current Flathub stable release | Flatpak app updates | Sandboxed desktop install with the same PuTTY release across supported Ubuntu LTS versions |
Update Ubuntu before installing PuTTY
Refresh the package index and install pending system updates before you add PuTTY.
sudo apt update && sudo apt upgradeThese commands use
sudofor package-management tasks that need root privileges. If your account does not have sudo access yet, follow the guide to add a new user to sudoers on Ubuntu before you continue.
Install PuTTY with APT on Ubuntu
Install PuTTY on Ubuntu with the distro package when you want the GUI client and the companion shell tools in one APT-managed workflow.
sudo apt install putty putty-tools -yThe putty package installs the graphical client. The putty-tools package adds plink, pscp, and puttygen, which matters if you want PuTTY’s command-line tools instead of only the desktop window.
command -v putty plink pscp puttygen/usr/bin/putty /usr/bin/plink /usr/bin/pscp /usr/bin/puttygen
Those paths confirm that the GUI launcher and the three PuTTY terminal helpers are available from the APT install. A Flatpak-only install does not add these host-side commands.
apt-cache policy puttyputty:
Installed: 0.83-3build1
Candidate: 0.83-3build1
Version table:
*** 0.83-3build1 500
500 http://au.archive.ubuntu.com/ubuntu resolute/universe amd64 Packages
100 /var/lib/dpkg/status
That is the current output on Ubuntu 26.04. Ubuntu 24.04 installs 0.81-1, and Ubuntu 22.04 installs 0.76-2, so the APT package version depends on the LTS release you are running.
Install PuTTY from Flathub on Ubuntu
Ubuntu does not preinstall Flatpak. If you want the complete Flatpak setup before installing PuTTY, follow the guide to install Flatpak on Ubuntu.
Install the Flatpak package before adding the Flathub remote.
sudo apt install flatpak -yAdd Flathub at system scope so the remote, the app, and later updates all use the same installation scope.
sudo flatpak remote-add --if-not-exists flathub https://dl.flathub.org/repo/flathub.flatpakrepoThe --if-not-exists flag avoids duplicate-remote errors, and sudo keeps Flathub in system scope instead of hitting the Ubuntu permission error that appears with a bare flatpak remote-add command.
flatpak remotes | grep "^flathub"flathub system
sudo flatpak install flathub uk.org.greenend.chiark.sgtatham.putty -yThe -y flag answers the Flatpak confirmation prompt automatically, which makes the command easier to paste into a fresh terminal session.
Flathub does not mark this PuTTY app as verified, so treat it as a community-maintained sandboxed package rather than an upstream-published PuTTY build. It is still a practical option when you want the same desktop release across Ubuntu 26.04, 24.04, and 22.04.
sudo flatpak info uk.org.greenend.chiark.sgtatham.putty | grep -E '^[[:space:]]*(ID|Ref|Arch|Branch|Version|Origin|Installation):'The grep command keeps the stable metadata fields, so older Flatpak releases that word the first descriptive line differently do not change what you need to check.
          ID: uk.org.greenend.chiark.sgtatham.putty
         Ref: app/uk.org.greenend.chiark.sgtatham.putty/x86_64/stable
        Arch: x86_64
      Branch: stable
     Version: 0.83
      Origin: flathub
Installation: system
The Flathub build currently reports version 0.83 on Ubuntu. If you want the PuTTY companion tools directly in your shell, the APT method is still the cleaner Ubuntu fit.
Launch PuTTY on Ubuntu
The package installs fine from SSH or on Ubuntu Server, but the main putty window only opens from an active graphical session. For terminal-only SSH work, use plink, pscp, or Ubuntu’s native OpenSSH tools instead of the GUI client.
Launch PuTTY from a desktop terminal on Ubuntu
Start the graphical client from a local desktop terminal with the standard PuTTY command.
puttyFor a Flatpak-only install, launch the desktop app through Flatpak instead. The flatpak run command does not need sudo, even when the app was installed at system scope.
flatpak run uk.org.greenend.chiark.sgtatham.puttyIf either launch command reports that it cannot open the display, start PuTTY from a logged-in Ubuntu desktop session instead of a headless SSH shell.
Launch PuTTY from the applications menu on Ubuntu
Open the launcher when you prefer starting PuTTY from the Ubuntu desktop menu.
- Click Activities in the top-left corner of the desktop.
- Open Show Applications to browse installed software.
- Type PuTTY into the search field.
- Select the PuTTY icon to open the client.
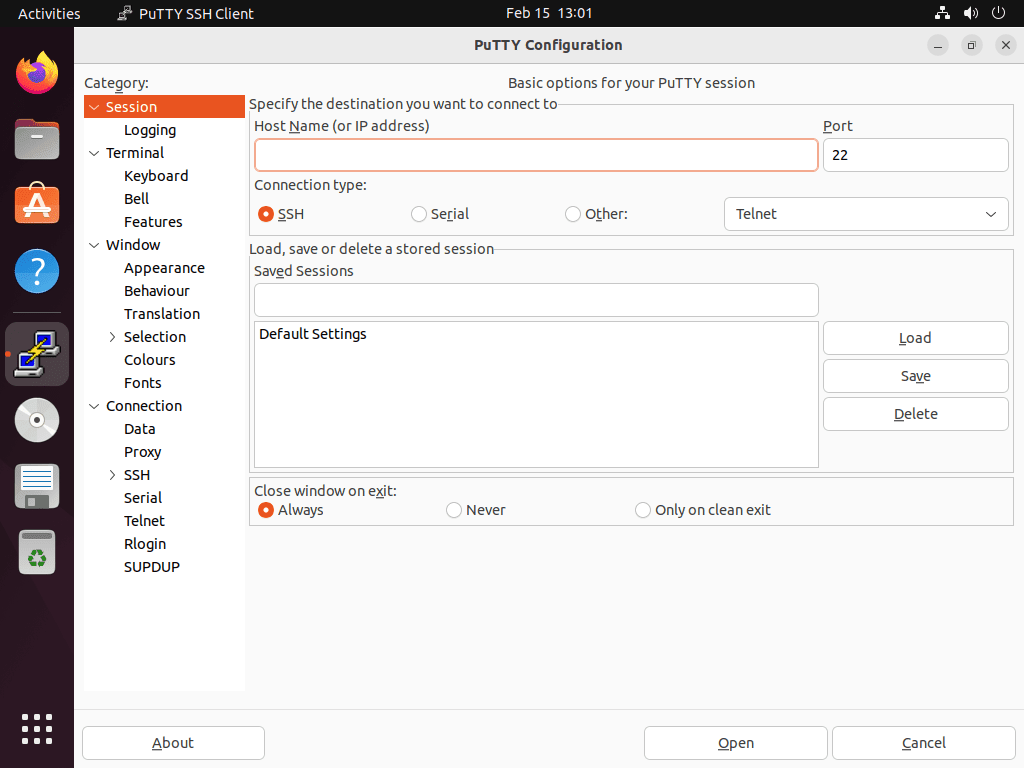
Review the PuTTY interface on Ubuntu
The main PuTTY window groups the settings you need for saved sessions, protocols, and connection details.
- Enter the hostname or IP address of the remote system.
- Choose the connection type, such as SSH, Telnet, or Raw TCP.
- Save session profiles, adjust ports, and tune terminal behavior before you connect.
Use PuTTY tools on Ubuntu
The putty-tools package is where the APT method becomes useful beyond the GUI. It installs plink for terminal-only SSH sessions, pscp for transfers, and puttygen for key generation and key conversion. Use this section after the APT install; the Flatpak method is for the desktop client.
Open terminal-only SSH sessions with Plink on Ubuntu
Use plink when you want PuTTY’s terminal-side SSH client instead of the graphical window.
plink user@hostFor example, this connects to a remote host with a regular user account:
plink user@192.168.1.100Transfer files with PSCP on Ubuntu
Use pscp when you need PuTTY’s SCP-style transfer tool, especially in workflows that still revolve around PuTTY key files.
Upload a file to a remote server with:
pscp local_file user@host:remote_pathThis example uploads document.txt to the remote user’s home directory:
pscp /home/user/document.txt user@192.168.1.100:/home/user/document.txtDownload a remote file back to the local system with:
pscp user@host:remote_file local_pathThis example downloads the same file into the local home directory:
pscp user@192.168.1.100:/home/user/document.txt /home/user/Ubuntu already includes OpenSSH tools, so
scpis often enough once you install OpenSSH on Ubuntu. Keep PSCP when you want PuTTY’s own transfer tool or PPK-oriented workflows.
Generate and convert keys with PuTTYgen on Ubuntu
Run puttygen from a desktop session when you want the graphical key generator for RSA, ECDSA, or Ed25519 keys.
puttygenIn headless shells, puttygen falls back to usage text instead of opening a window. To convert an existing OpenSSH private key into PuTTY’s PPK format, use the command-line mode instead:
puttygen ~/.ssh/id_ed25519 -O private -o ~/.ssh/id_ed25519.ppkCompare PuTTY versions on Ubuntu
The Ubuntu repository version depends on the LTS release, while the Flathub build stays on the same branch across supported Ubuntu versions.
| Ubuntu release | Default APT package | Support status | Best fit |
|---|---|---|---|
| Ubuntu 26.04 | 0.83.x | Current LTS in scope | Closest Ubuntu-packaged branch to current upstream |
| Ubuntu 24.04 | 0.81.x | Established LTS | Stable Noble package with full APT integration |
| Ubuntu 22.04 | 0.76.x | Oldest supported LTS | Jammy users who prefer distro packages over Flatpak |
If you want the same current PuTTY release on every supported Ubuntu LTS version, the Flathub build currently reports 0.83 across the board.
Troubleshoot PuTTY on Ubuntu
Most PuTTY problems on Ubuntu come down to remote SSH availability or key-format mismatches. These checks keep each issue tied to a clear cause and a quick fix.
Fix refused SSH connections in PuTTY on Ubuntu
A connection-refused error means the remote side is reachable but nothing is accepting the SSH session on the requested port.
Network error: Connection refused
Use verbose SSH output to confirm the refusal before you troubleshoot the remote host.
ssh -v user@192.168.1.100debug1: Connecting to 192.168.1.100 [192.168.1.100] port 22. debug1: connect to address 192.168.1.100 port 22: Connection refused ssh: connect to host 192.168.1.100 port 22: Connection refused
If you see those lines, the remote SSH service is down, listening on a different port, or blocked by a firewall. On Ubuntu targets, follow the guide to install OpenSSH on Ubuntu if the host is missing sshd, or install and configure UFW on Ubuntu so port 22 is reachable.
Fix PPK authentication errors in PuTTY on Ubuntu
OpenSSH servers usually expect standard OpenSSH keys, not PuTTY’s PPK format.
PuTTY Fatal Error: Unable to use key file
Convert the private key to OpenSSH format when the remote host rejects the PPK file.
puttygen mykey.ppk -O private-openssh -o mykey_opensshAfter the conversion, use mykey_openssh with ssh, scp, or any server that only accepts the standard OpenSSH key format.
Update or remove PuTTY on Ubuntu
APT and Flatpak handle PuTTY updates differently, so keep the maintenance commands tied to the method you installed.
Update APT-installed PuTTY on Ubuntu
Update the distro package without upgrading unrelated packages by targeting PuTTY directly.
sudo apt install --only-upgrade putty putty-tools -yThe --only-upgrade flag tells APT to refresh packages that are already installed without pulling in new package names you were not using before.
Check the installed APT version afterward.
apt-cache policy puttyputty:
Installed: 0.83-3build1
Candidate: 0.83-3build1
Version table:
*** 0.83-3build1 500
500 http://au.archive.ubuntu.com/ubuntu resolute/universe amd64 Packages
100 /var/lib/dpkg/status
Update Flatpak PuTTY on Ubuntu
Update the system-scope Flatpak build with Flatpak’s normal application update command.
sudo flatpak update uk.org.greenend.chiark.sgtatham.putty -yFlatpak prints Nothing to do. when the installed PuTTY app is already current.
Remove APT-installed PuTTY on Ubuntu
Remove the package first, then preview orphaned dependencies before deleting anything else.
sudo apt remove putty putty-tools -ysudo apt autoremove --dry-runContinue only if the preview lists packages you actually want to remove. Reused systems can have unrelated packages marked autoremovable, so review this list instead of treating it as part of PuTTY removal.
sudo apt autoremovePackage removal does not delete saved sessions automatically. PuTTY stores saved sessions in
~/.putty/sessions, so remove the~/.puttydirectory only if you want to wipe those profiles and any other PuTTY user settings.
Delete the PuTTY profile directory only when you are sure you no longer need its saved data.
rm -rf ~/.puttyConfirm that neither APT package is still installed. The grep filter checks for installed ii rows, and NOT_INSTALLED is the expected result after removal.
dpkg -l putty putty-tools 2>/dev/null | grep '^ii' || echo "NOT_INSTALLED"NOT_INSTALLED
Remove Flatpak PuTTY on Ubuntu
Remove the app first, then clear any unused runtimes that were only there for PuTTY.
sudo flatpak remove uk.org.greenend.chiark.sgtatham.putty -ysudo flatpak uninstall --unused -yThe first command removes the app, and --unused cleans runtimes that nothing else still depends on. The -y flag answers the removal prompt automatically.
Verify the result with the installed-app list.
sudo flatpak list --app --columns=application | grep -Fx uk.org.greenend.chiark.sgtatham.putty || echo "NOT_INSTALLED"NOT_INSTALLED
Flatpak app settings can remain under ~/.var/app/uk.org.greenend.chiark.sgtatham.putty/. Remove that directory only when you also want to delete the user data for the Flatpak build.
Conclusion
PuTTY is ready on Ubuntu for saved desktop sessions, PPK key conversion, and terminal-side work with plink or pscp when you used the APT method. For the server side of the connection, install OpenSSH on Ubuntu, then install and configure UFW on Ubuntu so remote access stays reachable without opening more than you need.

Good morning, I have the following error
(putty:49401): Gtk-CRITICAL **: 09:10:26.330: gtk_box_gadget_distribute: assertion ‘size >= 0’ failed in GtkScrollbar
(putty:49401): Gtk-CRITICAL **: 09:10:26.334: gtk_box_gadget_distribute: assertion ‘size >= 0’ failed in GtkScrollbar
(putty:49401): Gtk-CRITICAL **: 09:10:26.337: gtk_box_gadget_distribute: assertion ‘size >= 0’ failed in GtkScrollbar
Thanks for reporting this, ysa. These GTK-CRITICAL warnings about scrollbar distribution are cosmetic rendering messages from PuTTY’s GTK interface. They do not affect PuTTY’s functionality or SSH connections. The warnings appear because PuTTY’s GTK code encounters edge cases with certain scrollbar sizes during window initialization.
PuTTY should work normally despite these messages. If the application is otherwise functional, you can safely ignore the warnings. They only appear in the terminal you launched PuTTY from, not in PuTTY’s own terminal window. To avoid seeing these warnings, launch PuTTY from your applications menu instead of the command line.
If PuTTY crashes or fails to display properly, verify your GTK libraries are up to date with
sudo apt update && sudo apt upgrade. Alternatively, try the Flatpak version documented in the guide, which bundles its own GTK runtime and avoids conflicts with system libraries.Putty only connect to a serial port if running as root. Why?
Thanks for your comment, Bruno. Serial ports on Linux are restricted to the root user and
dialoutgroup by default for security reasons. To allow your user account to access serial devices without root privileges, follow these steps:First, add your user to the
dialoutgroup:After running the command, log out completely and log back in for the group membership to take effect. Verify the change with:
Expected output showing
dialoutin your groups:Next, verify the serial port permissions. Check the device file you want to use:
Expected output showing
dialoutgroup ownership:The
rw-permissions for thedialoutgroup allow read and write access. Once you are in thedialoutgroup and logged back in, PuTTY will connect to serial ports without requiring root access.Thanks for answering
I am already in the dialout group. Other apps, like minicom, works as expected. Any other hint for me?
Thanks for the follow-up, Bruno. Since you are already in the
dialoutgroup and Minicom works without root, this points to a PuTTY-specific configuration issue rather than system permissions. Let me walk you through diagnosing this.First, verify PuTTY can see the serial device. Launch PuTTY from the terminal to see any error messages:
In the PuTTY configuration window, select Serial as the connection type and enter your serial port path (for example,
/dev/ttyUSB0). If PuTTY shows a permissions error in the terminal when you click Open, run this command to check the exact device permissions:Expected output confirming group membership and permissions:
If the output shows you are in the
dialoutgroup but PuTTY still fails, this is typically caused by one of three issues. First, some Ubuntu systems have AppArmor or SELinux policies that restrict PuTTY specifically. Check if AppArmor is blocking PuTTY:If PuTTY appears in the output, temporarily disable the AppArmor profile to test:
Second, verify the serial device node has correct permissions. Some systems recreate device nodes with restrictive permissions on boot. If
ls -l /dev/ttyUSB0shows anything other thancrw-rw----withdialoutgroup, create a udev rule to fix permissions permanently:Third, if you installed PuTTY via Flatpak, the sandboxed environment may block direct hardware access. Flatpak applications require explicit permissions for device access. Grant PuTTY access to serial devices:
After running the override command, restart PuTTY and try connecting again. If you installed PuTTY via APT instead of Flatpak, this step does not apply. Let me know which of these resolves the issue, or if you see specific error messages when launching PuTTY from the terminal.