
Installing Xfce on Fedora is a DNF environment or group task, not a one-package xfce install. Fedora provides a full xfce-desktop-environment environment for a broader desktop set and a smaller hidden xfce-desktop group for the core session. Both standard paths install the normal X11 Xfce login entry; the Wayland session is a separate testing package.
For a clean Xfce-first system, download the official Fedora Xfce Spin. Use DNF when Fedora is already installed and you want to add Xfce beside another desktop or add a graphical Xfce session to a mutable Fedora system.
Fedora Atomic desktops use the rpm-ostree image model rather than normal DNF environment transactions. Choose the Fedora Xfce Spin for a clean Xfce install instead of layering a full desktop environment onto an Atomic desktop.
Install Xfce on Fedora
Update Fedora Packages First
Refresh repository metadata and apply pending updates before adding a desktop environment. Use an account with administrator access; if needed, configure a Fedora user in the wheel group for sudo access before starting the install.
sudo dnf upgrade --refreshChoose the Xfce Installation Path
Fedora publishes Xfce through a DNF environment and several package groups. The environment is the fuller existing-system path and should be the default choice for most Workstation installs. The hidden group remains useful when you want only the core Xfce session.
| Path | Install target | Best fit |
|---|---|---|
| Full DNF environment | xfce-desktop-environment | Existing Fedora desktop that should gain a broad Xfce desktop set, including standard desktop groups, Xfce applications, and multimedia support. |
| Core DNF group | xfce-desktop | Lean Xfce add-on session with the panel, session manager, window manager, Thunar, LightDM components, and core utilities. |
| Fedora Xfce Spin | Official ISO | Clean install where Xfce should be the primary desktop from first boot. |
Check the Xfce Environment and Group IDs
Check the available Fedora targets before installing. The key IDs are xfce-desktop-environment for the full environment and xfce-desktop for the hidden core group.
dnf environment list --available | grep -i xfce
dnf group list --hidden | grep -i xfce
Look for these IDs in the results:
xfce-desktop-environment          Xfce Desktop
xfce-desktop                      Xfce
Avoid stale commands such as dnf install xfce, dnf install xfce4, or legacy DNF aliases like groupinstall. DNF5 uses dnf environment install and dnf group install; the DNF5 group commands on Fedora reference covers the syntax in more detail.
Install the Full Xfce Desktop Environment
Install the full Fedora Xfce environment when you want the closest DNF-managed equivalent to a complete Xfce desktop on an existing system.
sudo dnf environment install xfce-desktop-environmentDNF displays a large transaction because the environment pulls in the core Xfce group plus supporting desktop groups. Review the transaction before accepting it, especially on systems that already have GNOME, KDE Plasma, or other large desktop stacks installed.
Install Only the Core Xfce Group
Install the hidden core group when you want a smaller Xfce session and prefer adding applications selectively afterward.
sudo dnf group install xfce-desktopThe xfce-desktop group is hidden in normal group listings, but it is valid when installed by ID. Fedora 44 package metadata shows this group includes the Xfce session, panel, window manager, desktop manager, Thunar file manager, terminal, LightDM packages, and related core components.
Add Optional Xfce Groups
The full environment already includes Fedora’s default Xfce applications and media groups. Add only the extra plugin or office groups if you used the full environment and want those additional components.
sudo dnf group install xfce-extra-plugins xfce-officeCore group installs can add the same optional groups plus the application and multimedia groups when a broader desktop application set is needed.
sudo dnf group install xfce-apps xfce-media xfce-extra-plugins xfce-officexfce-apps: Adds desktop applications such as Atril, Catfish, Claws Mail, Geany, GParted, Mousepad, Pidgin, Ristretto, and Xarchiver.xfce-media: Adds multimedia tools such as Parole, PulseAudio Volume Control, Pragha, and Xfburn.xfce-extra-plugins: Adds extra panel plugins for battery status, CPU graphs, sensors, weather, Whisker Menu, and other panel features.xfce-office: Adds LibreOffice Writer and Calc for document and spreadsheet work.
Verify Xfce Packages and Session Files
Confirm that the core Xfce packages and login-session file are present after installation.
rpm -q xfce4-session xfce4-panel xfdesktop xfwm4 Thunar
ls /usr/share/xsessions/xfce.desktop
The package check should print installed version lines, and the file check should print /usr/share/xsessions/xfce.desktop. That session file is the normal X11 Xfce login entry. Fedora 44 does not install xfce4-session-wayland-session through the full environment or core group path.
Log In to Xfce on Fedora
Reboot after installation so the display manager reloads its available desktop sessions.
sudo rebootSelect the Xfce Session
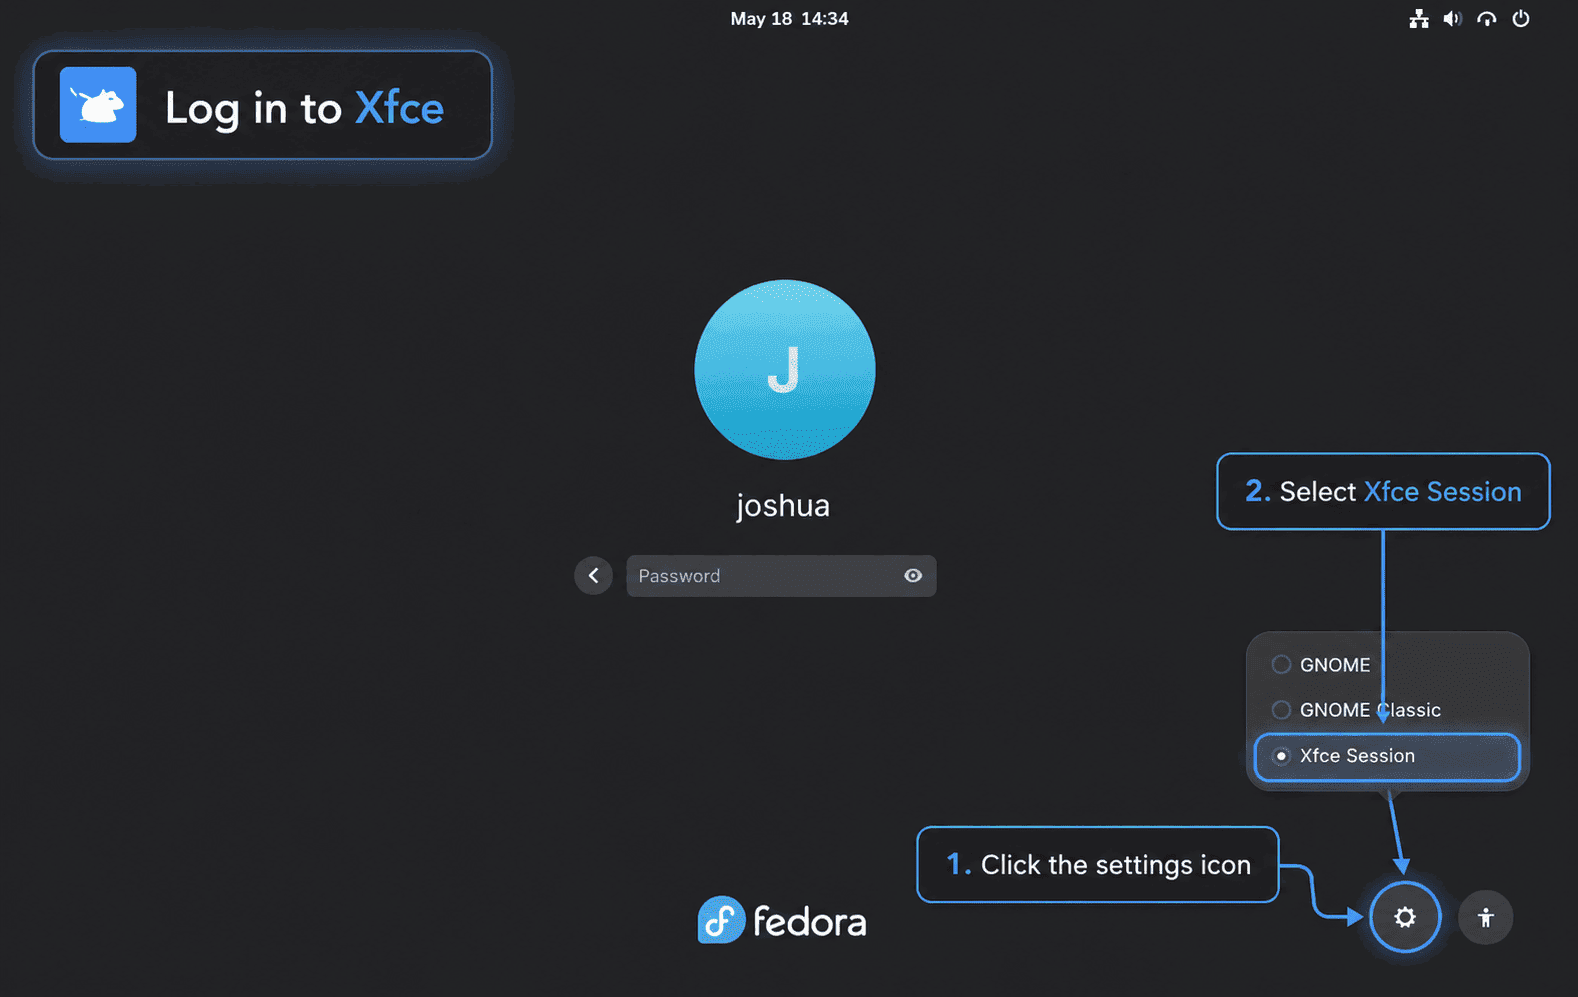
At the login screen, select your user, open the session selector, and choose the Xfce session before entering your password. Existing GNOME systems usually keep GDM, while systems installed from the Xfce Spin or switched later may use LightDM; both can launch Xfce.
The display manager remembers the selected session for later logins. To return to GNOME, KDE Plasma, or another installed desktop, log out and choose a different session from the same selector.
Confirm the Active Xfce Session
After logging in, check the session variables and Xfce session manager version from a terminal.
printf '%s\n' "$XDG_SESSION_DESKTOP"
printf '%s\n' "$XDG_SESSION_TYPE"
xfce4-session --version
A normal Fedora Xfce login should report an Xfce desktop and x11 as the session type. The session manager command prints the installed Xfce session version.
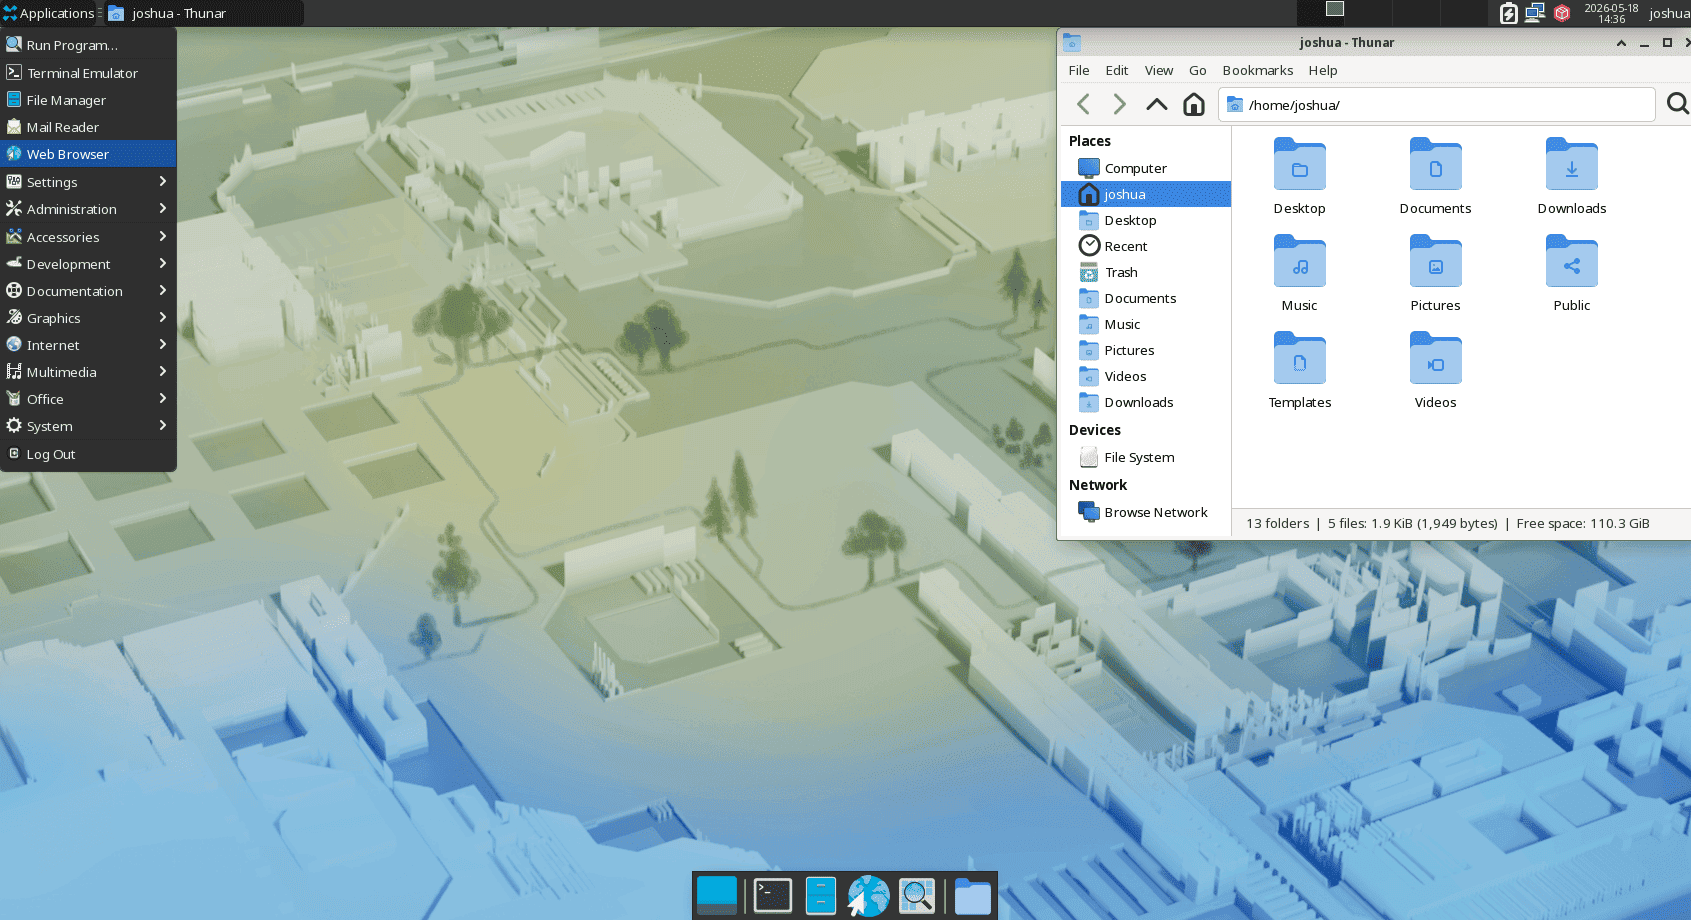
First Look at the Xfce Desktop
Xfce opens with a traditional panel, application menu, workspace switcher, system tray, and Thunar file manager integration. It is a lighter alternative to GNOME and KDE Plasma on Fedora when you prefer a compact desktop with fewer visual effects.
Use X11 or Wayland with Xfce on Fedora
The standard Fedora Xfce environment and core group install the X11 session file at /usr/share/xsessions/xfce.desktop. Xfce 4.20 includes experimental Wayland work, but upstream’s Xfce 4.20 changelog still describes Wayland support as experimental, and Fedora’s xfce4-session package changelog records that the Wayland session was split out so it is not installed by default.
Use the standard Xfce session for daily work. The upstream Xfce Wayland roadmap is useful for tracking progress, but install the separate Wayland package only when you intentionally want to test it.
sudo dnf install xfce4-session-wayland-sessionVerify the package, its compositor dependency, and the Wayland login-session file.
rpm -q xfce4-session-wayland-session labwc
ls /usr/share/wayland-sessions/xfce-wayland.desktop
After installing it, log out and look for the Xfce Wayland entry in the session selector. Return to the normal Xfce session if panel behavior, compositor behavior, screen sharing, remote desktop tools, or graphics drivers behave poorly. NVIDIA users who need driver-specific setup should also review the Fedora NVIDIA driver installation guide.
Manage Xfce on Fedora
Update Xfce Packages
Xfce packages update through Fedora’s enabled repositories. Use the normal system update command to update Xfce, the display manager packages, and the rest of the system together.
sudo dnf upgrade --refreshSystems that should apply updates automatically can use DNF Automatic on Fedora. Keep automatic updates aligned with your normal reboot and desktop-session workflow so display-manager and graphics stack updates are not left half-applied.
Manage the Display Manager
GDM can launch Xfce, so switching display managers is optional on Fedora Workstation. Check the current display manager before changing it.
systemctl status display-manager --no-pagerSwitch to LightDM only when you specifically want the Xfce-oriented login manager.
sudo systemctl enable --force lightdm.service
sudo reboot
Return to GDM before removing Xfce or whenever the GNOME login screen is preferred.
sudo systemctl enable --force gdm.service
sudo reboot
Troubleshoot Xfce on Fedora
DNF Cannot Find the Xfce Group
The core Xfce group is hidden in normal DNF group output. Query hidden groups and install by ID instead of relying on display names.
dnf group list --hidden | grep -i xfce
sudo dnf group install xfce-desktop
Legacy DNF Commands Fail
DNF5 no longer uses old aliases such as groupinstall or groupremove. Replace older examples with one current command that matches the install path you chose.
sudo dnf environment install xfce-desktop-environment
# or
sudo dnf group install xfce-desktop
Xfce Session Does Not Appear at Login
Check the core packages and the X11 session file first. A missing session file means the display manager has nothing to list.
rpm -q xfce4-session xfce4-panel xfdesktop
ls /usr/share/xsessions/xfce.desktop
If the checks fail, rerun the full environment install or the core group install, then reboot.
sudo dnf environment install xfce-desktop-environment
sudo reboot
Lean installations can rerun sudo dnf group install xfce-desktop instead.
Display Manager Fails or Loops at Login
Inspect the active display manager and recent boot logs when the login screen fails to start, loops after password entry, or returns immediately to the greeter.
systemctl status display-manager --no-pager
sudo journalctl -b -u display-manager -n 100 --no-pager
If LightDM is the failing component on a system that still has GNOME installed, switch back to GDM and reboot.
sudo systemctl enable --force gdm.service
sudo reboot
Wayland Session Is Missing or Unstable
The Wayland entry appears only after installing xfce4-session-wayland-session. Check the package and session file when the Wayland option is missing from the login screen.
rpm -q xfce4-session-wayland-session
ls /usr/share/wayland-sessions/xfce-wayland.desktop
If the Wayland session is installed but unstable, return to the normal Xfce session from /usr/share/xsessions/xfce.desktop and remove the testing package if you no longer need it.
sudo dnf remove xfce4-session-wayland-sessionRemove Xfce from Fedora
Do not remove Xfce from inside an active Xfce session. Log into GNOME, KDE Plasma, another installed desktop, or a text console, and make sure a working display manager remains enabled.
Restore GDM Before Removal
If you switched to LightDM and plan to keep GNOME, restore GDM before removing Xfce packages.
sudo systemctl enable --force gdm.service
sudo reboot
Remove the Full Xfce Environment
Use the environment remove path only if you installed the full environment.
sudo dnf environment remove xfce-desktop-environmentRemove the Core Xfce Group
Use the group remove path if you installed the lean xfce-desktop group.
sudo dnf group remove xfce-desktopRemove Optional Xfce Components
Remove optional Xfce groups and the optional Wayland session package only if you installed them.
sudo dnf group remove xfce-apps xfce-media xfce-extra-plugins xfce-office
sudo dnf remove xfce4-session-wayland-session
Review Unused Dependencies
After removing Xfce packages, review unused dependencies before accepting an autoremove transaction. Do not accept the removal if DNF proposes packages that belong to another desktop or application you still use.
sudo dnf autoremoveReboot after package removal so the display manager and session list reload cleanly.
sudo rebootConclusion
Fedora’s cleanest existing-system Xfce path is sudo dnf environment install xfce-desktop-environment, while sudo dnf group install xfce-desktop remains the lean core-session option. Keep the standard X11 Xfce session for daily work, treat xfce4-session-wayland-session as a separate testing path, and use the official Xfce documentation for deeper desktop customization after the Fedora packages are installed.

Hi.
nothing close to XFCE on version 40 under virtualbox (testing). The closest thing is xfdesktop, which seems to install nd create a group xfce, which I add myself too. Still, no xfce desktop in the boot menu.
Cheers.
Thanks for reporting this, Jean-marc. You were absolutely right. The article had the wrong command when you commented. The Xfce group in Fedora is named
xfce-desktop, not “Xfce”, and the group is hidden by default, which is why you could not find it indnf group list.The article has been updated with the correct installation command:
To verify the group exists before installing, use:
After installation and reboot, the Xfce session should appear in the gear icon menu at the login screen. Installing
xfdesktopalone does not provide the full desktop environment, which is why the session was missing. Your troubleshooting helped identify this documentation gap.