Accurate timezone configuration affects log timestamps, scheduled task execution (cron jobs), SSL certificate validation, and distributed system coordination. Incorrect timezone settings can make troubleshooting nearly impossible when log entries show the wrong time, cause automated tasks to run at unexpected hours, and create synchronization issues in multi-server environments. This guide walks you through setting the timezone on Debian to ensure your system maintains accurate time for all operations. First, you will learn both interactive and command-line methods. Next, you’ll verify the configuration persists across reboots. Finally, you’ll understand how timezone changes affect running services. By the end, you’ll have your Debian system configured with the correct timezone and know how to verify it’s working properly.
Choose Your Timezone Configuration Method
Debian provides three methods for timezone configuration, each suited to different workflows and environments. First, the interactive dpkg-reconfigure method provides visual menus with geographical selection, making it straightforward for initial setup. Alternatively, the timedatectl set-timezone command enables scriptable, non-interactive configuration ideal for automation and remote management. Finally, desktop users can also adjust timezone settings through the graphical system settings interface when a desktop environment is installed.
| Method | Interface | Best For | Automation-Friendly |
|---|---|---|---|
| timedatectl | Command Line | Scripts, remote servers, automation | Yes |
| dpkg-reconfigure | Interactive TUI | Initial setup, visual confirmation | No |
| GNOME Settings | Graphical UI | Desktop users, beginners | No |
Most system administrators prefer the timedatectl command for its speed and scriptability, while the interactive methods work well when you need to browse available timezones or prefer visual confirmation at each step.
Prerequisites for Timezone Configuration
Before adjusting your timezone settings, ensure you have the necessary permissions and packages installed. Most Debian installations include these components by default. However, minimal server deployments may require manual installation.
- Root or sudo access: Timezone changes affect all users and require administrative privileges.
- systemd package: Required for the
timedatectlcommand (pre-installed on standard Debian systems). - tzdata package: Provides timezone database files (pre-installed on all Debian installations).
The
timedatectlcommand requires systemd running as the init system. In containerized environments without systemd, use thedpkg-reconfigure tzdatamethod instead or manually create the/etc/localtimesymlink.
If you need to manage timezone settings remotely, ensure SSH is installed and enabled on Debian for secure access. Users without administrative privileges can request access by following the guide to add a user to sudoers on Debian.
Method 1: Set Timezone Using timedatectl Command
The timedatectl command provides the fastest method for timezone configuration and works perfectly in scripts and automation workflows. This approach requires systemd running as the init system. As a result, it allows you to set the timezone without interactive prompts, making it ideal for remote server management.
Check Current Timezone
First, check your current timezone configuration to understand what needs changing. The timedatectl command displays comprehensive time and date information including your current timezone, whether network time synchronization is active, and the relationship between your system clock and hardware clock.
timedatectl statusThe command returns detailed information about your system’s time configuration:
               Local time: Sun 2025-12-08 14:23:45 UTC
           Universal time: Sun 2025-12-08 14:23:45 UTC
                 RTC time: Sun 2025-12-08 14:23:45
                Time zone: Etc/UTC (UTC, +0000)
System clock synchronized: yes
              NTP service: active
          RTC in local TZ: no
The Time zone line shows your current configuration. In this example, the system uses UTC (Coordinated Universal Time). Additionally, the output indicates whether network time synchronization is active. However, NTP automatically adjusts your system clock but does not change the timezone setting.
List Available Timezones
Before setting a new timezone, you can browse all available timezone identifiers. This approach is particularly useful when you know your geographic region but need the exact timezone name that Debian recognizes.
timedatectl list-timezonesThis command displays a complete list of timezone identifiers organized by region. However, the output includes hundreds of entries. Therefore, you can filter for specific regions using grep:
timedatectl list-timezones | grep AmericaAmerica/New_York America/Chicago America/Denver America/Los_Angeles America/Phoenix America/Toronto
Once you identify your desired timezone from the list, note the exact identifier for the next step.
Set Timezone Non-Interactively
After identifying the correct timezone identifier, set it with a single command. Replace America/New_York in the example below with your chosen timezone:
sudo timedatectl set-timezone America/New_YorkThis command updates the system timezone immediately without prompting for confirmation. The change applies system-wide and affects all users, processes, and services. As a result, running services do not require restart. Instead, they automatically recognize the new timezone for future timestamps.
Verify Timezone Change
Confirm the timezone change succeeded by checking the status again:
timedatectl status Local time: Sun 2025-12-08 09:23:45 EST
Universal time: Sun 2025-12-08 14:23:45 UTC
RTC time: Sun 2025-12-08 14:23:45
Time zone: America/New_York (EST, -0500)
System clock synchronized: yes
NTP service: active
RTC in local TZ: no
The Time zone line now reflects your selected timezone (America/New_York in this example) along with the current timezone abbreviation (EST) and UTC offset (-0500). Notice how the local time changed to reflect the new timezone. In contrast, the universal time remained constant, demonstrating that timezone changes adjust display formatting without affecting the actual system time.
Additionally, verify the symbolic link that Debian uses to maintain timezone configuration:
ls -l /etc/localtimelrwxrwxrwx 1 root root 36 Dec 8 09:23 /etc/localtime -> /usr/share/zoneinfo/America/New_York
The symlink points to the timezone data file in /usr/share/zoneinfo/ that corresponds to your selected timezone. This configuration persists across system reboots. Additionally, both timedatectl and dpkg-reconfigure modify the same underlying symlink, ensuring consistency regardless of which method you use.
Debian 11 and Debian 12 also maintain a plain-text
/etc/timezonefile containing the timezone identifier. However, Debian 13 (Trixie) no longer creates this file by default. The/etc/localtimesymlink serves as the authoritative timezone configuration on all Debian versions.
Method 2: Set Timezone Interactively with dpkg-reconfigure
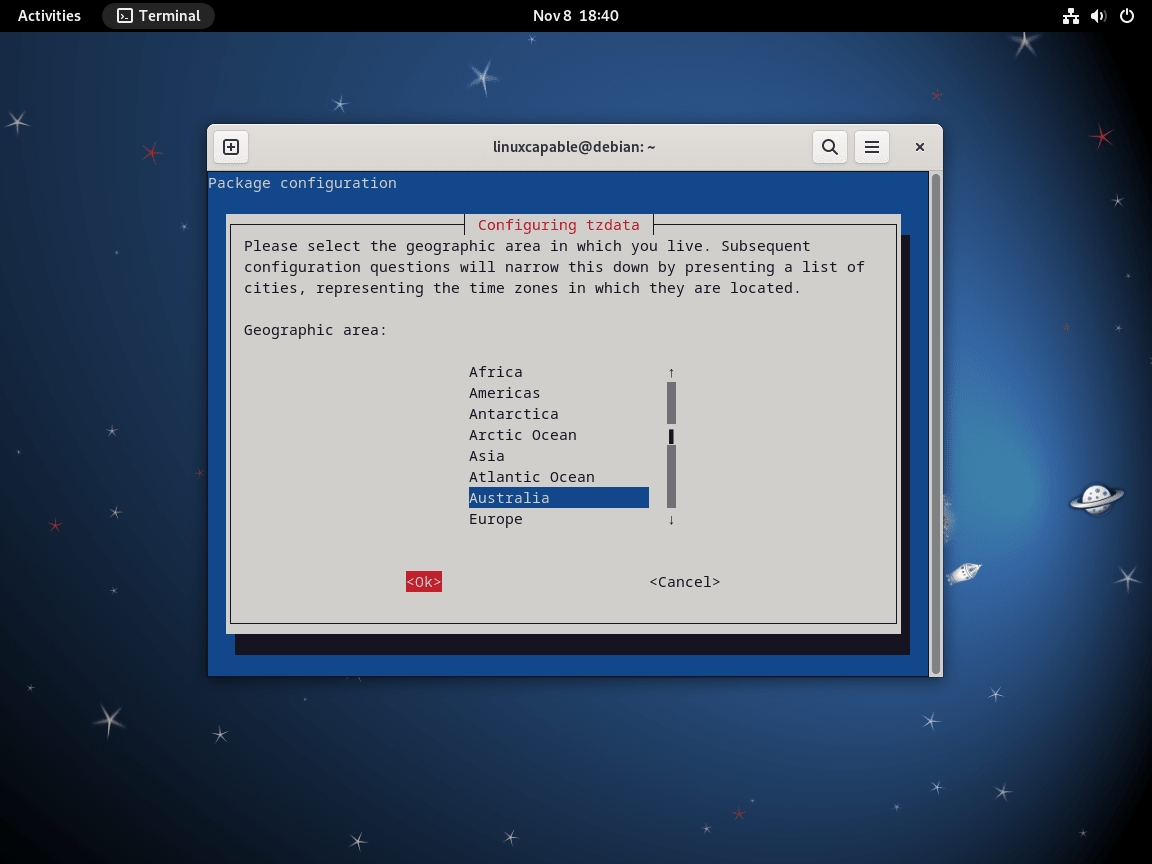
The dpkg-reconfigure tzdata command provides an interactive text-based menu for timezone selection. This method works particularly well for initial system setup. Alternatively, use this approach when you prefer browsing geographic regions visually rather than looking up timezone identifiers.
sudo dpkg-reconfigure tzdataThis command launches an interactive interface that first asks you to select your geographic region, then displays a list of cities or timezone identifiers within that region.

Use the arrow keys to navigate through the menus and the Enter key to confirm your selection. Once you select your timezone, the command completes and displays confirmation:
Current default time zone: 'America/New_York'
Local time is now:      Sun Dec  8 09:23:45 EST 2025.
Universal Time is now:  Sun Dec  8 14:23:45 UTC 2025.
The interactive method updates the same /etc/localtime symlink as the timedatectl command. Once complete, verify the change persists by checking the symlink with ls -l /etc/localtime, which should point to your selected timezone under /usr/share/zoneinfo/.
Method 3: Configure Timezone via GNOME Settings GUI
Desktop users running GNOME or other desktop environments can adjust timezone settings through the graphical system settings interface. This method requires a desktop environment installed and provides the most visual approach to timezone configuration.
This method applies to GNOME desktop environment specifically. Other desktop environments (KDE Plasma, Xfce, MATE) have similar settings panels in their respective system settings applications, typically under Date & Time or Clock settings.
Open GNOME Settings
Access the system settings panel through the system menu in the top-right corner of your screen. Alternatively, search for “Settings” in the application launcher. Once found, click the Settings icon to open the system configuration interface.
Navigate to Date and Time Settings
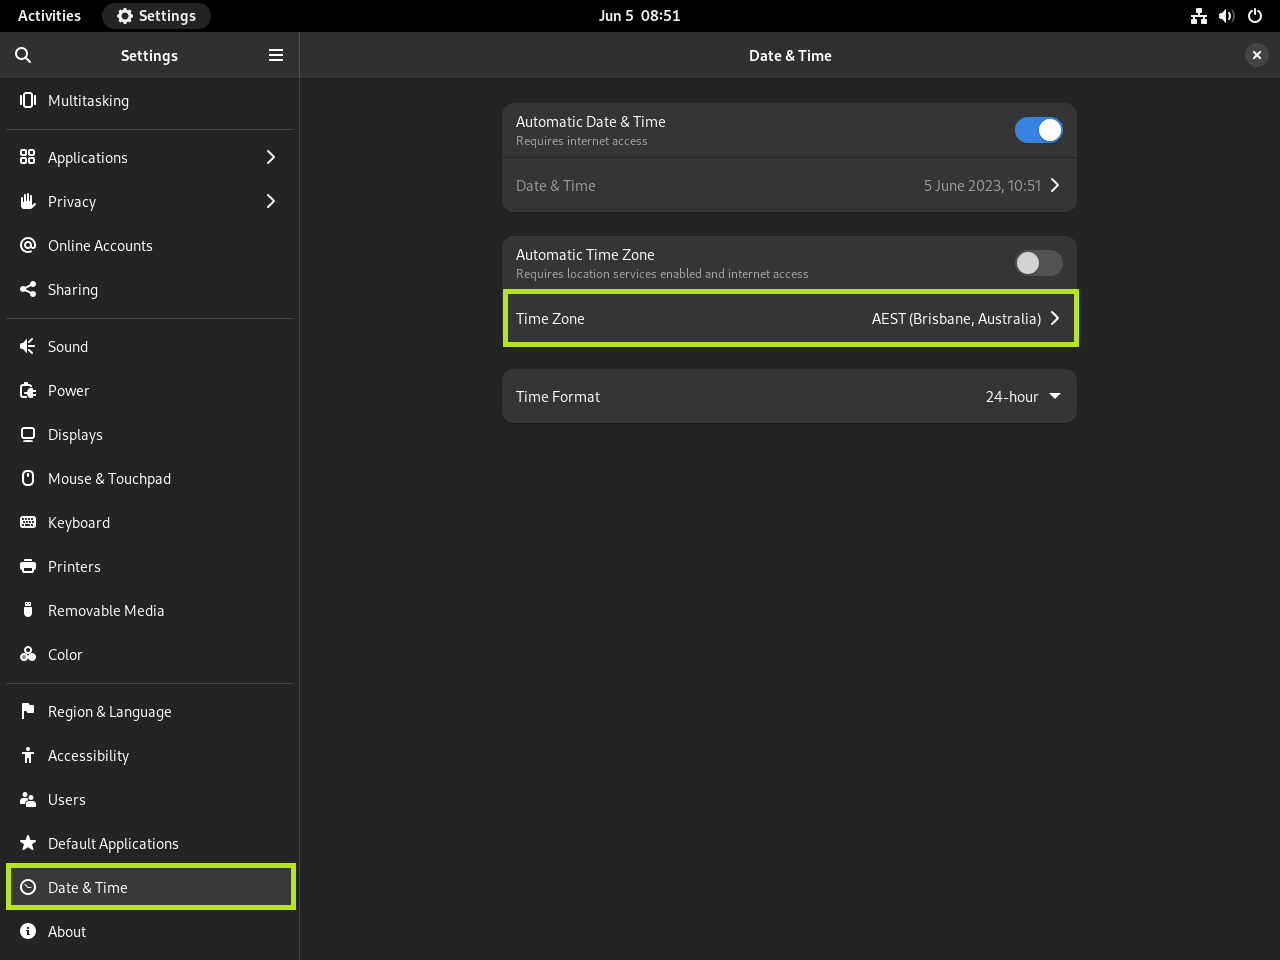
Once the Settings application opens, locate the Date & Time entry in the left sidebar. Next, click it to display your current timezone configuration in the main panel. Systems connected to the internet may have automatic timezone detection enabled. As a result, the system uses network location data to select an appropriate timezone automatically.

Select Your Timezone
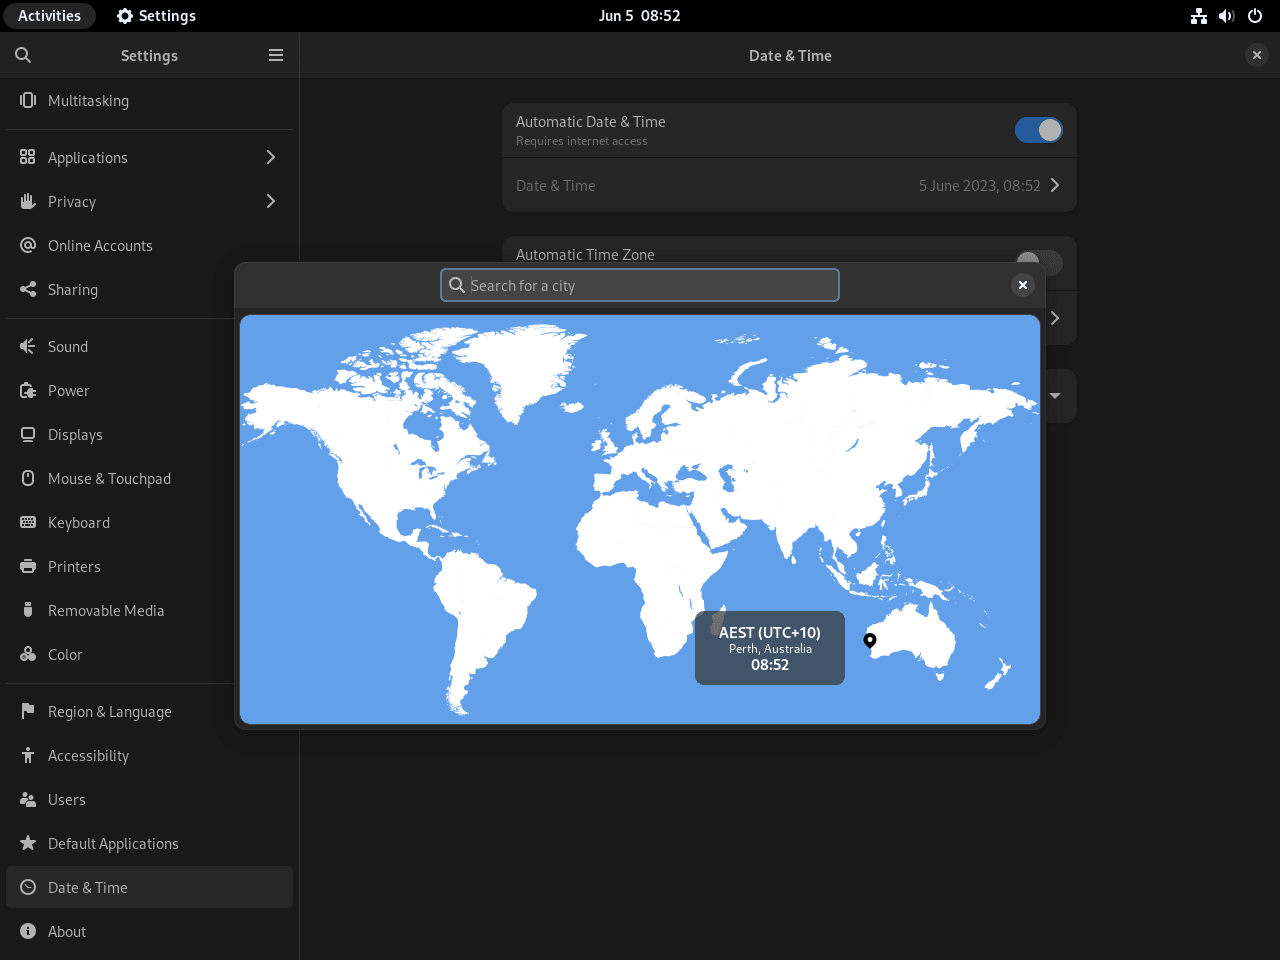
Click the Time Zone option to open an interactive world map interface. Next, click your geographic location on the map to automatically update the timezone setting. The interface updates immediately to reflect your selection. Consequently, you’ll see the new timezone abbreviation and current local time displayed.

After making your selection, close the map interface by clicking the X button in the top-right corner. The timezone change applies immediately without requiring a system restart. Subsequently, you can verify the change persists by opening a terminal and running timedatectl status as described in Method 1. For more advanced system configuration tasks, consider exploring how to enable contrib and non-free repositories on Debian to access additional software packages.
Troubleshooting Common Timezone Issues
Timezone configuration occasionally encounters issues related to system permissions, systemd availability, or conflicting time synchronization services. The following solutions address the most common problems reported by Debian users.
timedatectl Command Not Found
If running timedatectl returns “command not found,” the systemd package may not be installed. This typically occurs only in minimal or containerized Debian environments.
sudo apt update
sudo apt install systemd
After installation completes, verify the command works by checking your current timezone with timedatectl status.
System Not Booted with systemd Error
Containerized environments often lack systemd as the init system, causing timedatectl to fail with “System has not been booted with systemd as init system (PID 1).” In these situations, use the dpkg-reconfigure tzdata method instead. Alternatively, manually create the /etc/localtime symlink using sudo ln -sf /usr/share/zoneinfo/Your/Timezone /etc/localtime, which works without systemd.
Timezone Change Does Not Persist After Reboot
If your timezone reverts to UTC after rebooting, first verify the /etc/localtime symlink points to the correct timezone file:
ls -l /etc/localtimeThe symlink should point to a file under /usr/share/zoneinfo/ matching your desired timezone. However, if it points elsewhere or does not exist, recreate it manually:
sudo ln -sf /usr/share/zoneinfo/America/New_York /etc/localtimeReplace America/New_York with your chosen timezone identifier.
Permission Denied When Setting Timezone
Timezone changes require administrative privileges. If you receive “Permission denied” errors, ensure you prefix the command with sudo and that your user account has sudo access. Users without sudo privileges should follow the guide to add a user to sudoers on Debian.
Wrong Time Displayed After Timezone Change
If the local time appears incorrect after changing timezone, first verify your hardware clock (RTC) is set correctly. This issue commonly affects dual-boot systems. Therefore, check whether your RTC uses local time or UTC:
timedatectl status | grep "RTC in local TZ"Most Linux systems set the hardware clock to UTC (showing “RTC in local TZ: no”). However, if your system dual-boots with Windows, Windows typically expects the hardware clock in local time, which can cause conflicts. For dual-boot systems, either configure Windows to use UTC or set Linux to use local time:
sudo timedatectl set-local-rtc 1Using local time for the hardware clock can cause issues with daylight saving time transitions and is generally not recommended unless required for Windows dual-boot compatibility.
Reset Timezone to Default UTC
To revert your system to the default UTC (Coordinated Universal Time) timezone, use either the timedatectl command or the interactive method. UTC serves as the standard timezone for servers and systems that operate across multiple geographic regions. This configuration eliminates timezone-related confusion when coordinating with international teams or managing distributed infrastructure.
Reset to UTC using the direct command method:
sudo timedatectl set-timezone UTCAlternatively, run sudo dpkg-reconfigure tzdata and select “None of the above” from the geographic area menu. Next, choose “UTC” from the timezone list. Once complete, verify the change with timedatectl status to confirm the timezone shows as UTC.
Before making significant system changes, consider creating a system backup using Timeshift on Debian to preserve your configuration and data.
Conclusion
You now have your Debian system configured with the correct timezone using either the scriptable timedatectl set-timezone command for automation workflows, the interactive dpkg-reconfigure tzdata menu for visual confirmation, or the GNOME Settings interface for desktop environments. The configuration persists across reboots through the /etc/localtime symlink and applies immediately to all running processes without requiring service restarts. For production systems, consider enabling unattended upgrades on Debian to maintain timezone data packages automatically. Additionally, ensure network time synchronization remains active to keep your system clock accurate within the configured timezone. For more system administration tasks, explore how to install MariaDB on Debian for database services or install Nginx on Debian for web server deployments.

