

Apache HTTP Server (httpd) powers websites from personal blogs to enterprise applications. This guide walks you through installing Apache on CentOS Stream, configuring virtual hosts for multiple domains, securing traffic with Let’s Encrypt SSL certificates, and applying SELinux policies for production use. You will configure firewall rules, set up automatic certificate renewal, and verify each step with hands-on commands.
This guide covers CentOS Stream 9 and CentOS Stream 10. All commands work identically on both versions unless otherwise noted. CentOS Stream 8 reached end-of-life in May 2024 and is no longer supported.
Update CentOS Stream Before Installation
Before proceeding with the Apache installation on your CentOS Stream machine, we must verify that our system is fully up-to-date. This is more than just a precautionary measure. Updating your system helps prevent compatibility issues and significantly enhances its stability, security, and performance.
Run the following command to update all packages:
sudo dnf upgrade --refreshSpecifically, this command refreshes the package metadata and installs the latest updates and security patches. Wait for the update to complete before proceeding with the Apache installation.
Install Apache HTTPD via DNF Command
Next, the second step is to install Apache, or HTTPD, on your CentOS Stream system. This is a straightforward process, courtesy of the powerful DNF package manager. The DNF, or Dandified Yum, package manager simplifies installing, updating, and managing software packages.
To begin the installation of Apache (HTTPD), run the following command in your terminal:
sudo dnf install httpdAfter installation completes, verify Apache is installed correctly by checking the version:
httpd -vServer version: Apache/2.4.62 (CentOS Stream) Server built: Nov 6 2025 00:00:00
CentOS Stream 10 ships Apache 2.4.63, while CentOS Stream 9 includes Apache 2.4.62. Both versions support the same configuration syntax shown in this guide.
Enable Apache HTTPD at Boot
Once you have installed Apache, enable the service to start automatically at boot. This ensures your web server is available immediately after system restarts.
If the Apache (HTTPD) service is not active or set to run by default, use these commands in your terminal to start the service and ensure it runs on system boot:
sudo systemctl start httpd
sudo systemctl enable httpd
For instance, the first command, sudo systemctl start httpd, starts the Apache (HTTPD) service immediately, whereas the second command, sudo systemctl enable httpd, configures the service to start automatically upon system boot. By running these two commands, you ensure that Apache (HTTPD) remains accessible and ready to serve web requests whenever your system starts.
As an alternative, you can condense the two previous steps into one single command:
sudo systemctl enable httpd --nowThe –now option in the command sudo systemctl enable httpd –now simultaneously starts the Apache (HTTPD) service and configures it to launch on the system boot automatically. This single command unifies the two separate commands from the previous steps, making the process more streamlined and efficient.
Verify Apache HTTPD Service Status
Finally, we should verify the successful implementation and functioning of Apache (HTTPD) by utilizing the following systemctl command:
systemctl status httpd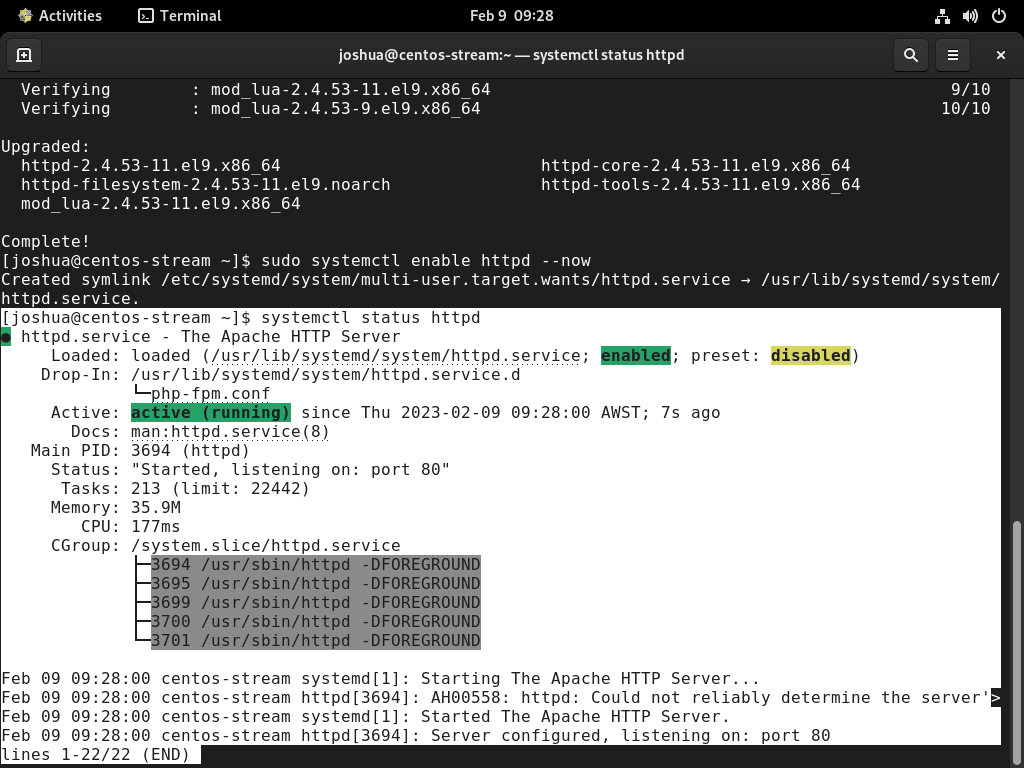
This command displays the real-time status of the Apache (HTTPD) service, including any errors or messages. If properly configured, you should see output indicating the service is active and running:
● httpd.service - The Apache HTTP Server
     Loaded: loaded (/usr/lib/systemd/system/httpd.service; enabled; preset: disabled)
     Active: active (running) since ...
   Main PID: 1234 (httpd)
     Status: "Total requests: 0; Idle/Busy workers 100/0;..."
      Tasks: 213 (limit: 22775)
     Memory: 25.0M
        CPU: 100ms
     CGroup: /system.slice/httpd.service
Typically, if the output shows “active (running)” in green, your Apache server is functioning correctly and ready to serve requests.
Configure FirewallD Rules
Following the installation of Apache (HTTPD) on CentOS Stream, you must configure firewall rules to allow HTTP and HTTPS traffic on ports 80 and 443 respectively.
If
firewall-cmdis not installed on your system (common in minimal installations), install it first withsudo dnf install firewalldand enable it withsudo systemctl enable firewalld --now.
Configure the firewall rules using the firewall-cmd tool, CentOS Stream’s default firewall management utility. The following steps cover the essential port configurations for your web server.
Opening Ports 80 and 443
Open ports 80 and 443 for HTTP and HTTPS traffic. The --permanent flag ensures rules persist after reboot:
sudo firewall-cmd --permanent --add-service=http
sudo firewall-cmd --permanent --add-service=https
Each command returns success when completed. Using service names (http, https) instead of port numbers makes firewall rules self-documenting.
Reload the firewall to apply the changes:
sudo firewall-cmd --reloadVerify the services are enabled:
sudo firewall-cmd --list-servicescockpit dhcpv6-client http https ssh
Firewall Security Considerations
Opening only the required ports minimizes your attack surface. For production servers, consider additional hardening such as rate limiting and fail2ban to protect against brute-force attacks.
SELinux Note: CentOS Stream enables SELinux by default. If Apache needs to make outbound network connections (e.g., for reverse proxy), run
sudo setsebool -P httpd_can_network_connect on. For content in non-standard directories, set the context permanently:sudo semanage fcontext -a -t httpd_sys_content_t "/path/to/content(/.*)?"followed bysudo restorecon -Rv /path/to/content.
Verifying Apache HTTPD Access
Verify Apache is running by opening a web browser and navigating to your server’s address:
http://your_server_ipOr use localhost if testing locally:
http://localhostIf Apache is configured correctly, you will see the default CentOS Stream HTTP server test page:

Create and Configure a Virtual Host
Virtual hosts allow Apache to serve multiple domains from a single server. Each virtual host has independent configuration for document root, logging, and SSL certificates. This section demonstrates creating a virtual host for example.com—replace this with your actual domain throughout the examples.
Creating and Configuring Directories
Create a directory to store your website files. The directory name typically matches your domain:
sudo mkdir /var/www/example.comSet appropriate permissions. Keep root ownership and use 755 for directories and 644 for files:
sudo chmod 755 /var/www/example.comKeep root ownership (
root:root) for security. Apache can read files owned by root as long as permissions are set correctly. Only useapache:apacheownership for directories that need write access, such as upload folders or cache directories.
Creating an index.html File
Create a test page to verify your virtual host configuration:
sudo nano /var/www/example.com/index.htmlAdd the following HTML content:
<html>
  <head>
    <title>Example Domain</title>
  </head>
  <body>
    <h1>Welcome to Example Domain</h1>
    <p>This is a sample page for the domain example.com.</p>
  </body>
</html>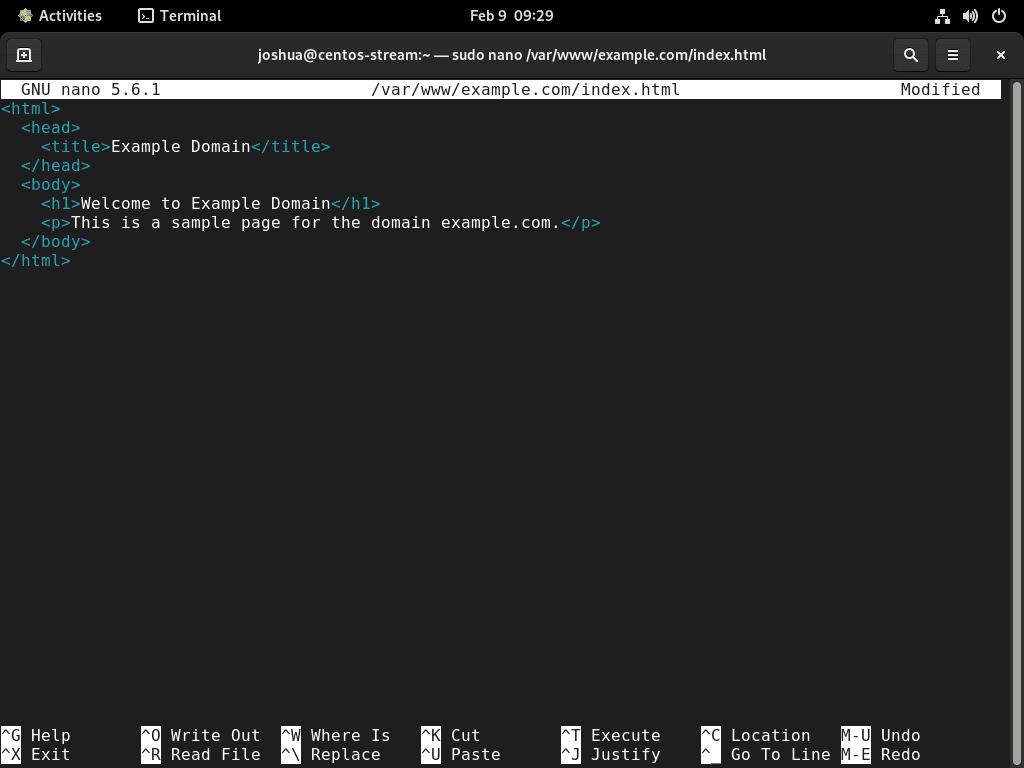
Upon finalizing the content of your index.html file, save the file and exit the text editor. In nano, press Ctrl+O to save, then Ctrl+X to exit.
CentOS Stream Apache uses
/etc/httpd/conf.d/for configuration files by default. This directory contains essential configs likessl.confand module settings. Keep the defaultIncludeOptional conf.d/*.confdirective enabled to avoid breaking SSL and other packaged configurations.
Create the Virtual Host Configuration File
Create a virtual host configuration file in /etc/httpd/conf.d/:
sudo nano /etc/httpd/conf.d/example.com.confAdd the following configuration, replacing example.com with your domain:
<VirtualHost *:80>
    ServerName example.com
    ServerAlias www.example.com
    DocumentRoot /var/www/example.com

    ErrorLog /var/log/httpd/example.com-error.log
    CustomLog /var/log/httpd/example.com-access.log combined

    <Directory /var/www/example.com>
        Options -Indexes +FollowSymLinks
        AllowOverride All
        Require all granted
    </Directory>
</VirtualHost>
This configuration includes logging directives, directory permissions, and disables directory listing for security.
Test the configuration for syntax errors before restarting Apache:
sudo apachectl configtestSyntax OK
If the test passes, the configuration is valid. If errors appear, the output shows the file and line number to fix.
Restart Apache to Load the Virtual Host
Restart Apache to apply the virtual host configuration:
sudo systemctl restart httpdOpen a browser and navigate to http://example.com (or your server’s IP address if testing locally). You should see the test page created earlier.

Additional Commands & Tips
Secure Directories and Files
Setting Secure Permissions
Set secure permissions to prevent unauthorized access. Use 755 for directories and 644 for files:
sudo find /var/www/example.com -type d -exec chmod 755 "{}" \;
sudo find /var/www/example.com -type f -exec chmod 644 "{}" \;
Verify permissions are set correctly:
ls -la /var/www/example.comtotal 12 drwxr-xr-x 2 root root 4096 Dec 12 10:00 . drwxr-xr-x 3 root root 4096 Dec 12 10:00 .. -rw-r--r-- 1 root root 245 Dec 12 10:00 index.html
Keep files owned by root. Apache can read root-owned files with 644 permissions. Only change ownership to
apache:apachefor directories that require write access, such as upload folders or application cache directories.
Secure Apache with Let’s Encrypt SSL
Install Certbot and the Apache Plugin
Securing your Apache server with an SSL certificate encrypts traffic between your server and visitors. Let’s Encrypt provides free, automated SSL certificates through the Certbot tool. First, enable the CRB repository and install EPEL, which provides Certbot packages.
Install the DNF configuration manager plugin:
sudo dnf install -y dnf-plugins-coreEnable the CRB (CodeReady Builder) repository:
sudo dnf config-manager --set-enabled crbVerify CRB is enabled:
dnf repolist | grep crbcrb CentOS Stream 9 - CRB
Next, install the EPEL repository. For a detailed guide on EPEL configuration, see our EPEL installation guide for CentOS Stream:
sudo dnf install epel-release -yWith EPEL enabled, install mod_ssl (the Apache SSL module) and Certbot with the Apache plugin:
sudo dnf install mod_ssl certbot python3-certbot-apache -yVerify Certbot installed correctly by checking the version:
certbot --versioncertbot 3.x.x
Run Certbot for Apache
Run the following command in your terminal to generate your SSL certificate using Certbot.
sudo certbot --dry-run --apache --agree-tos --redirect --hsts --staple-ocsp --email you@example.com -d www.example.comFor those new to Let’s Encrypt, you may seek more information on the abbreviation in the command.
- The “–dry-run” option lets you execute a test run of the certificate generation process without altering the system. This option is valuable for testing.
- The “–apache” option is to generate a certificate for an Apache web server.
- The “–agree-tos” option allows you to accept the terms of service from Let’s Encrypt, the certificate authority that provides the SSL certificate.
- The “–redirect” option automatically redirects all HTTP traffic to HTTPS.
- The “–hsts” option enables HTTP Strict Transport Security (HSTS). This security feature helps protect against protocol downgrade attacks and cookie hijacking by telling browsers only to access your website over a secure HTTPS connection.
- The “–staple-ocsp” option enables Online Certificate Status Protocol (OCSP) stapling, which verifies an SSL certificate’s revocation status without contacting the certificate authority.
- Use the “–email” option to specify the email address you want to associate with the certificate.
- The “-d” option specifies the domain name for which you will generate the certificate. In this example, the domain name is “www.example.com.”
Alternatively, you can use the following command and follow the step-by-step prompts for a more accessible experience.
sudo certbot certonly --apacheAfter testing with --dry-run, issue the actual certificate. Include both the apex domain and www subdomain:
sudo certbot --apache --agree-tos --redirect --hsts --staple-ocsp --email you@example.com -d example.com -d www.example.comReplace you@example.com with your email address and example.com with your domain. Certbot automatically configures Apache to use the certificate and creates renewal hooks.
Certbot automatically creates and manages the SSL configuration in
/etc/httpd/conf.d/example.com-le-ssl.conf. Do not manually edit/etc/httpd/conf.d/ssl.confor add certificate paths—Certbot handles all SSL directives during certificate issuance.
Automating Certificate Renewal
To keep the SSL certificate up-to-date, set up a cron job for automatic renewal. Test the renewal process with a dry run:
sudo certbot renew --dry-runCertbot from EPEL automatically creates a systemd timer to check and renew certificates. Verify the timer is active:
systemctl list-timers certbot*You should see the certbot-renew.timer scheduled to run periodically. This timer automatically checks your certificates and renews them before expiration. You can also view all system timers with:
systemctl list-timers --allApache HTTPD Management
With Apache successfully set up on your server, here are some essential points to remember for effective management.
View Apache Server Logs
Generally, Apache server logs are stored in the directory at /var/log/httpd/. The default filenames for the access and error logs are access.log and error.log, respectively. However, changing these names in the virtual host configuration file is possible.
Here’s an example of changing the Apache server logs in the virtual host configuration file.
<VirtualHost *:80>
    ServerName www.example.com
    DocumentRoot /var/www/example.com

    # Change access log to custom-access.log
    CustomLog /var/log/httpd/custom-access.log combined

    # Change error log to custom-error.log
    ErrorLog /var/log/httpd/custom-error.log
</VirtualHost>
In this case, this example changes the access and error logs to custom-access.log and custom-error.log, respectively. You can change the names of the log files to whatever you prefer and update the corresponding path in the virtual host configuration file.
Common Apache Commands
Here are some of the frequently used commands when managing Apache:
Stop Apache webserver:
sudo systemctl stop httpdStart Apache webserver:
sudo systemctl start httpdRestart Apache webserver:
sudo systemctl restart httpdReload Apache webserver:
sudo systemctl reload httpdDisable Apache on server boot:
sudo systemctl disable httpdEnable Apache on server boot:
sudo systemctl enable httpdUpdate Apache HTTPD
To keep Apache updated, run the command you typically use to check if your system is up to date.
sudo dnf update --refreshHowever, it’s important to make backups or create images of your system before performing any upgrades, as bugs can sometimes occur. The following command will refresh all system packages, including Apache, and prompt you to upgrade.
Remove Apache HTTPD
To uninstall Apache from your system, use the following command.
sudo systemctl disable httpd --nowNow, use the following command to remove Apache altogether.
sudo dnf remove httpdWarning: The following command permanently deletes all Apache configuration files, virtual host configurations, and SSL certificates stored in
/etc/httpd/. Back up any configurations you want to keep before proceeding.
Remove the Apache configuration directory:
sudo rm -rf /etc/httpd/Finally, remove any orphaned dependencies that were installed with Apache:
sudo dnf autoremoveVerify Apache has been removed:
rpm -q httpdpackage httpd is not installed
Troubleshoot Apache HTTPD
If Apache fails to start or serve content, check these common issues.
Configuration Syntax Errors
Test Apache configuration before restarting the service:
sudo apachectl configtestSyntax OK
If errors appear, the output shows the file and line number containing the problem.
Port 80 Already in Use
If Apache fails to start with “Address already in use”, check what process is using port 80:
sudo ss -tlnp | grep :80LISTEN 0 511 *:80 *:* users:(("httpd",pid=1234,fd=4))
The output shows which process (and PID) is listening on port 80. Stop the conflicting service or configure Apache to use a different port.
SELinux Denials
Check for SELinux denials in the audit log:
sudo ausearch -m avc -ts recent | grep httpdIf denials appear, the output shows the blocked action. Common fixes include enabling httpd_can_network_connect for reverse proxy setups (sudo setsebool -P httpd_can_network_connect on) and labeling custom document roots with semanage fcontext followed by restorecon.
Permission Denied on Document Root
Ensure Apache can read your document root:
sudo namei -l /var/www/example.comf: /var/www/example.com drwxr-xr-x root root / drwxr-xr-x root root var drwxr-xr-x root root www drwxr-xr-x root root example.com
Every directory in the path must have execute permission (755). If any directory shows drwx------ or lacks the x bit for others, Apache cannot traverse the path. Fix with chmod 755 on the restricted directory.
Conclusion
With Apache HTTP Server and Let’s Encrypt SSL certificates deployed on your CentOS Stream system, your web server is ready for production use. The EPEL-based Certbot installation handles automatic certificate renewals, and systemd ensures Apache starts with your server. To extend this setup into a full LAMP stack, continue with our guide to install PHP on CentOS Stream.

Formatting tips for your comment
You can use basic HTML to format your comment. Useful tags currently allowed:
<code>command</code>command<strong>bold</strong><em>italic</em><blockquote>quote</blockquote>