
Optical discs still matter when you need a bootable DVD, an audio CD for older hardware, or an offline archive that does not depend on cloud storage. To install Brasero on Ubuntu, use the native universe package for the cleanest GNOME desktop integration, or choose the Flathub build if your desktop already revolves around Flatpak.
Brasero can create audio CDs, data discs, video DVDs, disc copies, and ISO image burns. On Ubuntu 26.04, 24.04, and 22.04, the APT package and Flathub app both install the Brasero 3.12.3 series, while package revisions, runtimes, and cleanup commands differ by method.
Install Brasero on Ubuntu
Brasero is available as a native Ubuntu package and as a sandboxed Flatpak build from Flathub. Pick the method that matches how you prefer to manage desktop software:
| Method | Source | Package Line | Updates | Best Fit |
|---|---|---|---|---|
| APT (recommended) | Ubuntu universe repository | Ubuntu 3.12.3 package series | With system updates | Most users who want zero extra setup and full desktop integration |
| Flatpak | Flathub (unverified) | Flathub stable app | Via Flatpak refresh | Users who prefer sandboxed apps or already use Flathub |
Use APT unless you have a Flatpak reason. The Ubuntu package installs the desktop launcher, burn helpers such as brasero-cdrkit, and release-matched libraries through the normal package manager. The Flathub package is useful for sandboxed desktop workflows, but Flathub currently marks the Brasero listing as unverified.
Ubuntu users do not need a separate Brasero .deb download. Use APT for the native package, or use Flathub when you specifically want the sandboxed app and runtime update path.
These steps cover Ubuntu 26.04, 24.04, and 22.04 LTS. The APT package is available from Ubuntu’s universe component on all three releases; the Flatpak method works after Flatpak and Flathub are configured.
Update Ubuntu Before Installing Brasero
Open a terminal from the Activities overview or your desktop applications menu, then update your package index and apply pending upgrades to prevent dependency conflicts:
sudo apt update && sudo apt upgradeThe commands below use
sudofor tasks that need root privileges. If your account is not in the sudoers file yet, follow the guide on how to add and manage sudo users on Ubuntu.
Method 1: Install Brasero with APT
The Brasero package is available from Ubuntu’s universe repository. If a minimal or customized system reports that the package cannot be located, follow the guide to enable Universe and Multiverse repositories on Ubuntu, then return to this command:
sudo apt install braseroAPT also installs the disc-burning helpers Brasero calls behind the scenes, including brasero-cdrkit, genisoimage, growisofs, and wodim. These tools handle the actual CD and DVD writing tasks while Brasero provides the graphical workflow.
Verify the Brasero APT Installation
Confirm the package installed by checking the installed-state line from dpkg. The grep '^ii' filter returns only packages that are installed; the Linux grep command guide explains the pattern syntax if you want a refresher.
dpkg -l brasero | grep '^ii'Relevant output on Ubuntu 26.04 includes:
ii brasero 3.12.3-8 amd64 CD/DVD burning application for GNOME
Ubuntu 24.04 currently shows 3.12.3-2build4, and Ubuntu 22.04 shows 3.12.3-1. The upstream application series remains 3.12.3 across the supported LTS releases.
Method 2: Install Brasero via Flatpak and Flathub
The Flathub package installs Brasero as a sandboxed desktop app. Choose this method when you already use Flatpak for GUI apps or want the app and its GNOME runtime managed outside Ubuntu’s APT package set.
Flatpak is not pre-installed on Ubuntu. If you have not set it up yet, follow the guide to install Flatpak on Ubuntu and add the Flathub repository before continuing.
Add Flathub at system scope if it is not already present:
sudo flatpak remote-add --if-not-exists flathub https://dl.flathub.org/repo/flathub.flatpakrepoConfirm the remote exists before installing the app:
flatpak remotes --columns=name,options | grep -w flathubflathub system
Install Brasero from Flathub. The -y flag accepts Flatpak’s confirmation prompt:
sudo flatpak install flathub org.gnome.Brasero -yVerify the installed Flatpak metadata:
flatpak info org.gnome.BraseroRelevant output includes:
          ID: org.gnome.Brasero
         Ref: app/org.gnome.Brasero/x86_64/stable
        Arch: x86_64
      Branch: stable
     Version: 3.12.3
      Origin: flathub
Launch Brasero on Ubuntu
Once installation completes, launch Brasero from either the terminal or your applications menu.
Launch Brasero from Terminal
Run the command that matches how you installed Brasero:
APT installation:
braseroFlatpak installation:
flatpak run org.gnome.BraseroBrasero opens with your saved preferences after either command.
Launch Brasero from Applications Menu
Alternatively, launch Brasero from your application menu:
- Click the Activities overview in the top-left corner or press the Super key to open the application search.
- Select the “Show Applications” icon at the bottom of the dock or start typing “Brasero” to search.
- Click “Brasero” when it appears in the list to launch the application.
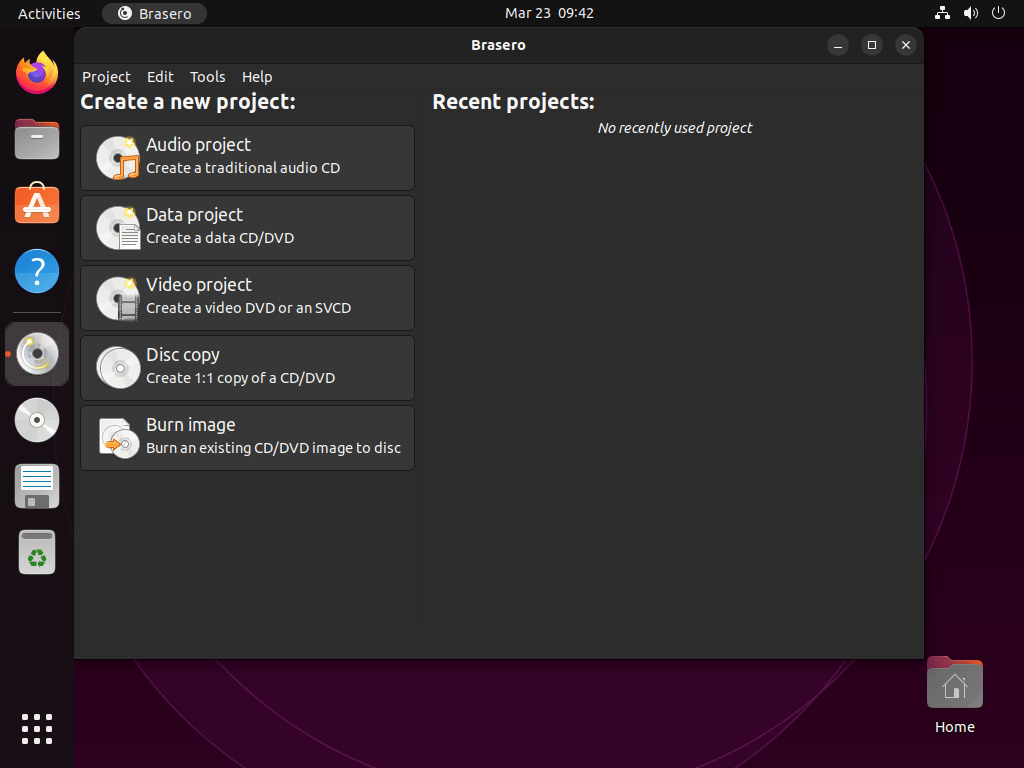
Configure Your First Brasero Disc Project
When Brasero opens, the main window displays project type options for common disc-burning tasks.
Start Your First Brasero Burn
Select a project type from the main window based on your needs:
- Audio project: Create music CDs playable in standard CD players. Brasero converts formats like MP3, FLAC, and OGG automatically when the needed GStreamer plugins are present.
- Data project: Back up files and folders to CD or DVD. This is useful for archiving documents, photos, or system backups.
- Video project: Create video DVDs playable on DVD players. Brasero handles format conversion when the needed codecs are available.
- Disc copy: Create exact duplicates of existing discs or copy disc contents to an ISO image file.
- Burn image: Write ISO, TOC, or CUE disc images to CD or DVD for operating system installations or software distributions.
Brasero writes ISO, TOC, and CUE images to optical discs, not USB flash drives. If your goal is to write an installer ISO to a USB stick, use GNOME Disks, Startup Disk Creator, or another USB imaging tool instead.
Use CD-R discs for audio CDs rather than CD-RW, since most standalone CD players lack the laser sensitivity to read rewritable formats reliably. CD-RW discs work well for data backups where you need to erase and reuse the media.
Configure Brasero Burn Settings
Before starting your burn, configure these settings for more reliable results:
- Burning speed: Lower speeds, such as 4x or 8x, are often more reliable for older drives or cheap media. Maximum speed is usually fine for quality discs and modern drives.
- Burnproof: Keep this enabled unless you have a specific reason to disable it. Burnproof helps prevent buffer underrun errors that can ruin writable discs.
- Temporary directory: Brasero needs working space before it burns a disc. Make sure
/tmphas at least twice the final project size available.
Enable Brasero Disc Verification
Brasero offers a verification checkbox in the burn dialog that compares burned data against the source files. The check adds a few minutes to the burn time, but it confirms your data was written correctly, which is worth enabling for backups and operating system installer discs.
Troubleshoot Brasero on Ubuntu
Fix Brasero Disc or Drive Not Detected
If Brasero does not detect your optical drive or inserted disc, start with the physical checks:
- Verify the disc is properly seated in the drive tray.
- Check whether the drive appears in Files or another file manager.
- Try a different disc to rule out media defects.
- Restart Brasero after inserting the disc.
Next, confirm that your account belongs to the cdrom group:
groupsThe output lists all groups for your account:
username adm cdrom sudo dip plugdev lpadmin sambashare
If cdrom does not appear in this list, use the permission fix below.
Fix Brasero Burn Failures and Buffer Underruns
If burns fail or produce unusable discs, work through the common causes first:
- Reduce burning speed to 4x or 8x for more reliable writes.
- Close other applications during burning to free system resources.
- Check available space in the
/tmpdirectory. - Keep Burnproof enabled in burn settings.
- Try different disc brands, because quality varies between manufacturers.
- For rewritable discs, blank the disc completely before another burn if previous writes failed.
Use this command to see how much temporary space is available:
df -h /tmpExample output:
Filesystem      Size  Used Avail Use% Mounted on
tmpfs           3.9G   48K  3.9G   1% /tmp
Brasero needs at least twice the project size available in /tmp for temporary files. If /tmp is tight, clear temporary files or choose a different temporary directory in Brasero’s preferences.
Fix Brasero DVD Compatibility Issues
If you experience problems burning DVDs, verify these compatibility factors:
- Check whether your drive accepts DVD+R, DVD-R, DVD+RW, and DVD-RW media. Drives labeled “multi” typically accept both plus and minus formats.
- Confirm that the disc type matches your drive’s capabilities, especially for dual-layer media.
- For DVD-R discs, use blank media that has not been written before.
- For DVD-RW or DVD+RW discs, blank the disc before writing if it already contains data.
Fix Brasero Permission Errors
If Brasero reports permission errors when accessing the drive, add your user to the cdrom group without removing existing group memberships:
sudo usermod -aG cdrom $USERThe -aG option appends cdrom instead of replacing your other supplementary groups. For terminal checks, activate the new group membership in your current shell:
newgrp cdromYou still need to log out and back in for the group membership change to reach graphical apps, even if you refresh the terminal session with
newgrp.
Fix Brasero Unsupported Format Errors
If Brasero cannot recognize audio or video files, install the broader GStreamer plugin sets for codec coverage:
sudo apt install gstreamer1.0-plugins-bad gstreamer1.0-plugins-uglyAdd proprietary codecs for AAC or WMA playback only when you need to process media that depends on those formats:
sudo apt install ubuntu-restricted-extrasThe ubuntu-restricted-extras package comes from the multiverse component and also installs Microsoft core fonts and extra multimedia libraries, so skip it if you prefer to keep proprietary components off your system.
Finally, verify file integrity, because corrupted files cannot be converted or burned successfully. Run a checksum on troublesome media files or ISO images and compare it to the source download page:
sha256sum /path/to/download.isoGrant Brasero Flatpak Access to Removable Media
The Brasero Flatpak already declares device access plus home and GVFS filesystem access. Check those permissions before adding any override:
flatpak info --show-permissions org.gnome.BraseroRelevant output includes:
[Context]
shared=ipc;
sockets=x11;wayland;pulseaudio;fallback-x11;
devices=all;
filesystems=home;xdg-run/gvfsd;
If the Flatpak build still cannot reach removable media mounted under /run/media/$USER, add a user-scoped filesystem override for that path. Use --user even when the app was installed with sudo, because Flatpak stores per-user overrides separately from the system app install.
flatpak override --user --filesystem=/run/media/$USER org.gnome.BraseroReset the override when you no longer need the extra filesystem access:
flatpak override --user --reset org.gnome.BraseroManage Brasero Updates and Removal on Ubuntu
Update Brasero on Ubuntu
Updates follow the method you selected during installation. To update only the APT package without upgrading every package on the system, run:
sudo apt update && sudo apt install --only-upgrade braseroFor Flatpak installations, refresh the Flathub app directly:
sudo flatpak update org.gnome.Brasero -yRemove Brasero from Ubuntu
Remove Brasero with the command that matches your installation source.
APT installation:
sudo apt remove braseroPreview orphaned dependencies before removing them, because reused systems can have unrelated packages marked as autoremovable:
sudo apt autoremove --dry-runIf the preview only lists Brasero helper packages or other packages you intentionally want to remove, run the cleanup:
sudo apt autoremoveVerify the APT package is no longer installed with an installed-state check:
dpkg -l brasero | grep '^ii' || echo "Brasero is not installed"Brasero is not installed
If you added your account to the cdrom group only for Brasero, remove that extra group membership after confirming no other optical-disc tools need it:
sudo gpasswd --delete $USER cdromRun groups again after a fresh login; cdrom should no longer appear if the revoke was intentional and successful.
Group membership changes do not fully apply to graphical sessions until you log out and back in. Keep
cdrommembership if you still use other disc-burning tools.
Flatpak installation:
sudo flatpak remove org.gnome.Brasero -yVerify the Flatpak app is no longer listed:
sudo flatpak list --app --columns=application | grep -Fx org.gnome.Brasero || echo "Brasero Flatpak is not installed"Brasero Flatpak is not installed
After removing the application, clean up unused Flatpak runtimes:
sudo flatpak remove --unused -yConclusion
For most Ubuntu desktops, Brasero’s APT package is the simpler long-term setup because updates and removal stay with the system package manager. The Flatpak build remains a workable sandboxed alternative, especially on systems already using Flathub. Whichever method you use, keep disc verification enabled for important backups or installer DVDs, and use a USB imaging tool when the target is a flash drive rather than optical media.

Formatting tips for your comment
You can use basic HTML to format your comment. Useful tags currently allowed in published comments:
<code>command</code>command<strong>bold</strong><em>italic</em><a href="https://example.com">link</a><blockquote>quote</blockquote>