
Ubuntu users can now install two official Anthropic products: Claude Desktop for a graphical Chat, Cowork, and Code workspace, or Claude Code for a terminal-native coding agent. Claude Desktop for Linux is in beta and installs from Anthropic’s signed APT repository. Claude Code remains available through the recommended native installer, an official APT repository, Homebrew, or npm.
Ubuntu 26.04 LTS (Resolute Raccoon), Ubuntu 24.04 LTS (Noble Numbat), and Ubuntu 22.04 LTS (Jammy Jellyfish) can use the same install paths. Claude Desktop requires a graphical session, while the CLI also works over SSH and on Ubuntu Server. Anthropic publishes the Desktop and APT packages for amd64 and arm64; the repository steps stop on any other architecture.
Choose Claude Desktop or Claude Code on Ubuntu
Choose the product first, then use one installation method for it. Desktop provides the graphical Claude experience and can open Claude Code sessions from its Code tab. The claude CLI stays focused on terminal and automation workflows. Installing both is supported, but each has its own package and update path.
| Method | Product | Updates | Best For |
|---|---|---|---|
| Anthropic Desktop APT repository | Claude Desktop | apt package upgrades | Graphical Chat, Cowork, and Code workflows |
| Native installer | Claude Code CLI | Built-in background updater | Most terminal, SSH, and server users |
| Anthropic CLI APT repository | Claude Code CLI | apt package upgrades | Package-managed workstations and fleets |
| Homebrew cask | Claude Code CLI | brew upgrade | Existing Homebrew environments |
| npm | Claude Code CLI | Reinstall the latest npm package | Existing Node.js 22 or newer workflows |
If you searched for Claude Desktop on Ubuntu, the Linux app is now official; older guidance that says Linux is unsupported is obsolete. If you only need the Claude CLI, install Claude Code instead. Ubuntu’s default repositories contain neither product, so sudo apt install claude-desktop or sudo apt install claude-code works only after adding the matching Anthropic repository.
Claude Desktop signs in through Claude.ai or your organization’s single sign-on flow. A Claude Console API key is not entered directly into Desktop. Claude Code supports Claude.ai accounts as well as Console and supported cloud-provider authentication, so choose the sign-in path that matches how your organization provides access.
The current Linux beta does not include Computer Use or dictation. Its Quick Entry global shortcut works on X11; native Wayland sessions need a desktop environment with the GlobalShortcuts portal. These are product limitations rather than installation failures.
Do not paste API keys into commands copied from an article. Start the installed app or CLI and complete Anthropic’s interactive sign-in flow instead.
Install Claude Desktop or Claude Code on Ubuntu
Install Claude Desktop with the Anthropic APT Repository
Add the Anthropic Claude Desktop Repository
According to Anthropic’s Claude Desktop for Linux documentation, the app supports Ubuntu 22.04 and newer on amd64 and arm64. Use the signed APT repository so Ubuntu owns the install and future package upgrades. Install the download, certificate, and key-inspection tools first:
sudo apt update
sudo apt install curl ca-certificates gnupg -y
Download Anthropic’s release key to a temporary file, verify its full fingerprint in an isolated GnuPG directory, and install it only when the fingerprint matches:
tmp_key="$(mktemp)"
tmp_gnupg="$(mktemp -d)"
status_code=1

if curl -fsSLo "$tmp_key" https://downloads.claude.ai/claude-desktop/key.asc && \
   key_metadata="$(GNUPGHOME="$tmp_gnupg" gpg --batch --show-keys --with-colons "$tmp_key")"; then
    fingerprint="$(printf '%s\n' "$key_metadata" | awk -F: '$1 == "fpr" {print $10; exit}')"
    printf 'Anthropic key fingerprint: %s\n' "$fingerprint"

    if [ "$fingerprint" = "31DDDE24DDFAB679F42D7BD2BAA929FF1A7ECACE" ]; then
        sudo install -Dm644 "$tmp_key" /usr/share/keyrings/claude-desktop-archive-keyring.asc
        status_code=$?
    else
        echo "Unexpected Anthropic signing key fingerprint" >&2
    fi
else
    echo "Anthropic key download or inspection failed" >&2
fi

rm -rf "$tmp_key" "$tmp_gnupg"
[ "$status_code" -eq 0 ]
Anthropic key fingerprint: 31DDDE24DDFAB679F42D7BD2BAA929FF1A7ECACE
Add the stable Desktop repository only when Ubuntu reports a supported package architecture. The package recognizes this .list location and avoids creating a duplicate source during installation:
arch="$(dpkg --print-architecture)"

case "$arch" in
    amd64|arm64)
        echo 'deb [arch=amd64,arm64 signed-by=/usr/share/keyrings/claude-desktop-archive-keyring.asc] https://downloads.claude.ai/claude-desktop/apt/stable stable main' \
        | sudo tee /etc/apt/sources.list.d/claude-desktop.list > /dev/null
        ;;
    *)
        printf 'Unsupported Claude Desktop architecture: %s\n' "$arch" >&2
        false
        ;;
esac
Refresh package metadata and confirm that APT resolves claude-desktop from Anthropic:
sudo apt update
apt-cache policy claude-desktop
Relevant policy output has this shape; the candidate version and architecture change with the current package and host:
claude-desktop:
  Installed: (none)
  Candidate: <current-version>
  Version table:
     <current-version> 500
        500 https://downloads.claude.ai/claude-desktop/apt/stable stable/main <architecture> Packages
Install and Verify Claude Desktop
Install the app after APT shows an Anthropic candidate:
sudo apt install claude-desktop -yConfirm that the package provided the command, desktop entry, and icon before launching it:
dpkg-query -W claude-desktop
command -v claude-desktop
test -f /usr/share/applications/com.anthropic.Claude.desktop && echo desktop-entry-present
grep -E '^(Name|Exec|Icon|StartupWMClass)=' /usr/share/applications/com.anthropic.Claude.desktop
test -f /usr/share/icons/hicolor/256x256/apps/claude-desktop.png && echo desktop-icon-present
The package version varies, but the command path and launcher fields should match this output:
claude-desktop	<current-version>
/usr/bin/claude-desktop
desktop-entry-present
Name=Claude
Exec=claude-desktop %U
Icon=claude-desktop
StartupWMClass=com.anthropic.Claude
desktop-icon-present
Claude Desktop is much larger than the CLI. The package can install QEMU and related virtualization components used by Cowork, so review APT’s package summary before confirming the transaction on storage-constrained systems.
Ubuntu 24.04 and 26.04 restrict unprivileged user namespaces through AppArmor. Anthropic’s package detects that policy and creates /etc/apparmor.d/claude-desktop so Electron’s sandbox can start. Ubuntu 22.04 normally does not need the profile. No manual AppArmor override is required when you install the official package.
Launch Claude Desktop
Open the Ubuntu application menu, search for Claude, and select the Anthropic icon. You can also launch the same desktop entry from a graphical terminal:
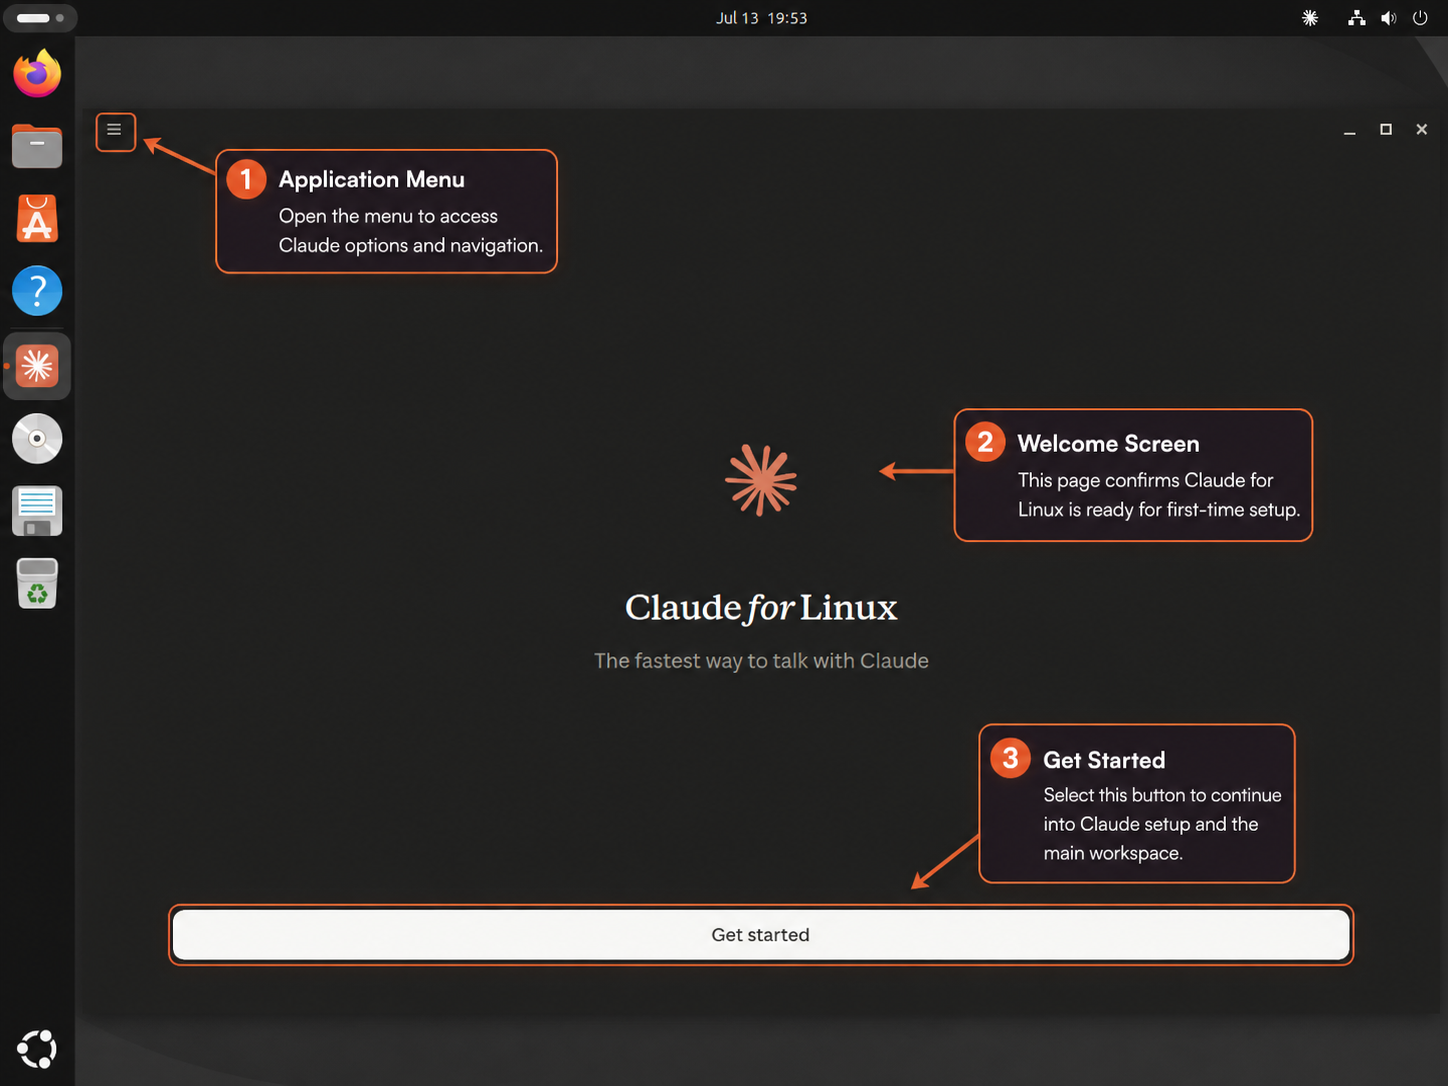
claude-desktopThe first screen displays Claude for Linux and a Get started button. Continue to the browser-based Claude.ai or organization sign-in flow. After authentication, use the Chat, Cowork, or Code tab according to the task you want to perform.
Install Claude Code for the Terminal
Anthropic recommends the native installer for Claude Code, and it does not require Node.js. Use the APT repository when system package visibility matters, Homebrew when it already manages your command-line tools, or npm only for an established Node.js 22 or newer workflow. Choose one CLI method so multiple package managers do not compete for the same claude command.
Install Claude Code with the Native Installer
The native installer places the claude launcher in your home directory and lets Claude Code update itself without depending on Node.js or APT. Install the curl command in Linux first if you are on Ubuntu Server, a minimal VM, or another image where it is not already present.
sudo apt update
sudo apt install curl -y
These commands use
sudofor package installation. If your account is not in the sudoers file yet, follow the guide on how to add a new user to sudoers on Ubuntu before continuing.
Check for an existing Claude Code command before installing. If this returns a path, remove or update that existing method instead of layering another installation over it:
command -v claude || echo no-existing-claude-commandDownload Anthropic’s installer to a unique temporary file, verify its Bash syntax, run it, and preserve any failure after cleanup:
installer="$(mktemp)"
install_status=1

if curl -fsSLo "$installer" https://claude.ai/install.sh && bash -n "$installer"; then
    bash "$installer"
    install_status=$?
else
    echo "Claude Code installer download or syntax check failed" >&2
fi

rm -f "$installer"
[ "$install_status" -eq 0 ]
A successful install reports ~/.local/bin/claude as the launcher location. The release number changes as Anthropic publishes new builds.
If your shell cannot find claude after the install, add ~/.local/bin to your Bash startup file in a rerun-safe way, then reload the shell.
touch ~/.bashrc
grep -qxF 'export PATH="$HOME/.local/bin:$PATH"' ~/.bashrc || echo 'export PATH="$HOME/.local/bin:$PATH"' >> ~/.bashrc
source ~/.bashrc
Zsh users can place the same export line in ~/.zshrc after they install Zsh on Ubuntu.
Confirm the shell resolves the user-local launcher and that it starts:
command -v claude
claude --version
The first line should be ~/.local/bin/claude; the version line follows this nonliteral pattern:
/home/<username>/.local/bin/claude
<current-version> (Claude Code)
The default installer selects the latest channel. Switch only this installation to Anthropic’s delayed stable channel when you prefer slower release adoption:
claude install stableUse claude install latest later if you want to return to the newest channel.
Install Claude Code with the Anthropic APT Repository
Add the Anthropic Claude Code Repository
The CLI APT repository is the right fit when you want Ubuntu to track the installed package, show its origin in apt-cache policy, and update Claude Code through package-manager commands. This is separate from the Desktop repository even though Anthropic signs both with the same release key.
Install the tools needed to download and verify the signing key:
sudo apt update
sudo apt install curl ca-certificates gnupg -y
Download Anthropic’s release signing key, verify its full fingerprint without touching your normal GnuPG home, and install the verified ASCII key:
tmp_key="$(mktemp)"
tmp_gnupg="$(mktemp -d)"
status_code=1

if curl -fsSLo "$tmp_key" https://downloads.claude.ai/keys/claude-code.asc && \
   key_metadata="$(GNUPGHOME="$tmp_gnupg" gpg --batch --show-keys --with-colons "$tmp_key")"; then
    fingerprint="$(printf '%s\n' "$key_metadata" | awk -F: '$1 == "fpr" {print $10; exit}')"
    printf 'Anthropic key fingerprint: %s\n' "$fingerprint"

    if [ "$fingerprint" = "31DDDE24DDFAB679F42D7BD2BAA929FF1A7ECACE" ]; then
        sudo install -Dm644 "$tmp_key" /etc/apt/keyrings/claude-code.asc
        status_code=$?
    else
        echo "Unexpected Anthropic signing key fingerprint" >&2
    fi
else
    echo "Anthropic key download or inspection failed" >&2
fi

rm -rf "$tmp_key" "$tmp_gnupg"
[ "$status_code" -eq 0 ]
The printed fingerprint must match this exact line before the key is installed:
Anthropic key fingerprint: 31DDDE24DDFAB679F42D7BD2BAA929FF1A7ECACE
Add the repository with a DEB822 source file only on Anthropic’s supported amd64 and arm64 architectures:
arch="$(dpkg --print-architecture)"

case "$arch" in
    amd64|arm64)
        printf '%s\n' \
        'Types: deb' \
        'URIs: https://downloads.claude.ai/claude-code/apt/stable' \
        'Suites: stable' \
        'Components: main' \
        "Architectures: $arch" \
        'Signed-By: /etc/apt/keyrings/claude-code.asc' \
        | sudo tee /etc/apt/sources.list.d/claude-code.sources > /dev/null
        ;;
    *)
        printf 'Unsupported Claude Code architecture: %s\n' "$arch" >&2
        false
        ;;
esac
Refresh APT metadata and confirm Ubuntu sees the package from Anthropic:
sudo apt update
apt-cache policy claude-code
Relevant policy output has this nonliteral shape; the package version and architecture vary:
claude-code:
  Installed: (none)
  Candidate: <current-version>
  Version table:
     <current-version> 500
        500 https://downloads.claude.ai/claude-code/apt/stable stable/main <architecture> Packages
Install and Verify the Claude Code Package
Install Claude Code from the new repository:
sudo apt install claude-code -yVerify both the shell command and the installed Debian package version:
claude --version
dpkg-query -W claude-code
Both version strings change with the current stable package:
<current-version> (Claude Code)
claude-code	<current-package-version>
Install Claude Code with Homebrew
Use Homebrew only when it already manages the rest of your CLI stack. If you still need Homebrew itself, the guide to install Homebrew on Ubuntu covers its Linux prerequisites and shell environment.
Install Anthropic’s stable cask:
brew install --cask claude-codeAfter Homebrew links the binary into its prefix, verify both cask ownership and the command from a shell where brew shellenv is loaded:
brew list --cask --versions claude-code
command -v claude
claude --version
The cask line should include claude-code and its installed version. The resolved command normally sits under Homebrew’s Linux prefix, and the final line ends with (Claude Code).
Homebrew installations do not use Claude Code’s background updater, so keep upgrades inside the Homebrew workflow.
Install Claude Code with npm
The npm package remains available, but Anthropic treats it as a compatibility method for users who already manage global developer tools with Node.js. It requires Node.js 22 or newer. Check both runtime versions before installing:
node --version
npm --version
If node --version is older than 22, use the guide to install Node.js on Ubuntu before continuing. Once Node.js 22 or newer is available, use a command-local prefix so this package installs under your home directory without rewriting npm’s persistent configuration:
mkdir -p "$HOME/.local"
npm install --global --prefix "$HOME/.local" @anthropic-ai/claude-code@latest
The command-local
--prefixavoids system-directory permission errors without changing the prefix used by NVM or other Node.js installations. Do not usesudo npm install -gfor this package.
Add the npm launcher directory to Bash in a rerun-safe way, then load it into the current shell:
touch ~/.bashrc
grep -qxF 'export PATH="$HOME/.local/bin:$PATH"' ~/.bashrc || echo 'export PATH="$HOME/.local/bin:$PATH"' >> ~/.bashrc
export PATH="$HOME/.local/bin:$PATH"
Confirm that npm owns the package and that the friendly command resolves to the user-local prefix:
npm list --global --prefix "$HOME/.local" --depth=0 @anthropic-ai/claude-code
command -v claude
claude --version
The package listing should include @anthropic-ai/claude-code, command -v should return a path ending in /.local/bin/claude, and the version line should end with (Claude Code).
Authenticate Claude Code on Ubuntu
Claude Code needs an account before it can send prompts, read project context, or apply changes. Claude Pro, Max, Team, Enterprise, Claude Console, Amazon Bedrock, Google Vertex AI, and Microsoft Foundry accounts are valid paths, but each provider uses a different sign-in flow.
Sign In to Claude Code
Open a terminal inside the repository you want Claude Code to work with, then start the interactive session:
cd ~/your-project
claude
Claude Code opens a browser login flow on first launch. If no browser appears, press c to copy the login URL and open it manually. On Ubuntu Server, over SSH, or in a headless VM, copy that URL into a browser on your workstation instead of trying to open a browser inside the remote shell.
Cloud-provider accounts do not use the same browser-based Claude.ai flow. Set the provider environment variables for Amazon Bedrock, Google Vertex AI, or Microsoft Foundry first, then run claude.
Check Claude Code Authentication Status
Use the CLI status command any time you want to confirm whether this shell is already authenticated:
claude auth status --textAn unauthenticated shell prints this exact message and returns exit status 1:
Not logged in. Run claude auth login to authenticate.
After login, the same status command returns account details. Start the authentication flow directly when you are signed out:
claude auth loginTo replace stale credentials, log out first and then begin a fresh login. This sequence finishes by restoring authentication:
claude auth logout
claude auth login
Use Claude Code on Ubuntu
After installation and login, Claude Code behaves like a terminal-native coding assistant instead of a browser chatbot. Start in a project directory, give it a concrete task, and let it inspect files, run commands, and propose edits in context.
Start a Claude Code Session
Launching claude in a repository starts the interactive session most developers use day to day:
cd ~/your-project
claude
Type /help to list built-in commands, or use /init to create a project-level CLAUDE.md file that explains your coding conventions and repository layout.
Use Common Claude Code Commands
These commands cover the first workflows most Ubuntu users need after installation:
| Command | What It Does |
|---|---|
claude | Starts the interactive session in the current project |
claude -p "explain this function" | Runs one non-interactive prompt and exits |
claude -c | Continues the most recent conversation in the current directory |
claude -r | Opens the resume picker or resumes a session when you provide an ID |
/help | Shows available slash commands |
/init | Creates a project CLAUDE.md instructions file |
/config | Opens the interactive settings interface |
/status | Shows version, account, and active configuration sources |
/memory | Edits Claude Code memory files for the current project |
Try Claude Code Prompts
These first prompts map well to everyday Ubuntu development sessions:
claudeEnter one prompt at a time inside the active Claude Code session:
what does this project do?
where is the main entry point?
add tests for the authentication helper
When you only need one answer without staying in the interactive session, use print mode:
claude -p "explain the function in src/auth.ts"
claude -c -p "continue with the next failing test"
Configure Claude Code on Ubuntu
Claude Code keeps settings in a small set of JSON files, with separate scopes for your user account and for the repository you are working in. That split matters because personal preferences and team-shared instructions usually do not belong in the same file.
Review Claude Code Settings Files
| Path | Purpose |
|---|---|
~/.claude/settings.json | User-wide settings such as permissions, hooks, environment variables, and model preferences |
.claude/settings.json | Shared project settings stored with the repository |
.claude/settings.local.json | Local project overrides that stay out of source control |
~/.claude.json | Global application state such as preferences and local MCP configuration |
.mcp.json | Project MCP server configuration |
Open Claude Code Settings
The interactive settings UI is usually faster than hand-editing JSON when you only want to inspect or toggle common options:
/config
/status
Run those slash commands inside an active claude session. /config opens the settings interface, while /status shows which configuration sources are active and whether any of them contain errors.
Set Claude Code Update Preferences
Native installations can follow the latest channel or the delayed stable channel. Set the delayed channel without disabling its background updater:
{
  "autoUpdatesChannel": "stable"
}
Disable native background updates only when another rollout process will run claude update on a controlled schedule:
{
  "env": {
    "DISABLE_AUTOUPDATER": "1"
  }
}
Use stable when you want a delayed channel that skips releases with major regressions. Keep latest if you want new Claude Code features as soon as Anthropic publishes them. Remove the DISABLE_AUTOUPDATER entry to restore background updates. APT, Homebrew, and npm installs follow their package manager instead of the native background updater.
Update Claude Desktop or Claude Code on Ubuntu
Update each product with the same toolchain used to install it. Desktop, native CLI, APT CLI, Homebrew, and npm installations do not share update state, so mixing their commands creates version confusion.
Update Claude Desktop
The Linux app does not self-update. Refresh it through APT with other Ubuntu packages, or target only the Desktop package:
sudo apt update
sudo apt install --only-upgrade claude-desktop
Update Native Claude Code
Native installations update in the background, but you can force an immediate check when you want the newest build right away:
claude updateUpdate APT Claude Code
APT installations update through Ubuntu’s package manager. Use a single-package upgrade when you only want to refresh Claude Code:
sudo apt update
sudo apt install --only-upgrade claude-code
Update Homebrew Claude Code
Keep the Homebrew-owned installation on its cask update path:
brew upgrade --cask claude-codeUpdate npm Claude Code
Anthropic advises reinstalling the latest global package instead of using npm update -g. Reuse the command-local prefix from the npm installation method:
npm install --global --prefix "$HOME/.local" @anthropic-ai/claude-code@latestTroubleshoot Claude Desktop or Claude Code on Ubuntu
Desktop problems usually involve an incomplete package transaction or its package-generated AppArmor profile. CLI problems more often come down to PATH, a missing repository source, network access, low memory, search tooling, or authentication from the wrong terminal.
Fix Claude Desktop Not Launching
Confirm that the package, executable, and desktop entry are present before changing sandbox or graphics options:
dpkg-query -W claude-desktop
command -v claude-desktop
test -f /usr/share/applications/com.anthropic.Claude.desktop && echo desktop-entry-present
Compare Ubuntu’s live user-namespace restriction with the package-generated profile before changing AppArmor:
restriction="$(sysctl -n kernel.apparmor_restrict_unprivileged_userns 2>/dev/null || echo 0)"
printf 'Unprivileged user-namespace restriction: %s\n' "$restriction"

if [ -f /etc/apparmor.d/claude-desktop ]; then
    echo "Claude Desktop AppArmor profile present"
elif [ "$restriction" = "1" ]; then
    echo "Claude Desktop profile is required but missing; reinstall the package" >&2
    false
else
    echo "Claude Desktop AppArmor profile not required on this release"
fi
If the profile is present but the launcher still fails, reload that one profile and confirm AppArmor lists it:
sudo apparmor_parser -r /etc/apparmor.d/claude-desktop
sudo aa-status | grep -F claude-desktop
If the package, launcher, desktop entry, or required profile is missing, reinstall the official package and try the launcher again:
sudo apt install --reinstall claude-desktop
claude-desktop
Do not disable AppArmor or add --no-sandbox as a first response. Review recent kernel messages for an actual denial instead:
sudo journalctl -k --since "10 minutes ago" | grep -iE 'apparmor|claude|anthropic'Fix Claude Code Command Not Found
If claude is missing after a successful native or npm install, confirm that the user-local launcher exists and resolve its target before changing your shell profile:
test -x ~/.local/bin/claude && echo launcher-present
readlink -f ~/.local/bin/claude
launcher-present followed by a path proves the file exists. Add ~/.local/bin to your shell profile with the rerun-safe command from the matching install method. APT installs place claude under the system path instead, so check the package state if the APT method cannot find the command:
dpkg-query -W claude-code
command -v claude
The APT package version varies, but the command path should remain /usr/bin/claude:
claude-code	<current-package-version>
/usr/bin/claude
Fix APT Unable to Locate a Claude Package
If APT cannot locate claude-desktop or claude-code, inspect the matching source, refresh metadata, and check both package candidates. The Desktop and CLI repositories are independent:
test -f /etc/apt/sources.list.d/claude-desktop.list && cat /etc/apt/sources.list.d/claude-desktop.list
test -f /etc/apt/sources.list.d/claude-code.sources && cat /etc/apt/sources.list.d/claude-code.sources
sudo apt update
apt-cache policy claude-desktop claude-code
If the needed package still has no candidate, recreate only its keyring and source file from the matching APT method. A default Ubuntu install does not know about either Claude package until its own source is present and apt update succeeds.
Fix Claude Code Installer Download Errors
If the installer returns HTML instead of a shell script, or if curl breaks mid-download, test both the installer endpoint and the current release endpoint:
curl -fsSL https://claude.ai/install.sh -o /dev/null && echo installer-reachable
curl -fsSL https://downloads.claude.ai/claude-code-releases/latest -o /dev/null && echo downloads-reachable
installer-reachable downloads-reachable
If those checks fail, retry from a different network or set HTTP_PROXY and HTTPS_PROXY before running the installer again. TLS errors on minimal systems can also come from missing certificate updates, so refresh ca-certificates before blaming the installer.
sudo apt update
sudo apt install ca-certificates -y
Fix Low-Memory Installs on Ubuntu Server
Exit status 137 means the installer received SIGKILL; low memory is a common cause, but the status alone does not prove an out-of-memory kill. Anthropic documents roughly 512 MB of free memory for the install step and at least 4 GB of RAM for normal Claude Code use. Check current memory, swap, and recent kernel messages before creating anything:
free -h
swapon --show
sudo journalctl -k --since "15 minutes ago" --no-pager \
| grep -iE 'out of memory|oom-kill|killed process' \
|| echo "No recent kernel OOM entry found"
Create temporary swap only when low available memory, missing swap, or kernel OOM evidence corroborates the failure. The following block uses an article-specific 2 GB path, refuses an existing file, symlink, or active swap target, and records ownership in the current shell. Keep this terminal open so the later cleanup block can verify that it is removing the file created here:
swap_path=/swapfile-claude-code
swap_created_by_guide=0
swap_ready=0

if ! active_swap_paths="$(swapon --show=NAME --noheadings --raw)"; then
    echo "Unable to inspect active swap; refusing to create $swap_path" >&2
    false
elif sudo test -e "$swap_path" || sudo test -L "$swap_path" || \
     printf '%s\n' "$active_swap_paths" | grep -Fxq -- "$swap_path"; then
    echo "$swap_path already exists or is active; inspect it instead of overwriting it" >&2
    false
else
    allocation_status=0
    sudo fallocate -l 2G "$swap_path" || allocation_status=$?

    if sudo test -f "$swap_path" && ! sudo test -L "$swap_path"; then
        swap_created_by_guide=1
    fi

    if [ "$allocation_status" -eq 0 ] && \
       sudo chmod 600 "$swap_path" && \
       sudo mkswap "$swap_path" && \
       sudo swapon "$swap_path"; then
        swap_ready=1
    fi

    if [ "$swap_ready" -ne 1 ] && [ "$swap_created_by_guide" -eq 1 ]; then
        cleanup_status=0
        if ! active_swap_paths="$(swapon --show=NAME --noheadings --raw)"; then
            cleanup_status=1
        elif printf '%s\n' "$active_swap_paths" | grep -Fxq -- "$swap_path"; then
            if ! sudo swapoff "$swap_path"; then
                cleanup_status=1
            elif ! active_swap_paths="$(swapon --show=NAME --noheadings --raw)"; then
                cleanup_status=1
            elif printf '%s\n' "$active_swap_paths" | grep -Fxq -- "$swap_path"; then
                cleanup_status=1
            fi
        fi

        if [ "$cleanup_status" -eq 0 ]; then
            if sudo rm -f -- "$swap_path"; then
                swap_created_by_guide=0
            else
                cleanup_status=1
            fi
        fi

        if [ "$cleanup_status" -ne 0 ]; then
            echo "Setup failed and safe cleanup was not proved; retained $swap_path for inspection" >&2
        fi
    fi

    [ "$swap_ready" -eq 1 ]
fi
Retry the installer in the same terminal, then remove only the temporary file owned by the block above. The cleanup refuses an unset ownership marker, a substituted symlink, a failed swapoff, or an inconclusive post-check. Do not replace this path with a pre-existing target such as /swapfile or /swap.img:
swap_path=/swapfile-claude-code

if [ "${swap_created_by_guide:-0}" -ne 1 ]; then
    echo "Ownership is not proved in this shell; inspect $swap_path instead of deleting it" >&2
    false
elif sudo test -L "$swap_path"; then
    echo "$swap_path is now a symlink; refusing cleanup" >&2
    false
elif ! sudo swapoff "$swap_path"; then
    echo "swapoff failed; retained $swap_path" >&2
    false
elif ! active_swap_paths="$(swapon --show=NAME --noheadings --raw)"; then
    echo "Unable to verify swap state; retained $swap_path" >&2
    false
elif printf '%s\n' "$active_swap_paths" | grep -Fxq -- "$swap_path"; then
    echo "$swap_path is still active; refusing deletion" >&2
    false
elif sudo rm -f -- "$swap_path" && \
     sudo test ! -e "$swap_path" && \
     sudo test ! -L "$swap_path"; then
    swap_created_by_guide=0
    echo "Temporary Claude Code swap removed"
else
    echo "Swap is inactive, but file removal was not verified" >&2
    false
fi
Fix Claude Code Search Issues
Claude Code normally bundles ripgrep. Change that default only when claude doctor reports a search failure or bundled search fails while a system rg command works. Check both paths first:
claude doctor
command -v rg && rg --version
If no system command exists, install Ubuntu’s ripgrep package:
sudo apt update
sudo apt install ripgrep -y
rg --version
After the system command works, add the documented override to ~/.claude/settings.json, or use the project settings file when only one repository needs it:
{
  "env": {
    "USE_BUILTIN_RIPGREP": "0"
  }
}
Restart Claude Code and run claude doctor again; the Search row should report OK. Remove the override to return to bundled search. Remove Ubuntu’s ripgrep package only when no other tool uses it.
Run Claude Code Diagnostics
The terminal-level claude doctor command is a read-only check of installation health, settings-file errors, update state, bundled search, and Remote Control eligibility. Its rows vary by install method, channel, authentication state, and current version:
claude doctorReview any warning row and press Enter to close the report. Inside an active Claude Code session, /doctor runs the separate interactive checkup that can also offer repairs.
Fix Claude Code Login Problems
If browser login fails, inspect the current authentication state before deleting credentials:
claude auth status --textIf the command reports that you are not logged in, run claude auth login. If it reports an account but the browser flow or token remains stale, replace that session in order:
claude auth logout
claude auth login
On remote Ubuntu hosts, press c when prompted and open the copied login URL in a browser on your workstation.
Remove Claude Desktop or Claude Code from Ubuntu
Remove each product with the same method used to install it. Uninstalling removes method-owned executable or package files, but it does not intentionally delete the Desktop profile or Claude Code user data under your home directory. The optional reset steps below handle those paths separately. Project files such as CLAUDE.md, .claude/, and .mcp.json stay untouched because they may be shared and version controlled.
If you want to end the current sign-in, do so before removing the product. Sign out inside Claude Desktop before closing it. For Claude Code, run the logout command while the claude executable from your chosen method is still installed:
claude auth logoutIf you intend to end the current local sign-in, do not treat uninstalling as a substitute for logout. Logging out clears Claude Code’s current local authentication, but it does not revoke provider-side sessions, API keys, or cloud credentials. Use the relevant Claude.ai, Console, or cloud-provider security controls when remote revocation is required.
Remove Claude Desktop
Purge the Desktop package, then delete the repository and key added by this guide:
sudo apt purge claude-desktop -y
sudo rm -f /etc/apt/sources.list.d/claude-desktop.list
sudo rm -f /usr/share/keyrings/claude-desktop-archive-keyring.asc
sudo apt update
Confirm that the launcher, AppArmor profile, repository, and signing key are gone:
command -v claude-desktop || echo "Claude Desktop command removed"
desktop_status="$(dpkg-query -W -f='${db:Status-Abbrev}' claude-desktop 2>/dev/null || true)"
case "$desktop_status" in
    ""|un*) echo "Claude Desktop package removed" ;;
    *) printf 'Claude Desktop package state: %s\n' "$desktop_status" >&2; false ;;
esac
test ! -e /etc/apparmor.d/claude-desktop && echo "AppArmor profile removed"
test ! -e /etc/apt/sources.list.d/claude-desktop.list && echo "Desktop repository removed"
test ! -e /usr/share/keyrings/claude-desktop-archive-keyring.asc && echo "Desktop signing key removed"
The package removal also unloads and removes its generated AppArmor profile. To reset the local Electron profile, close Claude Desktop, inspect the profile first, and copy it to a backup location if you may need anything stored only in that profile:
if [ -e "$HOME/.config/Claude" ] || [ -L "$HOME/.config/Claude" ]; then
    du -sh -- "$HOME/.config/Claude"
fi
No output means the Desktop profile does not exist for the current account.
This optional reset deletes local cookies, caches, logs, and application preferences under the Desktop profile. It does not revoke remote sessions or provider credentials; use the account-security controls for the corresponding provider when revocation is required.
rm -rf -- "$HOME/.config/Claude"Verify the profile directory after the reset:
if [ -e "$HOME/.config/Claude" ] || [ -L "$HOME/.config/Claude" ]; then
    echo "Claude Desktop profile still exists" >&2
else
    echo "Claude Desktop profile removed"
fi
Remove Native Claude Code
Delete the launcher and version directory that the native installer created:
rm -f ~/.local/bin/claude
rm -rf ~/.local/share/claude
Clear the shell cache before checking whether the command is gone:
hash -r
command -v claude || echo command-not-found
command-not-found
Keep the ~/.local/bin PATH entry when other user-local tools use that directory. Removing the Claude launcher does not require changing the shared PATH.
Remove APT Claude Code
Purge the package, then delete the source file and keyring the APT method created:
sudo apt purge claude-code -y
sudo rm -f /etc/apt/sources.list.d/claude-code.sources
sudo rm -f /etc/apt/keyrings/claude-code.asc
sudo apt update
Verify the package and command are gone:
hash -r
command -v claude || echo command-not-found
package_status="$(dpkg-query -W -f='${db:Status-Abbrev}' claude-code 2>/dev/null || true)"
case "$package_status" in
    ""|un*) echo package-not-installed ;;
    *) printf 'package-state=%s\n' "$package_status" >&2; false ;;
esac
command-not-found package-not-installed
Remove Homebrew Claude Code
Remove the cask and verify Homebrew no longer records it:
brew uninstall --cask claude-code
brew list --cask --versions claude-code || echo cask-not-installed
Remove npm Claude Code
If you installed the npm package, remove it through npm from the same user-local prefix instead of deleting files manually:
npm uninstall --global --prefix "$HOME/.local" @anthropic-ai/claude-code
npm list --global --prefix "$HOME/.local" --depth=0 @anthropic-ai/claude-code 2>/dev/null || echo package-not-installed
Remove Claude Code Settings and Local Data
Claude Code keeps user-wide settings and history under ~/.claude and ~/.claude.json. Current builds can also create ~/.cache/claude and ~/.local/state/claude. Inspect these paths first, and back up anything you may want to restore, including settings, memory, MCP configuration, custom user content, or session history:
for path in "$HOME/.claude" "$HOME/.claude.json" "$HOME/.cache/claude" "$HOME/.local/state/claude"; do
    if [ -e "$path" ] || [ -L "$path" ]; then
        du -sh -- "$path"
    fi
done
No output means none of these user-wide paths exists for the current account.
This optional reset removes file-backed settings, personal content, history, cache, and local runtime state. It does not guarantee a complete authentication reset. Credentials may also exist in an operating-system keyring or credential helper, and deleting local files does not revoke Claude.ai sessions, API keys, or cloud-provider credentials. Use
claude auth logoutbefore uninstalling and the provider’s security controls when revocation matters. Keep these paths if you only wanted to remove the executable.
rm -rf -- "$HOME/.claude" "$HOME/.cache/claude" "$HOME/.local/state/claude"
rm -f -- "$HOME/.claude.json"
Check each user-wide path separately after the reset:
for path in "$HOME/.claude" "$HOME/.claude.json" "$HOME/.cache/claude" "$HOME/.local/state/claude"; do
    if [ -e "$path" ] || [ -L "$path" ]; then
        printf 'Still present: %s\n' "$path" >&2
    else
        printf 'Removed: %s\n' "$path"
    fi
done
Do not include project-owned files in a normal uninstall. Before changing a specific repository, enter its root and inspect whether Claude files are tracked or shared:
cd ~/your-project
pwd
git status --short -- .claude .mcp.json CLAUDE.md
Back up and review those files with the project team before deleting any of them. A repository’s CLAUDE.md, .claude/, and .mcp.json may be intentional team configuration rather than disposable application data.
Conclusion
Claude Desktop now opens from Ubuntu’s application menu, while Claude Code resolves as a verified terminal command with authentication and updates tied to its install owner. Start the app for graphical work or run claude from a project directory. To compare terminal agents before standardizing a workflow, evaluate Codex CLI on Ubuntu and Gemini CLI on Ubuntu.

Formatting tips for your comment
You can use basic HTML to format your comment. Useful tags currently allowed in published comments:
<code>command</code>command<strong>bold</strong><em>italic</em><a href="https://example.com">link</a><blockquote>quote</blockquote>