Ubuntu can run Unity 7 alongside the default GNOME desktop. Installing ubuntu-unity-desktop adds Unity as an X11 session on the login screen, so you can choose either desktop when you sign in. This is the Linux desktop environment, not the Unity game engine or Unity Hub.
The package comes from Ubuntu’s universe component and installs LightDM, Unity Greeter, Compiz, and the rest of the Unity desktop. Check APT’s summary before confirming: on Ubuntu 26.04 and 24.04, the transaction can replace PipeWire audio packages with PulseAudio.
| Ubuntu release | Installation note | What changes |
|---|---|---|
| 26.04 LTS | Install ubuntu-unity-desktop from Universe | Adds LightDM; APT can replace pipewire-audio and pipewire-alsa with PulseAudio |
| 24.04 LTS | Install ubuntu-unity-desktop from Universe | Adds LightDM; APT can replace pipewire-audio and pipewire-alsa with PulseAudio |
| 22.04 LTS | Install dbus-x11 first, then the Unity metapackage | Adds LightDM; GNOME remains available as a fallback |
Install Unity Desktop on Ubuntu
Install Unity from Ubuntu’s Repository
Unity is available from Ubuntu’s universe component, so no third-party repository is needed.
Refresh the Ubuntu Package Index
Refresh APT’s package index before checking the Unity candidate. The package-management commands use sudo; if your account cannot run administrative commands, add a user to sudoers on Ubuntu before continuing.
sudo apt updateConfirm that APT can see the package before starting the large desktop transaction:
apt-cache policy ubuntu-unity-desktopThe version varies by Ubuntu release, but the output should contain a version after Candidate:. If it says Candidate: (none), install the repository-management helper, enable Ubuntu’s Universe component, refresh APT, and repeat the check:
sudo apt install software-properties-common
sudo add-apt-repository --yes universe
sudo apt update
apt-cache policy ubuntu-unity-desktop
The Ubuntu Universe repository guide explains the component layout and additional verification options.
Install dbus-x11 on Ubuntu 22.04 Only
Install dbus-x11 first on Ubuntu 22.04; Ubuntu 26.04 and 24.04 do not need this separate prerequisite. If you are unsure which release is installed, check your Ubuntu version first.
sudo apt install dbus-x11Install the Unity Desktop Metapackage
Install the standard metapackage so APT includes Unity’s recommended session and desktop integration packages:
sudo apt install ubuntu-unity-desktopAvoid adding
--no-install-recommends. Omitting recommended desktop components can leave Unity unable to maintain a usable login session. Also avoid--install-suggests, which can expand this desktop install into thousands of unrelated packages. Use the standard command above.On Ubuntu 26.04 and 24.04, inspect the REMOVED section before answering the APT prompt. If it lists
pipewire-audioandpipewire-alsa, Unity is switching the desktop audio stack to PulseAudio. Enternto cancel if you do not accept that change.
Select LightDM as the Display Manager
During installation, Ubuntu may ask which display manager should control the graphical login screen. Select lightdm to activate Unity Greeter as the login manager. You still choose the Unity session after reboot, and GNOME’s gdm3 remains installed so you can switch back later.

Use the arrow keys to highlight lightdm, press Tab to move to OK, and press Enter. Reboot when APT finishes so the new login manager and session are loaded:
sudo rebootLog In to the Unity Session
At the LightDM login screen, open the session selector near the username or password field and choose Unity before signing in. LightDM remembers that choice for the next login, but GNOME remains available from the same selector.
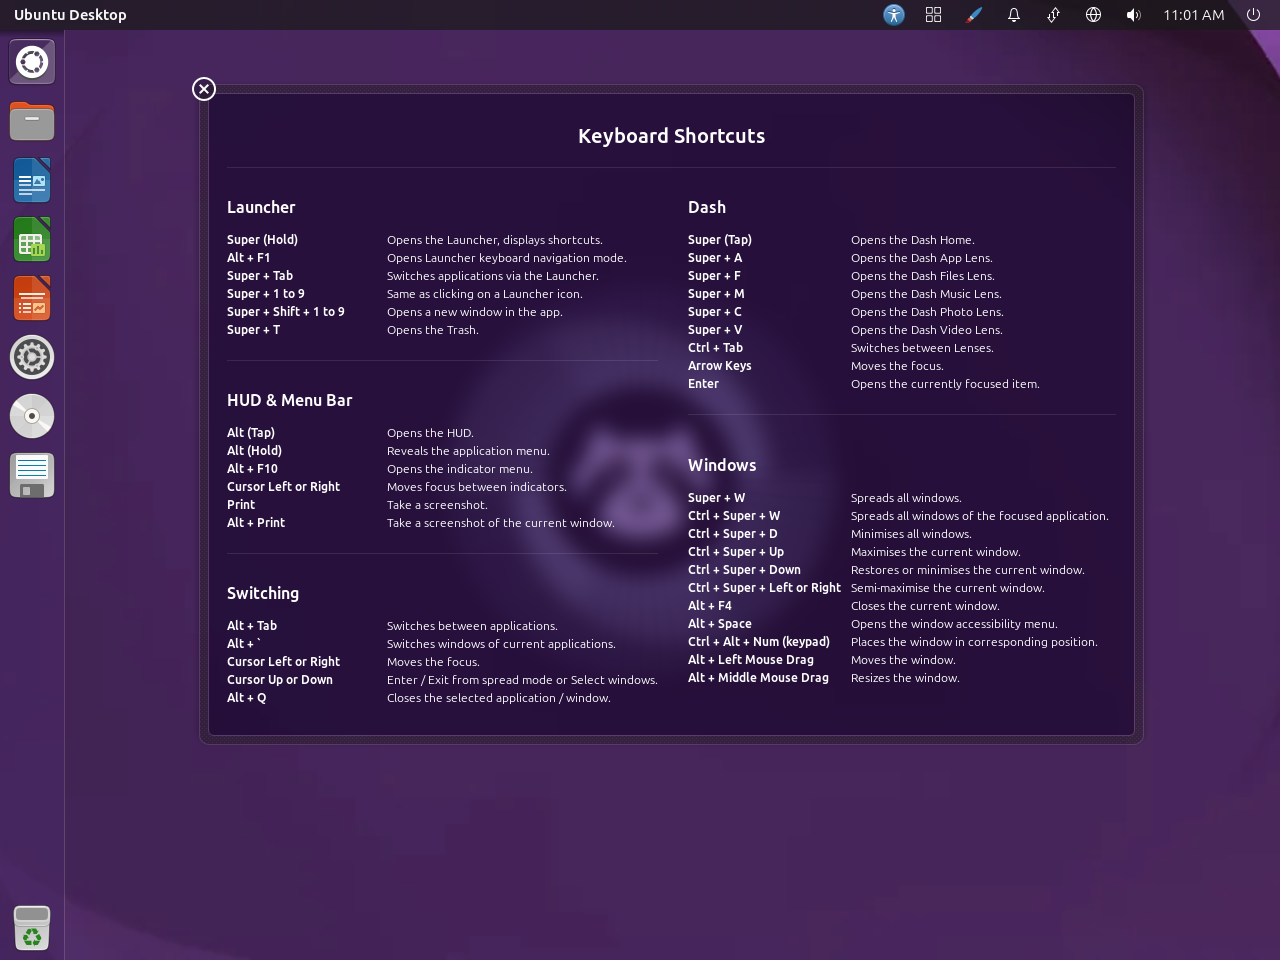
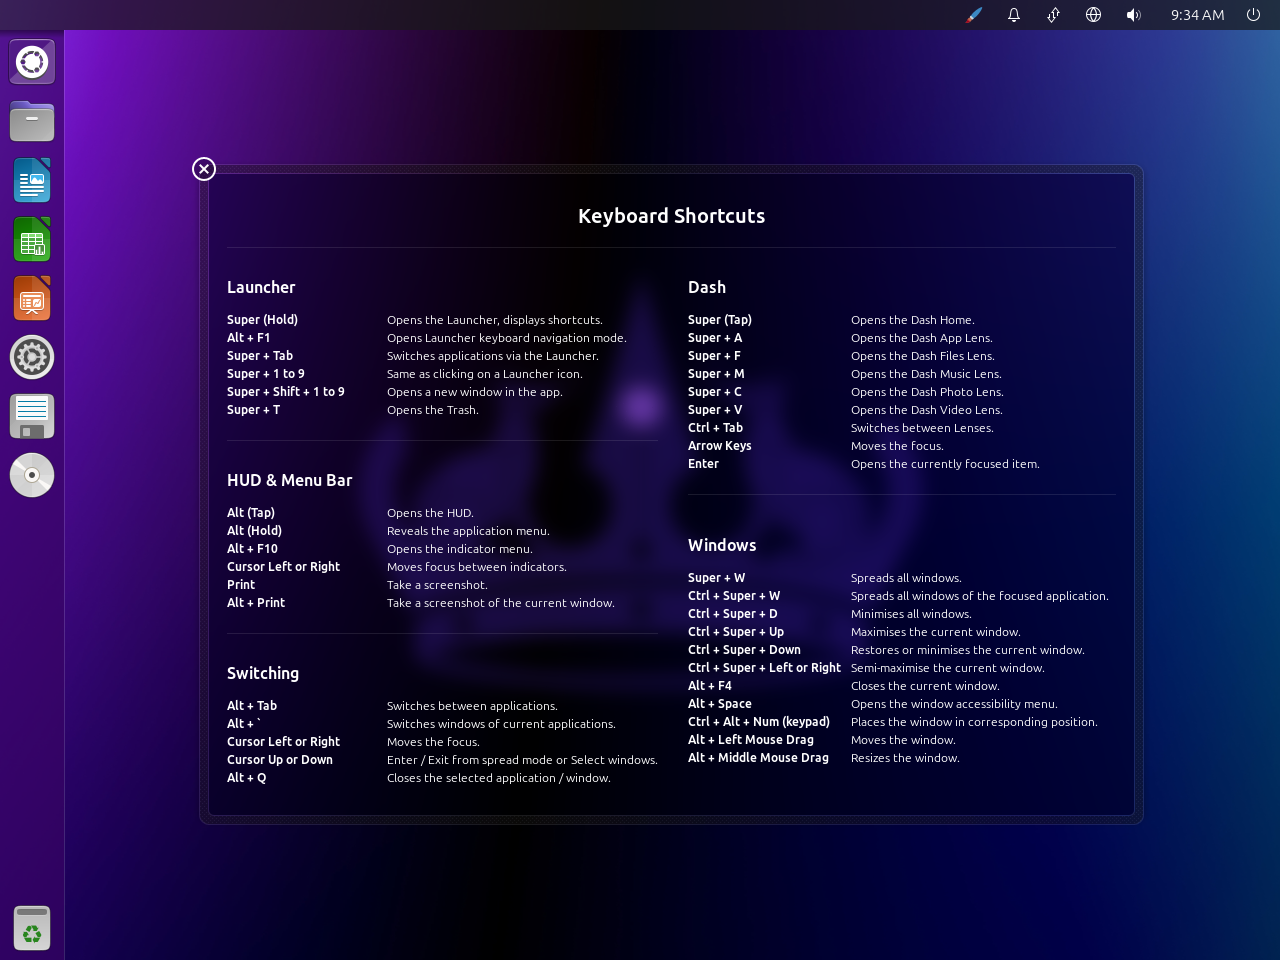
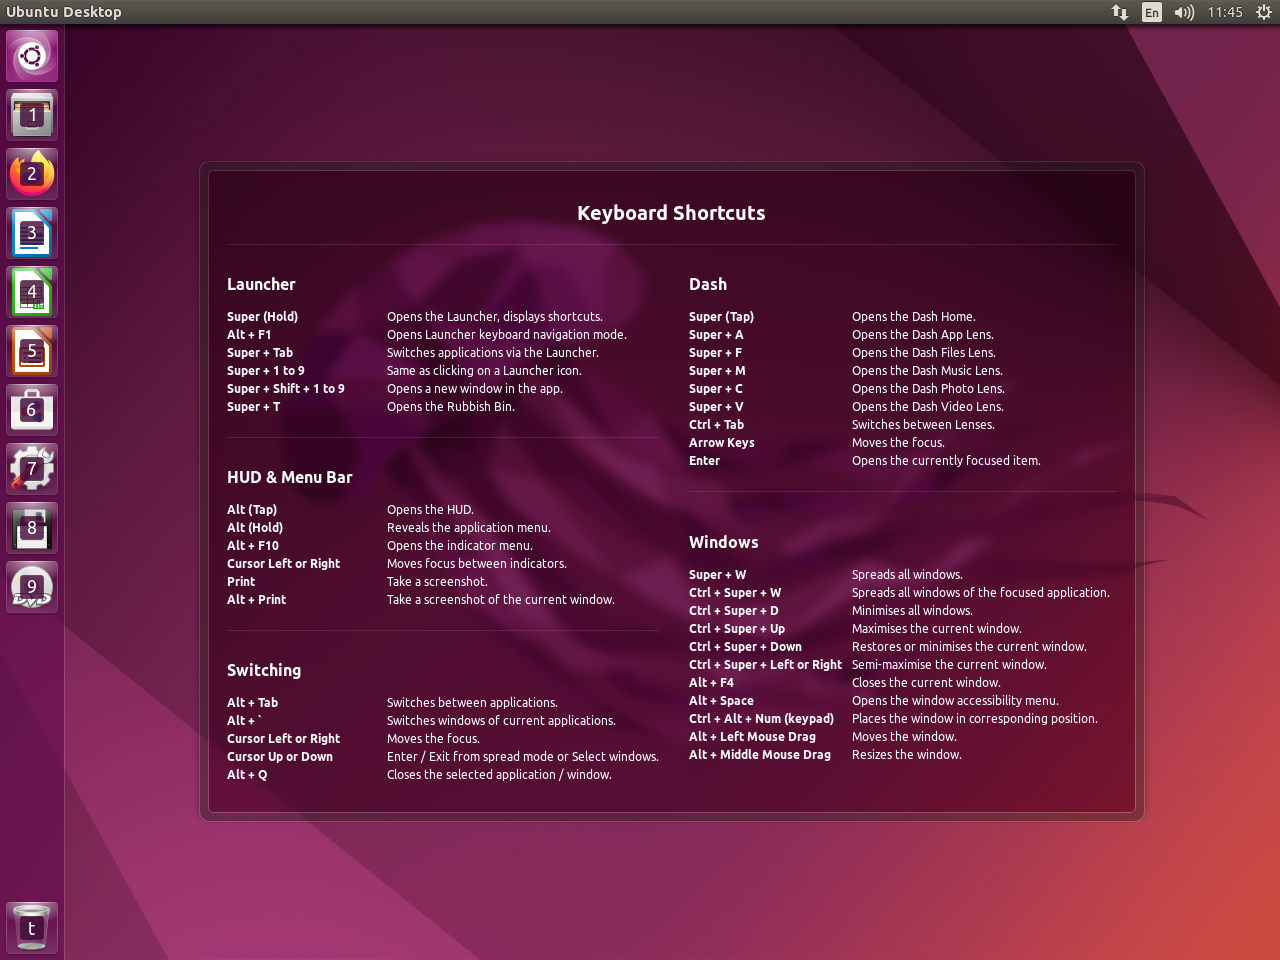
Unity places its launcher along the left edge and the panel across the top. Tap the Super key to open the Dash and search installed applications and local files, or press and hold Super to display Unity’s keyboard shortcuts.
Unity Desktop Across Ubuntu Releases
Unity looks almost identical on Ubuntu 26.04, 24.04, and 22.04. In each release, holding Super opens the Keyboard Shortcuts overlay while leaving the launcher and top panel visible. Most differences come from the wallpaper, launcher icons, and panel indicators.
Verify the Unity Desktop Session
Confirm the Session Identity
Open a terminal inside Unity and check both the desktop identifier and session type:
echo "$XDG_CURRENT_DESKTOP"
echo "$XDG_SESSION_TYPE"
A Unity 7 X11 login returns:
Unity:Unity7:ubuntu
x11
Confirm Unity and LightDM Services
Confirm that the Unity shell’s user service and the system display manager are active:
systemctl --user is-active unity7.service
systemctl is-active display-manager
systemctl show display-manager --property=Id --value
The first two commands should print active, and the last command should print lightdm.service. Learn how to interpret service states with systemctl if either result differs.
Switch Between Unity and GNOME
Log out, select Ubuntu or another GNOME session at LightDM, and sign in to return to GNOME. Use the same selector to choose Unity again. Both desktops use the same home directory, so files, installed applications, and some settings are shared rather than isolated between sessions.
Change the Default Display Manager
Open Ubuntu’s display-manager selector to switch between LightDM and GDM3:
sudo dpkg-reconfigure lightdmChoose lightdm for Unity Greeter or gdm3 for GNOME’s login screen, then reboot. Do not force-enable one service over the other; the package configuration step updates Ubuntu’s display-manager selection consistently.
sudo rebootAfter rebooting, compare the configured path with the active systemd unit:
cat /etc/X11/default-display-manager
systemctl show display-manager --property=Id --value
Troubleshoot Unity Desktop
APT Cannot Locate ubuntu-unity-desktop
Check the package candidate again if APT reports Unable to locate package ubuntu-unity-desktop:
apt-cache policy ubuntu-unity-desktopNo package candidate. A missing candidate normally means the universe component is disabled or the package index is stale. Enable the component as described in the installation section, run sudo apt update, and retry the standard installation command.
Unity Is Missing from the Login Screen
Ask dpkg which package owns Unity’s X11 session file:
dpkg-query -S /usr/share/xsessions/unity.desktopSession file check. A complete session installation returns unity-session as the owner. If dpkg reports that no path matches, reinstall that package and reboot:
sudo apt install --reinstall unity-session
sudo reboot
Unity Shows a Black Screen or Returns to Login
Why this happens. Unity 7 uses X11 and Compiz. Its packages can install successfully even when the graphical session cannot draw correctly, particularly with virtual graphics. Keep GNOME available until Unity renders and remains logged in on your hardware.
Collect the Session State
Press Ctrl+Alt+F3 to open a text console, sign in, and collect the package, display-manager, and Unity service states:
sudo apt-get check
journalctl -b -u display-manager --no-pager | tail -n 50
systemctl --user status unity7.service --no-pager
Read the Result
- Package error. Resolve the APT or dpkg problem before retrying Unity.
- VM or Compiz graphics. Use the journalctl command examples if you need more of the current boot log, then enable supported 3D acceleration and install the appropriate guest integration tools. For VMware, install Open VM Tools on Ubuntu.
- NVIDIA graphics. Install NVIDIA drivers on Ubuntu or compare the installed driver state before retrying Unity.
Safe fallback. If Unity still returns to the greeter or stays black, select GNOME at login rather than repeatedly restarting a broken session.
The Wrong Display Manager Starts
Compare Ubuntu’s configured display-manager path with the active systemd unit:
cat /etc/X11/default-display-manager
systemctl is-active display-manager
systemctl show display-manager --property=Id --value
Display manager mismatch. If the configured path and active unit do not name the display manager you selected, run sudo dpkg-reconfigure lightdm again, choose the intended option, and reboot. Avoid manually forcing both GDM3 and LightDM because only one should own the graphical login.
Update Unity Desktop
Unity packages installed from Ubuntu’s repositories update through the normal APT workflow. Review the transaction summary before confirming desktop or audio package changes:
sudo apt update
sudo apt upgrade
Remove Unity Desktop from Ubuntu
This rollback assumes you added Unity to an existing Ubuntu GNOME desktop and that GDM3 was present beforehand. Do not use it unchanged on the Ubuntu Unity flavor or on a system where Unity is the only working desktop.
Return to GDM3 and GNOME First
Open the display-manager selector, choose gdm3, and reboot before removing Unity or LightDM:
sudo dpkg-reconfigure lightdm
sudo reboot
At GDM3, choose an Ubuntu GNOME session and sign in. Confirm that GNOME and GDM3 are active before continuing:
echo "$XDG_CURRENT_DESKTOP"
systemctl show display-manager --property=Id --value
The desktop value should identify GNOME or Ubuntu, and the display-manager unit should be gdm.service.
Remove the Unity Packages
Remove the Unity metapackage, shell, session, and greeter:
sudo apt remove ubuntu-unity-desktop unity unity-session unity-greeterIf the Unity installation introduced LightDM and no other installed desktop uses it, remove LightDM and its GTK greeter separately:
sudo apt remove lightdm lightdm-gtk-greeterOn Ubuntu 22.04 only, remove dbus-x11 if you installed it solely for Unity and no other application needs it:
sudo apt remove dbus-x11Restore PipeWire on Ubuntu 26.04 and 24.04
If the Unity installation removed pipewire-audio and pipewire-alsa, reinstall them after removing Unity. APT resolves the conflicting PulseAudio packages during this transaction:
sudo apt install pipewire-audio pipewire-alsaPreview Remaining Package Cleanup
Simulate APT’s orphan cleanup and inspect every proposed removal:
sudo apt -s autoremoveThe preview can include packages that were already orphaned before Unity was installed. Do not rerun this command without
-sunless every listed removal is expected and you have confirmed that no other desktop, driver, or application needs those packages.
Finish the package cleanup, then reboot so the restored display manager and audio session start cleanly:
sudo apt-get check
sudo reboot
After signing back into GNOME, confirm that Unity’s session file is gone and GDM3 controls the active display manager:
test ! -e /usr/share/xsessions/unity.desktop && echo "Unity session removed"
systemctl is-active display-manager
systemctl show display-manager --property=Id --value
On Ubuntu 26.04 and 24.04, if you restored PipeWire during removal, verify both user services:
systemctl --user is-active pipewire.service pipewire-pulse.serviceConclusion
Unity is now available as an X11 session from the login screen, with GNOME still available from the same selector. Keep the LightDM and audio-stack changes in mind if you later remove Unity. If Unity is not the right fit, you can also install KDE Plasma on Ubuntu, install XFCE on Ubuntu, or install GNOME Flashback on Ubuntu.


Thanks for an excellent explanation. It helps a lot.
I wonder what you think of this even _more_ minimal installation.
Less disk space but potential waste of time fixing missing parts:
sudo apt install --no-install-recommends unity lightdm unity-control-center \
unity-scope-home unity-scopes-master-default unity-lens-application
# these may not be necessary
sudo apt install --no-install-recommends indicator-session indicator-applet indicator-application
Another question: is it really safe to remove the GNOME desktop after installing Unity?
Thanks!
Hi Rangjut. I’m glad it helped. I have since rechecked this and removed the minimal method. Your list may install Unity on an Ubuntu desktop, but it does not name
unity-session, which owns the login entry, and may rely on components GNOME already supplied. With--no-install-recommends, that is too system- and release-specific to recommend. Useubuntu-unity-desktopand add indicators only when a feature is missing.Unity does not require GNOME Shell, so removing it is possible, but a blanket GNOME purge is not risk-free. The desktops share components, APT’s automatic-package state varies, and GNOME is a useful fallback. For a lean Unity-only machine, an Ubuntu Unity installation is safer than stripping GNOME afterward.