
GParted provides a graphical interface for creating, resizing, moving, and deleting disk partitions on Ubuntu. Whether you need to shrink an existing partition for a dual-boot setup, recover space from an old installation, or format a USB drive, GParted handles these tasks visually and reduces the risk of command-line mistakes. The steps below install GParted on Ubuntu from the default repositories or the xtradeb PPA, then cover launching, updating, removing, and troubleshooting the application. Ubuntu includes GParted in its default repositories across all current LTS releases, with version 1.8.x on 26.04, 1.5.x on 24.04, and 1.3.x on 22.04.
Install GParted on Ubuntu
Ubuntu provides GParted through its default repositories, while the xtradeb PPA offers newer versions with additional features and bug fixes. The table below compares both options.
| Method | Channel | Version | Updates | Best For |
|---|---|---|---|---|
| APT (Default) | Ubuntu Repos | Distribution default | Automatic via apt upgrade | Most users who prefer stable, tested packages |
| APT (xtradeb PPA) | Launchpad PPA | Latest stable | Automatic via apt upgrade | Users who need newer features or bug fixes |
The default APT method suits most users because it provides a stable, tested version that integrates seamlessly with Ubuntu’s update system. Only use the PPA if you specifically need features from the latest GParted release.
This guide covers Ubuntu 26.04 LTS, 24.04 LTS, and 22.04 LTS. The default repository method works across all releases. The xtradeb PPA publishes GParted builds for 24.04 and 22.04 only; on 26.04, the default repository already ships GParted 1.8.x, which matches the latest upstream release.
Update Your Ubuntu System Before Installing GParted
Refresh your package lists to ensure you install the latest available version:
sudo apt updateAll commands in this guide require
sudoprivileges. Verify your account belongs to thesudogroup before proceeding. See how to add a user to sudoers on Ubuntu if you need to configure access.
Install GParted from the Default Ubuntu Repository
Ubuntu includes GParted in its default repositories, so no external sources are needed:
sudo apt install gpartedVerify the installation by checking the package source and installed version:
apt-cache policy gpartedExpected output (version varies by Ubuntu release):
Ubuntu 26.04:
gparted:
  Installed: 1.8.0-1
  Candidate: 1.8.0-1
  Version table:
 *** 1.8.0-1 500
        500 http://archive.ubuntu.com/ubuntu resolute/main amd64 Packages
        100 /var/lib/dpkg/status

Ubuntu 24.04:
gparted:
  Installed: 1.5.0-1build4
  Candidate: 1.5.0-1build4
  Version table:
 *** 1.5.0-1build4 500
        500 http://archive.ubuntu.com/ubuntu noble/main amd64 Packages
        100 /var/lib/dpkg/status

Ubuntu 22.04:
gparted:
  Installed: 1.3.1-1ubuntu1
  Candidate: 1.3.1-1ubuntu1
  Version table:
 *** 1.3.1-1ubuntu1 500
        500 http://archive.ubuntu.com/ubuntu jammy/main amd64 Packages
        100 /var/lib/dpkg/status
Install GParted from the xtradeb PPA
The xtradeb PPA provides newer GParted builds for Ubuntu 24.04 and 22.04. A PPA (Personal Package Archive) is a community-maintained repository hosted on Launchpad that delivers updated packages not yet available in Ubuntu’s official repositories.
Minimal Ubuntu installations may not include the
add-apt-repositorycommand. If the next command fails with “command not found,” first runsudo apt install software-properties-common.
Add the PPA and refresh your package lists in one step:
sudo add-apt-repository ppa:xtradeb/apps -yConfigure GParted APT Pinning (Recommended)
APT pinning restricts the PPA to GParted-related packages only, preventing other PPA packages from overriding Ubuntu defaults. This step is optional but recommended for system stability:
cat <<EOF | sudo tee /etc/apt/preferences.d/gparted-pin
Package: *
Pin: release o=LP-PPA-xtradeb-apps
Pin-Priority: 100

Package: gparted*
Pin: release o=LP-PPA-xtradeb-apps
Pin-Priority: 700
EOF
The first rule deprioritizes all PPA packages to 100. The second rule overrides this for GParted specifically, raising it to 700 so APT prefers the PPA build over the default repository version.
Install GParted from the PPA:
sudo apt install gpartedVerify the PPA version is active by checking the package source:
apt-cache policy gpartedExpected output with pinning active:
Ubuntu 24.04:
gparted:
  Installed: 1.8.0-1xtradeb1.2404.1
  Candidate: 1.8.0-1xtradeb1.2404.1
  Version table:
 *** 1.8.0-1xtradeb1.2404.1 700
        100 https://ppa.launchpadcontent.net/xtradeb/apps/ubuntu noble/main amd64 Packages
        100 /var/lib/dpkg/status
     1.5.0-1build4 500
        500 http://archive.ubuntu.com/ubuntu noble/main amd64 Packages

Ubuntu 22.04:
gparted:
  Installed: 1.6.0-1xtradeb1
  Candidate: 1.6.0-1xtradeb1
  Version table:
 *** 1.6.0-1xtradeb1 700
        100 https://ppa.launchpadcontent.net/xtradeb/apps/ubuntu jammy/main amd64 Packages
        100 /var/lib/dpkg/status
     1.3.1-1ubuntu1 500
        500 http://archive.ubuntu.com/ubuntu jammy/main amd64 Packages
The priority value of 700 on the PPA line confirms that APT pinning is active and the PPA version takes priority over the default repository.
Launch GParted on Ubuntu
GParted requires root privileges to access and modify disk partitions. Both terminal and desktop launch methods prompt for authentication.
Launch GParted from the Terminal
Launch GParted with sudo to get full disk access:
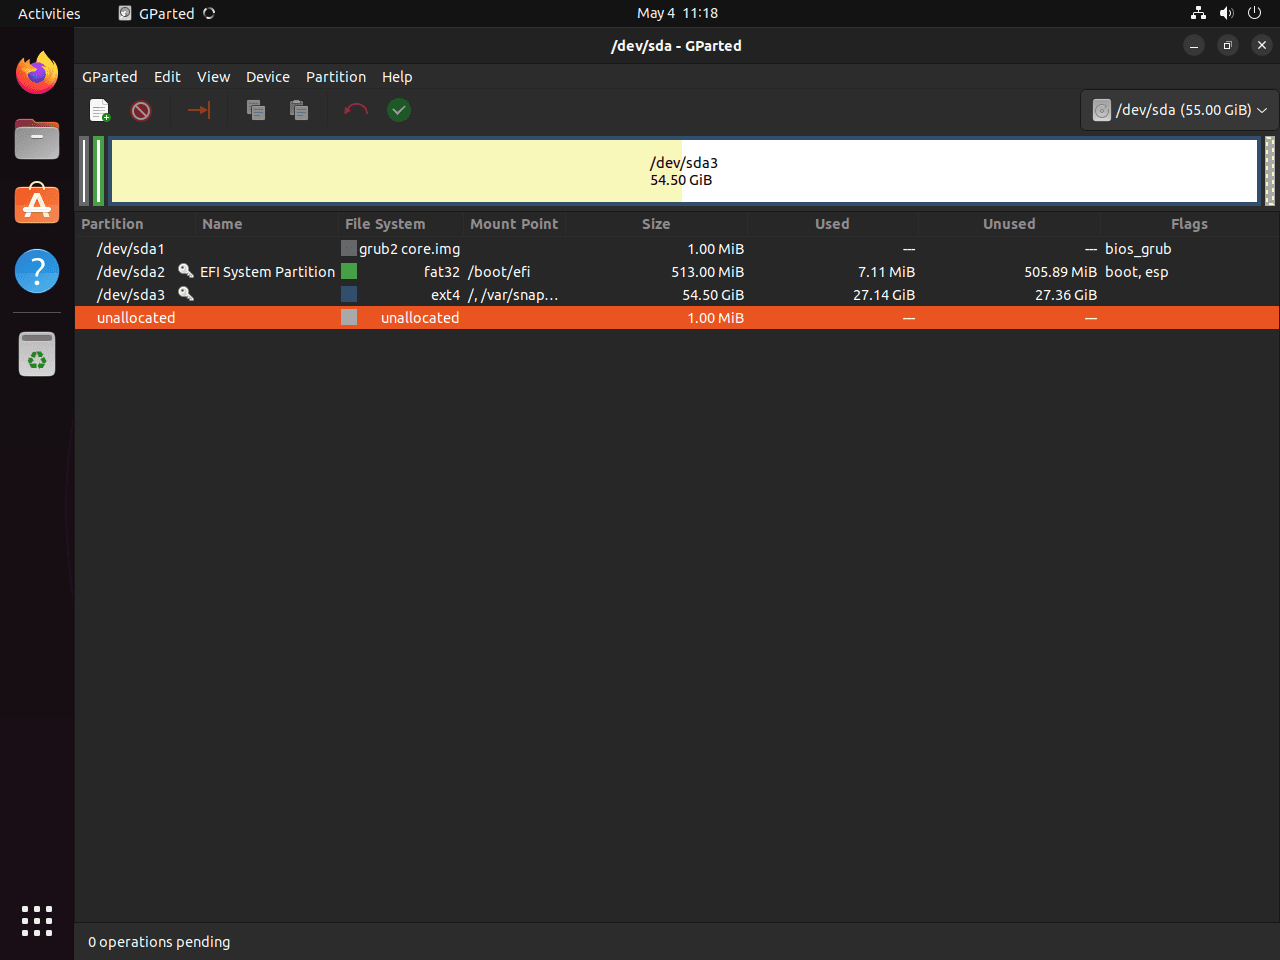
sudo gpartedAfter entering your password, the GParted graphical interface opens with full access to all disk operations.
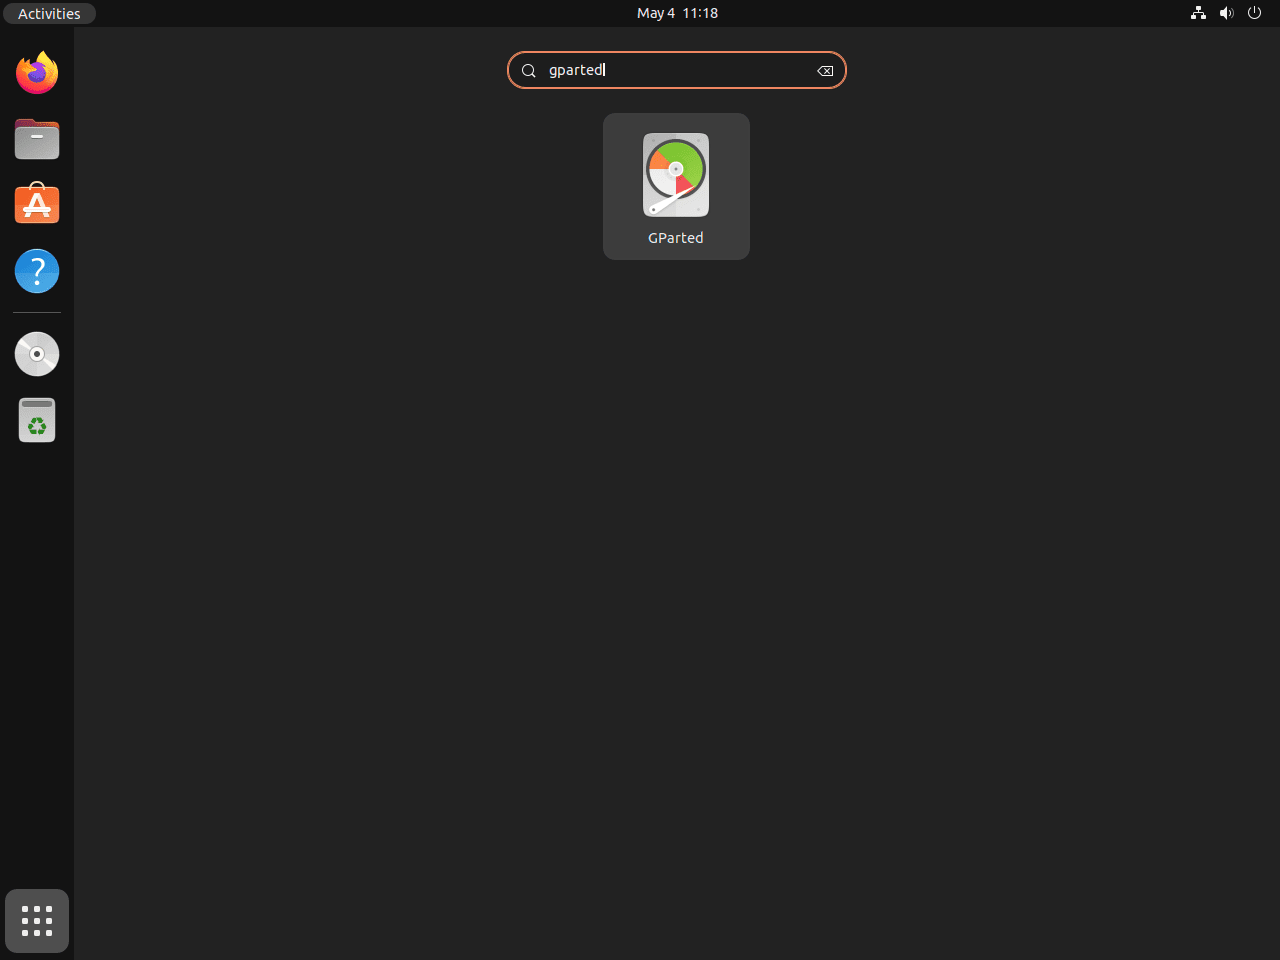
Launch GParted from the Applications Menu
GParted is also accessible through the Ubuntu desktop interface:
- Click Activities in the top-left corner of your screen.
- Type “GParted” in the search bar.
- Click the GParted icon to launch the application.
- Enter your password when prompted for authentication.
Update GParted on Ubuntu
GParted updates automatically through standard Ubuntu system updates. To update only GParted without upgrading other packages:
sudo apt update && sudo apt install --only-upgrade gpartedConfirm the updated version is active:
apt-cache policy gpartedThe Installed line in the output should match or exceed the versions listed in the installation section.
Remove GParted from Ubuntu
If you no longer need GParted, you can remove it along with its configuration files and unused dependencies.
Remove the GParted Package
Remove GParted and purge its configuration files:
sudo apt remove --purge gpartedNext, remove any orphaned dependencies that APT installed alongside GParted:
sudo apt autoremoveRemove the xtradeb PPA (If Added)
If you added the xtradeb PPA, remove the repository:
sudo add-apt-repository --remove ppa:xtradeb/apps -yAlso remove the APT pinning file if you configured one earlier:
sudo rm -f /etc/apt/preferences.d/gparted-pinFor more detailed instructions on managing PPAs, see our guide on how to remove a PPA from Ubuntu.
Verify GParted Removal
Confirm GParted is no longer installed:
apt-cache policy gpartedExpected output confirming successful removal:
gparted:
  Installed: (none)
  Candidate: 1.8.0-1
  Version table:
     1.8.0-1 500
        500 http://archive.ubuntu.com/ubuntu resolute/main amd64 Packages
Installed: (none) confirms GParted has been completely removed. The Candidate line shows the version available for reinstallation if needed.
Troubleshoot GParted Issues on Ubuntu
GParted Shows No Disks or Partitions
If GParted opens but displays an empty partition list with the message “No devices detected,” the application launched without root privileges. You will see this error in the terminal:
Unable to open /dev/sda read-write (Read-only file system). /dev/sda has been opened read-only.
Close GParted and relaunch it using sudo gparted from the terminal. If launching from the applications menu, ensure you enter your password when the authentication prompt appears. Verify you have root access by checking that all connected drives appear in the device dropdown menu at the top-right of the GParted window.
Cannot Modify a Mounted GParted Partition
When you attempt to resize or modify a partition, GParted may show this error:
Unable to resize partition: partition is currently mounted
This occurs because GParted cannot modify partitions that are currently in use. Check if the partition is mounted by looking for a key icon next to the partition label. Right-click the partition and select Unmount. After unmounting, the key icon disappears and resize/move operations become available.
For system partitions like your root filesystem (/), you cannot unmount them while Ubuntu is running. Instead, boot from a GParted Live USB or Ubuntu installation media, select “Try Ubuntu,” and launch GParted from there to modify system partitions.
GParted Operations Queue Not Applying
GParted queues all partition changes until you explicitly apply them. If you resize a partition but see no changes when you reboot, you likely forgot to apply the operations queue. After making your desired changes, click the green checkmark button in the toolbar or go to Edit → Apply All Operations. A confirmation dialog appears showing the pending operations:
Are you sure you want to apply the pending operations?

1. Resize /dev/sda1 from 500 GB to 300 GB
2. Create ext4 partition on /dev/sda2 (200 GB)
Review the list carefully before clicking Apply, as partition changes cannot be undone once the operation completes. After applying, GParted shows a progress bar and displays “All operations completed successfully” when finished.
Frequently Asked Questions About GParted on Ubuntu
No. GParted cannot modify a mounted partition. To resize your root filesystem, boot from a GParted Live USB or Ubuntu installation media, select “Try Ubuntu,” and launch GParted from there. This gives GParted full access to unmounted partitions.
GNOME Disks (gnome-disk-utility) handles basic tasks like formatting drives, managing SMART data, and creating disk images. GParted provides advanced partition operations including resizing, moving, and copying partitions across disks. Use GNOME Disks for quick formatting and GParted for partition layout changes.
Yes. Download the GParted Live ISO from gparted.org and flash it to a USB drive using a tool like Etcher or dd. Boot from the USB to access a standalone GParted environment that can modify any partition on the system, including the Ubuntu root filesystem.
No. GParted requires direct hardware access to disk block devices, which Snap and Flatpak sandboxing restricts. Install GParted through APT using either the default Ubuntu repository or the xtradeb PPA.
Yes. The parted command provides similar partition management from the terminal without a graphical interface. Run sudo parted /dev/sda to start an interactive session. GParted is the graphical frontend built on the same underlying libparted library.
GParted requires a graphical display (X11 or Wayland) and cannot run on headless servers. On Ubuntu Server, use the parted command-line tool instead, or boot from a GParted Live USB to access the graphical interface without installing a desktop environment.
Conclusion
GParted is installed on Ubuntu and ready for resizing, creating, and managing disk partitions through its graphical interface. The default repository delivers a stable version that suits most partition tasks, while the xtradeb PPA gives access to the latest release on Ubuntu 24.04 and 22.04. Before modifying partitions on drives with important data, consider installing Timeshift on Ubuntu to protect against unexpected issues during resize or move operations.

I don’t even know if you still check here. That would be good. For example, I would like a tutorial in this direction on how to change the download folder in Ubuntu.
Thanks for reaching out, ademir. Yes, the site is still actively maintained and updated.
A tutorial on changing the default download folder in Ubuntu is a good suggestion. The process typically involves adjusting settings in your file manager or browser, depending on which application you want to configure. I have added this topic to the content roadmap for a future guide that will cover both approaches.