
When Linux Mint hides the boot menu or keeps booting the wrong entry, Grub Customizer gives you a graphical way to change boot order, expose the hidden menu, and adjust GRUB without hand-editing every file. To install Grub Customizer on Linux Mint, use the Daniel Richter PPA, then verify the package source, launch it from a desktop session, rebuild GRUB when settings change, and remove the PPA cleanly if you stop using it.
Install Grub Customizer on Linux Mint
Update Linux Mint Packages Before Installing Grub Customizer
Refresh package metadata and install pending updates before adding the PPA. This reduces dependency conflicts during the installation.
sudo apt update
sudo apt upgrade
These commands use
sudofor tasks that need administrative privileges. If your account is not configured for sudo yet, use the root account or follow our guide on creating and adding sudo users on Linux Mint.
Add the Grub Customizer PPA on Linux Mint
Grub Customizer is not available in Linux Mint’s default repositories, and there is no separate Mint-specific download to chase down. Install it from the Daniel Richter PPA instead.
These steps support Ubuntu-based Linux Mint 22.x, from Wilma through Zena, and Linux Mint 21.x, from Vanessa through Virginia. The PPA publishes both
nobleandjammybuilds, andadd-apt-repositoryselects the right Ubuntu base automatically. Do not use these steps for Mint 20.x because Linux Mint’s current support list no longer includes that series.
Add the PPA with the standard Mint command:
sudo add-apt-repository ppa:danielrichter2007/grub-customizer -yThe
-yflag automatically confirms the repository prompt. If you want to review the PPA details first, leave the flag off and confirm manually.
Refresh APT so Linux Mint can read the new package list:
sudo apt updateAPT should now read package metadata from the PPA. Verify that the PPA provides the grub-customizer package:
apt-cache policy grub-customizerMint 22.x returns:
grub-customizer:
  Installed: (none)
  Candidate: 5.2.8-0ubuntu1~ppa1n
  Version table:
     5.2.8-0ubuntu1~ppa1n 500
        500 https://ppa.launchpadcontent.net/danielrichter2007/grub-customizer/ubuntu noble/main amd64 Packages
Mint 21 shows the same 5.2.8 release with a
ppa1jsuffix from thejammybranch. The build identifier changes with the Ubuntu base, but the application version stays the same.
Install Grub Customizer from the PPA on Linux Mint
Install the package with APT:
sudo apt install grub-customizerCheck the installed version:
grub-customizer -vRelevant output includes:
Grub Customizer, version 5.2.8
Launch Grub Customizer on Linux Mint
Grub Customizer needs a graphical Linux Mint session. Package installation can run from any terminal, but the application itself needs a logged-in desktop session.
Launch Grub Customizer from Terminal on Linux Mint
Start Grub Customizer from a terminal as your normal user. When the application needs to load or save privileged GRUB settings, Linux Mint prompts for administrative authentication through the desktop session.
grub-customizerLaunch Grub Customizer from the Applications Menu on Linux Mint
You can also open it from the desktop menu:
- Open the application menu from your panel.
- Search for
Grub Customizer. - Open the matching result.
Seeing Ubuntu labels inside generated GRUB entries is normal on Linux Mint because Mint uses Ubuntu as its package base. The labels do not mean Mint or GRUB is misconfigured.
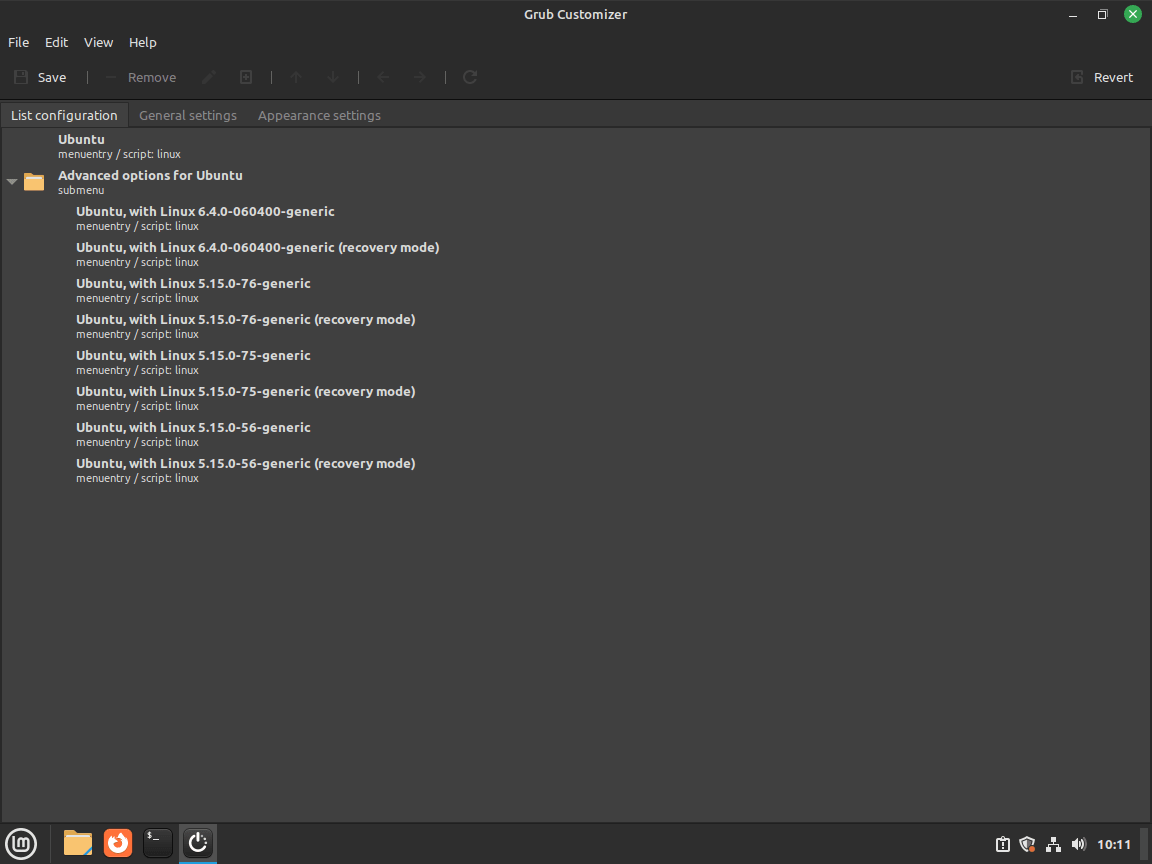
Edit GRUB Settings with Grub Customizer on Linux Mint
Once the window opens, you can handle the most common GRUB tasks from one place instead of editing files by hand. These are the controls most Linux Mint users reach for first.
| Task | Where to Find It | When to Use It |
|---|---|---|
| Change boot order | Main entry list and toolbar arrows | Dual-boot systems where you want a different default OS or kernel |
| Change timeout | General Settings | Show the boot menu longer, or stop Mint from hiding it immediately |
| Check OS detection | Main entry list after saving | Confirm Windows or another Linux install appears in the menu |
| Apply themes | Appearance Settings | Set background images, colors, fonts, and menu layout |
GRUB changes affect how your system starts. Make one change at a time, save it, then reboot and confirm the result before you stack more edits on top.
Back Up GRUB Defaults Before Using Grub Customizer on Linux Mint
Back up your current GRUB defaults before changing boot order, timeouts, or themes. That gives you a quick rollback if a change behaves badly.
sudo cp /etc/default/grub /etc/default/grub.backupIf you need to restore the original defaults later, copy the backup back into place and rebuild the menu:
sudo cp /etc/default/grub.backup /etc/default/grub
sudo update-grub
Edit GRUB Defaults Manually on Linux Mint
Linux Mint keeps the main GRUB defaults in /etc/default/grub. If you want to edit GRUB without the GUI, open that file with sudo nano /etc/default/grub, save your changes, then run sudo update-grub so Linux Mint rebuilds /boot/grub/grub.cfg with the new settings.
sudo nano /etc/default/grub
sudo update-grub
Change Boot Order and the Default Entry in Grub Customizer on Linux Mint
Select the operating system or kernel entry you want, then move it with the toolbar arrows until it sits where you want it in the list. The top entry usually becomes the default boot target unless you choose a saved entry in General Settings. This is also the section you will use most if Linux Mint has multiple kernels installed, such as when you install XanMod kernel on Linux Mint. Click Save when the order looks right so GRUB can rebuild the menu.
Show the GRUB Menu and Change the Timeout in Grub Customizer on Linux Mint
Current Linux Mint 22.x and 21.x installs hide the menu by default with GRUB_TIMEOUT_STYLE=hidden and GRUB_TIMEOUT=0. This hidden menu behavior is normal on single-boot systems. Open General Settings, increase the timeout to a few seconds, and save the change if you want more time to pick another kernel or operating system during boot.
Apply GRUB Themes and Background Images in Grub Customizer on Linux Mint
Open Appearance Settings to swap the background image, adjust menu colors, tweak font size, or move the menu on screen. Theme changes are easy to overdo, so save one visual adjustment at a time and reboot to confirm the result before you keep styling the boot menu.
Update Grub Customizer and Rebuild GRUB on Linux Mint
To update the Grub Customizer application, refresh the package from the Daniel Richter PPA with APT. If you mean the GRUB bootloader configuration itself, run sudo update-grub after you save changes in Grub Customizer or edit /etc/default/grub by hand.
Update the Grub Customizer Package with APT
sudo apt update
sudo apt install --only-upgrade grub-customizer
Confirm the installed version afterward:
grub-customizer -vRelevant output includes:
Grub Customizer, version 5.2.8
Rebuild the GRUB Menu After Settings Changes
Run sudo update-grub after changing GRUB defaults manually, restoring a backup, or saving a boot-menu change that needs to be regenerated from the terminal.
sudo update-grubA successful rebuild finishes with done. If the command stops earlier, fix the reported error before rebooting.
Troubleshoot Grub Customizer on Linux Mint
These checks cover the most common PPA, package-detection, and boot-menu refresh problems after installing Grub Customizer on Linux Mint.
Fix a Missing add-apt-repository Command for Grub Customizer on Linux Mint
If Linux Mint says add-apt-repository is missing, restore the Mint package that provides the helper. Current Mint 22.x and 21.x systems own /usr/bin/add-apt-repository through mintsources, not software-properties-common.
add-apt-repository: command not found
Install the missing package only when the command is absent, then confirm the path and package owner before retrying the PPA step:
command -v add-apt-repository >/dev/null 2>&1 || sudo apt install mintsources
command -v add-apt-repository
dpkg -S "$(command -v add-apt-repository)"
Relevant output includes:
/usr/bin/add-apt-repository
mintsources: /usr/bin/add-apt-repository
Fix the Unable to Locate grub-customizer Error on Linux Mint
If Linux Mint returns E: Unable to locate package grub-customizer, the PPA was not added correctly, APT was not refreshed, or you removed the repository earlier.
E: Unable to locate package grub-customizer
Check the package policy and confirm that Mint created the PPA source file:
apt-cache policy grub-customizer
find /etc/apt/sources.list.d -maxdepth 1 -type f -name '*grub-customizer*' -printf '%f\n'
The policy command shows whether APT can see the package at all. The source-file check confirms that Mint actually created the PPA file in /etc/apt/sources.list.d/.
On Mint 22, a healthy result looks like this:
grub-customizer:
  Installed: (none)
  Candidate: 5.2.8-0ubuntu1~ppa1n
  Version table:
     5.2.8-0ubuntu1~ppa1n 500
        500 https://ppa.launchpadcontent.net/danielrichter2007/grub-customizer/ubuntu noble/main amd64 Packages
danielrichter2007-grub-customizer-noble.list
If the policy block is empty and the .list file is missing, add the PPA again and refresh APT:
sudo add-apt-repository ppa:danielrichter2007/grub-customizer -y
sudo apt update
Fix GRUB Changes That Do Not Apply After Saving in Grub Customizer on Linux Mint
If the menu order, timeout, or theme does not change after you save, regenerate the GRUB configuration manually. This confirms whether the update step completed successfully.
sudo update-grubOn Mint 22, relevant output includes:
Sourcing file `/etc/default/grub'
Sourcing file `/etc/default/grub.d/50_linuxmint.cfg'
Generating grub configuration file ...
Warning: os-prober will be executed to detect other bootable partitions.
Adding boot menu entry for UEFI Firmware Settings ...
done
Mint 21 shows the same pattern with older kernel versions and may include one extra sourced file, /etc/default/grub.d/init-select.cfg. Reboot after the command finishes so the regenerated menu can load.
Restore Missing Operating System Entries in Grub Customizer on Linux Mint
Linux Mint normally keeps OS detection enabled through its own GRUB drop-in, so missing Windows or secondary Linux entries usually point to a broken os-prober install or a stale GRUB menu.
dpkg -s os-prober | grep -E '^(Status|Version):'
grep -R --line-number GRUB_DISABLE_OS_PROBER /etc/default/grub /etc/default/grub.d
The first command checks whether os-prober is installed. The second searches both the main GRUB defaults file and Mint’s drop-in directory for the switch that can disable operating-system detection.
On Mint 22, relevant diagnostic output includes:
Status: install ok installed
Version: 1.81ubuntu4
/etc/default/grub:18:#GRUB_DISABLE_OS_PROBER=false
/etc/default/grub.d/50_linuxmint.cfg:26:GRUB_DISABLE_OS_PROBER=false
If os-prober is missing or damaged, reinstall it and rebuild the boot menu:
sudo apt install --reinstall os-prober
sudo update-grub
On a working dual-boot system, the second command should add new Found ... lines for the missing operating system before it finishes.
Remove Grub Customizer from Linux Mint
Remove the package first, then remove the PPA if you do not plan to reinstall Grub Customizer later.
Remove the Grub Customizer Package from Linux Mint
If you no longer need the application, remove the package first, then clean up the extra dependencies that came with it.
sudo apt remove grub-customizer
sudo apt autoremove
Review APT’s package list before confirming. On current Mint 22.x and 21.x releases, apt autoremove also removes hwinfo, libx86emu3, and either libhd21t64 on Mint 22.x or libhd21 on Mint 21.x.
Verify that the package is gone:
dpkg-query -W -f='${db:Status-Abbrev} ${binary:Package}\n' grub-customizer 2>/dev/null || echo "not installed"After removal, Mint reports:
not installed
Removing Grub Customizer does not undo the GRUB changes you already saved. The package has no conffiles of its own, so
removeandpurgebehave the same here. If you want the old boot behavior back, restore your backup of/etc/default/gruband runsudo update-grub.
Remove the Grub Customizer PPA from Linux Mint
After uninstalling the package, remove the PPA so APT stops checking an unused repository.
sudo add-apt-repository --remove ppa:danielrichter2007/grub-customizer -y
sudo apt update
Now confirm that APT can no longer see the package from that repository:
find /etc/apt/sources.list.d -maxdepth 1 -type f -name '*grub-customizer*' -printf '%f\n'
apt-cache show grub-customizer
The find command should print no source files. The package lookup then reports:
E: No package found
Conclusion
The Daniel Richter PPA gives Linux Mint an APT-managed Grub Customizer package, while saved GRUB changes remain separate from the app package itself. Keep a backup of /etc/default/grub, change one boot setting at a time, and rebuild the menu when needed.

Piece of cake. Thanks
Great instructions
Good, logical and well explained.
Thanks for the feedback.