LXQt is a lightweight desktop environment built on the Qt framework, designed for users who prioritize speed and low memory usage without sacrificing modern features. Common use cases include reviving older hardware, running lean virtual machines, and creating minimal workstations for development or server administration. Recent versions also include Wayland compositor support for users who prefer modern display protocols. By the end of this guide, you will have a fully functional LXQt desktop with the SDDM display manager ready to use on your Debian system.
Choose Your LXQt Installation Method
Debian offers two approaches for installing LXQt, depending on whether you want a complete desktop experience or a minimal setup. The following table summarizes your options:
| Method | Package | Includes | Best For |
|---|---|---|---|
| Full Desktop | task-lxqt-desktop | LXQt, SDDM, LibreOffice, recommended apps | Desktop users wanting a complete experience |
| Minimal | lxqt | Core LXQt components only | Server with occasional GUI, custom setups |
For most users, the full desktop method is recommended because it includes essential applications, proper display manager configuration, and a polished out-of-the-box experience. The minimal method suits advanced users who prefer to select individual components manually.
Update Debian Before Installing LXQt
Before installing any new packages, refresh your package index and upgrade existing software to prevent dependency conflicts. Run the following commands in your terminal:
sudo apt update
sudo apt upgrade
The first command downloads the latest package information from Debian’s repositories, while the second upgrades any outdated packages on your system. After the upgrade completes, you can proceed with the LXQt installation.
Install LXQt Desktop Environment
Option 1: Full Desktop Installation (Recommended)
The full desktop installation includes LXQt along with the SDDM display manager, LibreOffice, and other recommended applications commonly expected on a desktop system. Install it with:
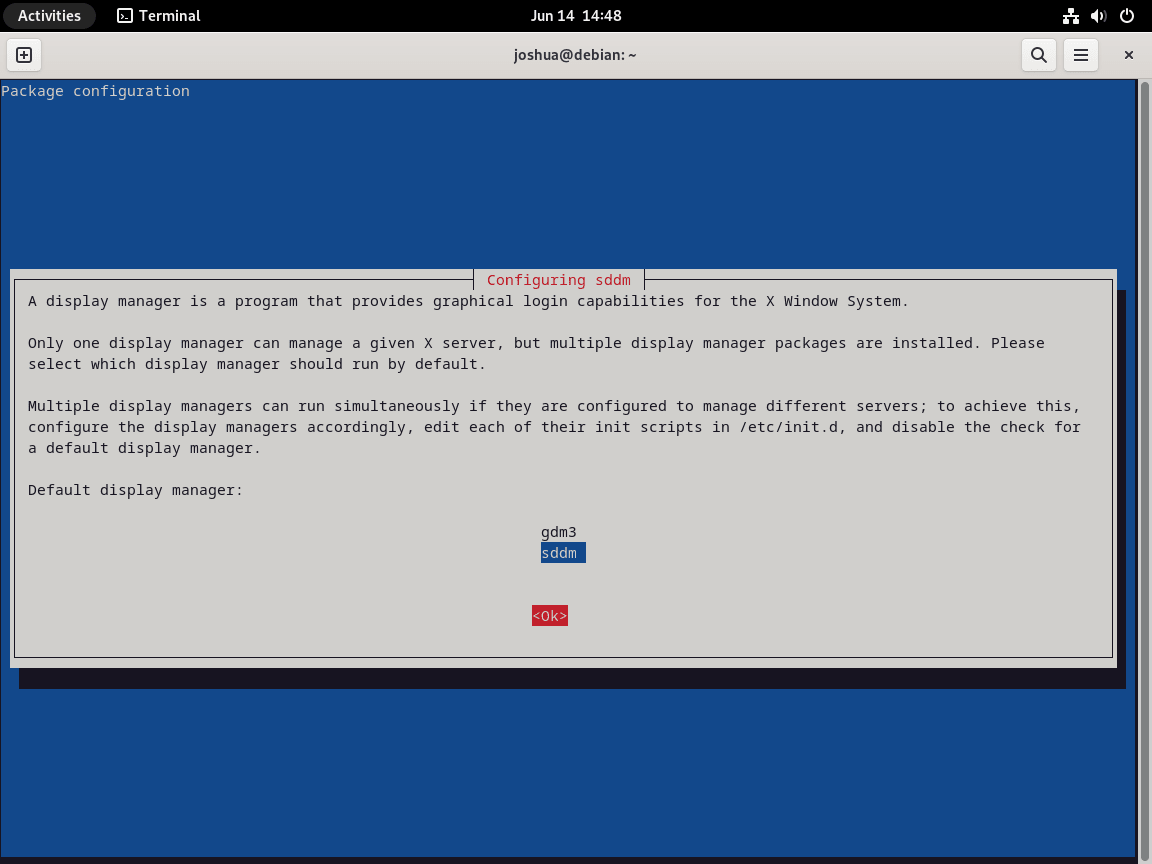
sudo apt install task-lxqt-desktopDuring installation, you will see a “Configuring sddm” prompt. LXQt uses the Simple Desktop Display Manager (SDDM) as its login screen. To proceed, use the TAB key to highlight <Ok> and press ENTER.

Option 2: Minimal Installation
If you prefer a lighter installation without the bundled applications, install only the core LXQt metapackage:
sudo apt install lxqtThis installs the essential LXQt components, including the panel, session manager, file manager, and terminal. You will still see the SDDM configuration prompt since the display manager is a dependency. However, you will need to install additional applications manually as needed.
Verify the Installation
After installation completes, confirm that APT installed the LXQt packages correctly:
apt-cache policy lxqtExpected output:
lxqt:
  Installed: 33.2
  Candidate: 33.2
  Version table:
 *** 33.2 500
        500 http://deb.debian.org/debian trixie/main amd64 Packages
        100 /var/lib/dpkg/status
The version number varies by Debian release: Debian 13 (Trixie) includes LXQt metapackage 33.2, Debian 12 (Bookworm) includes 31, and Debian 11 (Bullseye) includes 30. All versions provide a complete LXQt experience.
Reboot and Access LXQt Desktop
After installation, restart your system to ensure the display manager initializes properly:
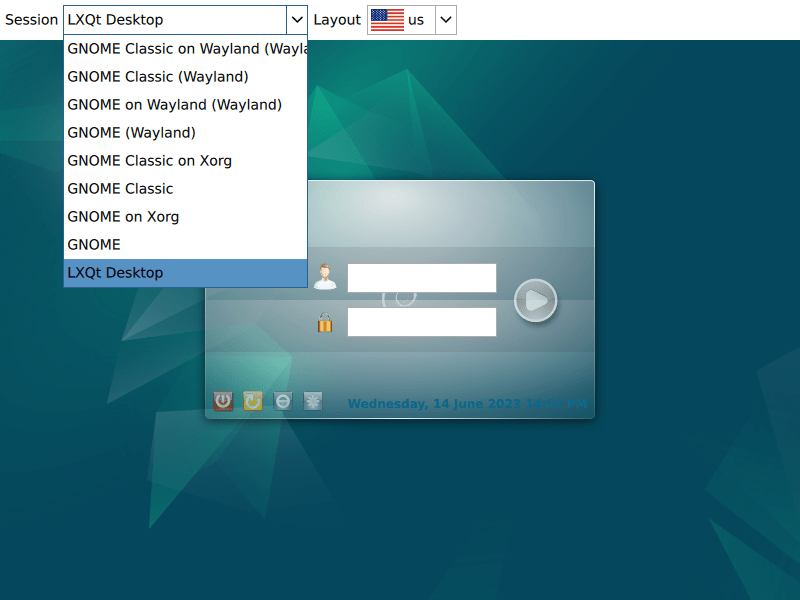
sudo rebootOnce your system restarts, you will see the SDDM login screen. In most cases, LXQt becomes the default desktop environment automatically. If you have multiple desktop environments installed, click the session selector (typically in the top-left corner of the login screen) and choose “LXQt” from the dropdown menu.

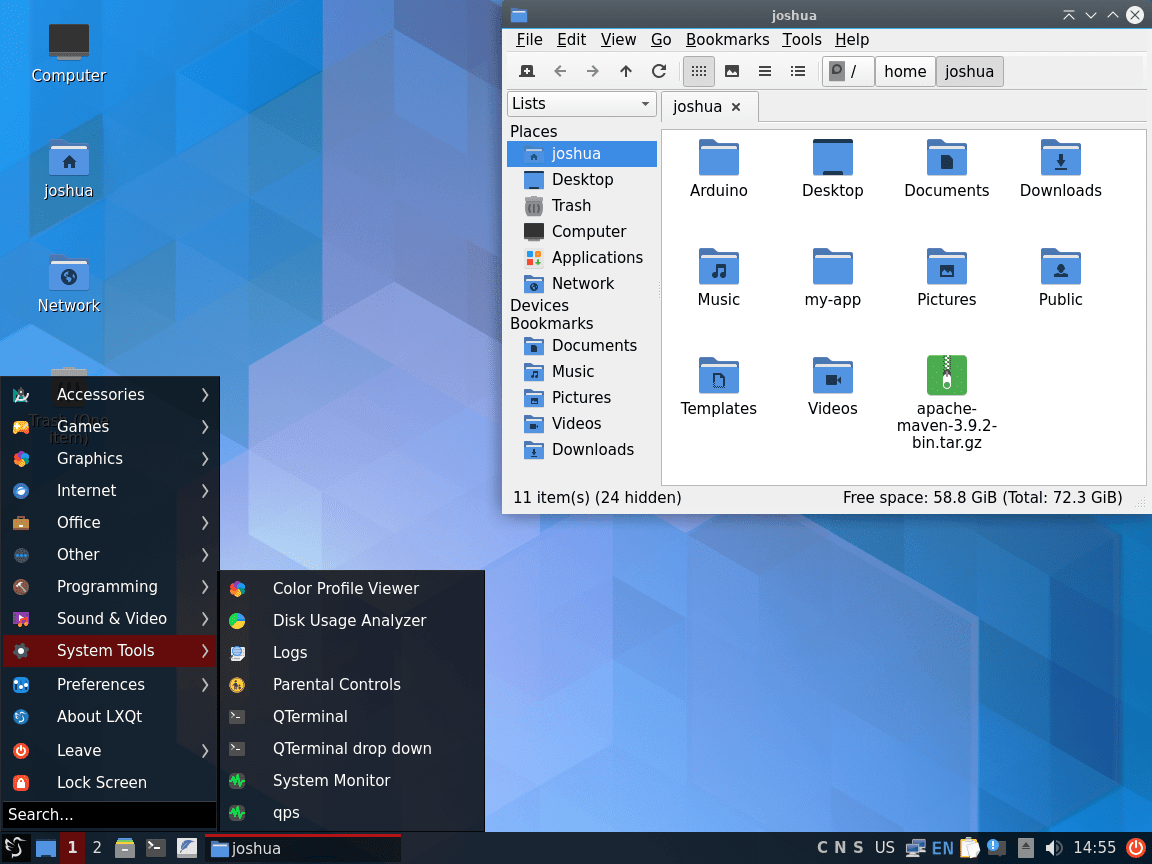
After logging in, you will see the LXQt desktop with a clean, familiar interface:

Manage LXQt Desktop Environment
Switch Display Manager
If you have multiple desktop environments installed and want to change the default display manager, use the dpkg-reconfigure command. For example, to switch between SDDM (used by LXQt) and GDM3 (used by GNOME):
sudo dpkg-reconfigure sddmA dialog appears allowing you to select your preferred display manager. After making your selection, reboot to apply the change:
sudo rebootRemove LXQt from Debian
If you decide to remove LXQt, the following command uninstalls all LXQt-related packages along with the task metapackage, then cleans up orphaned dependencies:
sudo apt autoremove '^lxqt' task-lxqt-desktop sddm --purgeThe --purge flag removes configuration files in addition to the packages themselves. The command also removes SDDM since APT installed it as an LXQt dependency.
Verify the removal completed successfully:
apt-cache policy lxqtExpected output after removal:
lxqt:
  Installed: (none)
  Candidate: 33.2
  Version table:
     33.2 500
        500 http://deb.debian.org/debian trixie/main amd64 Packages
The Installed: (none) line confirms the package was removed. The package remains available in Debian’s repositories for reinstallation if needed.
User configuration files remain in
~/.config/lxqt/,~/.cache/lxqt/, and~/.local/share/lxqt/after package removal. Delete these directories manually if you want a complete cleanup.
Restore GNOME After LXQt Removal
If you previously used GNOME and the uninstallation removed some packages, reinstall the GNOME desktop with:
sudo apt install task-gnome-desktopThis installs the GNOME desktop along with GDM3 (GNOME Display Manager) and standard GNOME applications. After installation, reboot to start using GNOME:
sudo rebootTroubleshoot Common LXQt Issues
LXQt Session Not Appearing in Login Screen
If LXQt does not appear as a session option after installation, verify that the session file exists:
ls /usr/share/xsessions/ | grep -i lxqtExpected output:
lxqt.desktop
If the file is missing, reinstall the lxqt-session package:
sudo apt install --reinstall lxqt-sessionSDDM Fails to Start
If the display manager fails to start and you boot to a text console, check the SDDM service status:
systemctl status sddmIf SDDM is inactive, the output shows:
○ sddm.service - Simple Desktop Display Manager
     Loaded: loaded (/lib/systemd/system/sddm.service; disabled; preset: enabled)
     Active: inactive (dead)
Enable and start it manually to resolve the issue:
sudo systemctl enable sddm
sudo systemctl start sddm
For more detailed error information, check the journal logs:
journalctl -xeu sddmExplore Other Debian Desktop Environments
If you want to compare LXQt with other lightweight or feature-rich desktop environments available on Debian, consider exploring these options:
- Install Xfce on Debian, another lightweight option with GTK-based applications
- Install KDE Plasma on Debian for a full-featured Qt-based desktop
- Install Cinnamon on Debian for a traditional desktop layout
- Install Budgie on Debian for a modern, elegant interface
Conclusion
You now have LXQt installed and configured on Debian, providing a fast, resource-efficient desktop environment. LXQt includes essential tools like the PCManFM-Qt file manager, QTerminal, and the LXQt Panel, giving you a complete workspace for everyday tasks. From here, explore the LXQt Configuration Center to customize themes, keyboard shortcuts, and panel layouts to match your workflow.


Very good, I finally got rid of the gnome – it got too big!
Thanks for the feedback! Indeed, LXQt desktop environment is indeed much better on resources compared to GNOME.
Ah!
your pieces of advice are NOT only an annoying collection of command like in a recipe book.
Every command is explained, thks you.
Thanks for the feedback.