
Matomo gives you page views, goals, campaigns, and ecommerce reporting without handing that data to a third-party analytics provider. You can install Matomo on Ubuntu with Nginx, MariaDB, and PHP-FPM, then finish the browser installer on your own domain or on a private host before exposing it to the internet.
Ubuntu 26.04, 24.04, and 22.04 all support this stack from the default repositories, while Matomo itself comes from the official tarball instead of an Ubuntu package. Most commands stay the same across all three LTS releases, but the PHP-FPM service and socket names change with the default PHP branch.
Install Matomo on Ubuntu
Ubuntu’s default Nginx, MariaDB, and PHP-FPM packages provide the server stack, while Matomo comes from the official upstream archive. Matomo’s current requirements page still recommends PHP 8.x and MySQL 8+ or MariaDB, so all three supported Ubuntu LTS releases meet the server baseline.
| Ubuntu release | Default PHP-FPM | Default MariaDB | Matomo note |
|---|---|---|---|
| Ubuntu 26.04 LTS | PHP 8.5.x (php8.5-fpm) | MariaDB 11.8.x | Use the 8.5 PHP-FPM socket in Nginx |
| Ubuntu 24.04 LTS | PHP 8.3.x (php8.3-fpm) | MariaDB 10.11.x | Use the 8.3 PHP-FPM socket in Nginx |
| Ubuntu 22.04 LTS | PHP 8.1.x (php8.1-fpm) | MariaDB 10.6.x | Use the 8.1 PHP-FPM socket in Nginx |
Matomo does not publish an official Ubuntu
.debpackage for this setup. The supported self-hosted path here uses the upstreammatomo-latest.tar.gzarchive, then serves it through Ubuntu’s own Nginx, MariaDB, and PHP-FPM packages. This is the native server workflow, not the Matomo Docker image or Matomo for WordPress plugin path.
Update Ubuntu and install Nginx for Matomo
Start with current package metadata, then install Nginx plus the download and HTTP-check tools used later in the tarball workflow.
sudo apt updateThese commands use
sudobecause they change system packages and service state. If your account does not have sudo access yet, first add a new user to sudoers on Ubuntu.
sudo apt install nginx wget curl -yConfirm that Nginx started cleanly before you move on:
systemctl is-active nginx
systemctl is-enabled nginx
A healthy service returns:
active
enabled
If UFW is enabled on this server, allow the web ports before you open the installer with
sudo ufw allow 'Nginx Full'. For SSH planning, custom application rules, and cleanup, configure UFW on Ubuntu first.
Ubuntu’s default Nginx package is enough for Matomo. If this host also needs the newer branch for other sites, use the separate guide to install Nginx Mainline on Ubuntu.
Install MariaDB for Matomo on Ubuntu
Matomo stores visits, reports, goals, and other analytics data in a MySQL-compatible database. MariaDB works out of the box on Ubuntu and stays in the supported range across 26.04, 24.04, and 22.04.
sudo apt install mariadb-server mariadb-client -yCheck that the database service is running:
systemctl is-active mariadb
systemctl is-enabled mariadb
You should see an active and enabled MariaDB service:
active
enabled
Before you create the Matomo database, run the MariaDB hardening script:
sudo mariadb-secure-installationUse the script to remove anonymous users, block remote root logins, drop the test database, and reload the privilege tables. Some Ubuntu releases still provide mysql_secure_installation as a compatibility alias, but mariadb-secure-installation matches the current package naming. If you need different MariaDB branches or deeper hardening, see Install MariaDB on Ubuntu.
Install PHP-FPM and Matomo extensions on Ubuntu
Keep this as an FPM-first install. On Ubuntu, the plain php metapackage can satisfy its dependency with Apache’s module instead of PHP-FPM, so this Nginx guide installs the FPM and extension packages directly.
sudo apt install php-fpm php-cli php-mysql php-gd php-curl php-xml php-mbstring php-bcmath php-intl php-zip php-imagick php-ldap -yVerify the active PHP branch:
php -r 'echo PHP_MAJOR_VERSION . "." . PHP_MINOR_VERSION . PHP_EOL;'On Ubuntu 26.04 this prints the default PHP branch:
8.5
Now confirm the matching PHP-FPM service. Replace the service name if you are on Ubuntu 24.04 or 22.04:
systemctl is-active php8.5-fpm
systemctl is-enabled php8.5-fpm
A working PHP-FPM service returns:
active
enabled
Matomo’s requirements center on PHP 8.x plus database, graphics, XML, and multibyte support, which this package set covers. If you need another PHP branch for a different site on the same host, use Install PHP on Ubuntu for the broader version-management workflow.
Download and extract Matomo on Ubuntu
Matomo’s supported self-hosted install uses the official archive. The download itself is simple, and wget command examples covers resume, output-file, and mirror options if you need them on a slower link.
cd /tmp
wget -O matomo-latest.tar.gz https://builds.matomo.org/matomo-latest.tar.gz
Make sure the archive was saved before you extract it:
test -s /tmp/matomo-latest.tar.gz && echo "Matomo archive downloaded"The file check should return:
Matomo archive downloaded
Extract Matomo into its own web root. The --strip-components=1 option removes the top-level archive directory so the application lands directly in /var/www/matomo:
sudo mkdir -p /var/www/matomo
sudo tar -xzf /tmp/matomo-latest.tar.gz -C /var/www/matomo --strip-components=1
Check that the expected Matomo files exist:
ls /var/www/matomoA successful extract includes the main application tree:
CHANGELOG.md
config
console
core
index.php
js
matomo.php
plugins
tmp
vendor
Now hand the tree to the web-server user and apply standard directory and file modes. The two find and chmod commands keep directories traversable while regular files stay read-only by default. For a deeper breakdown of 755 and 644, see this chmod command guide.
sudo chown -R www-data:www-data /var/www/matomo
sudo find /var/www/matomo -type d -exec chmod 755 {} \;
sudo find /var/www/matomo -type f -exec chmod 644 {} \;
Verify the key writable directories now belong to www-data:
sudo stat -c '%U:%G %a %n' /var/www/matomo /var/www/matomo/config /var/www/matomo/tmpYou should see www-data ownership and standard web-root modes:
www-data:www-data 755 /var/www/matomo
www-data:www-data 755 /var/www/matomo/config
www-data:www-data 755 /var/www/matomo/tmp
Create the Matomo Nginx server block on Ubuntu
Put the Matomo Nginx configuration in /etc/nginx/sites-available/matomo.conf, then enable it from /etc/nginx/sites-enabled/. This server block is adapted from Matomo’s official Nginx configuration repository, but trimmed for Ubuntu’s packaging and this HTTP-first install flow.
sudo nano /etc/nginx/sites-available/matomo.confUse the PHP-FPM socket that matches your Ubuntu release:
/run/php/php8.5-fpm.sockon 26.04,/run/php/php8.3-fpm.sockon 24.04, and/run/php/php8.1-fpm.sockon 22.04. Ubuntu’ssnippets/fastcgi-php.confalready carries its owntry_filesrule, so do not paste a secondtry_files $fastcgi_script_name =404;line into this server block ornginx -twill fail with a duplicate-directive error.
server {
    listen 80;
    listen [::]:80;
    server_name matomo.example.com;

    root /var/www/matomo;
    index index.php;

    access_log /var/log/nginx/matomo.access.log;
    error_log /var/log/nginx/matomo.error.log;

    location ~ ^/(index|matomo|piwik|js/index|plugins/HeatmapSessionRecording/configs)\.php$ {
        include snippets/fastcgi-php.conf;
        fastcgi_param HTTP_PROXY "";
        fastcgi_pass unix:/run/php/php8.5-fpm.sock;
    }

    location ~* ^.+\.php$ {
        deny all;
        return 403;
    }

    location / {
        try_files $uri $uri/ =404;
    }

    location ~ ^/(config|tmp|core|lang) {
        deny all;
        return 403;
    }

    location ~ /\.ht {
        deny all;
        return 403;
    }

    location ~ js/container_.*_preview\.js$ {
        expires off;
        add_header Cache-Control "private, no-cache, no-store";
    }

    location ~ \.(gif|ico|jpg|png|svg|js|css|htm|html|mp3|mp4|wav|ogg|avi|ttf|eot|woff|woff2|json)$ {
        allow all;
        expires 1h;
        add_header Pragma public;
        add_header Cache-Control "public";
    }

    location ~ ^/(libs|vendor|plugins|misc|node_modules) {
        deny all;
        return 403;
    }

    location ~ /(.*\.md|LEGALNOTICE|LICENSE) {
        default_type text/plain;
    }
}
Enable the site, remove Ubuntu’s default placeholder site if it is still active, test the syntax, and restart Nginx:
sudo ln -sfn /etc/nginx/sites-available/matomo.conf /etc/nginx/sites-enabled/matomo.conf
sudo rm -f /etc/nginx/sites-enabled/default
sudo nginx -t
sudo systemctl restart nginx
A clean syntax check looks like this:
nginx: the configuration file /etc/nginx/nginx.conf syntax is ok
nginx: configuration file /etc/nginx/nginx.conf test is successful
This server block starts on port 80, which is enough to reach the installer before TLS is in place. Before you leave the shell, verify that Nginx can reach the Matomo installer locally. This is a quick way to catch bad socket paths or missing files before you switch to the browser.
curl -fsSI -H "Host: matomo.example.com" http://127.0.0.1/Relevant headers include:
HTTP/1.1 200 OK
Content-Type: text/html; charset=utf-8
If you want more header and redirect checks from the shell, see curl command in Linux. If this Matomo host will sit behind another frontend proxy or load balancer, adapt the final topology with Create a reverse proxy in Nginx.
Create the Matomo database and user on Ubuntu
Matomo should use its own database and login instead of borrowing MariaDB’s administrative account.
sudo mariadbRun these SQL statements inside the MariaDB shell. Replace the example password before you continue:
CREATE DATABASE matomo_db;
CREATE USER 'matomo_user'@'localhost' IDENTIFIED BY 'ChangeThisStrongPassword!';
GRANT SELECT, INSERT, UPDATE, DELETE, CREATE, INDEX, DROP, ALTER, CREATE TEMPORARY TABLES, LOCK TABLES ON matomo_db.* TO 'matomo_user'@'localhost';
FLUSH PRIVILEGES;
EXIT;
This database-level grant covers Matomo’s schema permissions without giving the application user broad control over other databases. Matomo also lists the global FILE privilege for LOAD DATA INFILE performance checks, but its own LOAD DATA INFILE troubleshooting guidance notes that local infile mode can work without that extra global permission. Add FILE only when your server policy allows it and you deliberately want that database-server-wide privilege.
Confirm the account has the expected grant on the Matomo database:
sudo mariadb -e "SHOW GRANTS FOR 'matomo_user'@'localhost';"Relevant output should include the Matomo database permissions:
GRANT SELECT, INSERT, UPDATE, DELETE, CREATE, DROP, INDEX, ALTER, CREATE TEMPORARY TABLES, LOCK TABLES ON `matomo_db`.* TO `matomo_user`@`localhost`
Complete the Matomo web installer on Ubuntu
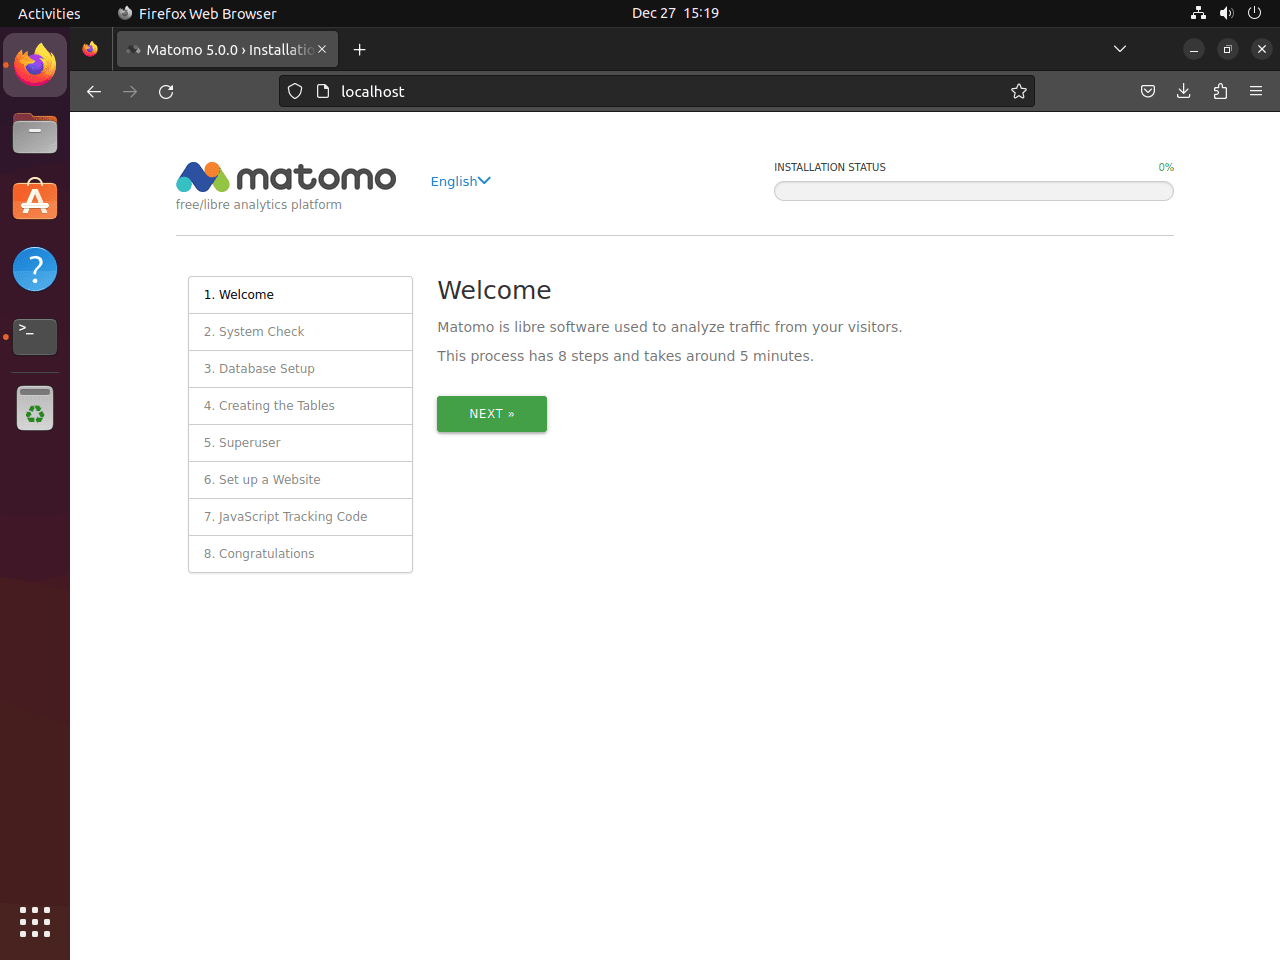
Open the hostname you used in server_name and walk through the browser installer. A private IP, internal DNS name, or temporary hosts-file entry is fine while you validate the stack; you only need a public hostname later if you want Let’s Encrypt to issue a certificate.
Open the Matomo installer in a browser
The first page confirms that Matomo is serving correctly through Nginx:
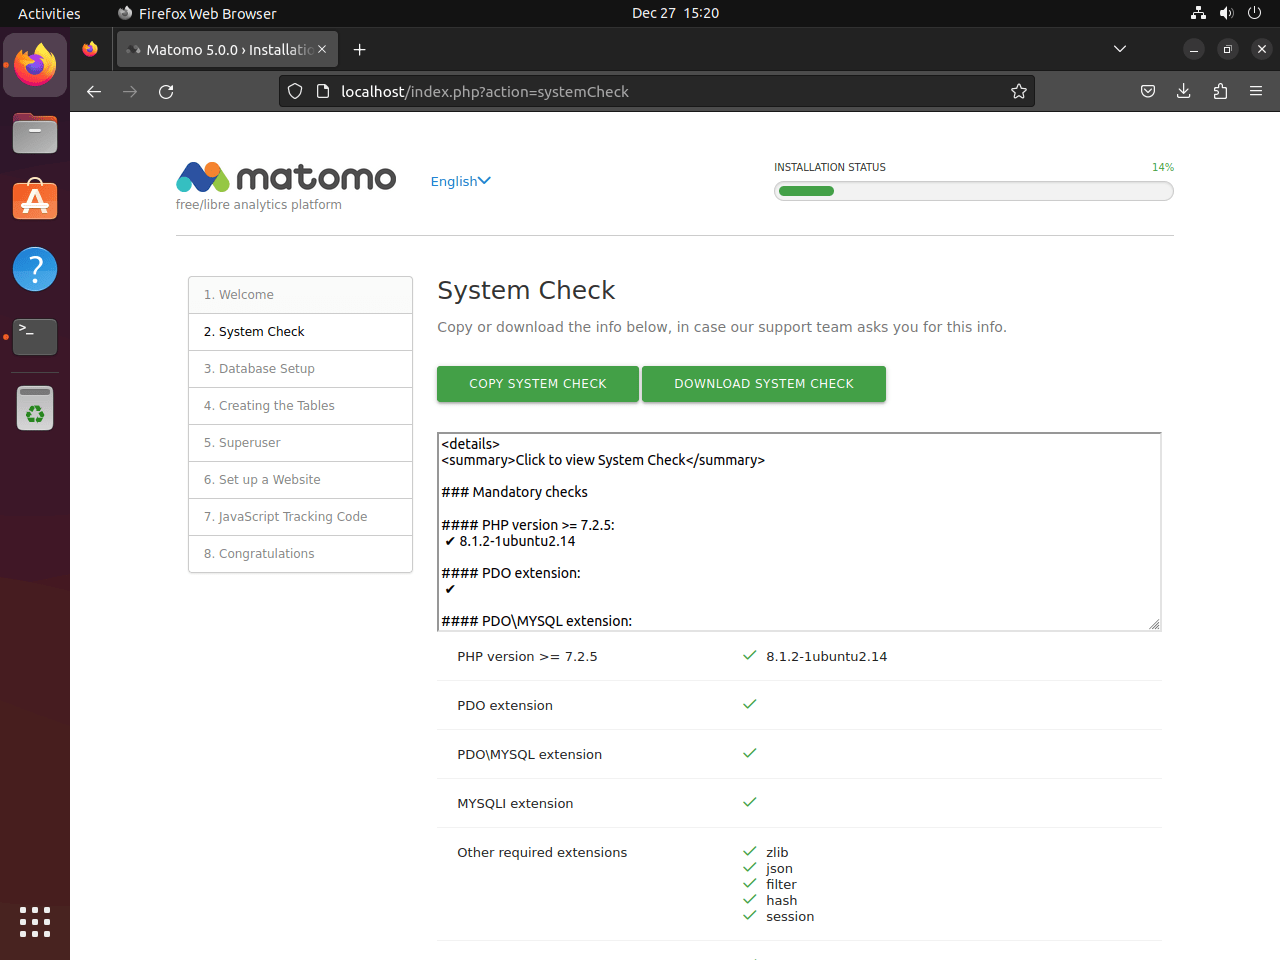
The installer also runs a quick environment check for PHP, extensions, file permissions, and database drivers. Fix any red entries in the shell before you continue:
- PHP version and required extensions
- Writable Matomo directories such as
configandtmp - Database driver availability for MariaDB
- General server environment compatibility
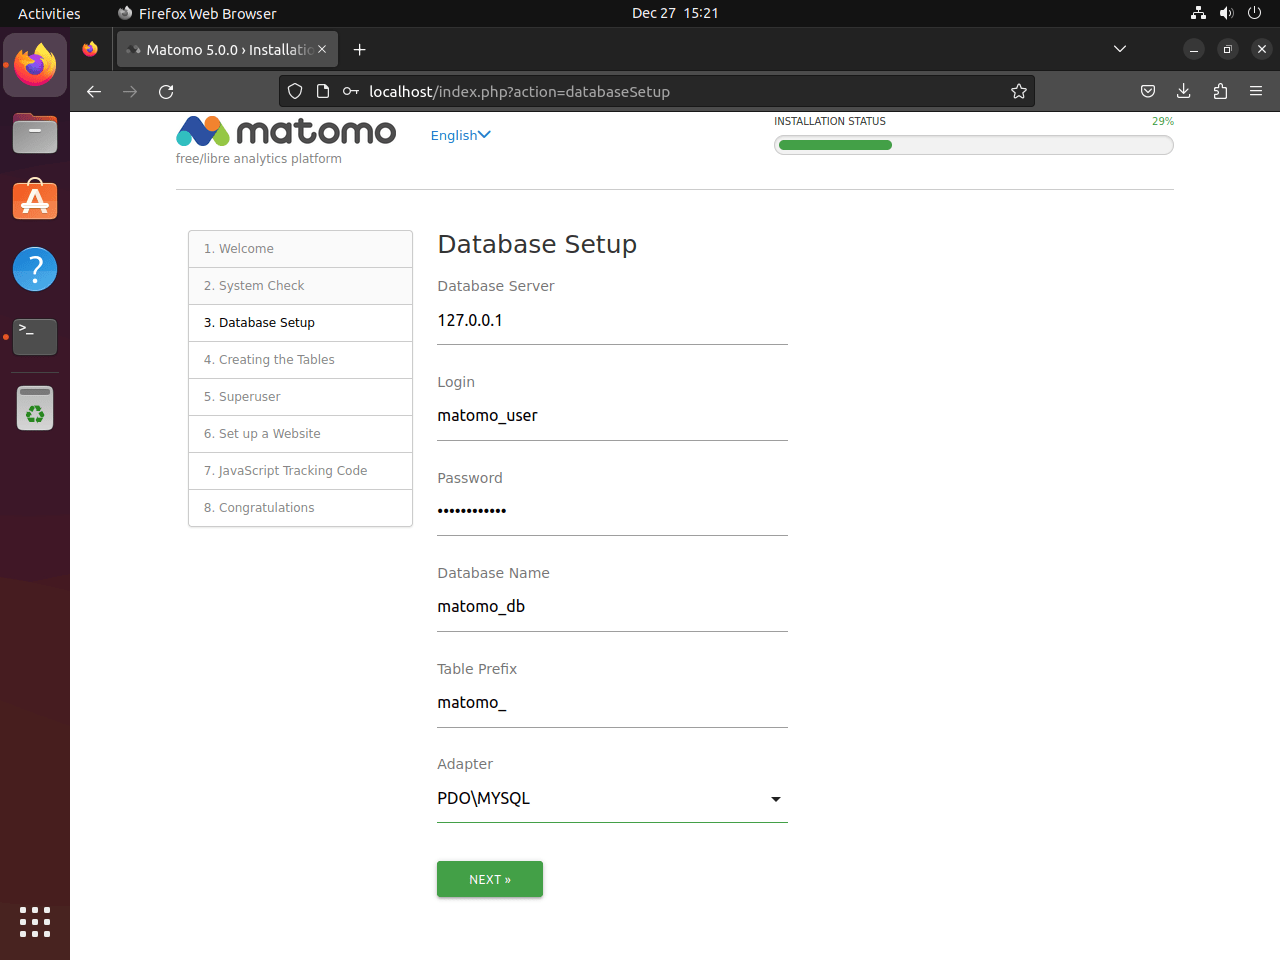
Connect Matomo to MariaDB and create the admin account
Use the database name, username, and password you created in the shell. For a local database server, the host field usually stays at localhost:
- Database Server:
localhost - Login:
matomo_user - Password: the password you assigned to
matomo_user - Database Name:
matomo_db
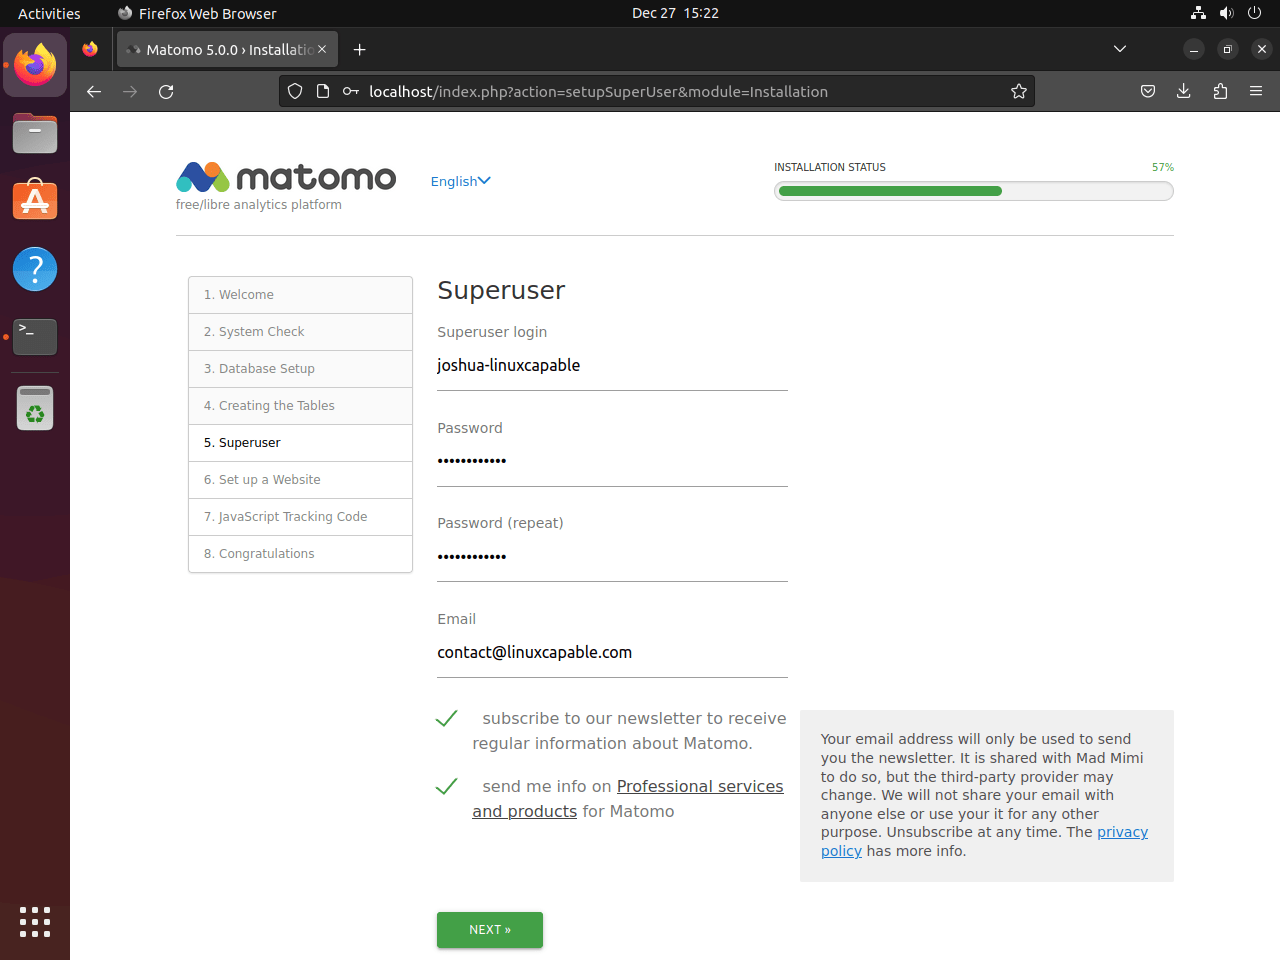
After the database step, create the first Matomo super user account. This is the main administrative login for reports, plugins, and site settings:
- Username: choose a dedicated admin name
- Password: use a strong password you do not reuse elsewhere
- Email Address: use a working address for account recovery and alerts
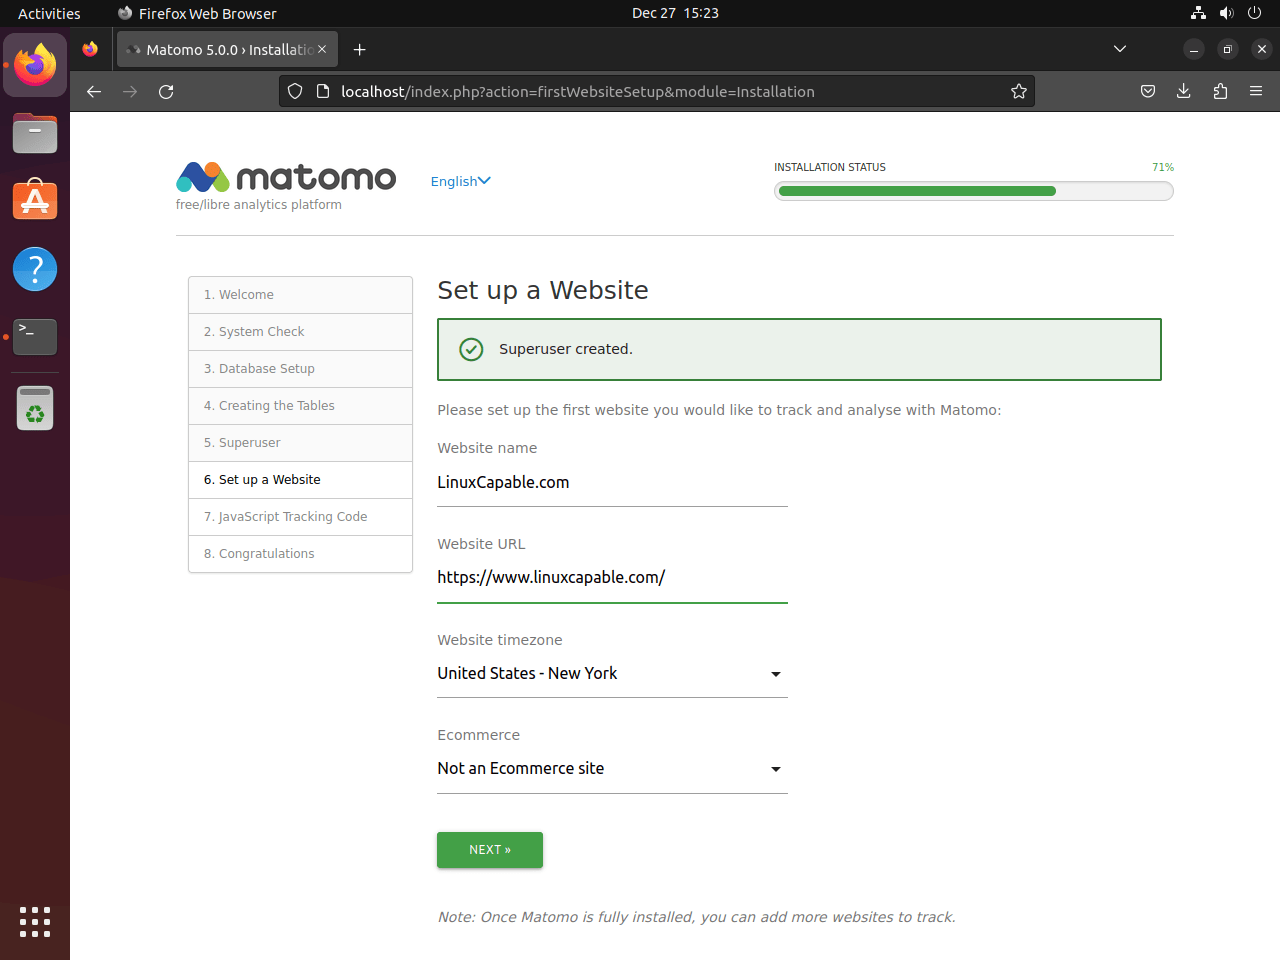
Add the first website and tracking code in Matomo
Once the admin account exists, add the first site you want Matomo to track and copy the JavaScript snippet it generates:
- Website Name: the site label you want to see in reports
- Website URL: the full canonical URL of the site you are tracking
Place the tracking snippet in the HTML of the site you want to measure, usually just before the closing </head> tag:
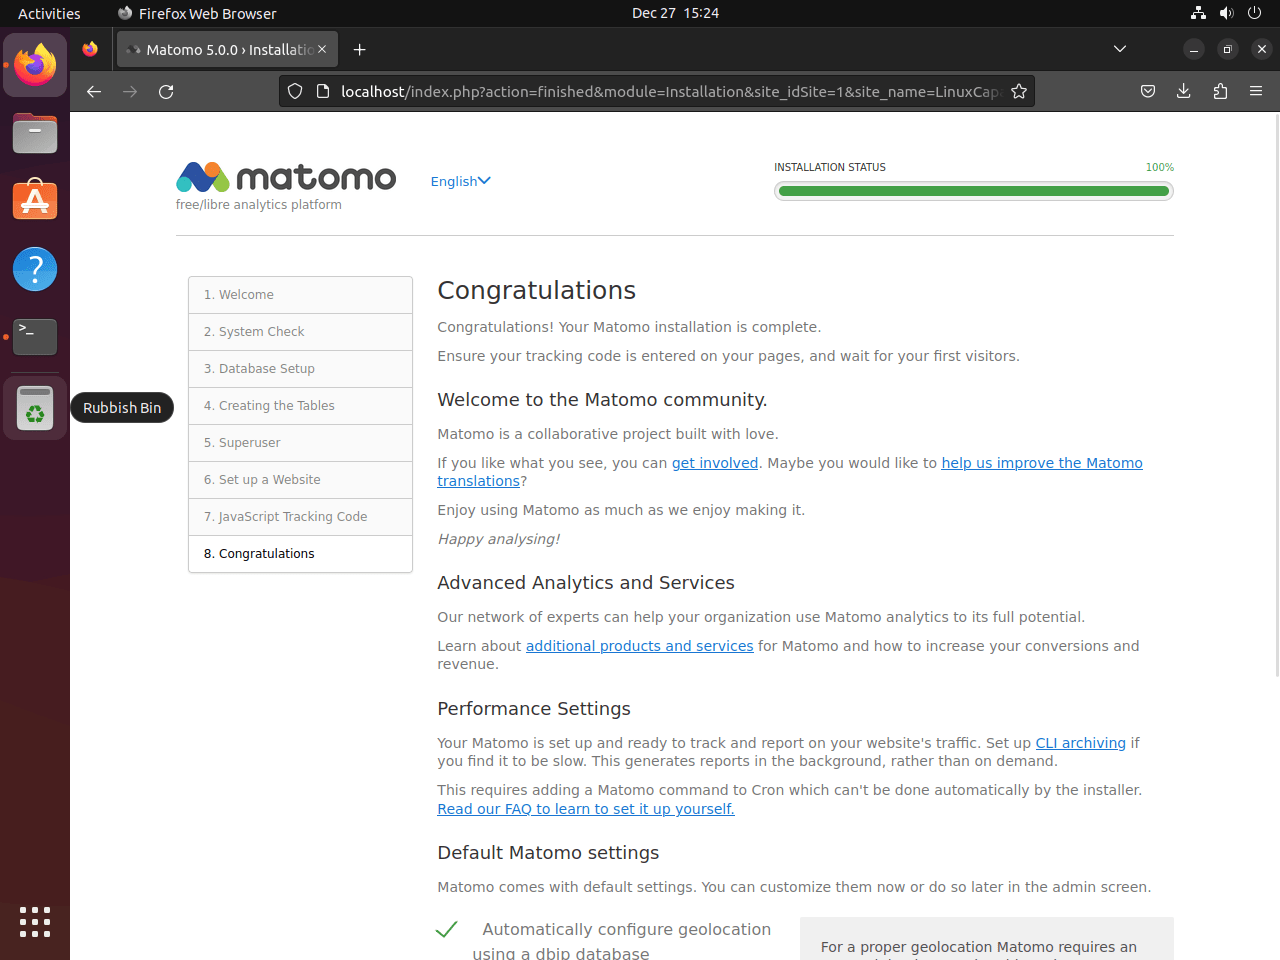
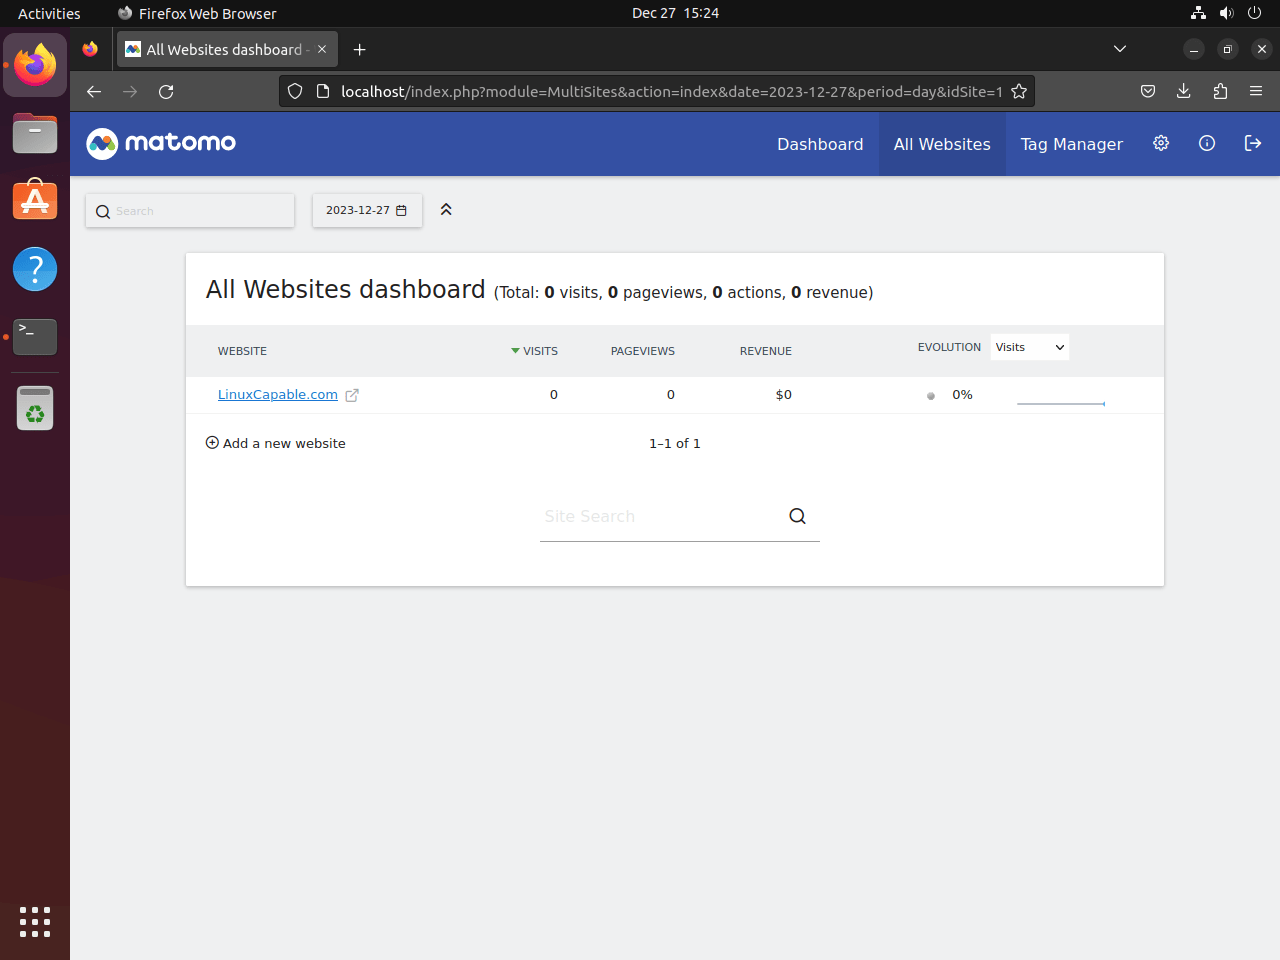
After you finish the wizard, Matomo opens the dashboard and waits for the first tracked visits:
If you need extra Matomo plugins, install them after login from Matomo’s Administration area or follow the official Matomo plugin installation instructions. Plugins are managed inside Matomo, not through Ubuntu’s package manager or an Nginx module.
Secure Matomo on Ubuntu with Let’s Encrypt
Use HTTPS once the Matomo hostname resolves publicly to this server. If you are still testing through localhost, a private IP, or temporary DNS, skip this section for now and come back after the final hostname is live.
Install Certbot for Matomo on Ubuntu
Ubuntu packages the Nginx Certbot plugin directly:
sudo apt install python3-certbot-nginx -yFor more examples around redirect choices, wildcard edge cases, and renewal debugging, follow Secure Nginx with Let’s Encrypt on Ubuntu.
Request a Let’s Encrypt certificate for Matomo on Ubuntu
Replace the email address and hostname with the values that match your deployment:
sudo certbot --nginx --agree-tos --redirect --email admin@example.com -d matomo.example.comThe important flag here is --redirect, which asks Certbot to add the HTTP-to-HTTPS redirect after the certificate is issued. Add HSTS, OCSP stapling, preload, or stricter TLS settings later only after HTTPS works and you know the hostname should always be HTTPS-only.
Verify the Certbot renewal timer on Ubuntu
Ubuntu’s Certbot package installs a systemd timer for automatic renewal. Check that it is enabled and active:
systemctl is-enabled certbot.timer
systemctl is-active certbot.timer
A working renewal timer returns:
enabled
active
After Certbot issues the certificate, run a renewal simulation before you rely on unattended renewal. The dry run uses Let’s Encrypt’s staging environment and checks the renewal configuration without replacing the live certificate:
sudo certbot renew --dry-runA successful dry run reports that the simulated renewal succeeded. If it fails, fix the Nginx configuration, DNS, firewall, or renewal hook issue before the certificate gets close to expiry.
Update Matomo on Ubuntu
Ubuntu updates Nginx, MariaDB, PHP-FPM, and Certbot through APT, but the Matomo application files come from the upstream archive. Use Matomo’s updater for the application itself instead of expecting sudo apt upgrade to replace the Matomo core.
Use the Matomo web updater on Ubuntu
For normal self-hosted installs, log in as a Matomo superuser and follow the update notice in the Administration area. Matomo’s official update guide documents this one-click updater as the primary path when the web-server user can write to the Matomo tree, which matches the www-data-owned install path used here.
Back up the database and Matomo configuration before any update that may change the schema. These backup commands store files under /root/matomo-backups/, so keep them on the server only long enough to move them into your normal backup location:
sudo install -d -m 700 /root/matomo-backups
sudo cp /var/www/matomo/config/config.ini.php /root/matomo-backups/config.ini.php.$(date +%F)
sudo sh -c 'mariadb-dump matomo_db > /root/matomo-backups/matomo_db.$(date +%F).sql'
Run a manual Matomo update from the shell
Use the shell fallback when the web updater is unavailable, when you prefer a maintenance window, or when a larger Matomo database needs the CLI updater. Run the database and configuration backup block from the web-updater section before you continue because the CLI step can update the database schema.
Replace the application files from the same official tarball source used during installation, then run Matomo’s database updater as www-data:
cd /tmp
wget -O matomo-latest.tar.gz https://builds.matomo.org/matomo-latest.tar.gz
sudo tar -xzf matomo-latest.tar.gz -C /var/www/matomo --strip-components=1
sudo chown -R www-data:www-data /var/www/matomo
sudo -u www-data php /var/www/matomo/console core:update --yes
After the update completes, check for old files left from earlier Matomo releases. Review any reported paths before deleting them, especially if the installation has custom plugins or copied assets:
sudo -u www-data php /var/www/matomo/console diagnostics:unexpected-filesConfigure Matomo archiving on Ubuntu
Matomo’s scheduled archiver keeps reports fast by pre-processing data instead of building every report on demand in the browser. The upstream archiving guide uses the Matomo CLI with a matching base URL, so wait until the installer is complete and you know the final HTTP or HTTPS address you want the archiver to use.
Create the Matomo archiver cron job on Ubuntu
Prepare a writable log file before you add the cron entry. The cron job runs as www-data, and that account cannot create new files directly under /var/log on a default Ubuntu system:
sudo touch /var/log/matomo-archive.log
sudo chown www-data:www-data /var/log/matomo-archive.log
sudo -u www-data test -w /var/log/matomo-archive.log && echo "Matomo archive log is writable"
The writable-log check should return:
Matomo archive log is writable
Now edit the www-data crontab so the archiver runs as the same account that owns the Matomo files:
sudo crontab -e -u www-dataAdd this line, replacing the URL with your real Matomo address. If you enabled HTTPS already, keep the https:// URL here as well:
5 * * * * /usr/bin/php /var/www/matomo/console core:archive --url=https://matomo.example.com/ >> /var/log/matomo-archive.log 2>&1The --url= value tells Matomo which base URL to use while it builds reports, and the log file gives you something concrete to inspect if archiving falls behind.
List the cron entry after you save it:
sudo crontab -l -u www-dataYou should see the Matomo archiver line in the output:
5 * * * * /usr/bin/php /var/www/matomo/console core:archive --url=https://matomo.example.com/ >> /var/log/matomo-archive.log 2>&1
After the first scheduled run, inspect the log with
sudo tail -20 /var/log/matomo-archive.log. This tail command guide is useful if you want to follow the log live while you tune report generation.
Tune Matomo reporting on Ubuntu
These changes are optional. Leave the defaults in place unless your traffic level or reporting needs give you a reason to change Matomo’s archive size and retention behavior.
Adjust Matomo report limits in config.ini.php
Large sites sometimes need higher row limits so Matomo keeps more detail in archived reports:
sudo nano /var/www/matomo/config/config.ini.phpAdd or update these values under the [General] section:
[General]
datatable_archiving_maximum_rows_referrers = 5000
datatable_archiving_maximum_rows_subtable_referrers = 5000
datatable_archiving_maximum_rows_actions = 5000
datatable_archiving_maximum_rows_subtable_actions = 5000
datatable_archiving_maximum_rows_events = 5000
datatable_archiving_maximum_rows_subtable_events = 500
datatable_archiving_maximum_rows_site_search = 5000
Higher values preserve more detail but also grow the database and make the archiver work harder. Watch the archive log after changes and back the values down if one archive run starts overlapping the next.
For broader platform tuning, plugin references, and long-term maintenance, use the current Matomo guides and documentation.
Troubleshoot Matomo on Ubuntu
Fix duplicate try_files errors in the Matomo Nginx config on Ubuntu
If sudo nginx -t fails right after you paste the server block, Ubuntu’s bundled PHP snippet is the first place to look.
Relevant output includes the duplicate try_files message and the failed syntax-test line. The exact file line number after matomo.conf varies:
nginx: [emerg] "try_files" directive is duplicate
nginx: configuration file /etc/nginx/nginx.conf test failed
That happens when the server block includes try_files $fastcgi_script_name =404; even though Ubuntu’s snippets/fastcgi-php.conf already provides its own try_files rule. Remove the duplicate line, then test Nginx again:
sudo sed -i '/try_files \$fastcgi_script_name =404;/d' /etc/nginx/sites-available/matomo.conf
sudo nginx -t
A corrected configuration returns the normal success output:
nginx: the configuration file /etc/nginx/nginx.conf syntax is ok
nginx: configuration file /etc/nginx/nginx.conf test is successful
Fix Matomo 502 errors on Ubuntu by matching the PHP-FPM socket
A 502 response usually means Nginx is pointing at the wrong PHP-FPM socket or the matching service is down.
Check which PHP sockets actually exist:
ls /run/php/Ubuntu 26.04 shows this by default:
php-fpm.sock
php8.5-fpm.pid
php8.5-fpm.sock
If your server block still points at php8.3-fpm.sock or php8.1-fpm.sock on a 26.04 host, update fastcgi_pass, then restart the matching PHP-FPM service and Nginx:
sudo systemctl restart php8.5-fpm nginx
systemctl is-active php8.5-fpm
A healthy PHP-FPM service returns:
active
Fix Matomo database connection errors on Ubuntu
If the installer cannot connect to MariaDB, confirm the Matomo account still has the expected grant on the right database.
sudo mariadb -e "SHOW GRANTS FOR 'matomo_user'@'localhost';"The result should include the database-specific privilege:
GRANT SELECT, INSERT, UPDATE, DELETE, CREATE, DROP, INDEX, ALTER, CREATE TEMPORARY TABLES, LOCK TABLES ON `matomo_db`.* TO `matomo_user`@`localhost`
If the final grant line is missing, reconnect to MariaDB and re-run the database-specific GRANT SELECT, INSERT, UPDATE, DELETE, CREATE, INDEX, DROP, ALTER, CREATE TEMPORARY TABLES, LOCK TABLES statement from the database-setup section.
Fix Matomo file permission errors on Ubuntu
If Matomo reports that tmp or config is not writable, restore the web-root ownership and standard file modes:
sudo chown -R www-data:www-data /var/www/matomo
sudo find /var/www/matomo -type d -exec chmod 755 {} \;
sudo find /var/www/matomo -type f -exec chmod 644 {} \;
sudo stat -c '%U:%G %a %n' /var/www/matomo/config /var/www/matomo/tmp
After the fix, the writable directories should still belong to www-data:
www-data:www-data 755 /var/www/matomo/config
www-data:www-data 755 /var/www/matomo/tmp
Remove Matomo from Ubuntu
This removal path deletes the Matomo application tree, the dedicated Nginx site, the Matomo database, and the scheduled archiver entry while leaving the rest of the LEMP stack available for other applications.
Remove Matomo files, Nginx config, and logs from Ubuntu
These commands permanently delete the Matomo application files, generated reports, and local log files. Export any analytics data you still need before you continue.
sudo rm -rf /var/www/matomo
sudo rm -f /etc/nginx/sites-enabled/matomo.conf
sudo rm -f /etc/nginx/sites-available/matomo.conf
sudo rm -f /var/log/nginx/matomo.access.log /var/log/nginx/matomo.error.log /var/log/matomo-archive.log
sudo nginx -t
sudo systemctl reload nginx
Verify the files are gone and Nginx still parses cleanly:
sudo test ! -d /var/www/matomo && echo "Matomo files removed"
sudo nginx -t
The verification should confirm both the missing directory and a valid Nginx config:
Matomo files removed
nginx: the configuration file /etc/nginx/nginx.conf syntax is ok
nginx: configuration file /etc/nginx/nginx.conf test is successful
Remove the Matomo database and user on Ubuntu
Drop the dedicated database and its login from MariaDB:
sudo mariadbDROP DATABASE IF EXISTS matomo_db;
DROP USER IF EXISTS 'matomo_user'@'localhost';
FLUSH PRIVILEGES;
EXIT;Check that both the database and the dedicated login are gone:
sudo mariadb -Nse "SELECT 'Matomo database removed' WHERE NOT EXISTS (SELECT SCHEMA_NAME FROM INFORMATION_SCHEMA.SCHEMATA WHERE SCHEMA_NAME='matomo_db'); SELECT 'Matomo user removed' WHERE NOT EXISTS (SELECT 1 FROM mysql.user WHERE User='matomo_user' AND Host='localhost');"A successful cleanup prints:
Matomo database removed
Matomo user removed
Remove the Matomo archiver cron entry on Ubuntu
Edit the www-data crontab and remove only the line that runs /var/www/matomo/console core:archive. This keeps any unrelated web-application cron jobs intact.
sudo crontab -e -u www-dataAfter you save the edited crontab, confirm the Matomo line no longer exists:
sudo crontab -l -u www-data 2>/dev/null | grep -F '/var/www/matomo/console core:archive' || echo "Matomo archive cron job removed"The confirmation message should be:
Matomo archive cron job removed
Remove the Matomo TLS certificate on Ubuntu
If you created a dedicated Let’s Encrypt certificate for Matomo, remove it with Certbot:
sudo certbot delete --cert-name matomo.example.comReplace matomo.example.com with the real hostname you used when you requested the certificate, then confirm the deletion prompt if Certbot asks for confirmation.
Conclusion
Matomo is now running on Ubuntu with Nginx, MariaDB, PHP-FPM, and the official archive workflow, so you can collect analytics without handing raw visitor data to a third party. For the next round of web-server tuning, set up FastCGI cache on Ubuntu or configure security headers in Nginx.

Formatting tips for your comment
You can use basic HTML to format your comment. Useful tags currently allowed in published comments:
<code>command</code>command<strong>bold</strong><em>italic</em><a href="https://example.com">link</a><blockquote>quote</blockquote>