
A failed kernel update or broken package transaction is much easier to undo when you already have system snapshots. You can install Timeshift on Ubuntu from the default repositories, then roll system files back with RSYNC or BTRFS snapshots without hunting for a separate download.
Ubuntu 26.04 LTS (Resolute Raccoon), 24.04 LTS (Noble Numbat), and 22.04 LTS (Jammy Jellyfish) all ship Timeshift in the Ubuntu repositories, so the default APT method covers every supported LTS release. The optional teejee2008 PPA still publishes daily development builds for 24.04 and 22.04, while Ubuntu 26.04 users should stay with the repository package for now; the package also installs fine from SSH or on Ubuntu Server, but the GUI still needs a graphical session.
Prepare Ubuntu Before Installing Timeshift
Refresh APT metadata before you choose a Timeshift source so package resolution stays predictable on desktop, server, and minimal Ubuntu installs.
sudo apt update && sudo apt upgradeThese commands use
sudofor package management tasks that need root privileges. If your account does not have sudo access yet, follow the guide on how to add a new user to sudoers on Ubuntu before you continue.
Install Timeshift on Ubuntu
Ubuntu already packages Timeshift in the Universe component, while the teejee2008 PPA tracks daily development builds from the Linux Mint project for older supported Ubuntu releases. Most systems should stay with Ubuntu’s own package, and the PPA only makes sense when you specifically want the newer build branch on 24.04 or 22.04.
| Method | Ubuntu 26.04 | Ubuntu 24.04 | Ubuntu 22.04 | Best For |
|---|---|---|---|---|
| Ubuntu repository | 25.12.x | 24.01.x | 21.09.x | Most readers who want the default repository package |
| teejee2008 PPA | Not published for resolute | 25.12.x | 25.12.x | Readers on 24.04 or 22.04 who want daily development builds |
Pick one APT source at a time. If Timeshift is already installed from Ubuntu’s repository and you later move to the PPA, add the PPA first and then run the install command in that method so APT upgrades the package in place.
Kubuntu uses the same package commands because it shares Ubuntu’s package base. Only the desktop menu location can differ between GNOME, KDE Plasma, and other Ubuntu flavors.
Install Timeshift from Ubuntu’s Repository
The repository build is the default path on every supported Ubuntu LTS release, and Ubuntu 26.04 already ships the same 25.12.x branch the PPA provides for older releases. Install Timeshift from Ubuntu’s repository:
sudo apt install timeshiftIf APT returns Unable to locate package timeshift on a minimal or customized system, enable Universe on Ubuntu and refresh metadata first:
sudo apt install software-properties-common
sudo add-apt-repository universe
sudo apt update
The package name and primary CLI are both timeshift. Ubuntu also installs the graphical timeshift-gtk binary, while the desktop menu entry uses timeshift-launcher to handle the privilege prompt.
Verify the installed package state with APT:
apt-cache policy timeshiftExpected output by Ubuntu release:
Ubuntu 26.04
timeshift:
  Installed: 25.12.4-1
  Candidate: 25.12.4-1
  Version table:
 *** 25.12.4-1 500
        500 http://au.archive.ubuntu.com/ubuntu resolute/universe amd64 Packages
        100 /var/lib/dpkg/status

Ubuntu 24.04
timeshift:
  Installed: 24.01.1-1build2
  Candidate: 24.01.1-1build2
  Version table:
 *** 24.01.1-1build2 500
        500 http://au.archive.ubuntu.com/ubuntu noble/universe amd64 Packages
        100 /var/lib/dpkg/status

Ubuntu 22.04
timeshift:
  Installed: 21.09.1-1ubuntu1
  Candidate: 21.09.1-1ubuntu1
  Version table:
 *** 21.09.1-1ubuntu1 500
        500 http://au.archive.ubuntu.com/ubuntu jammy-updates/universe amd64 Packages
        100 /var/lib/dpkg/status
Install Timeshift from the teejee2008 PPA on Ubuntu
The teejee2008 PPA is only useful on Ubuntu 24.04 and 22.04 because Ubuntu 26.04 already ships the same 25.12.x branch from the default repository and the PPA does not publish a resolute suite. Treat this as a less conservative daily-build source, not the normal install path.
Ubuntu 26.04 users should skip this method. The PPA publishes
nobleandjammymetadata, but it does not publishresolute, so 26.04 systems should stay with Ubuntu’s own repository package for now.
Make sure the PPA helper is installed before adding the source on minimal or customized systems:
sudo apt install software-properties-commonAdd the PPA next. add-apt-repository refreshes APT metadata as part of the process, so the output should show Ubuntu contacting the new teejee2008 source immediately.
sudo add-apt-repository ppa:teejee2008/timeshift -yRelevant output includes the PPA source for your release:
Ubuntu 24.04
https://ppa.launchpadcontent.net/teejee2008/timeshift/ubuntu noble InRelease

Ubuntu 22.04
https://ppa.launchpadcontent.net/teejee2008/timeshift/ubuntu jammy InRelease
Install Timeshift from the new source, or upgrade the repository package in place if it is already installed:
sudo apt install timeshiftConfirm that APT now prefers the PPA build:
apt-cache policy timeshiftUbuntu 24.04
timeshift:
Installed: 25.12.4-0~202604081741~ubuntu24.04.1
Candidate: 25.12.4-0~202604081741~ubuntu24.04.1
Version table:
*** 25.12.4-0~202604081741~ubuntu24.04.1 500
500 https://ppa.launchpadcontent.net/teejee2008/timeshift/ubuntu noble/main amd64 Packages
100 /var/lib/dpkg/status
24.01.1-1build2 500
500 http://au.archive.ubuntu.com/ubuntu noble/universe amd64 Packages
Ubuntu 22.04
timeshift:
Installed: 25.12.4-0~202604081741~ubuntu22.04.1
Candidate: 25.12.4-0~202604081741~ubuntu22.04.1
Version table:
*** 25.12.4-0~202604081741~ubuntu22.04.1 500
500 https://ppa.launchpadcontent.net/teejee2008/timeshift/ubuntu jammy/main amd64 Packages
100 /var/lib/dpkg/status
21.09.1-1ubuntu1 500
500 http://au.archive.ubuntu.com/ubuntu jammy-updates/universe amd64 Packages
Launch Timeshift on Ubuntu
Timeshift opens from the desktop menu or from a local graphical terminal. If you installed it over SSH or on Ubuntu Server, stick with the CLI because the GUI still needs a running desktop session.
Launch Timeshift from the Application Menu on Ubuntu
On a desktop install, the application menu is the simplest way to complete the first-run wizard and choose your snapshot settings.
- Open Activities.
- Select Show Applications.
- Search for Timeshift and open it.
Launch Timeshift from the Terminal on Ubuntu
Use the same launcher wrapper the menu entry calls when you want the desktop wizard from a local graphical terminal. The timeshift binary stays available for CLI work, while timeshift-launcher opens the graphical app and handles privilege escalation.
timeshift-launcherConfigure Timeshift Snapshots on Ubuntu
For most desktop installs, the first-run wizard is the quickest way to get Timeshift working. It sets the snapshot mode, storage location, schedule, and first rollback point in one pass.
Choose a Timeshift Snapshot Mode on Ubuntu
Use RSYNC mode on most Ubuntu systems because the standard desktop and server installs still default to ext4. BTRFS mode only becomes available when your Ubuntu root filesystem is already on Btrfs with compatible subvolumes.
Select a Timeshift Snapshot Location on Ubuntu
Pick a partition or disk with enough free space for repeated snapshots. On Ubuntu 26.04, 24.04, and 22.04, Timeshift uses /timeshift on the selected device by default, so a separate ext4 or Btrfs filesystem with at least 10 GB free is a safer starting point than filling the root filesystem with rollback data. If you need to resize or create that partition first, install GParted on Ubuntu before you finish the wizard.
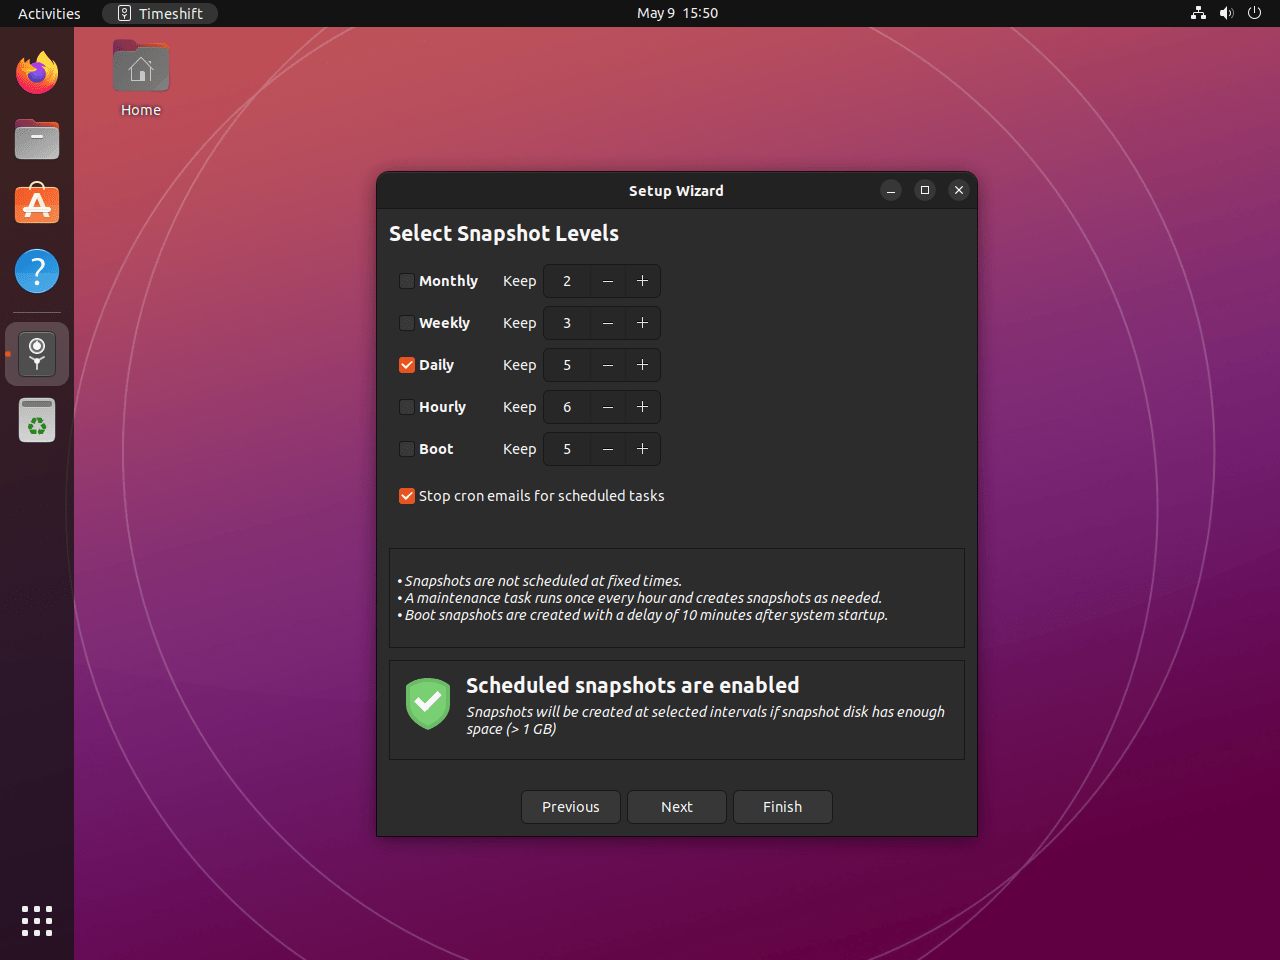
Configure Scheduled Timeshift Snapshots on Ubuntu
Daily or weekly schedules are enough for most desktops, while hourly jobs make more sense on systems that change constantly. Timeshift relies on cron for scheduled runs, so leave scheduling enabled only after you confirm the system has the space and backup device you want.
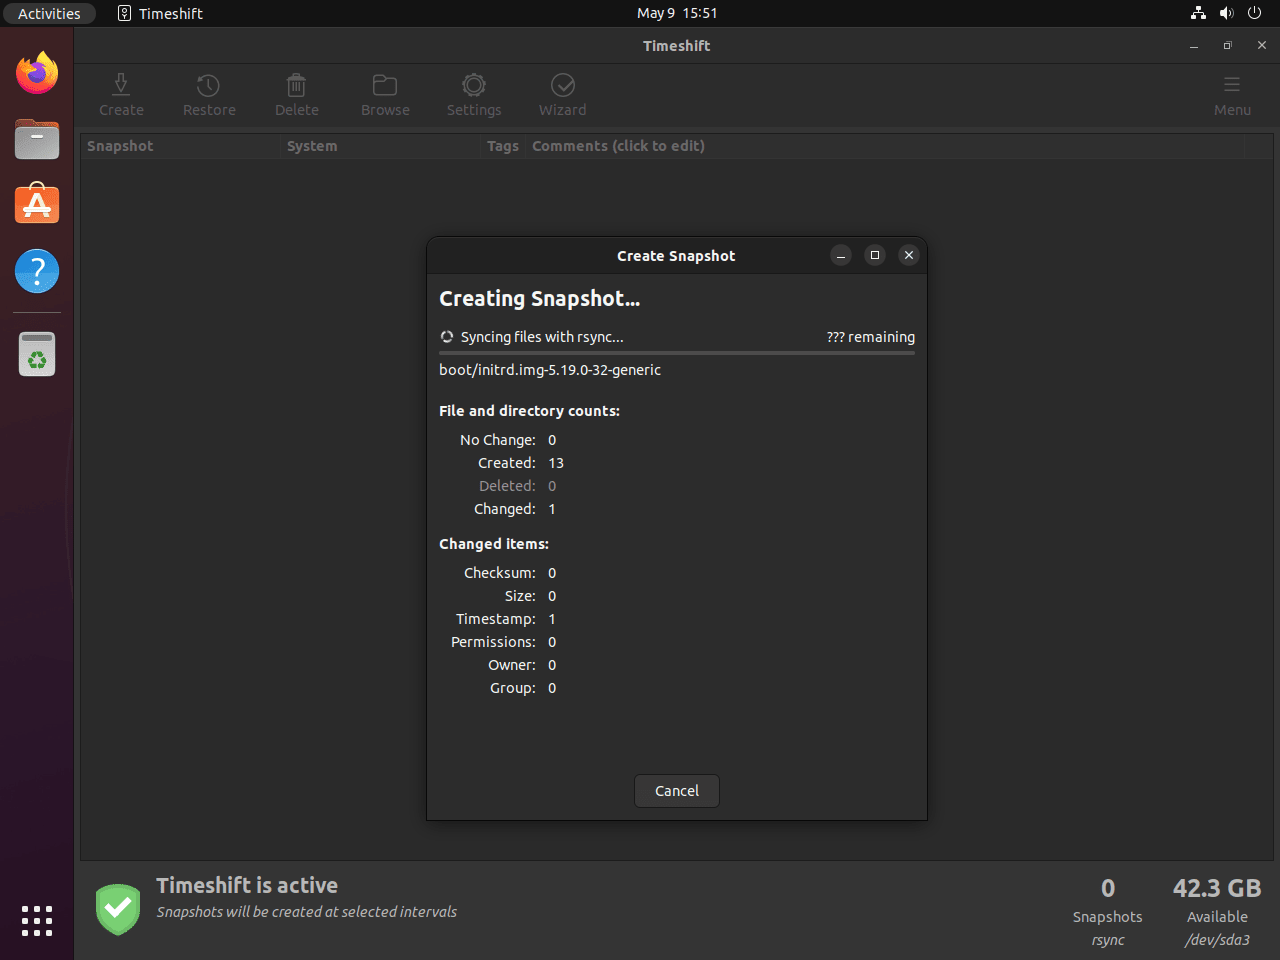
Create Your First Timeshift Snapshot on Ubuntu
Create an on-demand snapshot before kernel changes, driver work, or large package upgrades so you have a clear rollback point. Timeshift excludes home directories by default, so it works best as system rollback protection rather than a full file backup.
Use Timeshift from the Command Line on Ubuntu
Timeshift’s CLI is useful over SSH, on Ubuntu Server, or when you want repeatable snapshot jobs. On a fresh install, start by identifying the snapshot device because a bare --create command turns interactive until you tell Timeshift where to write the snapshot.
List Timeshift Snapshot Devices on Ubuntu
List the filesystems Timeshift can use before you try to create a snapshot from the terminal.
sudo timeshift --list-devicesDevices with Linux file systems: Num Device Size Type Label ------------------------------------------------------------------------------ 0 > /dev/sda2 134.2 GB ext4
Create a Manual Timeshift Snapshot on Ubuntu
Create a non-interactive snapshot when you want a rollback point from SSH or a local terminal before making system changes.
sudo timeshift --create --scripted --yes --comments "Before kernel upgrade" --snapshot-device /dev/sda2Replace /dev/sda2 with the device from the previous command. The --scripted and --yes flags keep the run non-interactive, and --comments gives you a readable label when you list snapshots later.
Verify that the snapshot was created:
sudo timeshift --listMounted '/dev/sda2' at '/run/timeshift/416610/backup' Device : /dev/sda2 UUID : ba3bd1ba-5e3a-4cf8-b426-5803f0a6cfca Path : /run/timeshift/416610/backup Mode : RSYNC Status : OK 1 snapshots, 96.0 GB free Num Name Tags Description ------------------------------------------------------------------------------ 0 > 2026-03-14_16-37-39 O Before kernel upgrade
Delete a Timeshift Snapshot on Ubuntu
Delete an old snapshot by name when you need to reclaim space or clean up a test restore point.
sudo timeshift --delete --scripted --yes --snapshot "2026-03-14_16-37-39" --snapshot-device /dev/sda2Replace the snapshot name and device with values from your own system. The snapshot name comes from sudo timeshift --list.
Confirm that the selected device no longer has snapshots:
sudo timeshift --listMounted '/dev/sda2' at '/run/timeshift/416994/backup' Device : /dev/sda2 UUID : ba3bd1ba-5e3a-4cf8-b426-5803f0a6cfca Path : /run/timeshift/416994/backup Mode : RSYNC Status : No snapshots on this device First snapshot requires: 0 B No snapshots found
When you need to roll a system back from the terminal, start with sudo timeshift --restore for the interactive selector or use sudo timeshift --restore --snapshot "SNAPSHOT_NAME" --target /dev/sdXN for a specific target. Run restores from a local console or recovery environment instead of SSH so you can reboot as soon as the rollback finishes.
Manage Timeshift on Ubuntu
APT manages repository and PPA installs the same way after setup. Use the update step when you want a newer Timeshift build, and use the removal steps when you want to clean the package back out of the system while keeping snapshot data separate.
Update Timeshift on Ubuntu
Refresh APT metadata, then upgrade only Timeshift if you do not want a full system upgrade.
sudo apt update
sudo apt install --only-upgrade timeshift
APT either upgrades Timeshift or reports that the installed source already has the newest package. The exact version depends on whether you use Ubuntu’s repository or the PPA.
For broader Ubuntu security updates, configure unattended upgrades on Ubuntu after you finish the initial setup. Do not assume the default unattended-upgrades policy will manage the teejee2008 PPA build; review that source manually unless you intentionally allow that origin.
Remove Timeshift from Ubuntu
Remove the package first. This keeps existing snapshot data untouched.
sudo apt remove timeshiftReview any now-unused dependencies before removing them:
sudo apt autoremove --dry-runContinue only if the preview lists packages you no longer need:
sudo apt autoremovePurge the package state next if you want the cleanest APT removal path.
sudo apt purge timeshiftIf you used the PPA, remove it after the package is gone so Ubuntu falls back to the repository build.
sudo add-apt-repository --remove ppa:teejee2008/timeshift -y
sudo apt update
APT removal does not delete your snapshot data, and
apt purgecan still leave/etc/timeshift/timeshift.jsonbehind. Delete those paths only after you confirm that you no longer need the rollback data.
Remove the leftover local config file if you want to erase the saved Timeshift settings completely.
sudo rm -f /etc/timeshift/timeshift.jsonDelete snapshot data only after you confirm you no longer need those restore points. The path below is the default location on the selected snapshot device; use the location you chose in Timeshift if it differs. If you want to size the directory first, review du command examples for disk usage analysis.
sudo rm -rf /timeshiftVerify the installed package state first:
dpkg-query -W -f='${db:Status-Abbrev} ${binary:Package}\n' timeshift 2>/dev/null | grep '^ii' || echo "timeshift is not installed"timeshift is not installed
If you removed the PPA, confirm that Ubuntu now prefers the repository build again:
apt-cache policy timeshifttimeshift:
Installed: (none)
Candidate: 24.01.1-1build2
Version table:
24.01.1-1build2 500
500 http://au.archive.ubuntu.com/ubuntu noble/universe amd64 Packages
Ubuntu 26.04 shows Candidate: 25.12.4-1, and Ubuntu 22.04 shows Candidate: 21.09.1-1ubuntu1, but the Installed: (none) line is the removal check that matters.
Troubleshoot Timeshift on Ubuntu
Most Timeshift problems on Ubuntu come down to storage detection, filesystem mode, the optional PPA source, or the background scheduler. These checks isolate each of those paths quickly.
Timeshift Does Not See a Snapshot Device on Ubuntu
List the storage devices Timeshift can use before you reopen the GUI. If this list is empty, the issue is usually an unmounted disk, an unsupported filesystem, or a filesystem with too little free space.
sudo timeshift --list-devicesDevices with Linux file systems: Num Device Size Type Label ------------------------------------------------------------------------------ 0 > /dev/sda2 134.2 GB ext4
If your target drive does not appear, mount it first and make sure it uses a Linux filesystem such as ext4 or Btrfs. If it does appear, pick that device in the wizard or in the CLI examples from the earlier section.
Timeshift BTRFS Mode Is Unavailable on Ubuntu
Check the root filesystem type before you assume Timeshift is broken. Ubuntu installs that still use ext4 should stay on RSYNC mode.
df -T /Filesystem Type 1K-blocks Used Available Use% Mounted on /dev/sda2 ext4 128426180 13526192 108330160 12% /
If the Type column shows ext4, keep RSYNC mode selected. BTRFS mode only applies when Ubuntu is already installed on Btrfs with the expected subvolume layout.
Ubuntu Still Prefers the Repository Package After Adding the Timeshift PPA
Use APT policy output to confirm that the PPA is actually the candidate source. This is the fastest way to separate a missing PPA from a package that simply has not been upgraded yet.
apt-cache policy timeshifttimeshift:
Installed: 25.12.4-0~202604081741~ubuntu24.04.1
Candidate: 25.12.4-0~202604081741~ubuntu24.04.1
Version table:
*** 25.12.4-0~202604081741~ubuntu24.04.1 500
500 https://ppa.launchpadcontent.net/teejee2008/timeshift/ubuntu noble/main amd64 Packages
100 /var/lib/dpkg/status
24.01.1-1build2 500
500 http://au.archive.ubuntu.com/ubuntu noble/universe amd64 Packages
If the candidate line still points only to archive.ubuntu.com, rerun the PPA add command on Ubuntu 24.04 or 22.04. Ubuntu 26.04 cannot use this method because the PPA does not publish a resolute suite.
Scheduled Timeshift Snapshots Are Not Running on Ubuntu
Check the cron service because Timeshift depends on it for scheduled snapshot jobs.
systemctl is-active cron
systemctl is-enabled cron
active enabled
If the service is inactive, enable it and start it again before you revisit the Timeshift schedule settings.
sudo systemctl enable --now cronConclusion
Timeshift is set up on Ubuntu with a working snapshot workflow for package rollbacks, driver changes, and kernel work. If you also want user-file backups beyond system snapshots, install UrBackup on Ubuntu so rollback protection and file recovery stay separate.

Formatting tips for your comment
You can use basic HTML to format your comment. Useful tags currently allowed in published comments:
<code>command</code>command<strong>bold</strong><em>italic</em><a href="https://example.com">link</a><blockquote>quote</blockquote>