

Xfce is a lightweight desktop environment that consumes significantly less memory and CPU than Ubuntu’s default GNOME. If you need to revive older hardware, run a minimal graphical interface on a virtual machine, or simply prefer a traditional desktop layout with panels and a taskbar, Xfce delivers a fast and responsive experience without sacrificing usability. By the end of this guide, you will have Xfce installed alongside GNOME, allowing you to switch between desktop environments at the login screen.
Ubuntu’s default repositories include Xfce, so installation requires only a few terminal commands. You have two main options: the base xfce4 package with the xfce4-goodies extras, or the complete xubuntu-desktop meta-package for the full Xubuntu experience.
Choose Your Xfce Installation Option
Before installing, decide which package set best fits your needs:
| Option | Packages Installed | Disk Space | Best For |
|---|---|---|---|
| xfce4 + xfce4-goodies | Core desktop, panel plugins, utilities (~80 packages) | ~400 MB | Users who want Xfce without changing Ubuntu’s default apps |
| xubuntu-desktop | Full Xubuntu experience with themes, apps, wallpapers (~200 packages) | ~1.5 GB | Users who want the complete Xubuntu look and feel |
For most users, the xfce4 + xfce4-goodies combination is recommended because it provides the full desktop environment and useful utilities while maintaining a smaller footprint. This guide uses this approach; substitute xubuntu-desktop if you prefer the complete package.
Update Ubuntu Before Xfce Installation
First, ensure your system packages are up-to-date before installing new software. Open a terminal and run the following command:
sudo apt update && sudo apt upgradeInstall Xfce via APT
Next, install the Xfce desktop environment along with the goodies package:
sudo apt install xfce4 xfce4-goodiesThe xfce4-goodies package is a meta-package that installs over 30 additional applications and panel plugins that extend Xfce’s functionality:
- Panel plugins: Weather display, CPU and memory graphs, disk usage, network monitor, system load, clipboard manager, and the Whisker Menu (an application launcher similar to the Windows Start menu).
- Applications: Mousepad text editor, Ristretto image viewer, Xfburn CD/DVD burner, Xfce4 Task Manager, Xfce4 Terminal, and the Xfce Screenshooter.
- Thunar plugins: Archive manager integration (create and extract archives from the file manager) and media tag editing for audio files.
During installation, you may be prompted to select a display manager. If you want to keep Ubuntu’s default login screen appearance, select gdm3. If you prefer the lighter LightDM that Xfce typically uses, select lightdm. Either choice works; you can change this later.
After installation completes, verify that the Xfce packages installed correctly:
dpkg -l xfce4 xfce4-goodies||/ Name Version Architecture Description +++-==============-============-============-================================= ii xfce4 4.18 all Meta-package for the Xfce [...] ii xfce4-goodies 4.18.2build1 amd64 enhancements for the Xfce4 [...]
Ubuntu 24.04 LTS ships Xfce 4.18 as shown above. Ubuntu 22.04 LTS ships Xfce 4.16. Both versions are fully functional; the newer release includes improved Wayland support and updated panel plugins.
Once installation is verified, reboot your system to apply changes:
sudo rebootLog In to the Xfce Desktop Environment
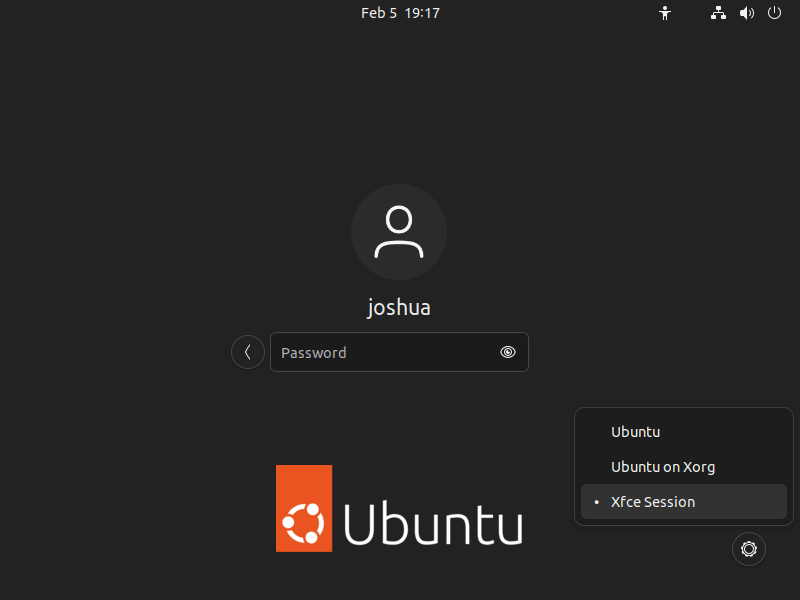
After your system restarts, you will see the login screen. Before entering your password, click the gear icon (settings) in the bottom-right corner of the screen and select “Xfce Session” from the dropdown menu instead of the default “Ubuntu” session.
After logging in, you will notice the Xfce panel at the top, the Thunar file manager, and a cleaner interface compared to GNOME. Your session choice persists across reboots until you change it again at the login screen.
Manage Xfce on Ubuntu
Update Xfce
Xfce updates arrive through Ubuntu’s standard package management system. To update Xfce along with all other system packages, run:
sudo apt update && sudo apt upgradeThis command refreshes your package index and upgrades all installed packages, including Xfce components, to their latest available versions.
Switch Between Display Managers
Installing Xfce may have added LightDM as an alternative display manager. If you want to switch between GDM3 (Ubuntu’s default) and LightDM, use the following command:
sudo dpkg-reconfigure gdm3A text-based menu appears listing available display managers (gdm3, lightdm). Use the arrow keys to highlight your choice and press Enter to confirm. After making your selection, reboot for the change to take effect. Both display managers work with both GNOME and Xfce sessions.
Remove Xfce from Ubuntu
If you decide to remove Xfce and return to using only GNOME, run the following command to uninstall Xfce and its associated packages:
sudo apt autoremove '^xfce' --purgeNext, clean up any orphaned dependencies that were installed alongside Xfce:
sudo apt autoremoveIf your GNOME desktop has issues after removing Xfce, reinstall the Ubuntu desktop meta-package to restore any missing components:
sudo apt install ubuntu-desktop gdm3 --reinstallBefore rebooting, ensure GDM3 is set as the active display manager so you see the graphical login screen:
sudo dpkg-reconfigure gdm3Finally, reboot to apply all changes:
sudo rebootXfce stores user configuration files in
~/.config/xfce4/and~/.cache/xfce4/. These directories are not removed by APT and will be reused if you reinstall Xfce later. To completely remove all Xfce settings, delete these directories manually after uninstalling the packages.
Troubleshoot Xfce Installation Issues
Xfce Session Not Appearing at Login
If the Xfce Session option does not appear in the gear menu at the login screen, the session file may not have been installed correctly. Verify that the session file exists:
ls /usr/share/xsessions/ | grep -i xfcexfce.desktop
If the file is missing, reinstall the Xfce session package:
sudo apt install xfce4-session --reinstallThen log out and check the login screen again.
Black Screen or Login Loop
A black screen after selecting Xfce Session usually indicates a configuration conflict. Press Ctrl+Alt+F3 to access a virtual terminal, log in with your username and password, and reset your Xfce configuration:
mv ~/.config/xfce4 ~/.config/xfce4.backup
mv ~/.cache/xfce4 ~/.cache/xfce4.backup
Then reboot and try logging into Xfce again:
sudo rebootIf the issue persists, check the Xfce-related logs for errors:
journalctl -b | grep -i xfce | tail -20Display Manager Fails to Start
If you see a text-based login prompt instead of the graphical login screen after rebooting, the display manager may have failed to start. Check its status:
systemctl status gdm3If GDM3 is not running, try starting it manually:
sudo systemctl start gdm3To ensure it starts automatically on future boots:
sudo systemctl enable gdm3Conclusion
Installing Xfce alongside GNOME gives you a lightweight alternative that is particularly useful on older hardware or when you need a responsive desktop with minimal resource overhead. You can switch between the two environments at the login screen without affecting your files or installed applications. If you want to explore other desktop environments on Ubuntu, consider trying KDE Plasma for a feature-rich experience, GNOME Flashback for a classic GNOME 2-style interface, LXQt for an even lighter Qt-based desktop, or the Unity desktop for the traditional Ubuntu look.
Xfce Documentation and Community
For further customization, troubleshooting, and community support, explore these official Xfce resources:
- Xfce Official Website: Release announcements, download links, and project news.
- Xfce Wiki: Developer documentation, roadmaps, and how-to guides for customization.
- Xfce Documentation: Official user documentation for all Xfce applications and panel plugins.
- Xfce Forum: Community forum for questions, troubleshooting, and discussions with other Xfce users.
- Xfce GitLab: Source code repositories, bug tracker, and contribution guidelines.

Formatting tips for your comment
You can use basic HTML to format your comment. Useful tags currently allowed:
<code>command</code>command<strong>bold</strong><em>italic</em><blockquote>quote</blockquote>