
Old kernels, stale APT caches, and browser leftovers can quietly eat gigabytes on an Ubuntu desktop. Ubuntu Cleaner gives you a small graphical Computer Janitor interface for removing that clutter without memorizing every cleanup command. To install Ubuntu Cleaner on Ubuntu, add the Gerard Puig Launchpad PPA, then install the ubuntu-cleaner APT package.
Ubuntu’s default repositories do not carry Ubuntu Cleaner. The PPA publishes packages for Ubuntu 26.04, 24.04, and 22.04, so the same APT workflow applies across those releases.
Install Ubuntu Cleaner on Ubuntu via PPA
Update Ubuntu Before Installing Ubuntu Cleaner
Refresh the package lists and apply pending upgrades before adding the PPA:
sudo apt update && sudo apt upgradeCommands that start with
sudoneed root privileges. If your user cannot run sudo yet, use a root shell or follow the guide to add and manage sudo users on Ubuntu.
Most Ubuntu desktop installs already include add-apt-repository. If a minimal or customized system reports that command as missing, install the helper package first:
sudo apt install software-properties-commonAdd the Ubuntu Cleaner PPA on Ubuntu
Add the Gerard Puig Launchpad PPA. Launchpad labels the Ubuntu Cleaner PPA as the official stable repository, but it is still a third-party package source maintained outside Ubuntu’s default archives.
Use this PPA instead of older direct .deb fallbacks when you are on Ubuntu 26.04, 24.04, or 22.04, because APT then has a current package source and normal update path. If you are using Linux Mint, confirm your Mint release’s Ubuntu base codename before adding any PPA; these commands are for Ubuntu itself.
sudo add-apt-repository ppa:gerardpuig/ppa -yThe -y flag confirms the PPA addition. Refresh APT afterward so the new package source becomes visible:
sudo apt updateInstall Ubuntu Cleaner with APT
Install the Ubuntu Cleaner package from the newly added PPA:
sudo apt install ubuntu-cleanerIf Ubuntu 26.04 prints Python SyntaxWarning messages from Ubuntu Cleaner’s package files during setup, treat them as package byte-compilation warnings unless APT exits with an error. Run apt-cache policy ubuntu-cleaner afterward to confirm the installed package and PPA source.
Check APT’s package policy after installation. The source line should point to the Gerard Puig PPA for your Ubuntu codename; Ubuntu 26.04 uses resolute, 24.04 uses noble, and 22.04 uses jammy.
apt-cache policy ubuntu-cleanerRelevant output on Ubuntu 26.04 includes the PPA source:
ubuntu-cleaner:
  Installed: 1.1.4-1
  Candidate: 1.1.4-1
  Version table:
 *** 1.1.4-1 500
        500 https://ppa.launchpadcontent.net/gerardpuig/ppa/ubuntu resolute/main amd64 Packages
        100 /var/lib/dpkg/status
Check Ubuntu Cleaner Package Status on Ubuntu
For package freshness and last update checks, use Launchpad and APT rather than GitHub Releases. The upstream Ubuntu Cleaner GitHub repository has source tags but does not publish Ubuntu release assets; the PPA package table shows the Ubuntu builds and upload dates, while APT policy confirms the package your system can install.
Launch Ubuntu Cleaner on Ubuntu
Launch Ubuntu Cleaner from Terminal
The ubuntu-cleaner command starts the graphical app. It is a launcher, not a cleanup CLI, so it still needs a graphical session and does not provide terminal subcommands for cleaning files.
ubuntu-cleanerUbuntu Cleaner can print PyGI deprecation, missing optional module, or icon-theme warnings when it starts from a terminal. If the window opens, those messages are startup noise rather than a failed cleanup action.
Launch Ubuntu Cleaner from Applications Menu
Open the Activities overview, search for “Ubuntu Cleaner,” and click the icon to launch it.
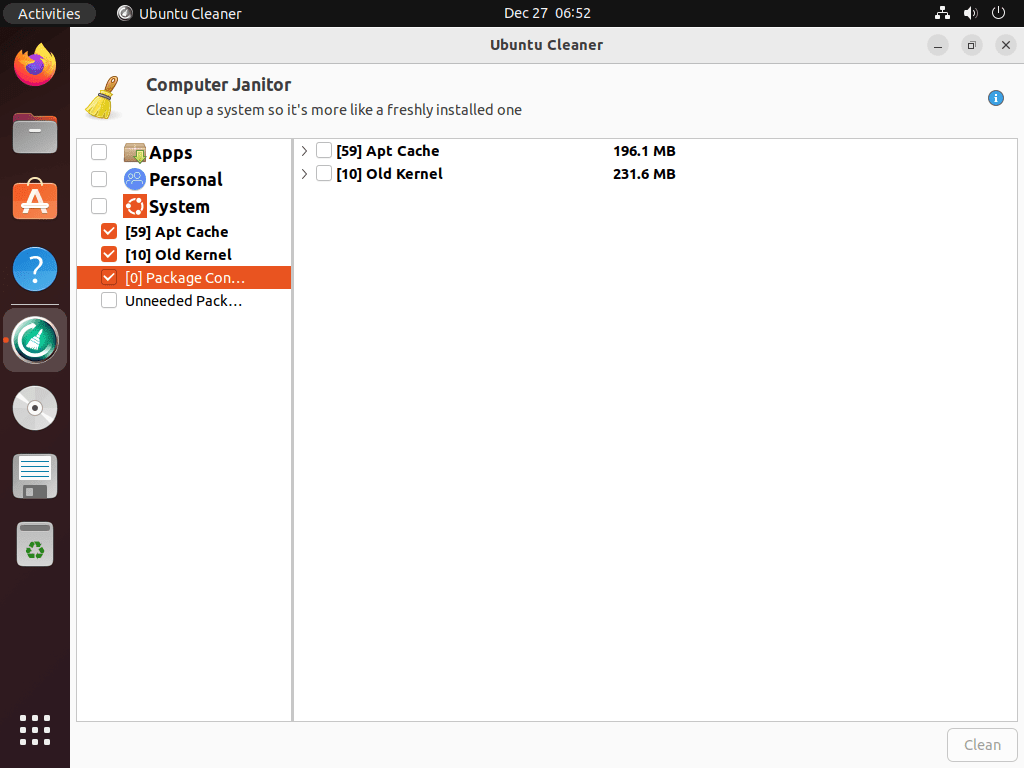
What Ubuntu Cleaner Removes on Ubuntu
Ubuntu Cleaner targets several categories of accumulated files that consume disk space over time. Review each category before cleaning, especially old kernels and packages marked as autoremovable.
| Category | What It Removes | Check Before Cleaning |
|---|---|---|
| Old Kernels | Previously installed kernel packages that are older than the running kernel | Compare the running kernel with installed kernel images |
| APT Cache | Downloaded .deb files stored in /var/cache/apt/archives/ | Check the cache size if you want to know the disk-space impact first |
| Thumbnail Cache | Cached image previews generated by the file manager | Safe to regenerate, but first access to folders may be slower afterward |
| Browser Cache | Traditional browser cache paths for supported browsers | Snap Firefox uses a different path; check the Firefox Snap troubleshooting section |
| Unneeded Packages | Dependencies APT no longer needs after package changes | Review APT’s removal preview before confirming package cleanup |
Use the du command when you want to check a cleanup target before removing files. For example, inspect the APT cache size first:
du -sh /var/cache/apt/archives/Manage Ubuntu Cleaner on Ubuntu
Update Ubuntu Cleaner
Ubuntu Cleaner updates through the PPA when normal APT upgrades run:
sudo apt update && sudo apt upgradeUpgrade only Ubuntu Cleaner when you do not want to apply every pending package update at the same time:
sudo apt install --only-upgrade ubuntu-cleanerRemove Ubuntu Cleaner from Ubuntu
Remove the Ubuntu Cleaner package with APT:
sudo apt remove ubuntu-cleanerConfirm the package is no longer installed:
dpkg-query -W -f='${db:Status-Abbrev} ${binary:Package}\n' ubuntu-cleaner 2>/dev/null | grep '^ii' || echo "ubuntu-cleaner is not installed"ubuntu-cleaner is not installed
If APT reports orphaned dependencies, preview the autoremovable list before deleting anything:
sudo apt autoremove --dry-runContinue only when the preview contains packages you no longer need, then run the cleanup:
sudo apt autoremoveRemove the Ubuntu Cleaner PPA
If you installed only Ubuntu Cleaner from this PPA, remove the source entry and refresh APT:
sudo add-apt-repository --remove ppa:gerardpuig/ppa -y
sudo apt update
Confirm no Gerard Puig source file remains. Ubuntu 26.04 and 24.04 usually create a .sources file, while Ubuntu 22.04 can create a legacy .list file:
sudo find /etc/apt/sources.list.d -maxdepth 1 -type f \( -iname '*gerardpuig*' -o -iname '*ubuntu-cleaner*' \) -print | grep . || echo "No Gerard Puig PPA source files found"No Gerard Puig PPA source files found
Check APT’s package policy as well. The removed PPA should no longer appear as a package source:
apt-cache policy ubuntu-cleaner | grep 'ppa.launchpadcontent.net' || echo "No Ubuntu Cleaner PPA candidate found"No Ubuntu Cleaner PPA candidate found
On Ubuntu 22.04, the PPA removal can leave an inactive legacy key under /etc/apt/trusted.gpg.d/. Remove that key only after confirming no Gerard Puig PPA source still references it:
ppa_sources=$(sudo find /etc/apt/sources.list.d -maxdepth 1 -type f -exec grep -lE 'ppa\.launchpadcontent\.net/gerardpuig/ppa|ppa\.launchpad\.net/gerardpuig/ppa' {} + 2>/dev/null || true)

if [ -z "$ppa_sources" ]; then
    sudo rm -f /etc/apt/trusted.gpg.d/gerardpuig-ubuntu-ppa.gpg /etc/apt/trusted.gpg.d/gerardpuig-ubuntu-ppa.gpg~
fi
Check for leftover Gerard Puig trust files afterward. No output means the legacy key cleanup is complete:
sudo find /etc/apt/trusted.gpg.d -maxdepth 1 -type f \( -iname '*gerardpuig*' -o -iname '*ubuntu-cleaner*' \) -printFor more details on managing PPAs, including how to list and remove multiple repositories, see our guide on removing PPAs from Ubuntu.
Troubleshoot Ubuntu Cleaner on Ubuntu
Firefox Snap Cache Not Detected by Ubuntu Cleaner
If Firefox does not appear in Ubuntu Cleaner’s browser cache options, you are probably using the Snap version that ships on current Ubuntu desktop installs. Ubuntu Cleaner reads traditional Firefox profile data from ~/.mozilla/firefox/ and cache files from ~/.cache/mozilla/firefox/, while Snap Firefox stores its equivalent data under ~/snap/firefox/. If you want to switch Firefox to a traditional .deb install that Ubuntu Cleaner can detect, see the guide on removing Firefox Snap from Ubuntu.
Check which cache location contains data on your system:
du -sh ~/.cache/mozilla/firefox/*/cache2/ 2>/dev/null || echo "No traditional Firefox cache"
du -sh ~/snap/firefox/common/.cache/mozilla/firefox/*/cache2/ 2>/dev/null || echo "No Snap Firefox cache"
If Snap Firefox has cache data, the second command prints a size and a path under ~/snap/firefox/common/.cache/mozilla/firefox/. If both commands print a “No cache” message, Firefox has not created cache data for those profile paths yet.
If the Snap path shows cache data, Ubuntu Cleaner cannot detect it automatically. Close Firefox first, then remove only the Snap Firefox cache2 contents:
This deletes cached web content only, not bookmarks or session data. The cache regenerates automatically as you browse.
rm -rf ~/snap/firefox/common/.cache/mozilla/firefox/*/cache2/*Alternatively, install BleachBit on Ubuntu for better Snap application path support and cache cleaning across Firefox installation methods.
Ubuntu Cleaner Shows No Old Kernels to Remove
If Ubuntu Cleaner does not list old kernels, your system may already be running the only installed kernel. Compare the running kernel with installed kernel image packages:
uname -r
dpkg -l 'linux-image*' | grep '^ii'
Keep the package that matches uname -r. If no older installed kernel image packages appear, Ubuntu Cleaner correctly skips that category.
Alternatives to Ubuntu Cleaner on Ubuntu
If you need more advanced cleaning options or prefer a tool with a real command-line mode, the guide to install BleachBit on Ubuntu covers a stronger alternative. BleachBit is available from Ubuntu’s Universe component and Flathub, so it does not require the Ubuntu Cleaner PPA.
| Feature | Ubuntu Cleaner | BleachBit |
|---|---|---|
| Installation source | Gerard Puig PPA | Ubuntu Universe or Flathub |
| Snap Firefox cache | Not detected automatically | Supported |
| Secure file deletion | No | Yes, including overwrite options |
| Application-specific cleaning | Limited browser, package, thumbnail, and kernel cleaners | Broader application cleaner list |
| Command-line mode | GUI launcher only | GUI and CLI |
| Old kernel removal | Yes | Yes |
For most users, Ubuntu Cleaner is sufficient for routine maintenance like clearing APT caches and removing old kernels. Treat it as lightweight in scope rather than a full cleaner suite: it focuses on a few common Ubuntu cleanup targets. Choose BleachBit if you need Snap Firefox cache cleaning, secure file deletion, or cleaning support for a broader range of applications.
Conclusion
Ubuntu Cleaner is a simple PPA-managed option for cleaning old kernels, APT cache, thumbnails, and traditional browser cache paths on Ubuntu. Keep the PPA visible in APT policy output, avoid the old direct .deb fallback on Ubuntu 26.04, 24.04, and 22.04, and choose BleachBit if you need Snap Firefox cache support or a real cleanup CLI.

OS NAME = Ubuntu 22.04.5 LTS
Excuse me, but I found a problem in that command and i found that this following command actually works “sudo add-apt-repository -s -P ppa:gerardpuig/ppa -y”
Best of the bestest,
Ethan
Thanks for the feedback, Ethan. I tested the standard command on a fresh Ubuntu 22.04.5 container and it works correctly:
Your alternative command with
-s -Palso works, but the flags are unnecessary for most users. The-sflag enables downloading source packages (deb-src entries), and-Pis an explicit PPA flag that is redundant when already using theppa:prefix in the argument.If the standard command failed for you, the issue was likely environment-specific. Common causes include network connectivity issues during key retrieval, missing
software-properties-commonpackage, or GPG keyserver timeouts. If you encounter similar issues in the future, running the command without-yfirst lets you see any error messages before automatic confirmation.Joshua James, Thank you.
“Cleans browser cache for Firefox, Chrome, and more, protecting your online privacy.”
Unable to Post a Screenshot here, But… the Only Apps it shows to clean are “Chrome Cache” and “Thunderbird Cache”. I use Firefox and Evolution.
Could have missed something but thought I’d let you know. Best, Jim
Thanks for the observation, Jim. This is likely because you are using the Snap version of Firefox, which is the default on Ubuntu 22.04 and newer. Ubuntu Cleaner was designed before Snap became the default and looks for traditional Firefox profile data under
~/.mozilla/firefox/and cache data under~/.cache/mozilla/firefox/, while Snap Firefox stores equivalent cache data under~/snap/firefox/instead.You can verify this with:
If the Snap Firefox path shows cache data but the traditional Firefox path does not, that confirms the detection limitation. For Evolution, check
~/.cache/evolution/to see if cache data exists there. Ubuntu Cleaner only displays applications where it finds cache data in the paths it knows about.For Snap Firefox cleanup, close Firefox first, then manually clear cached web content with
rm -rf ~/snap/firefox/common/.cache/mozilla/firefox/*/cache2/*or use BleachBit, which has better support for Snap application paths. I have updated the troubleshooting section in the article to explain this limitation.