Debian ships with AppArmor enabled by default, but some hardening and compliance workflows still expect SELinux and its tighter policy controls around services, files, and network ports. To install SELinux on Debian, you do more than add packages: you switch the active MAC workflow, relabel the filesystem, and test services before moving into enforcing mode.
The same package set works on Debian 13, 12, and 11 on server and desktop installs alike. After activation, you can tune the operating mode, label custom web content, inspect denials, and roll back to AppArmor cleanly if the host is not ready for permanent SELinux enforcement.
Install SELinux on Debian
Switching from AppArmor to SELinux changes how Debian enforces mandatory access controls, so the install flow starts with Debian’s current MAC baseline, then moves into package installation, boot activation, and a first reboot for relabeling.
Debian 13, 12, and 11 enable AppArmor by default, while SELinux remains available from the default Debian repositories as an optional policy stack. Debian-packaged kernels already include the required SELinux support; custom kernels or unusual filesystems should be checked for SELinux and extended-attribute support before you activate the policy.
Check AppArmor Before Installing SELinux on Debian
Check AppArmor first so you know whether Debian’s default profile loader is active on this host.
systemctl is-active apparmor
systemctl is-enabled apparmor
When AppArmor is active and enabled, the commands return:
active
enabled
Disabling AppArmor removes its profile enforcement until you enable it again. If this Debian system relies on custom AppArmor profiles today, back them up before you switch to SELinux.
Install SELinux Packages on Debian
Refresh the package index, then install the base SELinux tools, the default policy, audit logging, and the Python helpers used by semanage and audit2allow.
sudo apt updateIf your account does not already have sudo access, add a user to sudoers on Debian before you continue.
sudo apt install policycoreutils selinux-utils selinux-basics selinux-policy-default auditd policycoreutils-python-utilsThe package set is the same on Debian 13, 12, and 11. policycoreutils-python-utils provides semanage and audit2allow, while auditd records AVC denials for later troubleshooting.
APT may list a large dependency set for the SELinux policy tools, especially on minimal systems. Review the transaction before you confirm it so you know which Python, SETools, and policy-development packages will be added.
Check that the expected SELinux commands are available after the package install.
command -v sestatus || sudo sh -c 'command -v sestatus'
command -v semanage || sudo sh -c 'command -v semanage'
A valid path for each command confirms that the tooling is installed. On some minimal Debian installs, /usr/sbin may not be in a regular user’s PATH. If an SELinux administration command returns command not found, rerun it with sudo or the full /usr/sbin path.
Disable AppArmor Before Activating SELinux on Debian
Disable AppArmor after the SELinux packages are installed and before you run the SELinux activation script. This keeps Debian’s default profile enforcement in place during the package-install phase.
sudo systemctl disable apparmor --nowConfirm that AppArmor is no longer active before you activate SELinux.
systemctl is-active apparmor
systemctl is-enabled apparmor
inactive disabled
Activate SELinux on Debian
Run the activation script once so Debian adds the SELinux boot parameters and prepares the relabel on the next restart.
sudo selinux-activateSuccessful output resembles:
Activating SE Linux
Generating grub configuration file ...
Found linux image: /boot/vmlinuz-6.x.x-amd64
Found initrd image: /boot/initrd.img-6.x.x-amd64
done
SE Linux is activated.  You may need to reboot now.
Restart after the script finishes. The first SELinux boot can take several minutes because Debian relabels the filesystem before it hands control back to the system, and some systems reboot a second time after relabeling completes.
sudo reboot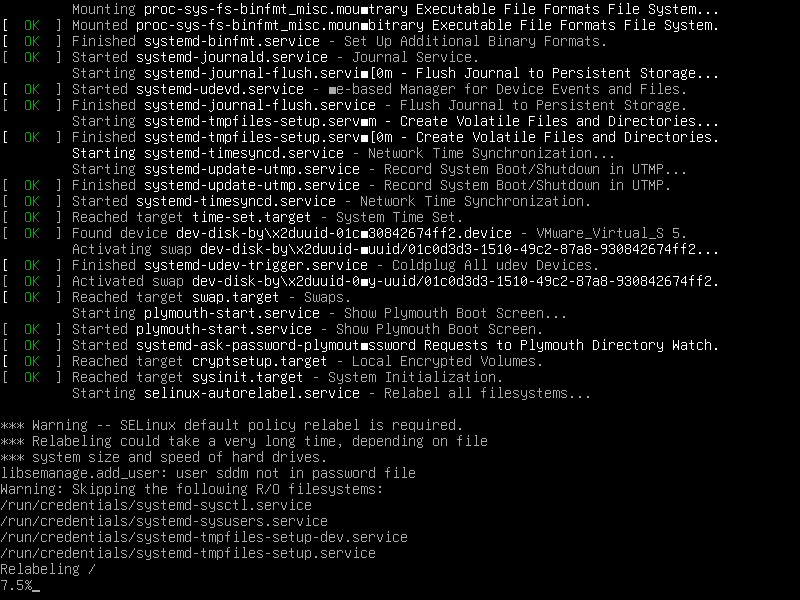
Verify SELinux Status on Debian
After the host comes back, confirm that SELinux is enabled and still in permissive mode.
sudo sestatusSELinux status: enabled SELinuxfs mount: /sys/fs/selinux Loaded policy name: default Current mode: permissive Mode from config file: permissive
Permissive mode is expected on the first boot. That gives you a safe place to collect denials before you move into enforcement.
Run Debian’s SELinux installation checker after the first reboot to catch common setup issues before you change the system to enforcing mode.
sudo check-selinux-installationConfigure SELinux on Debian
SELinux has three operating modes, and the right one depends on how far you are through testing.
- Enforcing: blocks and logs policy violations. Use this after the host and its services are labeled correctly.
- Permissive: logs denials without blocking them. This is the safest place to start after the first reboot.
- Disabled: turns SELinux off entirely. Re-enabling it later requires another relabel cycle.
Edit the SELinux Configuration File on Debian
Open the main SELinux configuration file before you choose the permanent mode.
sudo nano /etc/selinux/configSet SELINUX to the mode you want Debian to use after the next reboot.
Use enforcing mode once your services run cleanly under permissive mode.
SELINUX=enforcingKeep permissive mode if you still need to watch denials without blocking traffic.
SELINUX=permissiveUse disabled only when you are removing SELinux or intentionally backing out of the migration.
SELINUX=disabledApply SELinux Mode Changes on Debian
Restart Debian after you save the configuration so the new mode is loaded at boot.
sudo rebootVerify SELinux Mode After Reboot on Debian
Check the active mode after the host comes back.
sudo getenforceWhen enforcing mode is active, the command returns:
Enforcing
When permissive mode is active, the command returns:
Permissive
Configure SELinux Policy Settings on Debian
Most Debian systems only need two policy lines beyond the main mode setting in /etc/selinux/config.
SETLOCALDEFS=0keeps Debian on the policy-provided file contexts unless you deliberately add local overrides withsemanage.SELINUXTYPE=defaultloads Debian’s standard policy package. Usemlsonly when your environment truly requires multi-level security labels.
SETLOCALDEFS=0
SELINUXTYPE=default
Debian uses
defaultas the standard SELinux policy name. Do not change that line totargeted; that Red Hat naming does not exist in Debian’s policy packages.
Configure SELinux for Web Servers on Debian
Custom document roots and non-standard ports are common SELinux adjustments after you install Apache on Debian or install Nginx on Debian.
Check the existing SELinux label for a port before you add or change it. Debian’s default policy already assigns port 8080 to http_cache_port_t, so a normal semanage port -a command fails on current Debian releases.
sudo semanage port -l | grep -w 8080http_cache_port_t tcp 3128, 8080, 8118, 10001-10010
Modify the existing label only when you intentionally want a web server to use 8080 as a normal HTTP port. If your custom port has no existing label, use semanage port -a instead of semanage port -m.
sudo semanage port -m -t http_port_t -p tcp 8080Check the list again so you can confirm that 8080 now appears under http_port_t.
sudo semanage port -l | grep http_port_thttp_port_t tcp 80, 443, 488, 8008, 8009, 8080, 8443, 8448
Use a file-context rule when the web content lives outside Debian’s default document root.
sudo semanage fcontext -a -t httpd_sys_content_t "/srv/www(/.*)?"Restore the context on existing files after you add the rule.
sudo restorecon -Rv /srv/wwwRelabeled /srv/www from unconfined_u:object_r:var_t:s0 to unconfined_u:object_r:httpd_sys_content_t:s0
Remove the example custom rules if the service no longer uses port 8080 or the /srv/www document root. Deleting the local port override restores Debian’s packaged policy label for 8080, and deleting the file-context rule removes only the local /srv/www mapping.
sudo semanage port -d -p tcp 8080
sudo semanage fcontext -d "/srv/www(/.*)?"
sudo restorecon -Rv /srv/www
Troubleshoot SELinux on Debian
Most SELinux problems on Debian come down to missing labels, denied network access, or services that were moved outside their default paths. If the host also needs perimeter controls, install UFW on Debian and install Fail2Ban on Debian so the firewall and intrusion-response side stays in step with the policy work.
Restore Default SELinux File Contexts on Debian
Reset labels first when a service breaks after you move files or copy content into a path that SELinux already knows how to manage.
sudo restorecon -Rv /var/www/htmlWhen files need relabeling, the output resembles:
Relabeled /var/www/html from unconfined_u:object_r:var_t:s0 to unconfined_u:object_r:httpd_sys_content_t:s0
If no files need changes, restorecon finishes without printing anything.
Fix SELinux Command Not Found Errors on Debian
If getenforce, setenforce, or semanage returns command not found, first check whether the command is missing from the system or only missing from your user’s PATH. Debian installs these administrative commands under /usr/sbin, and regular user shells on minimal installs may not search that directory.
command -v getenforce || sudo sh -c 'command -v getenforce'
command -v semanage || sudo sh -c 'command -v semanage'
Install or repair the provider packages when those checks return no path. selinux-utils provides getenforce and setenforce, while policycoreutils-python-utils provides semanage.
sudo apt install selinux-utils policycoreutils-python-utilsTest SELinux with Permissive Mode on Debian
Switch to permissive mode temporarily when you need to confirm that SELinux is the source of a denial.
sudo setenforce 0Verify the mode change before you retest the application.
sudo getenforcePermissive
If the application works in permissive mode, inspect the audit logs and then switch back to enforcing once you have fixed the policy issue.
sudo setenforce 1Check the mode again after you re-enable enforcement.
sudo getenforceEnforcing
Review SELinux Audit Logs on Debian
Start with auditd because Debian writes SELinux denials into /var/log/audit/audit.log.
systemctl is-active auditdactive
Query the recent AVC records once the service is running.
sudo ausearch -m AVC,USER_AVC -ts recentUse a narrower log search when you want a quick look at the most recent denials. For more pattern-matching options, use grep command in Linux as a reference while you work through larger audit logs.
sudo grep 'denied' /var/log/audit/audit.log | tail -20An AVC denial entry looks like this.
type=AVC msg=audit(1234567890.123:456): avc: denied { read } for pid=1234 comm="httpd" name="index.html" dev="sda1" ino=123456 scontext=system_u:system_r:httpd_t:s0 tcontext=system_u:object_r:var_t:s0 tclass=file permissive=0
The process name, requested action, and source and target contexts usually tell you whether the fix belongs in a file label, a boolean, or a custom policy module.
Create Custom SELinux Policy Modules on Debian
Generate a local module only after you understand the denial and decide that the access should be allowed permanently.
sudo grep 'denied' /var/log/audit/audit.log | audit2allow -M mycustommodule
sudo semodule -i mycustommodule.pp
Only the grep part needs sudo because the audit log is root-readable. audit2allow writes the module files into your current working directory, and semodule loads the finished policy with root privileges.
Verify that Debian loaded the module after you install it.
sudo semodule -l | grep mycustommodulemycustommodule
Review the generated .te file before you load it on production systems so you are not granting broader access than the service actually needs.
Manage SELinux Booleans on Debian
Booleans are the quickest way to toggle common policy behaviors without writing a custom module. Use semanage boolean -l when you want policy-store output; getsebool needs SELinux to be active.
sudo semanage boolean -l | grep -E '^httpd_(can_network_connect|can_network_connect_db|can_sendmail|enable_cgi)[[:space:]]'httpd_can_network_connect (off , off) Determine whether httpd scripts and modules can connect to the network using TCP. httpd_can_network_connect_db (off , off) Determine whether scripts and modules can connect to databases over the network. httpd_can_sendmail (off , off) Determine whether httpd can send mail. httpd_enable_cgi (off , off) Determine whether httpd can use support.
Enable the boolean you need with the -P flag so the change survives reboots.
sudo setsebool -P httpd_can_network_connect 1Check the result after you change it. The current and persistent values should both show on.
sudo semanage boolean -l | grep '^httpd_can_network_connect 'Remove SELinux from Debian
Back the system out of SELinux in three stages: disable enforcement, remove the SELinux boot parameters, and purge the packages before you bring AppArmor back.
Disable SELinux on Debian Before Removal
Move SELinux into permissive mode first so you are not removing packages while policy enforcement is still active.
sudo setenforce 0Edit the main configuration file and change the permanent mode to disabled.
sudo nano /etc/selinux/configSELINUX=disabledRemove SELinux Kernel Parameters on Debian
Use Debian’s deactivation helper instead of editing GRUB by hand.
sudo selinux-activate disableSuccessful output resembles:
Deactivating SE Linux
Generating grub configuration file ...
done
SE Linux is deactivated.  You may need to reboot now.
selinux-activate disableremoves the SELinux boot parameters from GRUB. That is more reliable than editing/etc/default/grubby hand and hoping nothing gets left behind.
Remove SELinux Packages on Debian
Purge the SELinux packages after the configuration and boot parameters are in place.
sudo apt remove --purge selinux-basics selinux-policy-default policycoreutils policycoreutils-python-utils selinux-utils auditdPreview the dependency cleanup before you remove packages that were pulled in only for SELinux administration.
sudo apt -s autoremove --purgeIf the preview lists only SELinux-related packages that you no longer need, run the cleanup without simulation mode.
sudo apt autoremove --purgeVerify SELinux Removal on Debian
Re-enable AppArmor before the reboot if you want Debian’s default MAC layer back immediately.
sudo systemctl enable --now apparmorRestart once the cleanup is finished.
sudo rebootAfter Debian comes back, refresh APT metadata and confirm that the SELinux packages are no longer installed.
sudo apt update
apt-cache policy selinux-basics selinux-utils policycoreutils
selinux-basics: Installed: (none) Candidate: 0.x.x selinux-utils: Installed: (none) Candidate: 3.x.x policycoreutils: Installed: (none) Candidate: 3.x.x
The candidate version numbers vary by Debian release. The important removal check is that each package shows Installed: (none).
If you re-enabled AppArmor, confirm that the service is active again after the reboot.
systemctl is-active apparmor
systemctl is-enabled apparmor
active enabled
Conclusion
SELinux is installed on Debian and ready for permissive testing or a move to enforcing mode once your labels and booleans match the services you run. To keep the host hardened after the initial policy work, configure unattended upgrades on Debian for routine patches and install Fail2Ban on Debian if the server also needs automated response to brute-force traffic.

#Install Package Dependencies
sudo apt install selinux-basics selinux-policy-default selinux-policy-src selinux-policydoc auditd locate
Thanks for the suggestion, hmidani. You were right that
auditdis essential for troubleshooting. The article didn’t include it when you commented in April. The guide has been updated to includeauditdalong withpolicycoreutils-python-utils.The updated command is:
Thanks for helping improve the guide.