A WordPress site on Debian needs more than the CMS files; Apache must serve the virtual host, PHP must load the right modules, and MariaDB must hold the site data. To install WordPress with Apache on Debian cleanly, build the LAMP stack from Debian’s default packages, download the current WordPress release, then connect it to a dedicated database and virtual host.
The same workflow supports Debian 13 (Trixie), Debian 12 (Bookworm), and Debian 11 (Bullseye). It also covers HTTPS with Let’s Encrypt, UFW firewall rules, and fixes for common WordPress issues such as redirect loops and PHP session permission errors. If you prefer an Nginx stack instead, use the separate guide to install WordPress with Nginx on Debian.
Default Debian package sources provide the full LAMP stack. Debian 13 (Trixie) resolves the PHP metapackages to PHP 8.4 and MariaDB 11.8, Debian 12 (Bookworm) to PHP 8.2 and MariaDB 10.11, and Debian 11 (Bullseye) to PHP 7.4 and MariaDB 10.5.
Install WordPress with Apache on Debian
Start with fresh package metadata and review available security fixes before installing the WordPress stack:
sudo apt update
sudo apt upgrade
These commands use
sudofor tasks that need root privileges. If your user is not in the sudoers file yet, run the commands as root or follow the Debian guide on add a user to sudoers on Debian.
Install Apache on Debian
Apache HTTP Server provides the web server layer for WordPress and installs from Debian’s default APT sources:
sudo apt install apache2 -yThe -y flag automatically confirms the installation prompt. If you need a newer Apache branch than Debian’s default package provides, use the separate guide to upgrade Apache on Debian instead of mixing repository methods into this WordPress setup.
Verify Apache Installation
Confirm Apache installed successfully by checking the version through Apache’s control helper:
sudo apache2ctl -vThe output should report Apache 2.4 from Debian. The exact patch level can change after Debian security updates.
systemctl is-active apache2
systemctl is-enabled apache2
A running Apache service should return active and enabled:
active
enabled
If Apache is not running, enable and start the service:
sudo systemctl enable apache2 --nowEnable the Apache modules WordPress needs for permalinks and HTTPS. The rewrite module allows WordPress permalinks to use .htaccess rules, and the SSL module prepares Apache for the Certbot certificate step:
sudo a2enmod rewrite ssl
sudo systemctl restart apache2
Test Apache in Browser
Open a browser and visit the server’s IP address, local hostname, or domain to confirm Apache is serving pages. On the server itself, these local URLs should load the default Apache page:
http://127.0.0.1
http://localhost
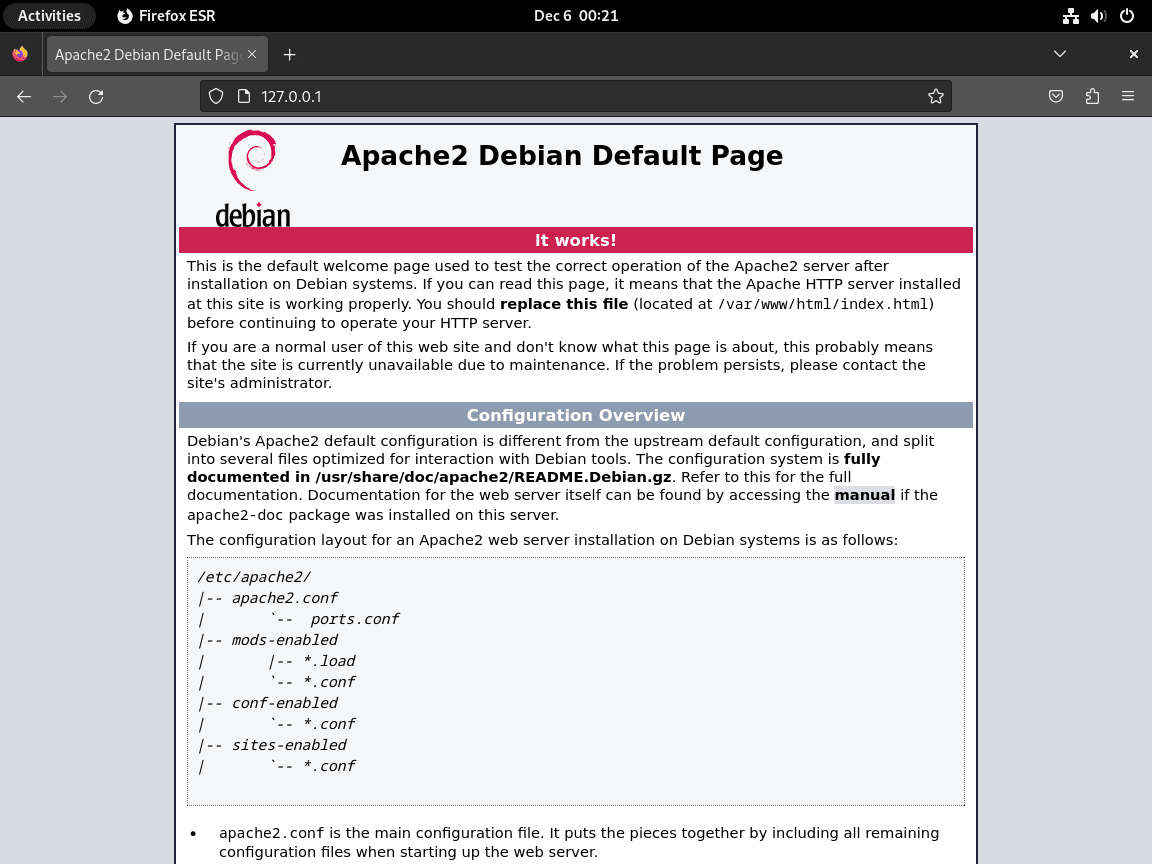
If the page is unreachable from another machine, finish the UFW firewall section before assuming Apache failed.
Install MariaDB on Debian
MariaDB stores WordPress posts, settings, users, and plugin data. Debian’s default package is the simplest fit for this stack; if you specifically need Oracle MySQL, use the separate guide to install MySQL 8.0 on Debian, or use the dedicated walkthrough to install MariaDB on Debian when you need a standalone database guide.
Begin by installing the MariaDB server and client packages:
sudo apt install mariadb-server mariadb-client -yVerify MariaDB Installation
After installation, verify MariaDB is available from the command line:
mariadb --versionThe major version varies by Debian release. Debian 13 currently reports MariaDB 11.8.x, Debian 12 reports 10.11.x, and Debian 11 reports 10.5.x:
mariadb from 11.8.x-MariaDB, client 15.2 for debian-linux-gnu (x86_64) using EditLine wrapper
Confirm the MariaDB service is running:
systemctl is-active mariadb
systemctl is-enabled mariadb
A running MariaDB service should return active and enabled:
active
enabled
Check that local socket authentication works for administrative queries:
sudo mariadb -e "SELECT VERSION();"If MariaDB is not running, enable and start the service:
sudo systemctl enable mariadb --nowUse
sudo systemctl stop mariadbto stop the service,sudo systemctl start mariadbto start it, andsudo systemctl restart mariadbto restart after configuration changes.
Secure MariaDB Installation
Fresh MariaDB installations include defaults meant for first boot and local administration. Run the MariaDB hardening helper to remove anonymous access, remote root login, and the test database:
sudo mariadb-secure-installationThe helper asks about these security measures:
- Keep or confirm socket-based local administration for the database
rootaccount - Remove root accounts accessible from remote hosts
- Remove anonymous user accounts
- Remove the default test database
For most production servers, accept socket authentication and answer Y to remove anonymous users, remote root access, and the test database. Set a separate database root password only if your local policy requires one.
The exact prompt order can vary by MariaDB branch, but the security choices above are the parts that matter for a normal WordPress server.
Install PHP on Debian
PHP processes WordPress pages and loads the extensions WordPress needs to talk to MariaDB, handle uploads, parse XML, and work with common plugins. Debian’s unversioned PHP metapackages resolve to the correct default branch for your release; for custom Sury repository builds, use the broader guide to install PHP on Debian.
Install PHP with the Apache module and the common WordPress extensions:
sudo apt install php libapache2-mod-php php-cli php-common php-zip php-curl php-mysql php-xml php-mbstring php-gd -yVerify PHP Installation
Verify PHP is accessible from the command line:
php -vOn Debian 13, the output shows PHP 8.4.x; Debian 12 shows PHP 8.2.x, and Debian 11 shows PHP 7.4.x. Check the required WordPress extensions before moving on:
php -m | grep -E '^(curl|gd|mbstring|mysqli|pdo_mysql|xml|zip)$'The Apache PHP module loads automatically during installation. Restart Apache once so the module and extensions are active for the WordPress virtual host:
sudo systemctl restart apache2Verify Apache has the PHP, rewrite, and SSL modules loaded. Debian 11 reports the PHP module as php7_module, while newer releases report php_module:
sudo apache2ctl -M | grep -E 'php[0-9]*_module|rewrite_module|ssl_module'If you later install another PHP branch from a third-party repository, switch Apache modules with the matching
a2dismodanda2enmodcommands for that branch. The default Debian workflow enables only one PHP branch.
Install WordPress Files and Database
Download WordPress on Debian
Debian 13 minimal installs may not include wget, so install it before downloading the official WordPress archive. The WordPress release archive lists the current tarball and older maintained releases; for extra download options, see the Linux wget command examples.
sudo apt install wget -y
wget -O wordpress-latest.tar.gz https://wordpress.org/latest.tar.gz
Extract the WordPress Directory
The downloaded file is a compressed .tar.gz archive. Confirm it contains the expected WordPress installer and configuration sample before extracting it:
tar -tzf wordpress-latest.tar.gz wordpress/wp-admin/install.php wordpress/wp-config-sample.phpwordpress/wp-admin/install.php wordpress/wp-config-sample.php
Extract the archive into Apache’s web root so the WordPress files land under /var/www/html/wordpress, then remove the downloaded tarball:
sudo tar -xzf wordpress-latest.tar.gz -C /var/www/html/
rm -f wordpress-latest.tar.gz
Set WordPress File Ownership and Permissions
WordPress needs Apache’s www-data user to own the site files so updates, plugin installs, and media uploads can write to the correct directories.
Change WordPress File Ownership
Change the owner and group of the WordPress directory to www-data:
sudo chown -R www-data:www-data /var/www/html/wordpress/Apply WordPress File Permissions
The find -exec commands apply chmod recursively: directories get 755 permissions, while files get 644. The generic guides for using find with exec in Linux and the chmod command in Linux explain those mechanics in more detail.
sudo find /var/www/html/wordpress -type d -exec chmod 755 {} \;
sudo find /var/www/html/wordpress -type f -exec chmod 644 {} \;
Create the WordPress MariaDB Database
WordPress should use its own database and its own database user instead of sharing administrative credentials.
Open the MariaDB Shell
Open MariaDB as the local administrative user:
sudo mariadbCreate the WordPress Database and User
Create a dedicated database, user, and password. Replace strong-password-here with a long unique password before running the SQL statements:
CREATE DATABASE wordpress CHARACTER SET utf8mb4 COLLATE utf8mb4_unicode_ci;
CREATE USER 'wpuser'@'localhost' IDENTIFIED BY 'strong-password-here';
GRANT ALL PRIVILEGES ON wordpress.* TO 'wpuser'@'localhost';
FLUSH PRIVILEGES;
EXIT;
Configure WordPress Database Settings
WordPress reads its database connection from wp-config.php. Create it from the sample file, then add the database values you created in MariaDB.
Enter the WordPress Directory
Change to the WordPress installation directory:
cd /var/www/html/wordpress/Edit WordPress wp-config.php
Copy the sample configuration into the live WordPress configuration file:
sudo mv wp-config-sample.php wp-config.phpOpen the file in a text editor. This example uses nano:
sudo nano wp-config.phpUpdate the database name, user, and password to match the MariaDB values you created:
// ** MySQL settings - You can get this info from your web host ** //
/** The name of the database for WordPress */
define( 'DB_NAME', 'wordpress' );

/* MySQL database username */
define( 'DB_USER', 'wpuser' );

/* MySQL database password */
define( 'DB_PASSWORD', 'strong-password-here' );

/* MySQL hostname, change the IP here if external DB set up */
define( 'DB_HOST', 'localhost' );

/* Database Charset to use in creating database tables. */
define( 'DB_CHARSET', 'utf8mb4' );

/* The Database Collate type. Don't change this if in doubt. */
define( 'DB_COLLATE', '' );
Optional settings can raise the memory limit and keep WordPress filesystem updates direct because Apache owns the site directory:
/* Save files directly through the web server-owned WordPress directory. */
define( 'FS_METHOD', 'direct' );

/* Increase the memory limit for themes, plugins, and media tasks. */
define( 'WP_MEMORY_LIMIT', '256M' );

/* Change this before installation if you want a custom table prefix. */
$table_prefix = 'wp_';
Set WordPress Security Keys
Generate unique authentication salts from the WordPress secret-key API, then replace the placeholder salt lines in wp-config.php. The API returns ready-to-paste PHP define() lines.
wget -qO- https://api.wordpress.org/secret-key/1.1/salt/Configure Apache for WordPress
Apache needs a virtual host that points your domain to the WordPress directory and allows WordPress permalinks to use .htaccess rules.
Create the WordPress Virtual Host File
Create a new Apache site file for your domain. Replace example.com and www.example.com with the real hostnames before saving the file:
sudo nano /etc/apache2/sites-available/example.com.conf<VirtualHost *:80>
ServerName example.com
ServerAlias www.example.com
DocumentRoot /var/www/html/wordpress
<Directory "/var/www/html/wordpress">
AllowOverride All
Require all granted
</Directory>
ErrorLog ${APACHE_LOG_DIR}/wordpress.error.log
CustomLog ${APACHE_LOG_DIR}/wordpress.access.log combined
</VirtualHost>Test the virtual host before enabling it:
sudo apache2ctl configtestSuccessful output ends with Syntax OK. Apache may also print an AH00558 message about the server’s fully qualified domain name; that warning does not block this virtual host.
Syntax OK
When the configuration test passes, enable the virtual host:
sudo a2ensite example.com.confRestart Apache to apply the change:
sudo systemctl restart apache2Probe the local virtual host before opening the browser. Replace example.com with the same hostname used in the Apache file:
curl -fsS -H 'Host: example.com' http://127.0.0.1/wp-admin/install.php -o /dev/nullInstall WordPress Frontend
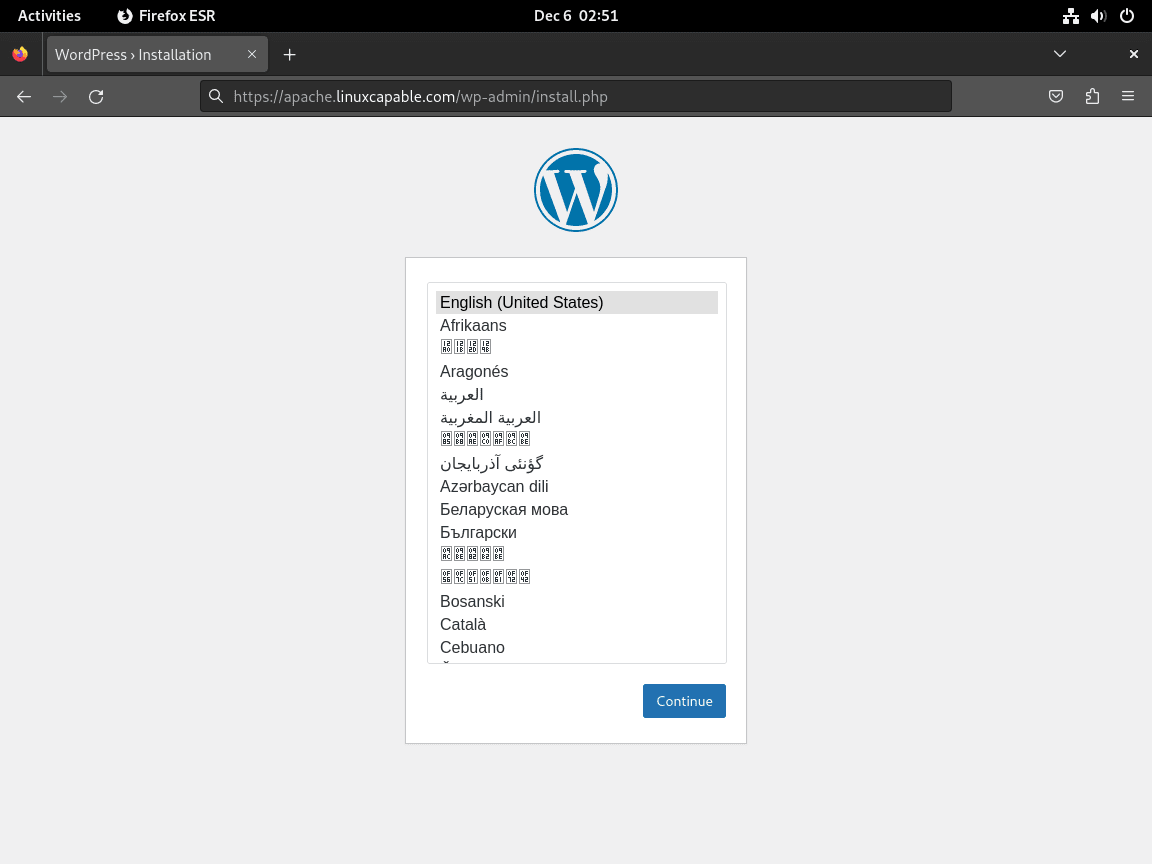
Accessing the Installation Address
Open the WordPress installer from the site’s domain. Use HTTP for this first browser setup because the Let’s Encrypt certificate step comes next:
http://example.comhttp://example.com/wp-admin/install.php
The first installer screen lets you select the language for the WordPress dashboard.
Setting Up Admin Account
Create the first administrator account with a unique username, a strong password, and an email address you control. You can change these details later from the WordPress dashboard.
Configuring Search Engine Visibility
For a site that is still under construction, select the option to discourage search engines from indexing it. Change this setting after the site is ready for public visitors.


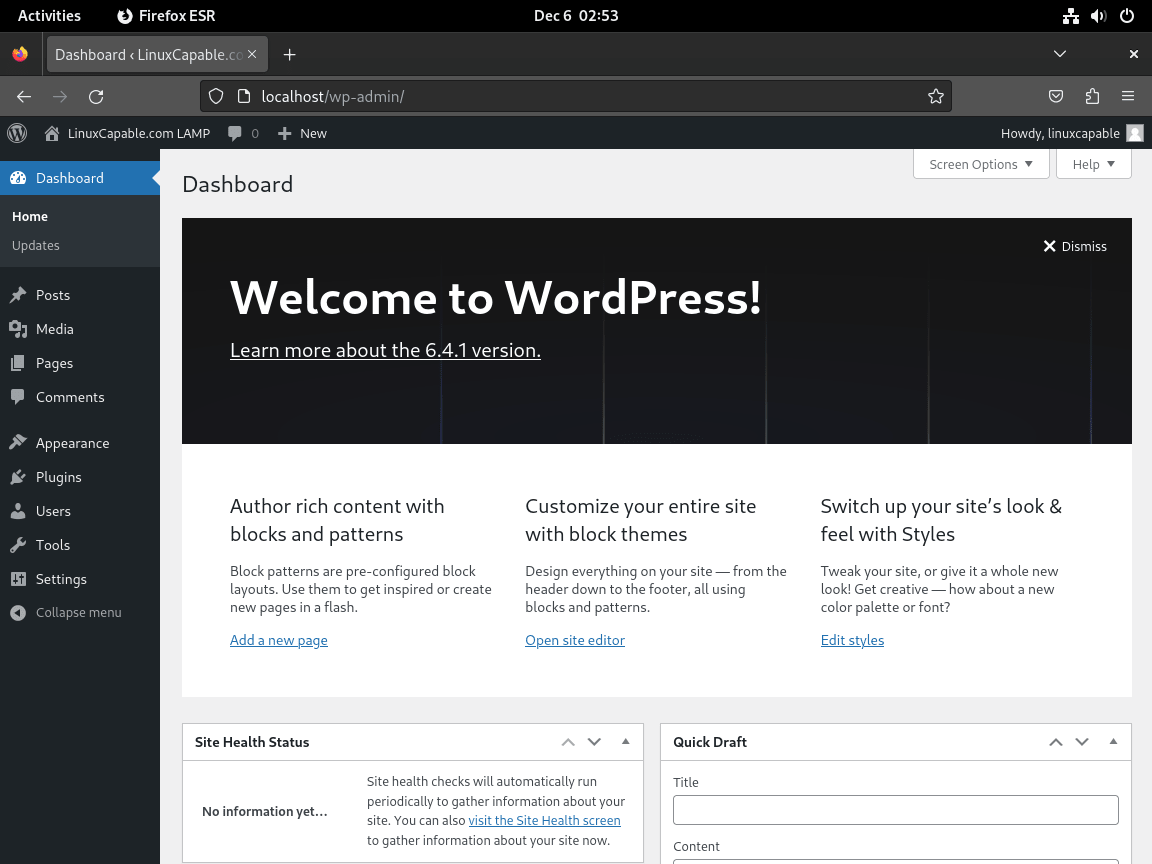
Completion of WordPress Installation
After the installer finishes, log in to the dashboard and confirm the site loads through the Apache virtual host.
Secure WordPress with Let’s Encrypt on Debian
Use Let’s Encrypt after the HTTP virtual host works and your domain points to the server. Certbot can then request the certificate, update Apache, and redirect visitors to HTTPS without hand-writing certificate paths before the files exist.
Install Certbot for Apache on Debian
Install Certbot and its Apache plugin from Debian’s default repositories:
sudo apt install python3-certbot-apache -yGenerate a Let’s Encrypt Certificate
Make sure ports 80 and 443 are reachable from the internet, then request the certificate for both the root domain and the www hostname:
sudo certbot --apache --non-interactive --agree-tos --redirect --no-eff-email --email admin@example.com -d example.com -d www.example.comReplace admin@example.com and both domain values before running the command. Add --hsts only after the domain is stable and you are ready for browsers to remember HTTPS for future visits. Do not add --staple-ocsp for current Let’s Encrypt certificates; Let’s Encrypt ended OCSP service in 2025, so current certificates no longer advertise an OCSP responder.
Verify Certbot Renewal Timer
Certbot automatically configures a systemd timer to handle certificate renewal. Let’s Encrypt certificates are valid for 90 days, and Certbot attempts renewal when certificates are within 30 days of expiration. Verify the renewal timer is enabled and active:
systemctl is-enabled certbot.timer
systemctl is-active certbot.timer
Successful output confirms the timer is enabled and active:
enabled
active
Test the renewal process without changing the live certificate:
sudo certbot renew --dry-runConfirm WordPress Uses HTTPS
After Certbot completes, open the site with https:// and confirm the WordPress dashboard, login page, and frontend all load without mixed-content warnings or redirect loops.
Configure UFW Firewall for WordPress
UFW limits exposed services to the ports this WordPress stack actually needs. Use explicit port rules because Debian 12 and Debian 11 do not always include Apache-specific UFW application profiles, while port rules work consistently across Debian 13, 12, and 11.
Install UFW on Debian
Install UFW if it is not already present. For a full firewall walkthrough, use the dedicated guide to install UFW on Debian.
sudo apt install ufw -yIf you connect over SSH, allow the SSH port before enabling UFW, keep the current session open, and test a second login before closing it. Otherwise, you can lock yourself out of the server.
sudo ufw allow 22/tcpIf your SSH daemon listens on a custom port, allow that port instead of 22/tcp.
Open HTTP and HTTPS Ports
Allow standard web traffic for the Apache virtual host:
sudo ufw allow 80/tcp
sudo ufw allow 443/tcp
Enable UFW after the SSH and web rules exist:
sudo ufw enableCheck the active rules:
sudo ufw status numberedRelevant output should include SSH, HTTP, and HTTPS entries. Systems with IPv6 enabled may also show matching (v6) rules:
Status: active

     To                         Action      From
     --                         ------      ----
[ 1] 22/tcp                     ALLOW IN    Anywhere
[ 2] 80/tcp                     ALLOW IN    Anywhere
[ 3] 443/tcp                    ALLOW IN    Anywhere
Update WordPress and Debian Packages
APT updates Apache, MariaDB, PHP, Certbot, UFW, and shared system libraries. WordPress core, themes, and plugins update through the WordPress dashboard because the site files came from the upstream WordPress archive, not from a Debian package.
sudo apt update
sudo apt upgrade
Back up the WordPress files and MariaDB database before major WordPress, theme, or plugin updates. For routine dashboard updates, verify the site, login page, and admin area afterward so plugin conflicts are caught quickly.
Troubleshoot Common WordPress Issues
Fix PHP Session Permission Errors
Some plugins use PHP sessions and can fail if the session directory was deleted or given the wrong permissions. Debian’s packaged PHP uses /var/lib/php/sessions by default.
Confirm the active session path:
php -r 'echo ini_get("session.save_path"), PHP_EOL;'Expected output on the default Debian PHP packages is:
/var/lib/php/sessions
Restore the directory with Debian’s root-owned sticky permissions, then restart Apache:
sudo install -d -m 1733 -o root -g root /var/lib/php/sessions
sudo systemctl restart apache2
After the restart, rerun the session path check and retry the WordPress page or plugin action that failed. Avoid changing the whole session directory to www-data:www-data. The sticky directory mode lets web processes create their own session files without making the directory itself web-server owned.
Fix an HTTPS Redirect Loop Behind a Proxy
A redirect loop can appear when a CDN or reverse proxy handles HTTPS before traffic reaches Apache, while WordPress still sees the backend request as plain HTTP.
Add Forwarded HTTPS Detection
When WordPress sits behind a reverse proxy or CDN that terminates HTTPS before traffic reaches Apache, add a guarded forwarded-protocol check to wp-config.php:
define('FORCE_SSL_ADMIN', true);

if (isset($_SERVER['HTTP_X_FORWARDED_PROTO']) && strpos($_SERVER['HTTP_X_FORWARDED_PROTO'], 'https') !== false) {
    $_SERVER['HTTPS'] = 'on';
}
The code does two things:
FORCE_SSL_ADMINkeeps WordPress admin pages on HTTPS.- The forwarded-protocol check only touches
$_SERVER['HTTPS']when the proxy reports HTTPS, which avoids PHP warnings when the header is absent.
Use this proxy fix only when a proxy or CDN is in front of Apache. If Apache handles the certificate directly through Certbot, fix the site URL or virtual host first.
Fix a WordPress Site URL Redirect Loop
Redirect loops can also come from a mismatch between the WordPress home URL, site URL, and the domain Apache serves.
Set WordPress Home and Site URL
If needed, set the canonical WordPress URLs in wp-config.php:
define('WP_HOME', 'https://example.com');
define('WP_SITEURL', 'https://example.com');
Make these values match the real domain and scheme. If the loop continues after the URLs are correct, recheck the Apache virtual host, Certbot redirect, and any proxy/CDN HTTPS mode.
Remove WordPress and LAMP Stack
Remove only the parts you no longer need. WordPress files and the WordPress database can be removed without uninstalling Apache, MariaDB, PHP, UFW, or Certbot when those services still host other sites.
Remove WordPress Files and Database
To remove WordPress while keeping the LAMP stack for other projects, confirm the WordPress directory before deleting it:
sudo du -sh /var/www/html/wordpressThe following commands permanently delete all WordPress files and database content. Back up any files or exports you want to keep before proceeding.
sudo rm -rf /var/www/html/wordpress/Remove the WordPress database and user from MariaDB:
sudo mariadb -u rootDROP DATABASE IF EXISTS wordpress;
DROP USER IF EXISTS 'wpuser'@'localhost';
FLUSH PRIVILEGES;
EXIT;Replace wordpress and wpuser if you used different database names during installation.
Remove Apache Virtual Host
Disable and remove the WordPress virtual host configuration. Replace example.com.conf if you used a different file name:
sudo a2dissite example.com.conf
sudo rm /etc/apache2/sites-available/example.com.conf
sudo systemctl reload apache2
Remove Certbot Certificate and UFW Rules
Remove the certificate only when no remaining Apache site uses it. Start by listing Certbot’s known certificates and matching the certificate name to the domain:
sudo certbot certificatessudo certbot delete --cert-name example.comKeep the UFW HTTP and HTTPS rules if another website uses the same server. If this WordPress site was the only public website, remove the two web rules and leave the SSH rule in place:
sudo ufw delete allow 80/tcp
sudo ufw delete allow 443/tcp
Completely Remove LAMP Stack (Optional)
To remove the LAMP and Certbot packages installed for this site, review APT’s transaction before confirming, especially on desktop systems where other packages can depend on Apache or PHP components. Do not remove MariaDB if it still stores other databases; export remaining databases and copy any Apache virtual host files you need before continuing. Leave ufw and wget installed when other workflows use them.
sudo apt remove apache2 mariadb-server mariadb-client php libapache2-mod-php php-cli php-common php-zip php-curl php-mysql php-xml php-mbstring php-gd python3-certbot-apache
sudo apt autoremove
To also remove package-managed configuration files, use purge instead of remove. Purging is more destructive than package removal, so use it only after confirming no remaining site, database, or local configuration depends on those files:
sudo apt purge apache2 mariadb-server mariadb-client php libapache2-mod-php php-cli php-common php-zip php-curl php-mysql php-xml php-mbstring php-gd python3-certbot-apache
sudo apt autoremove
Conclusion
WordPress is running on Debian with Apache serving the virtual host, MariaDB holding the site database, PHP loading the required modules, and Certbot/UFW ready for public HTTPS traffic. Keep APT packages and WordPress core, themes, and plugins patched; for broader server maintenance, continue with securing Apache with Let’s Encrypt on Debian or configuring unattended upgrades on Debian.

mysql_secure_installation is renamed to mariadb-secure-installation
I followed your example but applied it to a multisite setup and had issues, have you done this explanation for a multisite wordpress setup?
Juan
Excellent instructions how-t!. Thanks for this, it saved me a lot of time.
Hi Joshua
I followed your instructions and achieved success. Yours is the only set of instructions I have tried that has worked. You have done a lovely piece of work with this.
regards
Neal Clements