
UFW (Uncomplicated Firewall) provides a straightforward interface for managing iptables firewall rules on Ubuntu. By default, Ubuntu ships with UFW installed but disabled, leaving systems without active firewall protection until you explicitly enable it. Whether you’re securing a desktop workstation or hardening a production server, understanding how to enable, disable, and verify UFW status is essential for maintaining network security.
This guide walks through checking UFW status, enabling the firewall with proper SSH precautions for remote servers, disabling when needed for troubleshooting, viewing numbered rules for management, installing GUFW for graphical control, and resolving common issues. All commands work identically across Ubuntu 26.04, 24.04, 22.04, and their derivatives.
Check Your UFW Firewall Status
Open a terminal from the applications menu by clicking Activities in the top left corner, selecting Show Applications, and searching for Terminal.
Check the current firewall status:
sudo ufw statusExample output on a fresh Ubuntu installation:
Status: inactive
This output indicates the firewall is not currently enforcing any rules. Ubuntu does not activate UFW by default, so new installations have no firewall protection until you explicitly enable it.
Enable UFW Firewall
Enabling UFW activates a default-deny policy for incoming connections while allowing all outgoing traffic. If you’re connected to a remote server via SSH, you must add an SSH allow rule before enabling the firewall to avoid being locked out immediately.
Allow SSH Before Enabling (Remote Servers)
If you are connected remotely via SSH, allow SSH traffic before activating UFW. Skipping this step will immediately terminate your connection when the firewall enables, and you will need physical or console access to recover.
sudo ufw allow sshExample output:
Rules updated
Rules updated (v6)
This command creates rules allowing incoming TCP connections on port 22 for both IPv4 and IPv6. UFW includes application profiles for common services, and ssh is a built-in profile that maps to port 22.
Desktop users who never connect remotely via SSH can skip this step and proceed directly to enabling the firewall.
Activate the Firewall
After securing SSH access (if applicable), enable UFW:
sudo ufw enableExample output:
Firewall is active and enabled on system startup
UFW is now enforcing rules and will start automatically on every boot. The firewall immediately applies the default policy: deny all incoming connections and allow all outgoing connections.
Verify Firewall Status
Confirm the firewall is active and review any configured rules:
sudo ufw statusExample output with SSH allowed:
Status: active

To                         Action      From
--                         ------      ----
22/tcp                     ALLOW       Anywhere
22/tcp (v6)                ALLOW       Anywhere (v6)
The output shows the firewall is active with SSH (port 22) allowed from any source. If you did not add the SSH rule, the output would show Status: active with no rules listed.
View Detailed Firewall Status
For a comprehensive view including default policies, logging level, and rule directions, use the verbose flag:
sudo ufw status verboseExample output:
Status: active
Logging: on (low)
Default: deny (incoming), allow (outgoing), deny (routed)
New profiles: skip

To                         Action      From
--                         ------      ----
22/tcp                     ALLOW IN    Anywhere
22/tcp (v6)                ALLOW IN    Anywhere (v6)
The verbose output confirms that default policies deny incoming traffic and allow outgoing connections. The ALLOW IN notation indicates these rules apply to incoming traffic specifically. Logging is set to low by default, which logs blocked packets without flooding your logs.
View Numbered Rules
When managing multiple rules, numbered output makes it easier to identify and delete specific rules:
sudo ufw status numberedExample output:
Status: active

     To                         Action      From
     --                         ------      ----
[ 1] 22/tcp                     ALLOW IN    Anywhere
[ 2] 22/tcp (v6)                ALLOW IN    Anywhere (v6)
Each rule has a number in brackets. To delete a specific rule, use the number with the delete command. For example, to remove rule 2:
sudo ufw delete 2Example output:
Deleting:
 allow 22/tcp (v6)
Proceed with operation (y|n)? y
Rule deleted (v6)
Always check ufw status numbered before deleting rules, as rule numbers shift when rules are removed.
Disable UFW Firewall
When troubleshooting network connectivity issues or testing application behavior, temporarily disabling UFW helps isolate whether firewall rules are blocking traffic:
sudo ufw disableExample output:
Firewall stopped and disabled on system startup
Disabling UFW stops all firewall enforcement immediately and prevents it from starting on boot. All previously configured rules remain stored in /etc/ufw/ and will reactivate when you re-enable the firewall with sudo ufw enable.
Remember to re-enable UFW after troubleshooting. Running without a firewall leaves your system exposed to network-based attacks.
Install GUFW: Graphical UFW Manager
Install GUFW Package
For users who prefer graphical interfaces over command-line tools, GUFW (Graphical Uncomplicated Firewall) provides an intuitive way to manage UFW. Install it with the following command:
sudo apt install gufwVerify the installation by checking the package is installed:
dpkg -l gufw | grep -E '^ii'ii gufw 26.04.0-0ubuntu1 all graphical user interface for ufw
Launch GUFW Application
After installation, access GUFW by clicking Activities in the top left corner, selecting Show Applications, and searching for Firewall Configuration in the application menu.
Using GUFW Interface
With GUFW, you can easily enable or disable the UFW firewall. The GUI provides a straightforward toggle for this, as demonstrated in the image below, showing the firewall status as ‘off’:
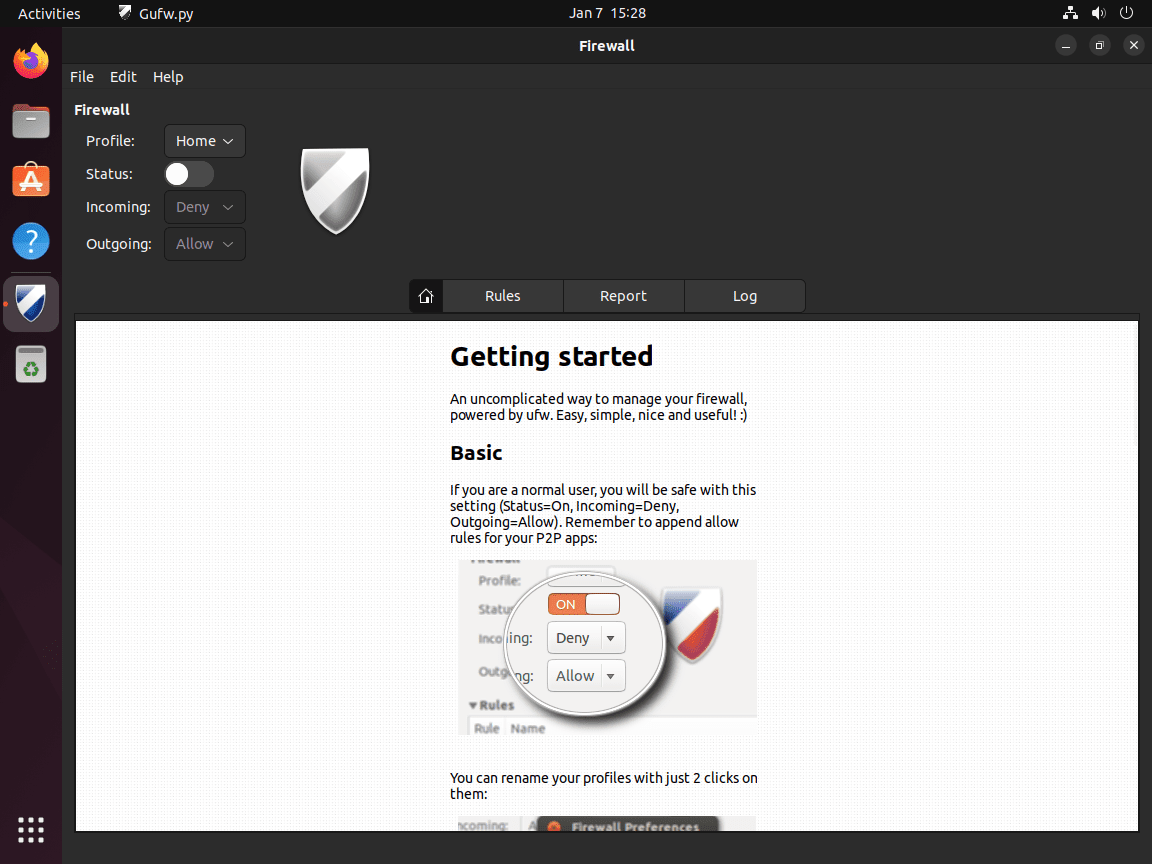
Manage Firewall Settings in GUFW
GUFW provides an intuitive interface to adjust default policies for incoming and outgoing connections, toggle firewall status on or off, create custom rules for specific ports or applications, and view firewall logs. The graphical approach eliminates command-line complexity while maintaining full control over UFW’s capabilities.
Remove GUFW
If you no longer need the graphical interface and prefer command-line management, remove GUFW:
sudo apt remove --purge gufwClean up any orphaned dependencies:
sudo apt autoremoveRemoving GUFW does not affect your UFW rules or firewall status. The command-line ufw tool continues to function normally.
Troubleshooting Common UFW Issues
Recovering from SSH Lockout
If you enabled UFW without allowing SSH and lost remote access, you need physical or console access to the server. Once connected locally, disable the firewall and add the SSH rule:
sudo ufw disable
sudo ufw allow ssh
sudo ufw enable
For cloud servers, use your provider’s console access feature (AWS EC2 Instance Connect, DigitalOcean Droplet Console, etc.) to run these commands.
UFW Not Starting on Boot
If UFW is not active after rebooting, verify it is enabled in systemd:
sudo systemctl enable ufw
sudo systemctl start ufw
Then re-enable UFW:
sudo ufw enableChecking UFW Logs
UFW logs blocked and allowed connections (depending on logging level) to /var/log/ufw.log. View recent entries:
sudo tail -50 /var/log/ufw.logLog entries show the action (BLOCK or ALLOW), interface, source and destination IPs, ports, and protocol. This helps identify what traffic is being filtered and diagnose connectivity issues.
Resetting UFW to Default
If your rules become too complex or you want to start fresh, reset UFW to its default state:
sudo ufw resetThis deletes all rules and disables the firewall. If connected via SSH, you will lose access. Only run this command with console access available.
Conclusion
UFW provides straightforward firewall management on Ubuntu through simple enable, disable, and status commands. The critical step for remote servers is allowing SSH before enabling the firewall to prevent lockouts, while the default deny-incoming policy immediately hardens network security once activated. For users preferring graphical control, GUFW delivers the same functionality without terminal commands.
To further secure your system, consider combining UFW with Fail2Ban to automatically ban IP addresses after repeated failed login attempts. For more advanced firewall configuration including custom rules, application profiles, rate limiting, and logging options, see the complete UFW configuration guide.

Formatting tips for your comment
You can use basic HTML to format your comment. Useful tags currently allowed:
<code>command</code>command<strong>bold</strong><em>italic</em><blockquote>quote</blockquote>