On Ubuntu, KVM is the Linux kernel’s hardware-acceleration layer rather than a standalone virtual machine application. A working host needs CPU virtualisation exposed to Ubuntu, QEMU to run guests, and libvirt to manage guest storage, networks, and lifecycle.
The steps support Ubuntu 26.04, 24.04, and 22.04 on Ubuntu Desktop or Server with an amd64 (x86_64) host. Stock Ubuntu kernels already include KVM, so the baseline does not need a PPA, DKMS module, or separate kernel-header installation. The main path uses system-wide libvirt, while graphical management, virtual TPM support, and a physical network bridge remain optional.
Install KVM on Ubuntu Linux
Review Ubuntu Updates Before Installation
Refresh the APT package index, then review wider Ubuntu updates before changing the virtualisation stack:
sudo apt update
apt list --upgradable
A full upgrade affects the wider system, not only the KVM packages, and is not required to install KVM. Review the transaction before accepting it, and expect kernel or core-library updates to require a reboot:
sudo apt upgradeIf the upgrade installs a new kernel, reboot before the final KVM verification so /dev/kvm and the active kernel modules represent the updated host.
Check Hardware Virtualisation Support
Confirm that Ubuntu reports the x86 architecture required by this package set:
dpkg --print-architecture
uname -m
Expected output:
amd64
x86_64
Continue when the commands report amd64 and x86_64. Stop if either value differs. ARM64 hosts require different QEMU and firmware packages, so these install commands do not apply to them.
Install Ubuntu’s hardware capability checker, then test whether KVM acceleration is available:
sudo apt install cpu-checker
sudo kvm-ok
These commands use sudo for system package changes and the most complete hardware check. If the account cannot use sudo, add a user to sudoers on Ubuntu before continuing.
Continue only when kvm-ok confirms that KVM acceleration can be used. A failure usually means Intel VT-x/VMX or AMD-V/SVM is disabled in firmware, unavailable on the processor, or not exposed to an Ubuntu guest running inside another hypervisor. QEMU can emulate a processor without KVM, but the performance is substantially lower and is outside this accelerated-host setup.
Install QEMU and libvirt
The Ubuntu Server libvirt documentation describes the core daemon and access model. Ubuntu exposes qemu-kvm as a virtual package without its own concrete candidate on all three supported releases. Ubuntu 24.04 and 22.04 currently resolve that name to qemu-system-x86, but Ubuntu 26.04 offers standard and HWE providers and rejects the ambiguous virtual name. Select the standard x86 provider explicitly for one command that behaves consistently on all three Ubuntu releases:
sudo apt install qemu-system-x86 qemu-utils libvirt-daemon-system libvirt-clients| Package | Role | Why It Is Included |
|---|---|---|
qemu-system-x86 | x86 QEMU system emulator | Provides the x86 system binary used with the host’s KVM acceleration. |
qemu-utils | Virtual disk utilities | Provides tools such as qemu-img for QCOW2 and other virtual disk formats. |
libvirt-daemon-system | System-wide libvirt deployment | Provides the daemon configuration, QEMU driver integration, default network components, and system resource access needed for system-wide guest management. |
libvirt-clients | Command-line management tools | Provides tools such as virsh and virt-host-validate for verification and guest management. |
The default libvirt network does not require bridge-utils. It gives guests outbound connectivity through NAT; a physical bridge is a separate Netplan and network-design task for guests that must appear directly on the LAN.
Install Optional KVM Management Packages
Choose only the tools required by the host. A server managed over SSH does not need the full graphical interface. The virt-manager, virt-viewer, and virtinst packages come from Ubuntu’s Universe component on all three supported releases; the core KVM and libvirt packages above come from Main. If a minimal installation reports no candidate for an optional package, enable Universe before retrying.
| Package | Use It For | Host Fit |
|---|---|---|
virt-manager | Creating and managing guests through a graphical interface; it also installs the virt-install command | Ubuntu Desktop, a workstation, or a non-production test host with a GUI |
virtinst | Creating guests with virt-install from the command line | Ubuntu Server, automation, and repeatable CLI workflows |
virt-viewer | Opening a guest console without the full manager | Local or remote graphical administration |
qemu-system-gui | QEMU graphical display and audio modules | Minimal hosts where recommended packages are disabled but SPICE or VNC is required |
ovmf | UEFI firmware for x86 guests | amd64 hosts that will create UEFI guests |
swtpm and swtpm-tools | Software-backed virtual TPM devices | Guests that require or benefit from a TPM |
For a local graphical manager, install virt-manager. Install virt-viewer as well when a lightweight standalone console is useful:
sudo apt install virt-manager virt-viewerFor command-line guest creation on a desktop or server, install virtinst. This package name works across the supported Ubuntu releases and provides the virt-install command:
sudo apt install virtinstAPT normally installs qemu-system-gui and ovmf as recommended dependencies of qemu-system-x86. Install them explicitly when recommended packages were disabled or when the host must provide the SPICE display and UEFI firmware required by the UEFI guest command:
sudo apt install qemu-system-gui ovmfAdd software-backed TPM support only for guests that require a virtual TPM:
sudo apt install swtpm swtpm-toolsGrant a User Access to System libvirt
The trusted account may already belong to the libvirt group after installation. Check its current groups before changing membership:
id -nG "$USER" | tr ' ' '\n' | grep -x libvirtIf the command prints nothing, add the account explicitly:
sudo adduser "$USER" libvirtLog out of the desktop session and sign back in, or disconnect and reconnect the SSH session. Group changes do not apply fully to the existing login session. Confirm that the new session includes libvirt:
id -nG | tr ' ' '\n' | grep -x libvirtDo not add every user to this group. System libvirt can manage host storage, networks, and virtual machines. Directly launching QEMU outside libvirt may also require kvm group access, but that separate workflow is not needed for the system-libvirt path used here.
Verify KVM and libvirt on Ubuntu
Validate KVM Acceleration
Run the hardware check again after any package update or reboot, then inspect the KVM device:
sudo kvm-ok
stat -c '%A %U %G %n' /dev/kvm
A usable host has /dev/kvm, and kvm-ok confirms hardware acceleration. The device is normally owned by the kvm group; libvirt opens it through its managed QEMU processes, so ordinary system-libvirt administration still uses the libvirt group.
Validate the QEMU Host
virt-host-validate checks the host features required or commonly used by the QEMU driver:
sudo virt-host-validate qemuThe KVM device and core QEMU checks should pass. Warnings for optional facilities such as an IOMMU, secure guests, or another advanced feature are not automatically fatal; resolve them only when the planned virtual machine needs that capability.
Connect to System libvirt
Use an explicit system libvirt connection URI for predictable storage and network behaviour:
virsh --connect qemu:///system list --allA successful command may show no virtual machines on a new host. The important result is that virsh connects without an authentication, socket, or permission error.
| Connection | Resource Scope | Use Case | Important Limitation |
|---|---|---|---|
qemu:///system | System-wide guests, storage, and networks | Normal administrator-managed KVM host | Requires authorised access through the libvirt group or policy controls |
qemu:///session | Guests owned by one logged-in user | Isolated desktop experiments using files in that user’s home directory | Uses restricted per-user networking and does not share the system guest inventory |
Do not create some guests under
qemu:///sessionand others underqemu:///systemwithout a deliberate reason. The two connections have separate guest inventories, storage access, and networking, which commonly makes a working VM appear to have disappeared.
Configure the Default KVM Network
The standard libvirt installation includes a private default network. Guests receive addresses from libvirt and reach external networks through NAT, so ordinary outbound guest access does not require an inbound UFW port on the host.
List every defined network, including inactive networks:
virsh --connect qemu:///system net-list --allIf default is listed but inactive, enable it for future boots and start it now:
virsh --connect qemu:///system net-autostart default
virsh --connect qemu:///system net-start default
Recheck the state:
virsh --connect qemu:///system net-list --allUse a physical bridge only when guests must obtain LAN addresses or accept direct connections from other machines without port forwarding. That change modifies the host’s real network configuration and should be planned separately, especially on a remote server where an incorrect Netplan change can disconnect SSH.
Create a KVM Virtual Machine on Ubuntu
Create a Guest with virt-manager
Launch the graphical manager from an Ubuntu desktop session:
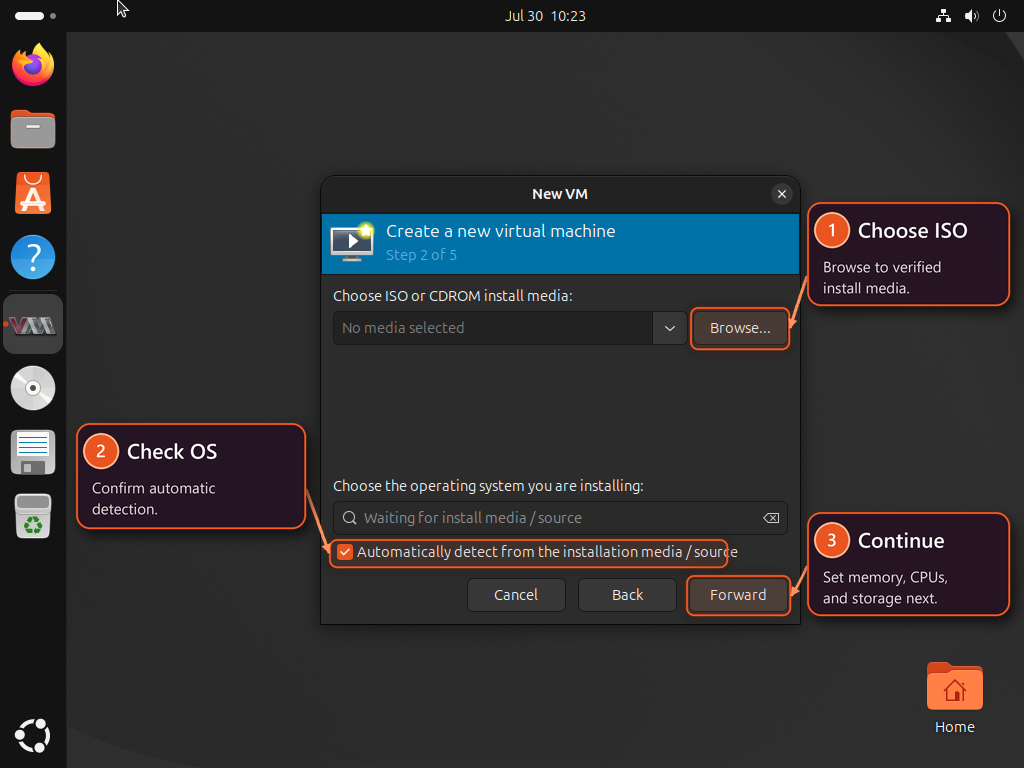
virt-manager --connect qemu:///systemWith the system QEMU/KVM connection open, select the new virtual machine button, choose an installation ISO, then assign memory, virtual CPUs, storage, and the default virtual network. Keep the guest architecture aligned with the host when you want KVM acceleration. Select UEFI firmware or add a virtual TPM only when the guest requires those devices and the matching optional packages are installed.
Use installation media from a trusted source and verify its published checksum before attaching it to a guest. If an ISO stored in a home directory triggers a libvirt or AppArmor access error, copy it into libvirt’s standard image directory before selecting it. Enter the real source path in the terminal that will copy the file:
read -r -e -p 'Full path to the installer ISO: ' ISO_SOURCECopy the ISO only when the source is readable and the destination does not already exist. If this command prints an error, correct the path or choose a different filename before rerunning it:
ISO_DEST="/var/lib/libvirt/images/$(basename -- "$ISO_SOURCE")"

if [ ! -f "$ISO_SOURCE" ] || [ ! -r "$ISO_SOURCE" ]; then
  printf 'The ISO is not a readable file: %s\n' "$ISO_SOURCE" >&2
elif [ -e "$ISO_DEST" ]; then
  printf 'The destination already exists: %s\n' "$ISO_DEST" >&2
elif ! sudo install -m 0644 "$ISO_SOURCE" "$ISO_DEST"; then
  printf 'Could not copy the ISO to %s. Check permissions and free space.\n' "$ISO_DEST" >&2
else
  printf 'Copied ISO to %s\n' "$ISO_DEST"
fi
Create a Guest with virt-install
Create a UEFI VM named ubuntu-guest with 4 GiB of memory, two virtual CPUs, a 30 GiB QCOW2 disk, the default NAT network, a virtio display, and a SPICE console. Use x86 installation media on the amd64 host. First, enter the verified ISO path in the terminal that will create the guest:
read -r -e -p 'Full path to the installer ISO: ' ISO_SOURCEThis creation command requires ovmf, refuses an existing guest or storage path, and copies the ISO into the standard libvirt image directory before defining the guest. If a check prints an error, resolve it before rerunning the command:
VM_NAME='ubuntu-guest'
ISO_PATH="/var/lib/libvirt/images/${VM_NAME}-installer.iso"
DISK_PATH="/var/lib/libvirt/images/${VM_NAME}.qcow2"

if ! command -v virt-install >/dev/null 2>&1; then
  printf 'Install the virtinst package before creating the guest.\n' >&2
elif [ "$(dpkg --print-architecture)" != 'amd64' ]; then
  printf 'This example requires an amd64 KVM host.\n' >&2
elif [ ! -f "$ISO_SOURCE" ] || [ ! -r "$ISO_SOURCE" ]; then
  printf 'The ISO is not a readable file: %s\n' "$ISO_SOURCE" >&2
elif ! dpkg-query -W -f='${db:Status-Abbrev}' ovmf 2>/dev/null | grep -q '^ii'; then
  printf 'Install ovmf before creating this UEFI guest.\n' >&2
elif virsh --connect qemu:///system dominfo "$VM_NAME" >/dev/null 2>&1; then
  printf 'A libvirt guest named %s already exists.\n' "$VM_NAME" >&2
elif [ -e "$ISO_PATH" ] || [ -e "$DISK_PATH" ]; then
  printf 'Choose another VM name or move the existing %s files first.\n' "$VM_NAME" >&2
elif ! sudo install -m 0644 "$ISO_SOURCE" "$ISO_PATH"; then
  printf 'Could not copy the ISO to %s. Check permissions and free space.\n' "$ISO_PATH" >&2
else
  virt-install \
    --connect qemu:///system \
    --virt-type kvm \
    --name "$VM_NAME" \
    --memory 4096 \
    --vcpus 2 \
    --disk "path=${DISK_PATH},size=30,format=qcow2,bus=virtio" \
    --cdrom "$ISO_PATH" \
    --osinfo detect=on,require=on \
    --boot uefi \
    --network network=default,model=virtio \
    --graphics spice \
    --video virtio \
    --noautoconsole
fi
Adjust the fixed VM_NAME, memory, CPU, and disk values before running the block when the guest needs different resources. The --virt-type kvm option prevents an unnoticed fallback to software emulation, while --boot uefi lets libvirt select the matching firmware from Ubuntu’s packaged capabilities instead of hard-coding a release-specific firmware path. The --osinfo check requires virt-install to identify the installation media so it can choose suitable guest defaults. If detection fails, run virt-install --osinfo list and supply the correct listed short ID instead of silently falling back to a generic guest profile. If creation fails after the ISO copy, inspect the named guest and both exact storage paths before removing or overwriting anything. The command requests SPICE without setting a public listen address; keep remote console access behind an SSH-backed libvirt connection instead of changing the listener to 0.0.0.0.
The --noautoconsole option returns control to the terminal while the installer runs. When an ISO-based installation finishes, the guest can stop instead of rebooting automatically; check its state with virsh --connect qemu:///system list --all and start it after installation when required.
On the same Ubuntu desktop, open the new console with:
virt-viewer --connect qemu:///system ubuntu-guestFor a headless KVM host, install virt-manager or virt-viewer on an Ubuntu workstation and connect over SSH with keys. Configure SSH access on Ubuntu first, and confirm the remote SSH account belongs to the host’s libvirt group. Enter a simple SSH username and a DNS name or IPv4 address in the same terminal, without URI punctuation. Do not expose an unauthenticated guest console directly to the network.
read -r -p 'SSH user on the KVM host: ' KVM_USERKeep the same terminal open, then enter the host name or IPv4 address:
read -r -p 'KVM host DNS name or IPv4 address: ' KVM_HOSTValidate the two URI components before opening the guest console:
if [ -z "$KVM_USER" ] || [ -z "$KVM_HOST" ]; then
  printf 'Both the SSH user and KVM host are required.\n' >&2
elif printf '%s\n' "$KVM_USER" | grep -qvE '^[A-Za-z0-9_][A-Za-z0-9._-]*$'; then
  printf 'The SSH user contains unsupported URI characters.\n' >&2
elif printf '%s\n' "$KVM_HOST" | grep -qvE '^[A-Za-z0-9][A-Za-z0-9.-]*[A-Za-z0-9]$|^[A-Za-z0-9]$'; then
  printf 'Use a DNS name or IPv4 address without URI punctuation.\n' >&2
elif ! getent ahosts "$KVM_HOST" >/dev/null 2>&1; then
  printf 'The KVM host does not resolve through the current network configuration.\n' >&2
else
  virt-viewer --connect "qemu+ssh://${KVM_USER}@${KVM_HOST}/system" ubuntu-guest
fi
Manage KVM Guests with virsh
List the complete system guest inventory before running a lifecycle command:
virsh --connect qemu:///system list --allUse the fixed guest name ubuntu-guest in these commands. Change the assignment once if the VM has a different name, then inspect its definition:
VM_NAME='ubuntu-guest'
virsh --connect qemu:///system dominfo "$VM_NAME"
Start a stopped guest:
VM_NAME='ubuntu-guest'
virsh --connect qemu:///system start "$VM_NAME"
Request a clean shutdown through the guest’s virtual power button:
VM_NAME='ubuntu-guest'
virsh --connect qemu:///system shutdown "$VM_NAME"
Enable automatic startup for a guest that should run when the host boots:
VM_NAME='ubuntu-guest'
virsh --connect qemu:///system autostart "$VM_NAME"
A graceful shutdown depends on the guest operating system responding to the ACPI request. Check the state with virsh --connect qemu:///system list --all before considering a forced power-off.
Update KVM and libvirt on Ubuntu
KVM, QEMU, libvirt, and the optional management tools remain owned by Ubuntu’s configured APT repositories. Refresh metadata and review the pending updates:
sudo apt update
apt list --upgradable
Apply reviewed updates through the normal Ubuntu upgrade transaction:
sudo apt upgradeAlready-running guests can continue using their pre-update QEMU processes until those guests restart. Kernel updates require a host reboot before the new KVM modules become active. Check whether Ubuntu recorded a reboot requirement:
if [ -f /var/run/reboot-required ]; then
  cat /var/run/reboot-required
else
  printf 'No reboot is currently recorded as required.\n'
fi
Do not restart the virtualisation stack or reboot a production host without checking running guests and arranging their shutdown or migration first.
Remove KVM from Ubuntu
Package removal does not delete virtual machine definitions, disk images, ISO files, or firmware state. List the guests and their storage before removing the management stack:
virsh --connect qemu:///system list --all
virsh --connect qemu:///system pool-list --all
Back up or deliberately remove every required guest before uninstalling libvirt. Files under
/var/lib/libvirt/can contain complete virtual disks, UEFI variable stores, snapshots, and other guest state. Do not delete that directory as a routine package-removal step.
After stopping or removing every guest that uses the default network, stop that network if it is active. This closes its managed dnsmasq processes and removes virbr0 before the libvirt packages disappear:
if virsh --connect qemu:///system net-info default 2>/dev/null |
  grep -Eq '^Active:[[:space:]]+yes$'; then
  virsh --connect qemu:///system net-destroy default
fi
Remove the optional graphical and command-line tools first when they are no longer needed:
sudo apt remove virt-manager virt-viewer virtinst qemu-system-gui swtpm swtpm-toolsThen remove the system libvirt deployment, command-line clients, and hardware checker:
sudo apt remove --purge libvirt-daemon-system libvirt-clients cpu-checkerThe QEMU provider, disk utilities, UEFI firmware, and block backends can support workloads outside libvirt. Inspect each package before removing it:
for PACKAGE in ovmf qemu-system-x86 qemu-utils qemu-block-extra; do
  if ! dpkg-query -W -f='${db:Status-Abbrev} ${binary:Package} ${Version}\n' \
    "$PACKAGE" 2>/dev/null; then
    printf '%s is not installed.\n' "$PACKAGE"
  fi
done
Remove these packages only when no other emulator, firmware, image-conversion, or virtualisation workflow depends on them. Keep qemu-block-extra in the same transaction as qemu-system-x86; on Ubuntu 22.04, removing the provider first can make APT select qemu-system-x86-xen to satisfy the remaining block package:
sudo apt remove ovmf qemu-system-x86 qemu-utils qemu-block-extraSimulate the autoremove transaction and review every dependency that APT considers unused:
apt -s autoremoveIf the simulation includes systemd-container and no other virtual-machine or container workflow needs it, stop its active systemd-machined process before the package disappears. This prevents the process from outliving its unit file on Ubuntu 24.04 or 22.04:
if systemctl is-active --quiet systemd-machined.service; then
  sudo systemctl stop systemd-machined.service
fi
Apply the reviewed transaction without auto-confirming it, then check for failed units:
sudo apt autoremove
systemctl --failed
If systemd-machined.service is the only failed entry, its load state is not-found, and the completed transaction confirms that systemd-container was removed, stop any retained process before reloading systemd and clear that exact stale record:
sudo systemctl stop systemd-machined.service 2>/dev/null || true
sudo systemctl daemon-reload
sudo systemctl reset-failed systemd-machined.service
systemctl --failed
Remove the current account from the libvirt group only when it no longer manages any system libvirt host:
if getent group libvirt >/dev/null && id -nG | tr ' ' '\n' | grep -qx libvirt; then
  sudo deluser "$USER" libvirt
fi
Troubleshoot KVM on Ubuntu
KVM Acceleration Cannot Be Used
Run the capability check and inspect recent kernel messages:
sudo kvm-ok
sudo dmesg | grep -iE 'kvm|vmx|svm' | tail -n 30
On bare metal, enable Intel VT-x or AMD-V in the system firmware. On an Ubuntu VM, enable nested virtualisation in the outer hypervisor and confirm that it exposes /dev/kvm. A CPU flag alone is not enough when the device is absent or firmware has disabled virtualisation.
Permission Denied for qemu:///system
Confirm the current login session has the required group and reconnect explicitly to the system scope:
id -nG
virsh --connect qemu:///system list --all
If libvirt is missing, add the user again, then end the complete desktop or SSH session and start a new one. Switching silently to qemu:///session can hide the permission problem while creating a separate set of guests and networks.
virsh Cannot Connect to libvirt
Confirm that the core packages remain installed, then retry the functional connection:
dpkg-query -W -f='${db:Status-Abbrev} ${binary:Package} ${Version}\n' \
  libvirt-daemon-system libvirt-clients
virsh --connect qemu:///system list --all
Review recent libvirt and QEMU messages without assuming one daemon unit name across every supported Ubuntu release. For narrower unit, boot, priority, or time filters, use these journalctl command examples:
sudo journalctl --since '10 minutes ago' | grep -Ei 'libvirt|virtqemud|qemu'Ubuntu’s libvirt service layout has changed over time, so a functional virsh connection is a stronger cross-release check than relying on one hard-coded systemctl status command.
The Default Network Is Missing or Inactive
Inspect the complete network inventory before changing its state:
virsh --connect qemu:///system net-list --allIf default is listed but inactive, enable it at boot and start it now:
virsh --connect qemu:///system net-autostart default
virsh --connect qemu:///system net-start default
If default is absent, reinstall the package that supplies its XML, define the packaged network, then change its startup state only when the reported value requires it:
sudo apt install --reinstall libvirt-daemon-config-network
virsh --connect qemu:///system net-define /usr/share/libvirt/networks/default.xml

if ! virsh --connect qemu:///system net-info default |
  grep -E '^Autostart:[[:space:]]+yes$' >/dev/null; then
  virsh --connect qemu:///system net-autostart default
fi

if ! virsh --connect qemu:///system net-info default |
  grep -E '^Active:[[:space:]]+yes$' >/dev/null; then
  virsh --connect qemu:///system net-start default
fi
Recheck the inventory after either fix. The default network should be active and configured to start automatically:
virsh --connect qemu:///system net-list --allDo not replace the private NAT network with a host bridge merely to clear an installation error. Bridging changes the host’s physical network path and solves a different requirement.
AppArmor Logs a Fresh Denial for an ISO or Disk
Ubuntu launches libvirt-managed QEMU guests under AppArmor isolation. Keep normal installation media and disks under /var/lib/libvirt/images/, then inspect recent denials when a non-standard path fails:
sudo journalctl -k --since '10 minutes ago' | grep -i 'apparmor="DENIED"'A fresh denial that names the failed guest and exact path is evidence to investigate AppArmor; an older or unrelated denial is not. First confirm the path, ownership, permissions, and intended access, move ordinary installation media into /var/lib/libvirt/images/, then retry the same guest action.
Do not edit the generated guest profiles under /etc/apparmor.d/libvirt/. If a non-standard path is genuinely required and a fresh denial confirms the block, use the package-provided local includes under /etc/apparmor.d/local/abstractions/libvirt-qemu or /etc/apparmor.d/local/usr.lib.libvirt.virt-aa-helper. The required rule is specific to the path and operation, so avoid generic broad allowances; parse and reload the affected profile, retest the guest, and keep a rollback that removes only the local rule.
virt-manager Does Not Open on Ubuntu Server
virt-manager requires a graphical session. Keep the KVM host headless and manage it with virsh, or run virt-manager or virt-viewer on a separate workstation through an SSH-backed libvirt connection. Installing an entire desktop on a production host only to open the manager increases the system’s package and attack surface.
Conclusion
KVM is installed with Ubuntu-managed QEMU and libvirt packages, hardware acceleration is checked through /dev/kvm, and the host can manage system guests through virsh, virt-manager, or virt-install. Keep the default NAT network for ordinary guests, add UEFI or TPM packages only when required, and consider VirtualBox on Ubuntu only when a desktop-focused cross-platform hypervisor better matches the workload.


Formatting tips for your comment
You can use basic HTML to format your comment. Useful tags currently allowed in published comments:
<code>command</code>command<strong>bold</strong><em>italic</em><a href="https://example.com">link</a><blockquote>quote</blockquote>