
Private access between Ubuntu servers and desktops is easier when you do not have to publish SSH or admin ports to the internet. You can install Tailscale on Ubuntu from Tailscale’s official APT repository or from Canonical’s Snap package, then authenticate the node into your private WireGuard-based tailnet with the tailscale CLI. The steps below cover Ubuntu 26.04 LTS (Resolute), 24.04 LTS (Noble), and 22.04 LTS (Jammy).
Install Tailscale on Ubuntu
Tailscale offers two practical installation methods on Ubuntu. The official APT repository tracks upstream releases faster and avoids Snap confinement limits, while the Canonical Snap package gives a quick install with automatic refreshes but stricter sandbox behavior.
| Method | Channel | Version Behavior | Updates | Best For |
|---|---|---|---|---|
| Official APT Repository | Tailscale Package Server | Current Tailscale stable release | APT upgrade workflow | Most users, servers, and full CLI behavior |
| Snap Package | Canonical Snapcraft | Canonical 1/stable track | Automatic Snap refreshes | Quick installs where strict confinement limits are acceptable |
Both methods currently work on Ubuntu 26.04 LTS, 24.04 LTS, and 22.04 LTS. The APT repository publishes codename-specific metadata for
resolute,noble, andjammy. The Snap package is available across the same releases, but it is published by Canonical and does not expose every Tailscale CLI feature.
For production systems, Ubuntu Server, and headless VMs, the APT method is the stronger default. If you searched for a Tailscale Ubuntu download or one-command installer, use the repository method instead of saving a standalone DEB file. Tailscale’s official install script also targets the package server, but the manual steps below make the keyring and source file visible for review and cleanup.
Update Ubuntu Before Installing Tailscale
Start by refreshing package metadata and installing any pending upgrades:
sudo apt update && sudo apt upgradeThis guide uses
sudofor commands that need elevated privileges. If your account does not have sudo access yet, follow how to add a sudo user on Ubuntu first.
Install Tailscale with the Official APT Repository
This method adds Tailscale’s signed repository as a DEB822 .sources file, stores the binary signing key, and installs the tailscale package.
Install the small prerequisites first. The -y flag auto-confirms the installation prompt:
sudo apt install curl ca-certificates -y
sudo mkdir -p --mode=0755 /usr/share/keyrings
Load your Ubuntu codename from /etc/os-release and print it before writing the repository file:
. /etc/os-release
printf '%s\n' "$VERSION_CODENAME"
resolute
Ubuntu 24.04 prints noble, and Ubuntu 22.04 prints jammy. The next commands reuse $VERSION_CODENAME so you do not have to edit repository lines by hand.
Download and store the Tailscale repository signing key using the curl command:
curl -fsSL "https://pkgs.tailscale.com/stable/ubuntu/${VERSION_CODENAME}.noarmor.gpg" | sudo tee /usr/share/keyrings/tailscale-archive-keyring.gpg > /dev/nullTailscale publishes a pre-dearmored
.noarmor.gpgkey, so piping throughteestores it directly. Nogpg --dearmorstep is needed.
Create the Tailscale DEB822 source file and print it back for a quick review:
printf '%s\n' \
  'Types: deb' \
  'URIs: https://pkgs.tailscale.com/stable/ubuntu' \
  "Suites: ${VERSION_CODENAME}" \
  'Components: main' \
  'Signed-By: /usr/share/keyrings/tailscale-archive-keyring.gpg' \
  | sudo tee /etc/apt/sources.list.d/tailscale.sources > /dev/null

cat /etc/apt/sources.list.d/tailscale.sources
Types: deb URIs: https://pkgs.tailscale.com/stable/ubuntu Suites: resolute Components: main Signed-By: /usr/share/keyrings/tailscale-archive-keyring.gpg
Refresh APT and install Tailscale:
sudo apt update
sudo apt install tailscale -y
The tee command writes root-owned files safely because a regular redirect (>) does not inherit sudo. The Tailscale package also installs tailscale-archive-keyring, which keeps the package server keyring registered for future upgrades.
Verify the package source and installed version:
apt-cache policy tailscaletailscale:
Installed: 1.96.4
Candidate: 1.96.4
Version table:
*** 1.96.4 500
500 https://pkgs.tailscale.com/stable/ubuntu resolute/main amd64 Packages
100 /var/lib/dpkg/status
The tailscale package automatically enables and starts the tailscaled daemon during installation. Confirm the service is running:
systemctl is-active tailscaled
systemctl is-enabled tailscaled
active enabled
Install Tailscale with Canonical Snap Package
If you prefer Snap packaging, install the current Tailscale stable track explicitly:
Ubuntu includes Snap on many standard desktop and server installs. If snap is missing on a minimal or customized system, install snapd first:
sudo apt install snapd -yThen install Tailscale from Canonical’s 1/stable track:
sudo snap install tailscale --channel=1/stableVerify the installed Snap release:
snap list tailscaleName Version Rev Tracking Publisher Notes tailscale 1.92.5 154 1/stable canonical** -
The Snap package is published by Canonical and is strictly confined, which limits some Tailscale features. The Snapcraft Tailscale listing currently notes that
tailscale sshandtailscale updatedo not work in this snap. If you need full CLI feature parity, use the official APT method.
Authenticate Tailscale on Ubuntu
With the daemon running, authenticate this device to your tailnet. Start with the default command unless you already know you need a custom option:
sudo tailscale upBy default, Tailscale accepts DNS settings from the admin console. Use the following variant instead of the default command if you want Ubuntu to keep its current resolver rather than enabling Tailscale DNS:
sudo tailscale up --accept-dns=falseIf Tailscale reports that changing settings requires all non-default flags, use the reset command in the troubleshooting section instead of repeating only part of the previous configuration.
The command prints a Tailscale login URL. Open that URL in your browser, sign in with your identity provider, and approve the device. Then verify connection status:
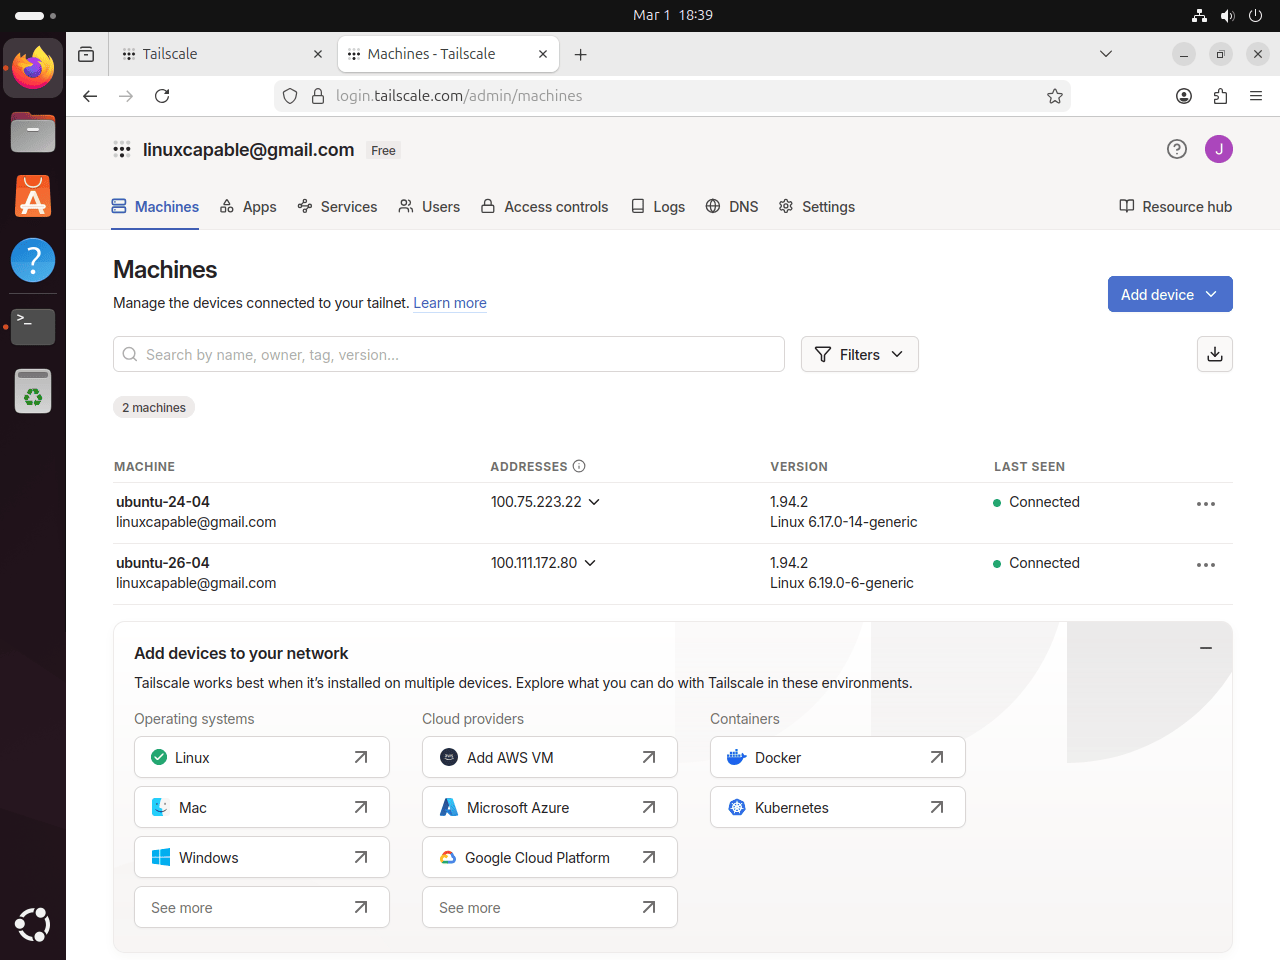
tailscale statusA connected node appears with a Tailscale IP, hostname, account name, operating system, and peer state. The exact values are unique to your tailnet.
Connect a Second Ubuntu Device to Tailscale
Tailscale is a mesh network, so you need at least two nodes to verify peer-to-peer connectivity. On a second Ubuntu machine (physical or VM), repeat the install and auth steps from above, then sign in with the same tailnet account.
If your tailnet uses device approval, approve the new node from the Tailscale Machines page before testing connectivity.
After authenticating the second device, verify both systems from either node:
tailscale statusThe output should list both Ubuntu devices. Use the hostname from that list for the next connectivity test.
Test direct peer connectivity using the hostname shown in tailscale status:
tailscale ping <second-device-hostname>A successful ping prints a pong from line. If the line includes via DERP, traffic is initially relayed through a Tailscale coordination server. After a few seconds, Tailscale usually establishes a direct WireGuard path and subsequent pings drop the DERP label.
You can also open the Tailscale Machines view to confirm both Ubuntu nodes are online from the admin console.
Access Tailscale on Ubuntu with Browser or Systray
Tailscale on Linux is primarily CLI-driven, but you can use a local browser interface and a systray helper on desktop systems.
Open Tailscale Web Interface on Ubuntu
Start the local web interface on http://localhost:8088:
sudo tailscale web --listen=localhost:8088The command stays attached to your terminal session. In a second terminal tab, confirm the endpoint is responding:
curl -I http://localhost:8088 | head -n 1HTTP/1.1 200 OK
Then open http://localhost:8088 in Firefox or Chrome on that Ubuntu machine. Use Ctrl+C in the original terminal to stop the web interface when you finish.
Run Tailscale Systray on Ubuntu Desktop
Desktop users can run the systray helper. If your user cannot manage Tailscale from the tray menu, set your Ubuntu account as an operator first:
sudo tailscale set --operator=$USERThe $USER variable resolves to your current logged-in username. After setting operator access, start systray normally without sudo:
tailscale systrayIf you run this command over SSH or on a headless server, systray integration usually fails because no desktop notification watcher is active. Launch
tailscale systrayfrom a logged-in graphical desktop session instead.
Tailscale CLI Quick Reference on Ubuntu
The tailscale CLI handles most day-to-day management. For the full subcommand list, see the Tailscale CLI reference.
| Command | Purpose |
|---|---|
tailscale up | Connect to your tailnet (triggers login if not authenticated) |
tailscale down | Disconnect from the tailnet without removing the node |
tailscale status | List connected peers and their Tailscale IPs |
tailscale ping <host> | ICMP-style ping over the Tailscale network |
tailscale ip | Print this node’s Tailscale IP address |
tailscale set --operator=$USER | Allow your desktop user to manage Tailscale without sudo |
tailscale ssh <host> | SSH to another tailnet node (APT install only) |
tailscale version | Print the installed Tailscale version |
tailscale netcheck | Analyze local network conditions and DERP relay latency |
tailscale logout | Disconnect and expire the current node key |
Update and Remove Tailscale on Ubuntu
Update Tailscale Installed with APT on Ubuntu
Refresh the Tailscale repository and upgrade to the latest stable release:
sudo apt update
sudo apt install --only-upgrade tailscale
Confirm the updated version:
tailscale version | head -n 11.96.4
Update Tailscale Installed with Snap on Ubuntu
Snap refreshes automatically, but you can trigger a manual check:
sudo snap refresh tailscale --channel=1/stable
snap list tailscale
Name Version Rev Tracking Publisher Notes tailscale 1.92.5 154 1/stable canonical** -
Remove Tailscale Installed with APT on Ubuntu
Stop the daemon, purge the Tailscale packages, then remove the repository files:
sudo systemctl disable --now tailscaled
sudo apt purge tailscale tailscale-archive-keyring -y
sudo rm -f /etc/apt/sources.list.d/tailscale.sources /usr/share/keyrings/tailscale-archive-keyring.gpg
sudo apt update
If you want to review unrelated packages that APT now considers unused, simulate cleanup before removing anything:
sudo apt autoremove --dry-runTailscale stores node keys and state in /var/lib/tailscale/. Remove that directory only if you want a fully clean slate:
This deletes all Tailscale node keys and network state. The device will need to re-authenticate after a fresh install.
sudo rm -rf /var/lib/tailscaleVerify removal:
dpkg -l tailscale tailscale-archive-keyring 2>/dev/null | grep '^ii' || echo "Tailscale APT packages removed"
test ! -e /etc/apt/sources.list.d/tailscale.sources && echo "Tailscale source file removed"
test ! -e /usr/share/keyrings/tailscale-archive-keyring.gpg && echo "Tailscale keyring file removed"
Tailscale APT packages removed Tailscale source file removed Tailscale keyring file removed
Remove Tailscale Installed with Snap on Ubuntu
Remove the Tailscale Snap package and its stored data:
sudo snap remove --purge tailscaleVerify the Snap package is removed:
snap list tailscale 2>/dev/null || echo "tailscale snap not installed"tailscale snap not installed
Troubleshoot Tailscale on Ubuntu
Most Tailscale issues on Ubuntu trace back to a stopped daemon, an expired login session, or a missing operator permission.
Fix Tailscale Daemon Not Running on Ubuntu
If the APT-installed CLI reports a daemon connection error, start the tailscaled service:
failed to connect to local tailscaled; it doesn't appear to be running
sudo systemctl enable --now tailscaled
systemctl is-active tailscaled
active
If you installed the Snap package, restart the Snap-managed service instead:
sudo snap restart tailscale
snap services tailscale
Service Startup Current Notes tailscale.tailscaled enabled active -
Fix Tailscale Command Not Found on Ubuntu
If your shell cannot find tailscale after installation, confirm which package path is available. The APT package installs /usr/bin/tailscale, while the Snap package exposes /snap/bin/tailscale.
command -v tailscale/usr/bin/tailscale
On customized Snap systems where /snap/bin is not on your PATH, open a new login shell or run the CLI through Snap directly:
snap run tailscale version | head -n 11.92.5
Fix Tailscale Login Flow Stuck on Ubuntu
If tailscale up prints a login URL and then exits, that behavior is expected until authentication completes in the browser.
sudo tailscale upIf your browser session expired or the URL timed out, rerun the command above to generate a fresh login link. After completing the browser flow, confirm the node is connected:
tailscale statusThe node appears in the status list after authentication finishes.
Fix Tailscale Up Non-Default Flags Error on Ubuntu
If Tailscale was previously configured with non-default options, rerunning tailscale up with only one flag can fail with this message:
Error: changing settings via 'tailscale up' requires mentioning all non-default flags.
Reset prior options and apply your current preference in one command:
sudo tailscale up --reset --accept-dns=falseVerify your node is still connected after resetting flags:
tailscale statusFix Systray No Permission to Manage Tailscale on Ubuntu
If systray starts but actions fail with a permissions error, your desktop user is not configured as a Tailscale operator yet.
no permission to manage tailscale
sudo tailscale set --operator=$USER
tailscale systray
Do not run systray with sudo. Start it as your normal desktop user after applying the operator setting.
Fix Tailscale Systray StatusNotifier Error on Ubuntu
If you start systray from SSH or from a shell without an active desktop session, you can see notifier errors like this:
systray error: failed to register: The name org.kde.StatusNotifierWatcher was not provided by any .service files
Launch systray from your Ubuntu desktop session after logging in graphically, not from a remote SSH-only shell.
Fix Missing Tailscale SSH Feature on Ubuntu Snap
The Snap package runs in a restricted sandbox and currently does not support tailscale ssh. If you need that feature, remove the Snap package and install Tailscale from the official APT repository instead.
Conclusion
Tailscale is running on Ubuntu with the daemon enabled at boot and the node ready to join your private WireGuard-based tailnet. Keep the APT repository when you want the current upstream client and full CLI behavior, or use the Canonical Snap package when automatic refreshes matter more than feature coverage. For deeper configuration like ACLs, subnet routing, and exit nodes, see the Tailscale documentation. For services that still face the public internet, configure UFW firewall rules on Ubuntu and install OpenSSH on Ubuntu only where traditional SSH access is still needed.

Formatting tips for your comment
You can use basic HTML to format your comment. Useful tags currently allowed in published comments:
<code>command</code>command<strong>bold</strong><em>italic</em><a href="https://example.com">link</a><blockquote>quote</blockquote>