
UrBackup provides an open-source client/server backup solution that protects data across Windows and Linux systems. By the end of this guide, you will have a working UrBackup server on Ubuntu with the web interface accessible for managing file and image backups. Common use cases include centralized backup management for small offices, automated incremental backups for home servers, and cross-platform data protection for mixed Windows/Linux environments.
Additionally, UrBackup continuously monitors directories for changes, making incremental backups fast and efficient. Files can be restored through the web interface or directly from the client, while full drive images support bare-metal recovery via a bootable USB stick. For the official project documentation and additional download options, visit the UrBackup website.
Install UrBackup Server on Ubuntu
Ubuntu users can install UrBackup through the official Launchpad PPA maintained by the project developer. This method provides the latest stable release with automatic updates through APT.
| Method | Channel | Version | Updates | Best For |
|---|---|---|---|---|
| Launchpad PPA | uroni/urbackup | Latest stable | Automatic via APT | Most users who want official releases with easy updates |
This guide covers Ubuntu 22.04 LTS, 24.04 LTS, and 26.04 LTS. The Launchpad PPA provides packages for all supported LTS releases, and the commands shown work identically across these versions.
Update Ubuntu Before Installation
First, update your package lists and upgrade existing packages before installing new software. This step ensures you have the latest security patches and prevents dependency conflicts during installation.
sudo apt update && sudo apt upgradeImport the UrBackup Launchpad PPA
UrBackup is not available in Ubuntu’s default repositories. Instead, add the official Launchpad PPA maintained by the UrBackup developer. This command imports the repository signing key and adds the PPA to your system:
sudo add-apt-repository ppa:uroni/urbackup -yThe -y flag automatically confirms the addition. After running this command, APT automatically refreshes the package index, so you can proceed directly to installation.
Install UrBackup Server
Once the PPA is configured, install the UrBackup server package:
sudo apt install urbackup-serverDuring installation, the package configuration prompts you to specify the backup storage location. By default, the path is /var/urbackup, which works for most setups. However, if you have a dedicated backup drive or partition, you can specify an alternative path such as /mnt/backups.
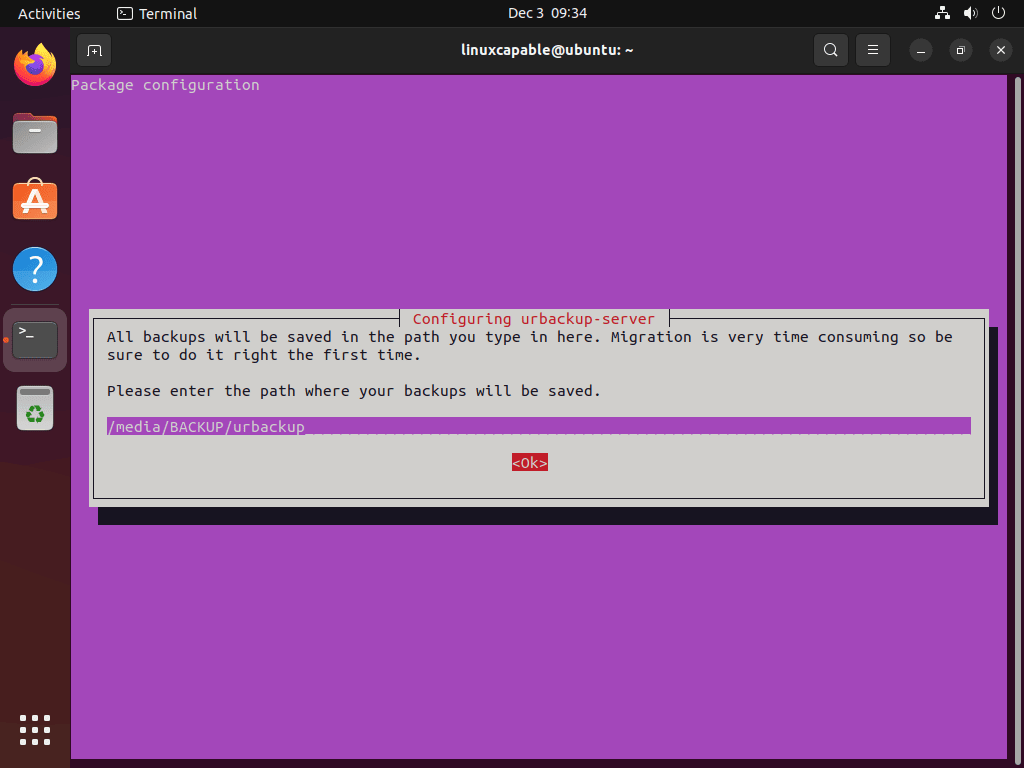
Choose a storage location with sufficient disk space for your backup needs. UrBackup uses deduplication to minimize storage usage, but you should still plan for at least 2-3 times the total size of the data you intend to back up.
Verify the Installation
Next, verify that UrBackup installed correctly by checking the version:
urbackupsrv --versionYou should see output similar to the following:
UrBackup Server v2.5.34.0
Copyright (C) 2011-2019 Martin Raiber
This is free software; see the source for copying conditions. There is NO
warranty; not even for MERCHANTABILITY or FITNESS FOR A PARTICULAR PURPOSE.
Configure the UrBackup Service
Check Service Status
UrBackup uses a SysV init script that systemd manages automatically. After installation, the service typically starts on its own. To confirm, verify the service status:
systemctl status urbackupsrvYou should see output similar to the following when the service is running correctly:
● urbackupsrv.service - LSB: Server for doing backups
     Loaded: loaded (/etc/init.d/urbackupsrv; generated)
     Active: active (running) since Fri 2025-12-27 10:00:00 UTC; 1min ago
       Docs: man:systemd-sysv-generator(8)
    Process: 1234 ExecStart=/etc/init.d/urbackupsrv start (code=exited, status=0/SUCCESS)
      Tasks: 10 (limit: 4915)
     Memory: 45.0M
        CPU: 1.234s
     CGroup: /system.slice/urbackupsrv.service
             └─1256 /usr/bin/urbackupsrv run --config /etc/default/urbackupsrv
Enable the Service at Boot
If the service is not running, or if you want to ensure it starts automatically after reboots, enable and start it with a single command:
sudo systemctl enable urbackupsrv --nowThe --now flag enables the service for future boots and starts it immediately. This ensures your backup server remains operational after system restarts without manual intervention.
Configure Firewall Access
If you use UFW (Uncomplicated Firewall), allow access to the UrBackup web interface and client communication ports:
sudo ufw allow 55413/tcp comment "UrBackup FastCGI"
sudo ufw allow 55414/tcp comment "UrBackup Web Interface"
sudo ufw allow 55415/tcp comment "UrBackup Internet Client"
To confirm the rules were added, run:
sudo ufw status numberedYou should see output similar to the following, showing the UrBackup ports:
Status: active

     To                         Action      From
     --                         ------      ----
[ 1] 22/tcp                     ALLOW IN    Anywhere
[ 2] 55413/tcp                  ALLOW IN    Anywhere                   # UrBackup FastCGI
[ 3] 55414/tcp                  ALLOW IN    Anywhere                   # UrBackup Web Interface
[ 4] 55415/tcp                  ALLOW IN    Anywhere                   # UrBackup Internet Client
Access the UrBackup Web Interface
Now that the service is running, you can access the web-based management interface through your browser. This interface provides complete control over backup configuration, client management, and restore operations.
Connect to the Interface
Open a web browser and navigate to:
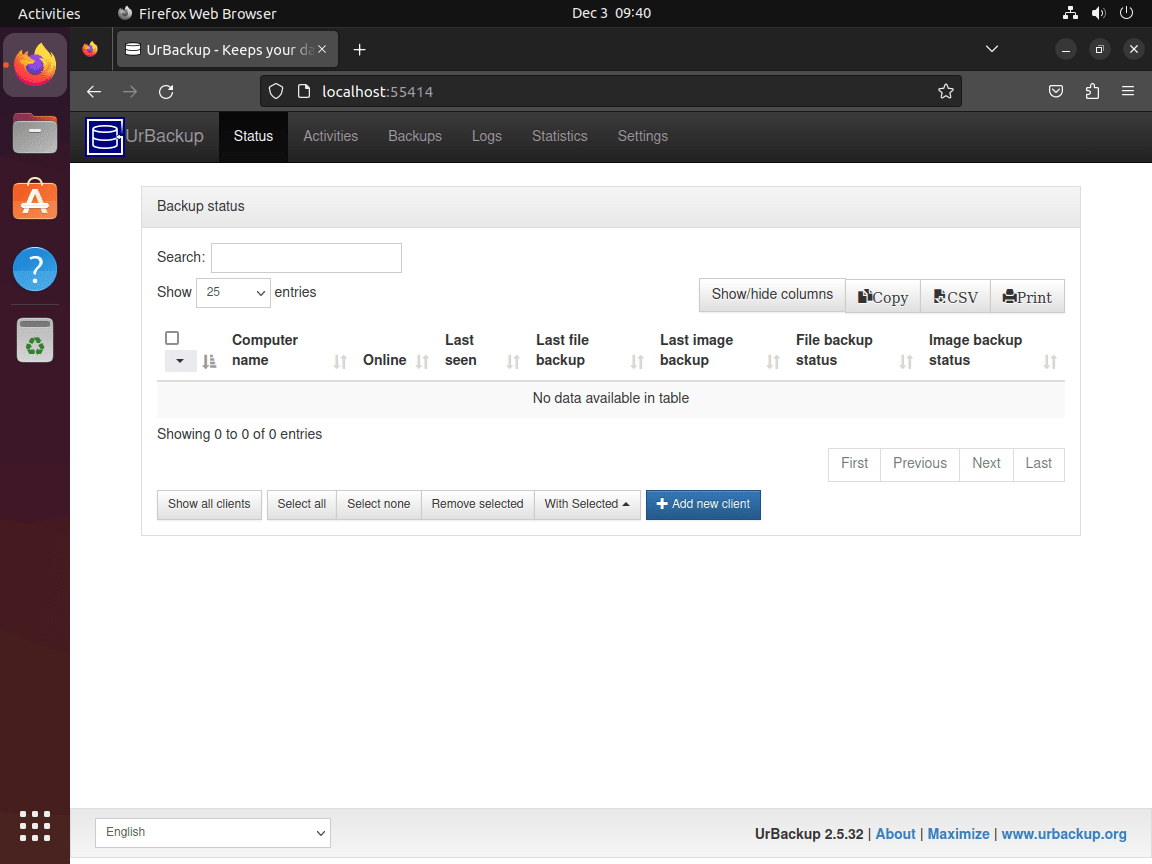
http://your-server-ip:55414Replace your-server-ip with your server’s actual IP address. For local testing, use http://localhost:55414 or http://127.0.0.1:55414.
When you first access the interface, it displays the status dashboard showing connected clients, recent backup activity, and server health. Initially, no clients appear until you install the UrBackup client software on systems you want to back up.
Initial Configuration Settings
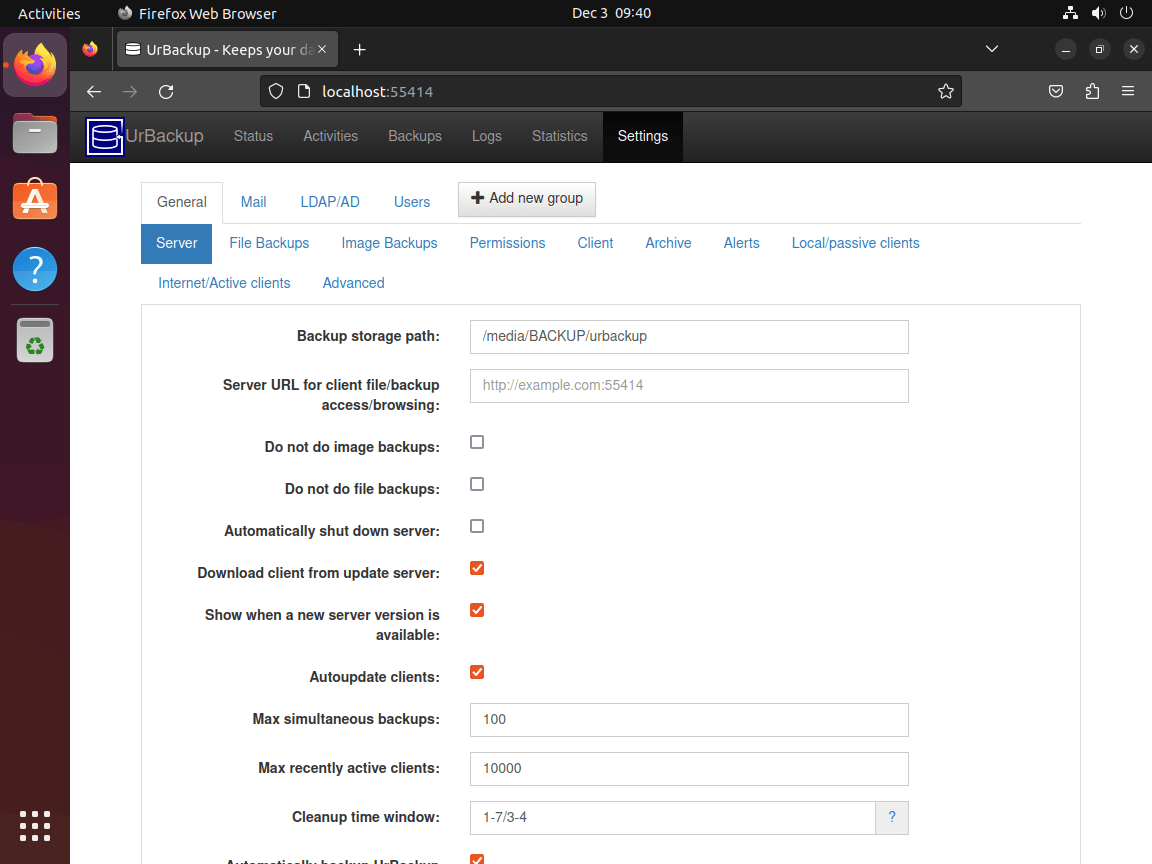
After accessing the interface, navigate to Settings to configure your backup environment:
- Server Settings: Configure the backup storage path, maximum storage usage, and cleanup policies for old backups.
- Internet Settings: If backing up remote clients over the internet, configure the internet server name and port forwarding.
- Mail Settings: Set up SMTP configuration to receive email notifications for backup successes, failures, and warnings.
For production deployments, configure email notifications immediately. This ensures you receive alerts if backups fail or clients become unreachable, allowing you to address issues before data loss occurs.
Configure Backup Schedules
In addition, UrBackup supports both file and image backups with configurable schedules. In the Settings menu, configure:
- Incremental file backups: Recommended daily or more frequently for active files
- Full file backups: Weekly or monthly depending on data change rate
- Incremental image backups: Weekly for system partitions
- Full image backups: Monthly for complete system recovery capability
The default settings provide a reasonable starting point. However, adjust them based on your Recovery Point Objective (RPO), which defines how much data loss is acceptable, and your available storage capacity.
Set Up Reverse Proxy with Apache or Nginx
In production environments, it is best to place the UrBackup web interface behind a reverse proxy to enable HTTPS encryption and integrate with your existing web server infrastructure. This section covers both Apache and Nginx configurations.
Apache Reverse Proxy Configuration
First, install Apache if not already present and enable the required proxy modules:
sudo apt install apache2
sudo a2enmod proxy proxy_http ssl
sudo systemctl restart apache2
Next, create a virtual host configuration file for UrBackup:
sudo nano /etc/apache2/sites-available/urbackup.confAdd the following configuration, replacing urbackup.example.com with your actual domain:
<VirtualHost *:80>
    ServerName urbackup.example.com

    ProxyPreserveHost On
    ProxyPass / http://localhost:55414/
    ProxyPassReverse / http://localhost:55414/

    ErrorLog ${APACHE_LOG_DIR}/urbackup_error.log
    CustomLog ${APACHE_LOG_DIR}/urbackup_access.log combined
</VirtualHost>
Finally, enable the site and reload Apache:
sudo a2ensite urbackup.conf
sudo systemctl reload apache2
Nginx Reverse Proxy Configuration
Alternatively, if you prefer Nginx, install it and create a server block configuration:
sudo apt install nginx
sudo nano /etc/nginx/sites-available/urbackup
Next, add the following configuration:
server {
    listen 80;
    server_name urbackup.example.com;

    location / {
        proxy_pass http://localhost:55414/;
        proxy_set_header Host $host;
        proxy_set_header X-Real-IP $remote_addr;
        proxy_set_header X-Forwarded-For $proxy_add_x_forwarded_for;
        proxy_set_header X-Forwarded-Proto $scheme;

        # WebSocket support for real-time updates
        proxy_http_version 1.1;
        proxy_set_header Upgrade $http_upgrade;
        proxy_set_header Connection "upgrade";
    }
}
Then, enable the configuration and test the Nginx syntax before reloading:
sudo ln -s /etc/nginx/sites-available/urbackup /etc/nginx/sites-enabled/
sudo nginx -t
sudo systemctl reload nginx
Add SSL with Certbot
For HTTPS encryption using free Let’s Encrypt certificates, install Certbot with the appropriate plugin for your web server.
When using Apache:
sudo apt install certbot python3-certbot-apache
sudo certbot --apache -d urbackup.example.com
When using Nginx:
sudo apt install certbot python3-certbot-nginx
sudo certbot --nginx -d urbackup.example.com
During the setup process, Certbot prompts you to enter an email address for renewal notifications and asks whether to redirect HTTP traffic to HTTPS automatically. Choose the redirect option for better security. After completion, your UrBackup interface is accessible via https://urbackup.example.com.
After the initial setup, test automatic certificate renewal with a dry run:
sudo certbot renew --dry-runAs a result, Certbot automatically configures a systemd timer for renewal, so certificates renew before expiration without manual intervention.
Troubleshoot Common UrBackup Issues
Service Fails to Start
If the UrBackup service fails to start, first check the logs for error messages:
sudo journalctl -u urbackupsrv -n 50 --no-pagerSome common causes include:
- Port already in use: Another service occupies port 55414. Check with
sudo ss -tlnp | grep 55414 - Permission issues: The backup directory lacks proper ownership. Fix with
sudo chown -R urbackup:urbackup /var/urbackup - Disk full: No space available in the backup directory. Check with
df -h /var/urbackup
Web Interface Inaccessible
If you cannot access the web interface, first verify that the service is listening on the expected port:
sudo ss -tlnp | grep urbackupYou should see output similar to the following, showing the listening ports:
LISTEN 0      4096         0.0.0.0:55413      0.0.0.0:*    users:(("urbackupsrv",pid=1256,fd=8))
LISTEN 0      4096         0.0.0.0:55414      0.0.0.0:*    users:(("urbackupsrv",pid=1256,fd=9))
If the ports are listening but the interface remains inaccessible from other machines, then check your firewall configuration or security group rules for cloud instances.
Clients Not Connecting
If UrBackup clients cannot connect to the server, try the following steps:
- Verify network connectivity: From the client machine, test with
telnet server-ip 55415 - Check client configuration: Ensure the client has the correct server IP address
- Review server logs: Check
/var/log/urbackup.logfor connection attempts and errors
Remove UrBackup from Ubuntu
If you no longer need UrBackup, you can remove the package and clean up associated files. This process removes the server software but preserves backup data for manual cleanup.
Stop and Remove the Package
To begin, stop the service and remove the package along with its configuration files:
sudo systemctl stop urbackupsrv
sudo apt remove --purge urbackup-server
sudo apt autoremove
Additionally, the autoremove command cleans up dependencies that were installed specifically for UrBackup and are no longer needed.
Remove the PPA
Next, remove the Launchpad PPA to stop receiving updates:
sudo add-apt-repository --remove ppa:uroni/urbackup -y
sudo apt update
Remove Backup Data
Warning: The following command permanently deletes all backup data stored by UrBackup. This action cannot be undone. If you need to preserve any backups, copy them to another location before proceeding.
Once you have confirmed you no longer need the backup data, remove the storage directory:
sudo rm -rf /var/urbackupSimilarly, if you configured a custom backup location during installation, remove that directory instead.
Conclusion
You now have a fully operational UrBackup server on Ubuntu, ready to protect your network’s data through automated file and image backups. The web interface at port 55414 provides centralized management for backup schedules, client configuration, and restore operations. For production environments, the reverse proxy configuration with SSL ensures secure access to the management interface. To complete your backup infrastructure, install the UrBackup client on Windows or Linux systems you want to protect. Clients automatically discover the server on local networks, or you can configure internet-based backups for remote locations.

Formatting tips for your comment
You can use basic HTML to format your comment. Useful tags currently allowed:
<code>command</code>command<strong>bold</strong><em>italic</em><blockquote>quote</blockquote>