
Xfce is a practical fit when a CentOS Stream 9 system needs a full desktop without the heavier GNOME workflow. It keeps the panel, window manager, file manager, terminal, settings tools, and session selector familiar while staying light enough for older hardware, lab VMs, and admin workstations. The maintained path to install Xfce on CentOS Stream 9 uses EPEL packages, the CentOS CRB repository, and a display manager so the session appears at login.
As of May 2026, Xfce is a CentOS Stream 9 workflow. EPEL 9 provides the
Xfcegroup, while EPEL 10 does not expose an Xfce group, and CentOS Stream 10 no longer shipsxorg-x11-server-Xorg. You can track the EPEL 10 packaging request in Red Hat Bugzilla Bug 2366792.
Install Xfce on CentOS Stream 9
Refresh package metadata and apply pending system updates before adding the Xfce desktop packages:
sudo dnf upgrade --refreshThe commands use
sudofor administrative tasks. If your account cannot run sudo commands, sign in asrootor ask an administrator to add your user to thewheelgroup.
Enable CRB and EPEL for Xfce Packages
The Xfce desktop group is delivered through EPEL on CentOS Stream 9. Enable CodeReady Builder (CRB) first because many EPEL packages rely on libraries from that repository.
Install the DNF plugin package that provides config-manager, then enable CRB:
sudo dnf install dnf-plugins-core
sudo dnf config-manager --set-enabled crb
Install the EPEL release package from the Fedora Project permalink for Enterprise Linux 9:
sudo dnf install https://dl.fedoraproject.org/pub/epel/epel-release-latest-9.noarch.rpmConfirm that CRB and EPEL are enabled:
dnf repolist --enabled | grep -E '^(crb|epel)([[:space:]]|$)'crb CentOS Stream 9 - CRB epel Extra Packages for Enterprise Linux 9 - x86_64
For broader repository management, including verification and cleanup, see the CentOS Stream EPEL setup guide.
Confirm the Xfce Group Name
CentOS Stream uses DNF group operations for desktop environments. Older yum examples may show groupinstall, but the current CentOS Stream syntax is dnf group install. The display name is Xfce, and the group ID is xfce-desktop:
dnf group list ids | grep -i xfceXfce (xfce-desktop)
Install the Xfce desktop group:
sudo dnf group install "Xfce"Verify that DNF marked the group as installed:
dnf group list installed | grep -i xfceXfce
Install Optional Xfce Panel Plugins
The current EPEL 9 Xfce group already includes core components such as Thunar, Xfwm4, xfce4-session, xfce4-screensaver, and xfce4-pulseaudio-plugin. Add these optional panel plugins if you want clipboard history, weather, and a searchable application menu:
sudo dnf install xfce4-clipman-plugin xfce4-weather-plugin xfce4-whiskermenu-pluginxfce4-clipman-pluginadds clipboard history to the panel.xfce4-weather-pluginadds weather information to the panel.xfce4-whiskermenu-pluginadds a searchable application menu.
Choose a Display Manager for Xfce on CentOS Stream 9
Installing Xfce does not automatically make a minimal or server installation boot into a graphical login screen. A display manager starts the login screen and exposes the Xfce session selector. Workstation systems may already have GDM enabled, while Xfce-only systems often use LightDM for a smaller login stack.
| Display Manager | Source | Best Fit |
|---|---|---|
| GDM | CentOS Stream AppStream | Systems that already use GNOME or need the default CentOS graphical login |
| LightDM | EPEL | Xfce-only or minimal systems that prefer a lighter login manager |
Check the current boot target and display-manager state before changing anything:
systemctl get-default
systemctl status display-manager --no-pager
Use GDM with Xfce on CentOS Stream 9
GDM is a good choice when the system already runs GNOME or when you want the default CentOS Stream graphical login. Install it if the package is missing, enable it, and set the system to boot into graphical mode:
sudo dnf install gdm
sudo systemctl enable --now gdm
sudo systemctl set-default graphical.target
Verify that GDM is running:
systemctl status gdm --no-pager | grep -o 'Active: active (running)'Active: active (running)
Use LightDM with Xfce on CentOS Stream 9
LightDM and its GTK greeter are available from EPEL. Install LightDM first, then switch from GDM only if you are sure the system should use LightDM for graphical logins:
sudo dnf install lightdm lightdm-gtk
sudo systemctl disable --now gdm 2>/dev/null || true
sudo systemctl enable --now lightdm
sudo systemctl set-default graphical.target
Verify that LightDM is running:
systemctl status lightdm --no-pager | grep -o 'Active: active (running)'Active: active (running)
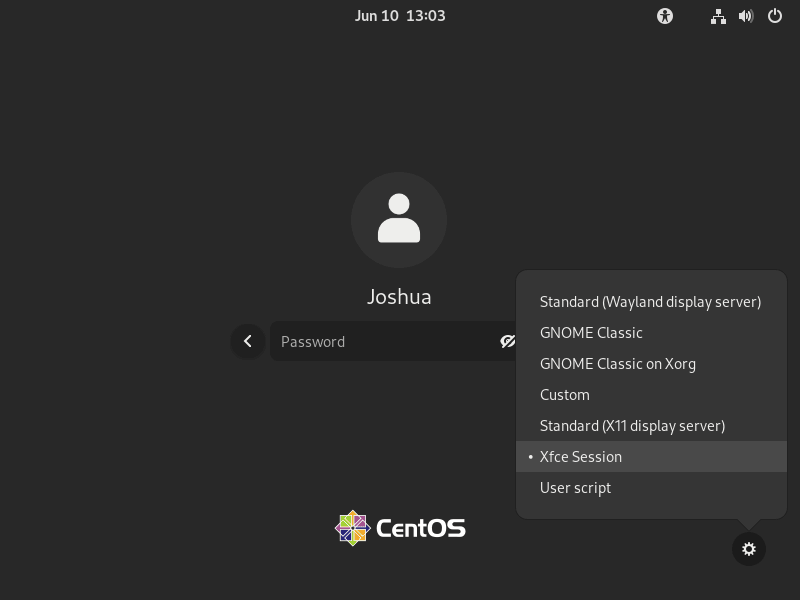
Reboot and Select the Xfce Session on CentOS Stream 9
Reboot after the display manager is enabled so the system starts a clean graphical login:
sudo rebootAt the login screen, open the session selector before entering your password. GDM uses a gear icon near the sign-in button, while LightDM uses a dropdown near the username field. Select Xfce Session, then sign in.
If the system returns to a text console instead of a graphical login, check that the display manager is enabled and that
systemctl get-defaultreturnsgraphical.target.
The session preference is remembered for later logins unless you choose a different desktop from the same selector.
Start Xfce Without a Display Manager
For console-based systems where you do not want a graphical login manager, start Xfce manually with startx. Install the Xorg server and xinit package, create a user-level X session file, then start the session from a local console:
sudo dnf install xorg-x11-server-Xorg xorg-x11-xinit
printf '%s\n' 'exec startxfce4' > ~/.xinitrc
startx
Manage Xfce on CentOS Stream 9
Update Xfce Packages
Xfce updates arrive through EPEL alongside normal CentOS Stream package updates. Refresh metadata and upgrade installed packages together:
sudo dnf upgrade --refreshDNF handles CentOS Stream and EPEL repositories in the same transaction, so review the package list before confirming large upgrades on production workstations.
Remove Xfce from CentOS Stream 9
Before removing packages, decide whether the graphical login was enabled only for Xfce. If another desktop still uses GDM or LightDM, keep the display manager enabled and remove only the Xfce packages.
For Xfce-only systems, return the machine to text-mode boot:
sudo systemctl set-default multi-user.targetDisable the display manager only when it was enabled solely for this Xfce setup:
For GDM:
sudo systemctl disable --now gdmFor LightDM:
sudo systemctl disable --now lightdmRemove the Xfce group:
sudo dnf group remove "Xfce"If you installed the optional panel plugins, remove them separately:
sudo dnf remove xfce4-clipman-plugin xfce4-weather-plugin xfce4-whiskermenu-pluginPreview orphaned dependency cleanup before removing anything else:
sudo dnf autoremove --assumenoIf the preview lists only packages you no longer need, run the cleanup without --assumeno:
sudo dnf autoremoveIf EPEL was enabled only for Xfce, remove the release package and confirm the repository is no longer enabled:
sudo dnf remove epel-release
dnf repolist --enabled | grep -E '^epel([[:space:]]|-next[[:space:]])' || echo "EPEL repositories are disabled"
Remove User Xfce Configuration Files
These commands permanently delete Xfce user settings, including panel layouts, keyboard shortcuts, and desktop preferences. Back up
~/.config/xfce4first if you want to preserve those settings.
if [ -d ~/.config/xfce4 ]; then
  cp -a ~/.config/xfce4 ~/xfce4-backup
fi
rm -rf ~/.config/xfce4 ~/.cache/xfce4
Reboot after package and session cleanup:
sudo rebootVerify Xfce Removal
Check the installed group list after reboot:
dnf group list installed | grep -i xfce || echo "Xfce group is not installed"Xfce group is not installed
Troubleshoot Xfce on CentOS Stream 9
Xfce Group Not Found During Installation
If DNF reports that the Xfce group is not available, verify the active repositories first:
dnf repolist --enabled | grep -E '^(crb|epel)([[:space:]]|$)'crb CentOS Stream 9 - CRB epel Extra Packages for Enterprise Linux 9 - x86_64
Then confirm the group name and group ID:
dnf group list ids | grep -i xfceXfce (xfce-desktop)
If those commands show CRB and EPEL but no Xfce group, confirm the machine is running CentOS Stream 9. On CentOS Stream 10, the missing group is expected while the EPEL 10 packaging request remains open.
config-manager Command Not Found
The config-manager subcommand comes from dnf-plugins-core. Install the helper package, then enable CRB again:
sudo dnf install dnf-plugins-core
sudo dnf config-manager --set-enabled crb
No Xfce Option at the Login Screen
If the system boots to a text console, verify the boot target and display-manager state:
systemctl get-default
systemctl status display-manager --no-pager
If the graphical login appears but Xfce is missing from the session selector, check whether the session file exists:
ls /usr/share/xsessions/ | grep -i xfcexfce.desktop
Reinstall xfce4-session if the session file is missing:
sudo dnf reinstall xfce4-sessionstartx Command Not Found
Minimal installs may not include xinit, which provides startx. Install the Xorg server and xinit package before using the manual console start path:
sudo dnf install xorg-x11-server-Xorg xorg-x11-xinitCreate ~/.xinitrc with exec startxfce4, then run startx from a local console.
Conclusion
CentOS Stream 9 can run Xfce through EPEL with CRB enabled, the Xfce group installed, and either GDM or LightDM handling graphical logins. Keep EPEL enabled for Xfce updates, review DNF transactions before broad cleanup, and use the session selector when switching between Xfce and any other installed desktop. For network-facing workstations or remote administration, pair the desktop with firewalld on CentOS Stream so access rules stay explicit.

Formatting tips for your comment
You can use basic HTML to format your comment. Useful tags currently allowed in published comments:
<code>command</code>command<strong>bold</strong><em>italic</em><a href="https://example.com">link</a><blockquote>quote</blockquote>