
A service that dies quietly at 2 a.m. is easy to miss until users start reporting downtime. Monit gives Ubuntu a lightweight watchdog for processes, ports, and resource thresholds, so you can install Monit on Ubuntu when you want automatic restarts and basic self-healing without deploying a larger monitoring stack.
Ubuntu 26.04, 24.04, and 22.04 all package Monit in the Ubuntu archive’s Universe component, with slightly different versions and service integration across those LTS releases. That setup installs Monit, verifies the daemon, turns on the optional web interface, limits access to port 2812, and extends cleanly into troubleshooting, updates, and removal.
Install Monit on Ubuntu
Update Ubuntu Packages
Refresh package metadata first so Ubuntu installs the current Monit build for your release.
sudo apt updateThese commands use
sudobecause they modify system packages and services. If your account does not have sudo access yet, follow the guide to add a new user to sudoers on Ubuntu or run the commands from a root shell.
Upgrade any already-installed packages before adding another long-running service.
sudo apt upgradeCheck Monit Versions in Ubuntu Universe
Monit comes from Ubuntu’s Universe component, so you do not need a separate download or third-party repository. Most standard Ubuntu installations already have Universe enabled, but minimal images can differ; if Monit does not show a candidate package, first enable Universe and Multiverse on Ubuntu.
| Ubuntu Release | Universe Package | Service Integration | What Changes |
|---|---|---|---|
| Ubuntu 26.04 | Monit 5.35.2 | Native systemd unit | Newest LTS package and native service unit path |
| Ubuntu 24.04 | Monit 5.33.0 | Native systemd unit | Current mainstream LTS package and native service unit path |
| Ubuntu 22.04 | Monit 5.31.0 | Generated SysV wrapper behind systemctl | Older LTS package with different loaded-path details |
The install command is the same on Ubuntu 26.04, 24.04, and 22.04. What changes between releases is the packaged Monit version and, on 22.04, the unit details shown by
systemctl.
Install Monit with APT
Install Monit from Ubuntu’s Universe component with APT.
sudo apt install monitCheck the installed Monit build before you move on to the service and web interface steps.
monit --versionThis is Monit version 5.35.2 Built with ssl, with ipv6, with compression, with pam and with large files
Ubuntu 24.04 reports This is Monit version 5.33.0, and Ubuntu 22.04 reports This is Monit version 5.31.0 on the first line.
Enable the Monit Service
The Ubuntu package enables and starts Monit during installation. Verify both states before you continue to the web interface and service-check steps.
systemctl is-enabled monit
systemctl is-active monit
enabled active
Ubuntu 26.04 and 24.04 use a native
/usr/lib/systemd/system/monit.serviceunit. Ubuntu 22.04 still works withsystemctl, but it exposes Monit through a generated wrapper backed by/etc/init.d/monit, so the loaded-path details look different and the enabled check may print redirect lines before the final state.
If a customized system reports disabled or inactive, enable and start the daemon manually.
sudo systemctl enable monit --nowMonit can watch more than daemon uptime once you add rules to the control file or an included configuration snippet. Common checks include process resource limits, TCP ports, filesystems, files, directories, and host-level resource thresholds.
Configure Monit Web Interface on Ubuntu
Monit does not listen on TCP port 2812 right after installation because the package ships its set httpd block commented out. Turn that block on before you expect the Monit web interface or the full Monit CLI command set to respond.
Back up the control file first so you can restore the package defaults if you want a clean starting point later.
sudo cp /etc/monit/monitrc /etc/monit/monitrc.bakOpen the Monit control file in a text editor.
sudo nano /etc/monit/monitrcLook for the default HTTP section near the middle of the file. It starts commented out like this:
#set httpd port 2812 and
#    use address localhost  # only accept connection from localhost
#    allow localhost
#    allow admin:monit
A good starting point is a localhost-only setup with one explicit login. Replace the sample password before saving the file, and keep the password in quotes if you use special characters.
set httpd port 2812 and
    use address localhost
    allow localhost
    allow monitadmin:"change-this-password"
That configuration keeps Monit bound to 127.0.0.1 and ::1, which is the safest default for server administration. If you want a browser on another machine to reach Monit directly, change use address localhost to the server’s LAN address or remove that line so Monit listens on every interface.
Monit’s built-in web interface can use TLS if you add
with ssl { ... }options and PEM files to theset httpdblock. For a simpler admin-only path, keep Monit on localhost and tunnel it over SSH. If you prefer HTTPS for shared admin access, put Monit behind a reverse proxy or enable Monit’s own SSL settings.
Test the file before restarting the daemon so Monit does not reload a broken configuration.
sudo monit -tControl file syntax OK
Restart Monit so the HTTP listener and credentials take effect.
sudo systemctl restart monitNow verify that Monit is really listening on port 2812. With the localhost-only example above, the listener stays local instead of opening the dashboard to the network.
ss -lnt | grep 2812LISTEN 0 1024 127.0.0.1:2812 0.0.0.0:* LISTEN 0 1024 [::1]:2812 [::]:*
Add Monit Service Checks on Ubuntu
Ubuntu’s Monit package includes example checks in /etc/monit/conf-available/ and loads enabled snippets from /etc/monit/conf-enabled/. Treat these files as starting points, not automatic defaults, because each snippet assumes the named service, paths, and helper commands exist on that server.
List the packaged examples before you decide what to enable.
ls -1 /etc/monit/conf-availableacpid apache2 at cron mdadm memcached mysql nginx openntpd openssh-server pdns-recursor postfix rsyslog smartmontools snmpd
When a snippet matches a service you already run, inspect it first, then enable it with a symbolic link. This example assumes Nginx is already installed; replace the name with the service you actually want Monit to supervise.
sudo nano /etc/monit/conf-available/nginx
sudo ln -s /etc/monit/conf-available/nginx /etc/monit/conf-enabled/nginx
Test the combined configuration after enabling any snippet. If Monit reports missing paths, helper commands, host keys, or service-specific files, adjust the snippet before reloading the daemon.
sudo monit -tControl file syntax OK
Reload Monit only after the syntax check passes.
sudo systemctl reload monitConfigure Firewall Rules for Monit on Ubuntu
You only need firewall rules for Monit if you changed the listener away from localhost and want another machine to reach port 2812 directly. If you kept the localhost-only configuration, skip this section and use the SSH tunnel in the next step instead.
UFW is common on Ubuntu desktops and servers, but it is not guaranteed on every minimal image. Install it first if the command is missing, or follow the full guide to configure UFW on Ubuntu if you want a broader firewall policy.
sudo apt install ufwIf you are connected over SSH, allow
OpenSSHbefore enabling UFW so the firewall does not cut off your current session.
Add the SSH rule first when you manage the server remotely.
sudo ufw allow OpenSSHEnable the firewall once SSH is allowed. UFW may ask for confirmation because firewall changes can affect active remote sessions; continue only after the SSH rule is in place.
sudo ufw enableCommand may disrupt existing ssh connections. Proceed with operation (y|n)? y Firewall is active and enabled on system startup
Allow the Monit dashboard from one trusted host if you only need a single admin workstation to reach it.
sudo ufw allow proto tcp from 203.0.113.50 to any port 2812Use a subnet rule instead when multiple management systems on the same LAN need access.
sudo ufw allow proto tcp from 192.168.1.0/24 to any port 2812Check the active ruleset so you can confirm that port 2812 is only open to the addresses you intended.
sudo ufw status numberedStatus: active
To Action From
-- ------ ----
[ 1] 22/tcp ALLOW IN Anywhere
[ 2] 2812/tcp ALLOW IN 192.168.1.0/24
[ 3] 22/tcp (v6) ALLOW IN Anywhere (v6)
Access Monit Web Interface on Ubuntu
If you kept Monit bound to localhost, create an SSH tunnel from your workstation and browse the dashboard through the encrypted local endpoint. If SSH is not set up on the server yet, start with the guide to install SSH on Ubuntu.
ssh username@server-ip -L 2812:127.0.0.1:2812http://127.0.0.1:2812
If you intentionally bound Monit to a server or LAN address and opened the firewall, use the server address instead. Monit’s web interface uses TCP port 2812 by default once the HTTP block is enabled.
http://203.0.113.10:2812
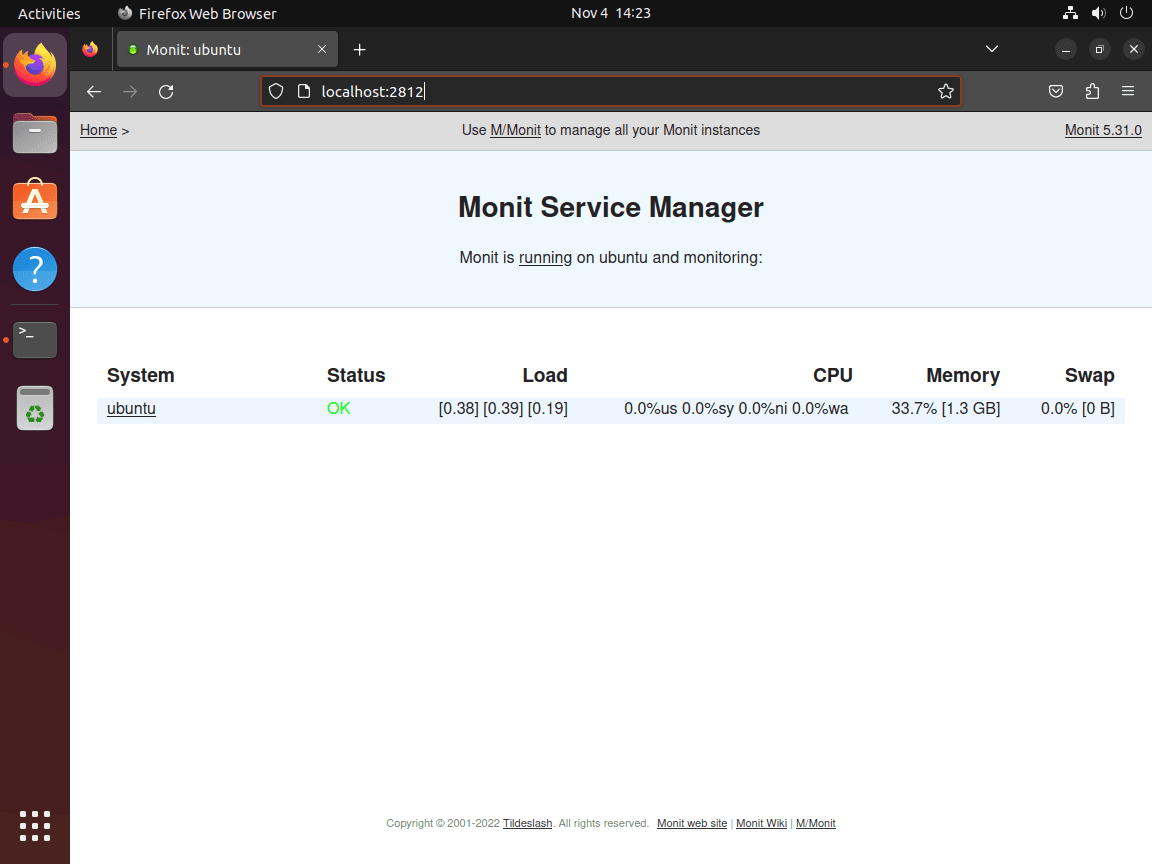
Log in with the credentials from /etc/monit/monitrc to reach the main dashboard and host summary.
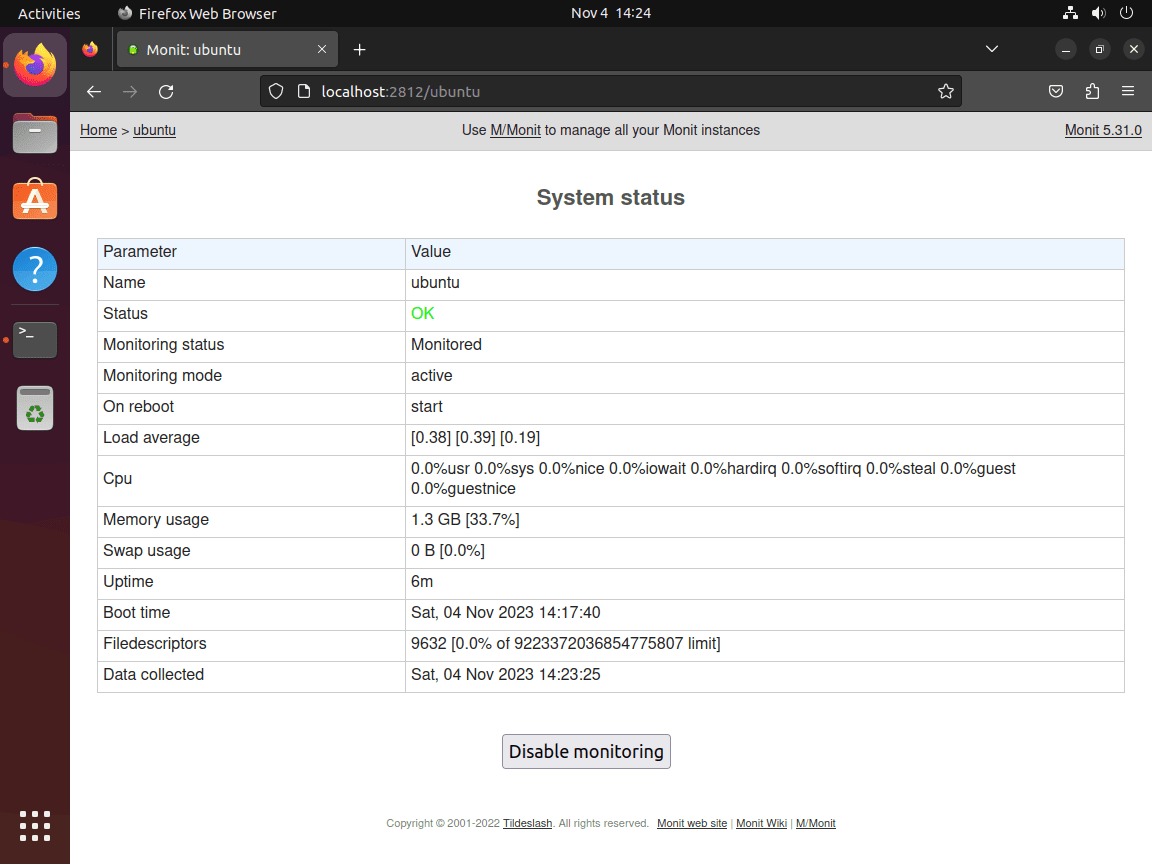
Click the host entry to drill into CPU, memory, filesystem, and process data for the current machine.
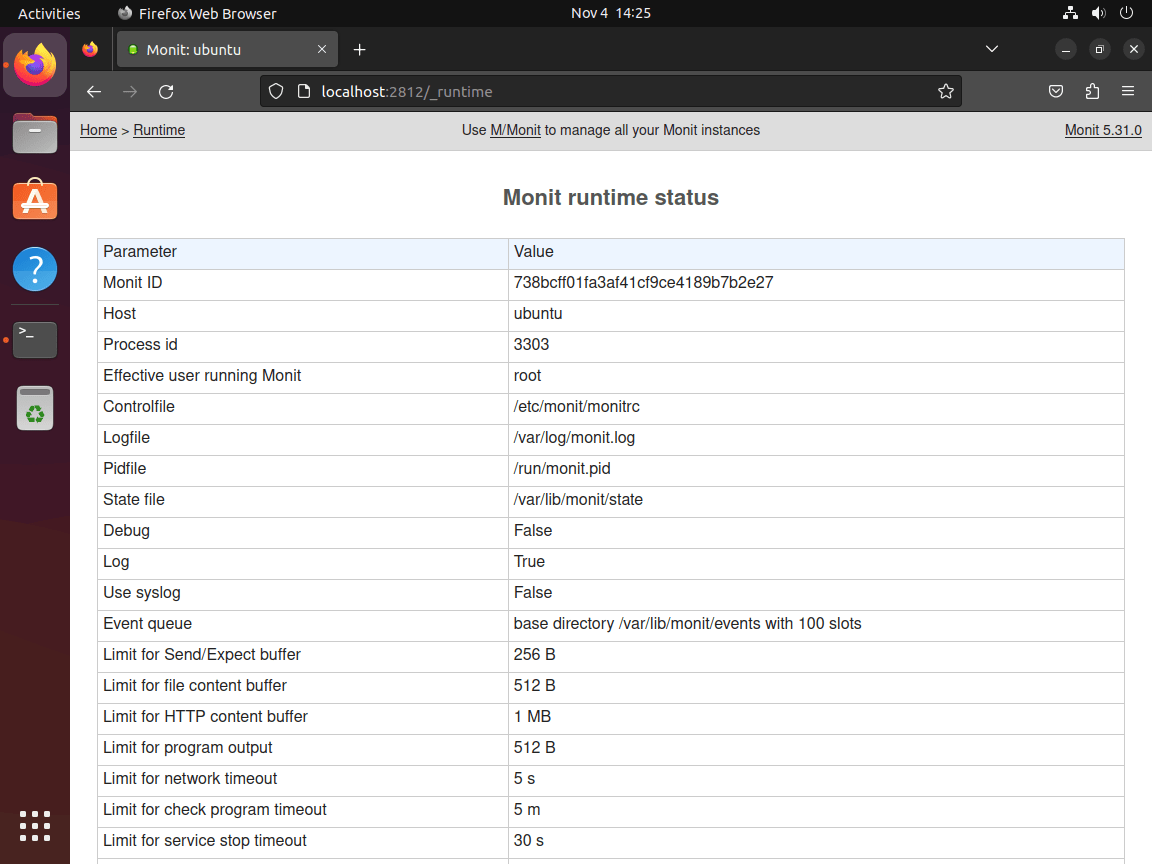
The runtime page is also useful when you need to confirm poll intervals, uptime, and the active configuration state after a restart.
For deeper service checks, SSL options, alert routing, and dependency rules, consult the official Monit manual.
Troubleshoot Monit on Ubuntu
Most Monit problems on Ubuntu come from small syntax mistakes in monitrc, the HTTP interface being disabled, or firewall rules that do not match the address Monit is actually using.
Fix Disabled Monit HTTP Interface Messages on Ubuntu
Running a Monit client command before enabling the HTTP block can return this message even when the daemon itself is active:
Monit: the monit HTTP interface is not enabled, please add the 'set httpd' statement and use the 'allow' option to allow monit to connect
Enable the set httpd block in /etc/monit/monitrc, include at least one allow rule, run sudo monit -t, and restart the service. After the restart, sudo monit status should show the local system summary instead of the interface warning.
Fix Monit Configuration Syntax Errors on Ubuntu
If Monit refuses to restart after you edit the control file, validate the syntax before changing anything else. A broken allow line or a missing quote is enough to stop the reload.
/etc/monit/monitrc:188: syntax error 'allow'
monit: error reading the control file '/etc/monit/monitrc'
Run the syntax test again after fixing the line.
sudo monit -tControl file syntax OK
Restart the daemon only after the syntax check passes.
sudo systemctl restart monitFix Duplicate Monit Credentials on Ubuntu
If Monit reports duplicate credentials such as Credentials for user admin were already added, the HTTP block has more than one allow user:password entry for the same username. Keep one credential line for each Monit user, save the file, then rerun the syntax test.
Fix Monit Web Interface Access Issues on Ubuntu
Start by checking whether Monit is active and whether anything is listening on port 2812. A running daemon with no 2812 listener usually means the set httpd block is still commented out or bound to a different address.
systemctl is-active monit
ss -lnt | grep 2812 || echo "port 2812 is not listening"
active port 2812 is not listening
If the service is active but port 2812 is not listening, re-enable the HTTP block in /etc/monit/monitrc and restart Monit. If the listener exists but the browser still fails, recheck the bind address, firewall rule, and the username and password you saved in the control file.
Check Monit Logs on Ubuntu
Use the systemd journal when the service starts, stops, or reloads unexpectedly. The newest entries usually show whether Monit rejected the control file, failed to bind port 2812, or stopped after a restart.
sudo journalctl -u monit --no-pager -n 50Update or Remove Monit on Ubuntu
Ubuntu keeps Monit under normal APT package management, so ongoing maintenance is simple.
Update Monit on Ubuntu
Pull new package metadata and upgrade only Monit when you do not want to touch the rest of the system yet.
sudo apt update && sudo apt install --only-upgrade monitCheck the reported version afterward to confirm the new package is in place.
monit --versionThis is Monit version 5.35.2 Built with ssl, with ipv6, with compression, with pam and with large files
Remove Monit from Ubuntu
Stop the service and purge the package if you want to remove Monit and its package-managed configuration files. Back up any custom checks, certificates, or alert scripts first if you stored them outside the default package paths.
sudo systemctl stop monit
sudo apt remove --purge monit
Preview orphaned dependencies before removing them. Continue only when APT’s list contains packages you no longer need.
sudo apt autoremove --dry-runRun the cleanup after reviewing the dry-run output.
sudo apt autoremoveVerify package state directly so a repository candidate does not look like an installed package.
dpkg -l monit 2>/dev/null | grep '^ii' || echo "monit is not installed"monit is not installed
If you want to reinstall Monit later, apt-cache policy should still show the Ubuntu repository candidate for your release.
apt-cache policy monitmonit:
Installed: (none)
Candidate: 1:5.35.2-3
Version table:
1:5.35.2-3 500
500 http://archive.ubuntu.com/ubuntu resolute/universe amd64 Packages
apt remove --purgeclears the packaged Monit configuration under/etc/monit/, but it does not know about custom files you placed elsewhere. Delete any leftover TLS files, helper scripts, or exported backups manually after you confirm you no longer need them.
Conclusion
Monit is running on Ubuntu with the daemon enabled, and the optional port 2812 dashboard is ready once the HTTP block matches the way you want to administer the server. For a TLS reverse proxy in front of that dashboard, install Nginx on Ubuntu. Apache works too when your stack already uses it, so you can install Apache on Ubuntu and proxy Monit through the existing web server.

Formatting tips for your comment
You can use basic HTML to format your comment. Useful tags currently allowed in published comments:
<code>command</code>command<strong>bold</strong><em>italic</em><a href="https://example.com">link</a><blockquote>quote</blockquote>