Zed’s Linux builds move quickly, so Ubuntu users should choose the update path before installing the editor. To install Zed on Ubuntu, use the official per-user installer for the current upstream stable or preview build, the community APT repository when package-manager ownership matters more than freshness, or Flathub when you already manage desktop apps through Flatpak.
The official Zed Linux installation documentation uses a shell installer, but that installer does not add an APT repository. It downloads the current Linux tarball for x86_64 or aarch64, replaces ~/.local/zed.app or ~/.local/zed-preview.app, creates ~/.local/bin/zed, and writes a per-user desktop launcher. The Flathub package and the community Debian/Ubuntu repository are separate packaging paths with different trust and update behavior.
Install Zed on Ubuntu
Choose a Zed Installation Method
Use the official installer when you want Zed’s current upstream Linux build and preview channel support. Use the community APT repository only when a system package and APT-managed updates are more important than using Zed’s official installer. Use Flatpak when you already rely on Flathub and accept its current unverified package status.
| Method | Source | Update Owner | Best Fit | Trade-offs |
|---|---|---|---|---|
| Official installer | Zed Linux docs | Rerun Zed’s installer for the selected channel | Most users who want the current upstream stable build or preview channel | Per-user install under ~/.local/, not an APT package; official Linux builds target x86_64 and aarch64 |
| Community APT repository | debian.griffo.io | APT-managed updates from the community source while access remains configured | Users who want a system package named zed | Unofficial packaging with a repository access change announced for October 1, 2026; versions can vary by Ubuntu suite |
| Flatpak | Flathub app listing for dev.zed.Zed | flatpak update | Flatpak-first desktops or users avoiding extra APT sources | Unverified Flathub wrapper with broad home directory and desktop-integration permissions |
Choose the community APT method only on Ubuntu 26.04, 24.04, or 22.04 systems running
amd64orarm64. The repository is not maintained by Zed Industries, its site says APT access will require authentication starting October 1, 2026, and thezedcandidate can lag behind Zed’s latest upstream release on some suites.
Ubuntu’s default APT sources do not currently expose a zed package. An empty apt-cache policy zed result means APT has no package candidate until you add a third-party source such as the community repository.
Install Zed with the Official Installer
Start with the official installer for normal Ubuntu desktop use on amd64 or arm64. It installs into your home directory, so the Zed app itself does not need sudo; only the curl prerequisite uses APT.
Install the download tools used by the installer:
sudo apt update
sudo apt install curl ca-certificates -y
These prerequisite commands use
sudofor system package changes. If your account cannot run administrative commands, configure access with the Ubuntu sudoers guide before continuing.
Download the installer to a temporary file, then run it with sh. This uses the same script as Zed’s one-line command while avoiding a direct pipe into the shell. The -fsSL flags make curl fail on HTTP errors, show error details, and follow redirects; the curl command guide has more download patterns if you want to inspect similar shell workflows.
rm -f /tmp/zed-install.sh
curl -fsSL https://zed.dev/install.sh -o /tmp/zed-install.sh && sh /tmp/zed-install.sh
Zed’s official one-liner is equivalent for the stable channel:
curl -f https://zed.dev/install.sh | shThe stable installer creates ~/.local/zed.app, points ~/.local/bin/zed at the app bundle, and writes ~/.local/share/applications/dev.zed.Zed.desktop. Ubuntu desktop sessions may not see a newly created ~/.local/bin directory until the shell environment refreshes, so export it for the current terminal before verifying the command.
export PATH="$HOME/.local/bin:$PATH"
command -v zed
zed --version | awk '{print $1, $2}'
readlink -f "$HOME/.local/bin/zed"
Example output from the stable installer:
/home/username/.local/bin/zed
Zed 1.7.2
/home/username/.local/zed.app/bin/zed
A newer version number is normal when Zed publishes a later stable build. The command path should still resolve through ~/.local/bin/zed to the app bundle under your home directory.
Check the desktop launcher if Zed does not appear in the application menu after signing out and back in:
grep -E '^(Name|Exec|Icon)=' "$HOME/.local/share/applications/dev.zed.Zed.desktop"Name=Zed Exec=/home/username/.local/zed.app/bin/zed %U Icon=/home/username/.local/zed.app/share/icons/hicolor/512x512/apps/zed.png
Install Zed Preview Channel
Use the preview channel only when you want early builds and can tolerate faster-moving editor behavior. Preview installs into ~/.local/zed-preview.app and writes a separate Zed Preview desktop launcher, but the ~/.local/bin/zed symlink points to whichever channel you installed most recently.
rm -f /tmp/zed-install.sh
curl -fsSL https://zed.dev/install.sh -o /tmp/zed-install.sh && ZED_CHANNEL=preview sh /tmp/zed-install.sh
Verify the preview channel before using it as your daily editor:
export PATH="$HOME/.local/bin:$PATH"
zed --version
readlink -f "$HOME/.local/bin/zed"
The version line should identify the preview channel, and the resolved path should end in ~/.local/zed-preview.app/bin/zed. Preview version numbers move faster than stable releases, so treat the channel name and app path as the important verification signals.
Install Zed from the Community APT Repository
The community APT repository provides a system package named zed. This method is useful when APT visibility matters, but it is not Zed’s official packaging path and can trail the official installer.
Install the tools for the repository key and HTTPS downloads:
sudo apt update
sudo apt install curl ca-certificates gpg -y
Download Dario Griffo’s repository key, convert it to a binary keyring, and install it under /etc/apt/keyrings/ for APT’s Signed-By field:
rm -f /tmp/debian-griffo.asc /tmp/debian-griffo.gpg
curl -fsSLo /tmp/debian-griffo.asc https://debian.griffo.io/EA0F721D231FDD3A0A17B9AC7808B4DD62C41256.asc
gpg --dearmor --yes -o /tmp/debian-griffo.gpg /tmp/debian-griffo.asc
sudo install -m 0755 -d /etc/apt/keyrings
sudo install -m 0644 /tmp/debian-griffo.gpg /etc/apt/keyrings/debian-griffo.gpg
rm -f /tmp/debian-griffo.asc /tmp/debian-griffo.gpg
Confirm the saved key fingerprint before creating the source file:
gpg --quiet --show-keys --with-fingerprint /etc/apt/keyrings/debian-griffo.gpgpub ed25519 2025-02-24 [SC]
EA0F 721D 231F DD3A 0A17 B9AC 7808 B4DD 62C4 1256
uid Dario Griffo <dariogriffo@gmail.com>
sub cv25519 2025-02-24 [E]
Create the DEB822 source file. This uses the same repository and signing key as the community setup page, but stores the source in a dedicated .sources file so it is easier to audit and remove later. The guard writes the repository only for Ubuntu 26.04, 24.04, or 22.04 on amd64 and arm64, the release and architecture pairs that publish zed in the repository metadata.
. /etc/os-release
codename="${VERSION_CODENAME:-}"
arch="$(dpkg --print-architecture)"

case "${codename}:${arch}" in
  resolute:amd64|resolute:arm64|noble:amd64|noble:arm64|jammy:amd64|jammy:arm64)
    printf '%s\n' \
      'Types: deb' \
      'URIs: https://debian.griffo.io/apt' \
      "Suites: ${codename}" \
      'Components: main' \
      "Architectures: ${arch}" \
      'Signed-By: /etc/apt/keyrings/debian-griffo.gpg' | sudo tee /etc/apt/sources.list.d/debian-griffo.sources > /dev/null
    ;;
  *)
    printf 'The community Zed repository does not publish packages for %s on %s.\n' "$codename" "$arch" >&2
    false
    ;;
esac
Refresh APT and verify that the zed candidate comes from debian.griffo.io:
sudo apt update
apt-cache policy zed
zed:
Installed: (none)
Candidate: 1.6.3-1+resolute
Version table:
1.6.3-1+resolute 500
500 https://debian.griffo.io/apt resolute/main amd64 Packages
The example above is from Ubuntu 26.04 on amd64. The candidate version can differ on Ubuntu 24.04 or 22.04 when the community repository publishes suite-specific packages, but the source URL and release suite should still match the source file you created.
Install the community package after the candidate and source match the repository you added. Review the transaction before confirming because this package comes from a third-party source:
sudo apt install zedVerify the installed package, command path, and application version:
dpkg-query -W -f='${db:Status-Abbrev} ${binary:Package} ${Version} ${Architecture}\n' zed
command -v zed
zed --version | awk '{print $1, $2}'
ii zed 1.6.3-1+resolute amd64 /usr/bin/zed Zed 1.6.3
The community package installs the terminal launcher at /usr/bin/zed and the desktop entry at /usr/share/applications/dev.zed.Zed.desktop.
Install Zed with Flatpak
Flatpak installs the unverified Flathub wrapper and its runtime outside APT. If Flatpak is not already configured on your desktop, the full Flatpak setup guide for Ubuntu explains system and user scope in more detail.
Install Flatpak and add Flathub at system scope:
sudo apt update
sudo apt install flatpak -y
sudo flatpak remote-add --if-not-exists flathub https://dl.flathub.org/repo/flathub.flatpakrepo
Install the Zed app ID from Flathub:
sudo flatpak install flathub dev.zed.ZedVerify the installed Flatpak metadata:
flatpak info dev.zed.Zed | grep -E '^[[:space:]]*(ID|Ref|Version|Origin|Installation|Runtime):' ID: dev.zed.Zed
Ref: app/dev.zed.Zed/x86_64/stable
Version: v1.7.2
Origin: flathub
Installation: system
Runtime: org.freedesktop.Sdk/x86_64/25.08
The Flatpak version and runtime branch can change as Flathub rebuilds the app. Keep Origin: flathub and Installation: system aligned with the install command shown earlier.
Inspect permissions before using the Flathub package for private project directories or credential-heavy workflows:
flatpak info --show-permissions dev.zed.Zed[Context] shared=network;ipc; sockets=wayland;pulseaudio;fallback-x11;ssh-auth;gpg-agent; devices=dri; filesystems=home; [Session Bus Policy] org.freedesktop.Flatpak=talk org.freedesktop.secrets=talk
Launch the Flatpak build from the terminal with:
flatpak run dev.zed.ZedLaunch and Start Using Zed on Ubuntu
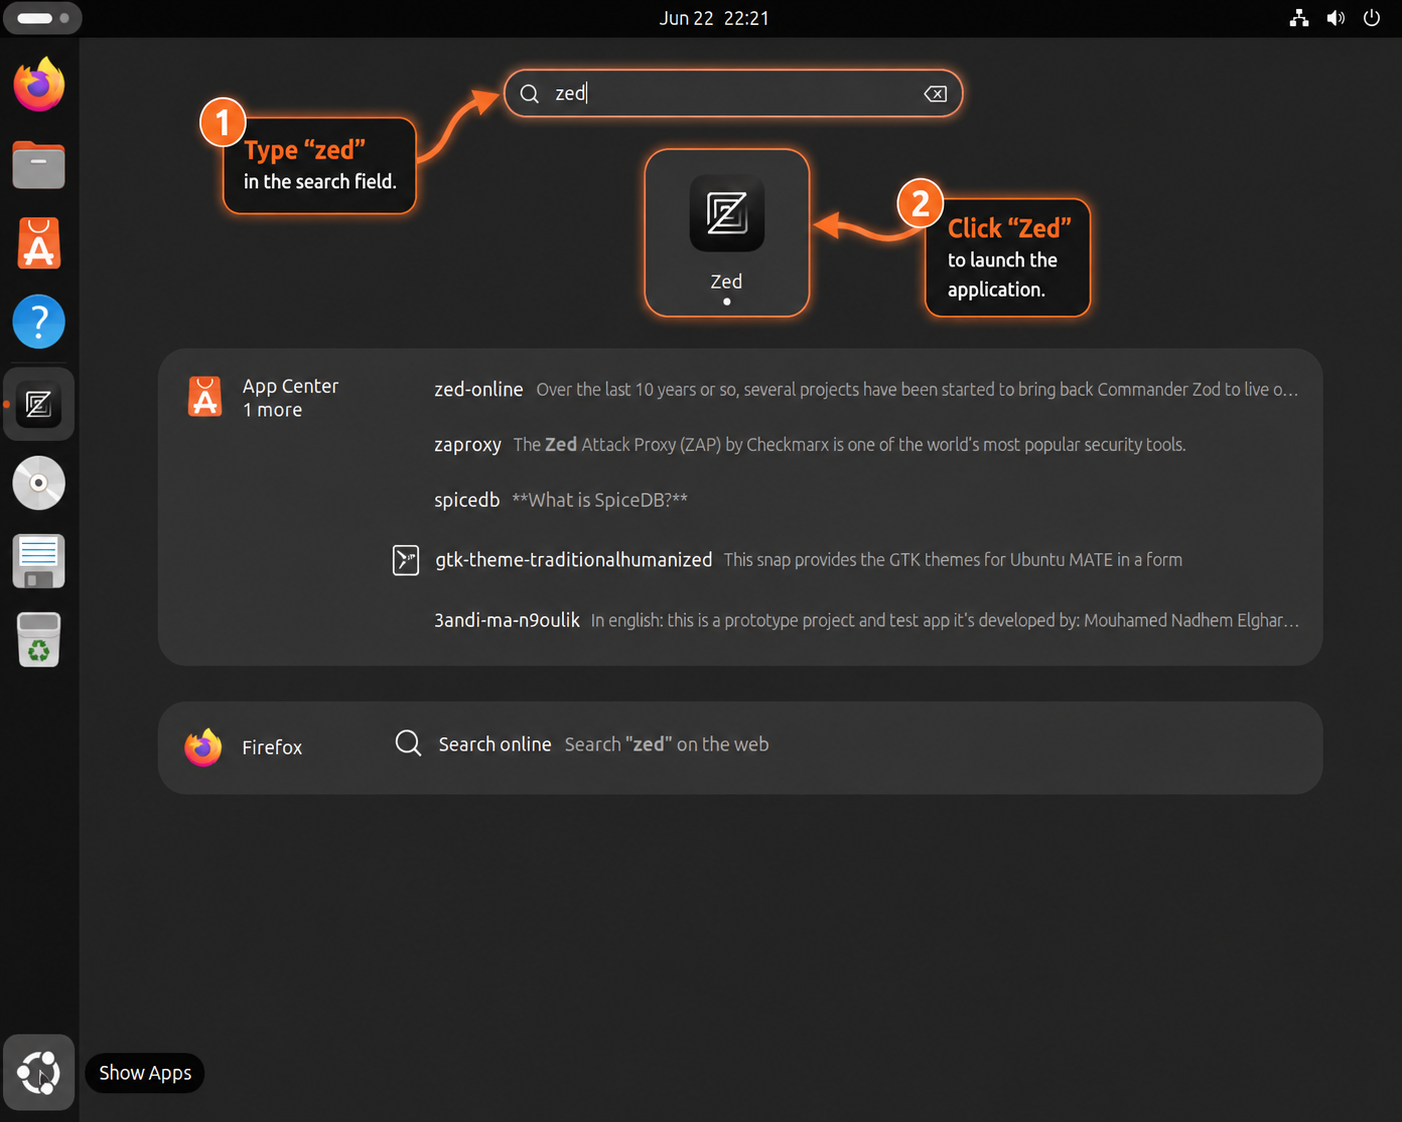
Open Zed from the Ubuntu application launcher by searching for Zed. If you installed the preview channel, search for Zed Preview. Flatpak installs use the same launcher name but are managed by the Flatpak app ID.
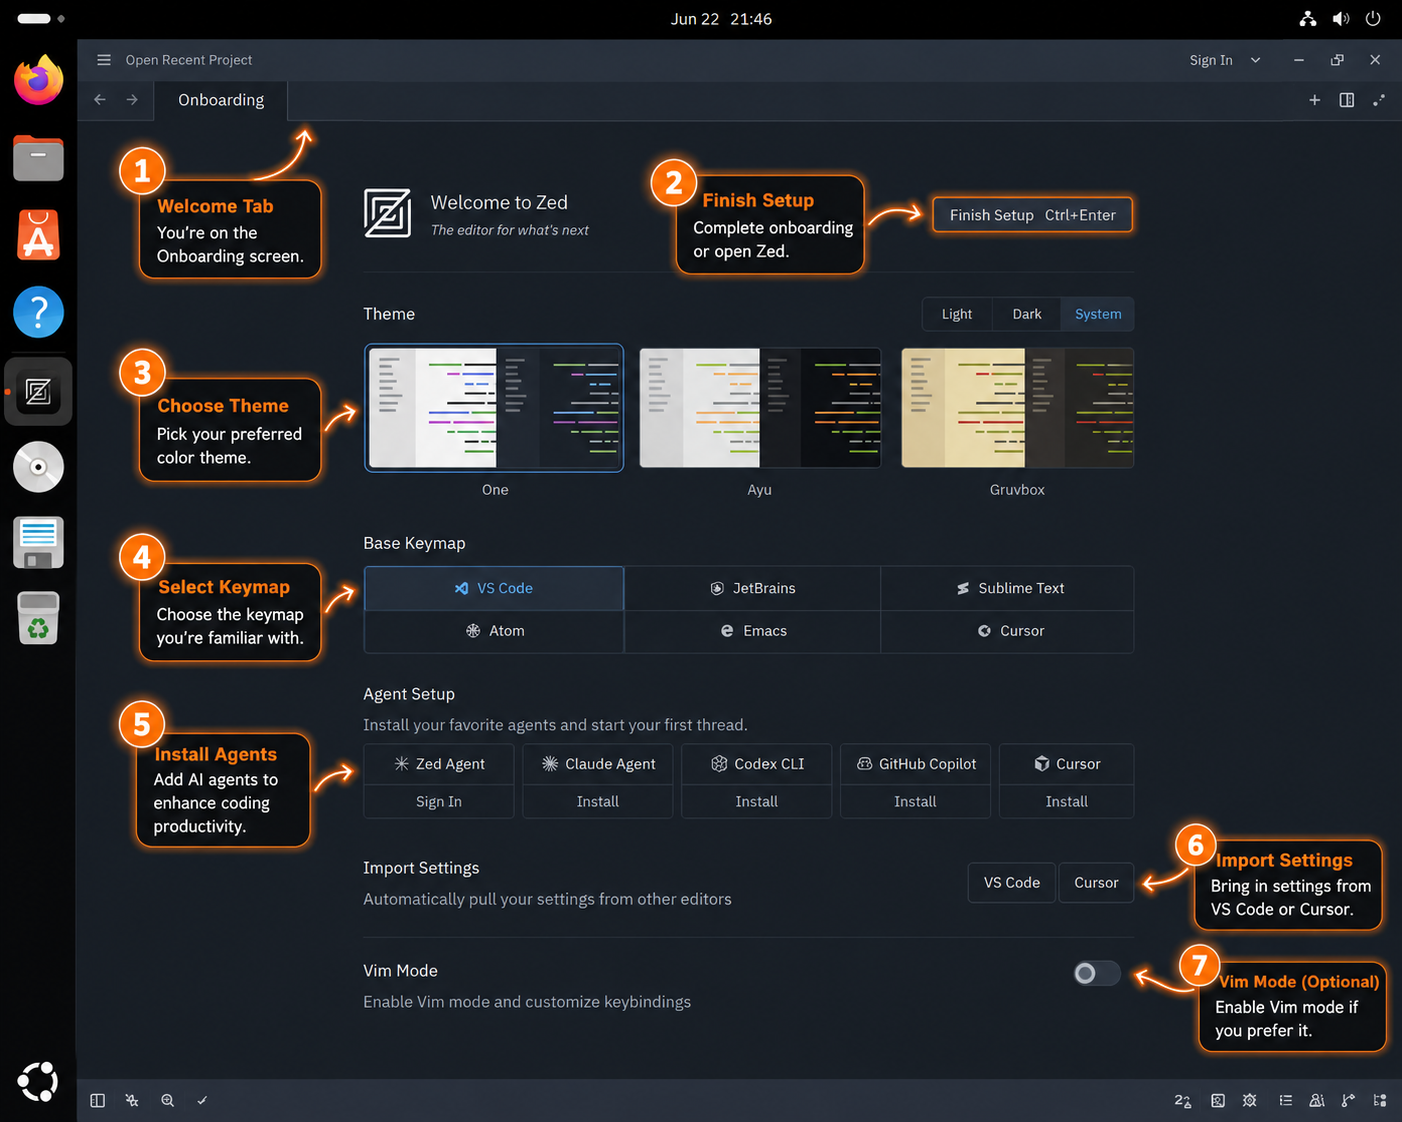
On first launch, Zed opens a setup screen for choices such as theme, keymap, agent setup, and import settings. Work through that screen before using the project commands below so the editor opens into a normal workspace.
The terminal launcher accepts files, directories, and line-column targets. Zed’s getting started documentation treats project opening, the command palette, extensions, and AI setup as early first-use steps, which maps cleanly to Ubuntu terminal and desktop launch paths.
Create a disposable test project when you want to confirm Zed without opening a private repository:
mkdir -p ~/projects/zed-demo/src
cat > ~/projects/zed-demo/README.md <<'EOF'
# Zed Ubuntu Demo

Use this project to confirm that Zed opens a folder, shows files in the project tree, and edits a normal workspace.
EOF
cat > ~/projects/zed-demo/src/main.py <<'EOF'
print("Zed is ready on Ubuntu")
EOF
zed ~/projects/zed-demo
Open a new Zed window or jump to a specific file and line when you already have a project:
zed -n ~/projects/zed-demo
zed ~/projects/zed-demo/src/main.py:1:1
For a Flatpak install, use the app ID when launching from the terminal:
flatpak run dev.zed.Zed ~/projects/zed-demoInstall Extensions and Set Up AI Features
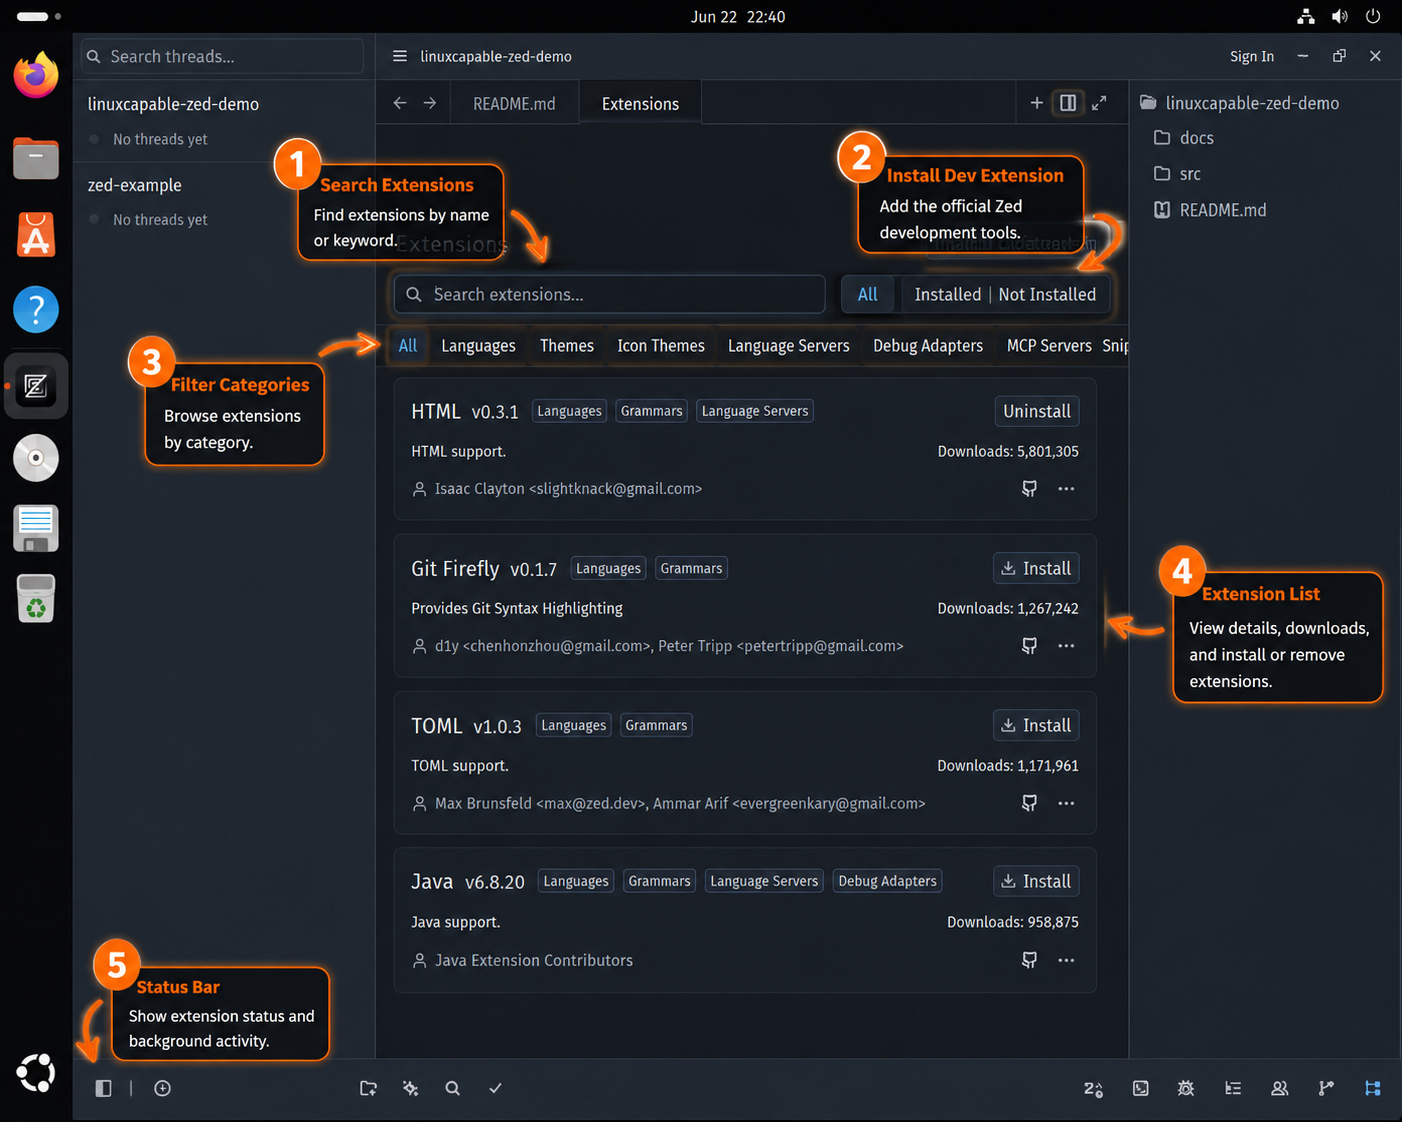
Use the Extension Gallery for language support, themes, debuggers, snippets, MCP servers, and other editor additions. Open it with Ctrl+Shift+X on Ubuntu, search for the feature you need, then install only the extension that matches the project workflow.
For AI features, open the Agent Panel with Ctrl+Shift+A and choose a provider or sign-in path before sending project context. Zed also supports External Agents through the ACP registry, including Codex, but those agents own their own authentication, billing, model settings, and native configuration; configuring a Zed provider key does not automatically configure an external Codex thread.
Update Zed on Ubuntu
Update ownership depends on the method you chose. Do not use APT commands to update the official installer bundle or Flatpak commands to update the community package.
Update the Official Installer Build
Rerun the official installer for the same channel you installed. The stable channel uses no extra environment variable:
rm -f /tmp/zed-install.sh
curl -fsSL https://zed.dev/install.sh -o /tmp/zed-install.sh && sh /tmp/zed-install.sh
Update the preview channel with the same ZED_CHANNEL value used during installation:
rm -f /tmp/zed-install.sh
curl -fsSL https://zed.dev/install.sh -o /tmp/zed-install.sh && ZED_CHANNEL=preview sh /tmp/zed-install.sh
Update the Community APT Package
APT updates Zed while the community source file remains enabled:
sudo apt update
sudo apt install --only-upgrade zed
Update the Flatpak Package
Flatpak updates the Zed app and any required runtimes from Flathub:
sudo flatpak update dev.zed.ZedRemove Zed from Ubuntu
Use the removal path that matches the install method. Package removal does not automatically delete every editor preference, project cache, login token, or workspace setting.
Remove the Official Installer Build
Run Zed’s own uninstaller for the installed channel. The prompt asks whether to keep preferences.
"$HOME/.local/zed.app/bin/zed" --uninstallFor the preview channel, use the preview app bundle path:
"$HOME/.local/zed-preview.app/bin/zed" --uninstallIf you added a custom ~/.local/bin line to ~/.bashrc during troubleshooting, remove that line manually after uninstalling Zed.
Remove the Community APT Package and Source
Remove the package first, then delete the source file and keyring created by this method if no other packages on the system use the same community repository:
sudo apt remove zed
sudo rm -f /etc/apt/sources.list.d/debian-griffo.sources /etc/apt/keyrings/debian-griffo.gpg
sudo apt update
Confirm the package is no longer installed:
dpkg-query -W -f='${db:Status-Abbrev} ${binary:Package}\n' zed 2>/dev/null | grep '^ii' || echo "zed package not installed"zed package not installed
Remove the Flatpak Package
Remove the Flathub app at the same system scope used during installation:
sudo flatpak uninstall dev.zed.ZedConfirm the system-scope Flatpak app is no longer listed:
flatpak list --system --app --columns=application | grep -Fx dev.zed.Zed || echo "NOT_INSTALLED"NOT_INSTALLED
Check for sandboxed Flatpak user data before deleting it:
if [ -e "$HOME/.var/app/dev.zed.Zed" ]; then
  echo "$HOME/.var/app/dev.zed.Zed"
else
  echo "No Flatpak user data found"
fi
Deleting the Flatpak data directory permanently removes Zed’s sandboxed settings, caches, sessions, and local app state for that account. Back up anything you need before removing it.
rm -rf "$HOME/.var/app/dev.zed.Zed"Troubleshoot Zed on Ubuntu
Fix curl Command Not Found
Fresh Ubuntu desktops may not include curl. Install it before using Zed’s installer or downloading repository keys:
sudo apt update
sudo apt install curl ca-certificates -y
Fix zed Command Not Found After the Official Installer
The official installer creates ~/.local/bin/zed, but the current terminal may not include ~/.local/bin in PATH. Refresh it for the current shell first:
export PATH="$HOME/.local/bin:$PATH"
command -v zed
/home/username/.local/bin/zed
If you want Bash terminals to add that path automatically, add a guarded line to ~/.bashrc:
path_line='export PATH="$HOME/.local/bin:$PATH"'
touch "$HOME/.bashrc"
grep -qxF "$path_line" "$HOME/.bashrc" || printf '\n%s\n' "$path_line" >> "$HOME/.bashrc"
Check Flatpak Remote or Scope Problems
If Flatpak cannot find dev.zed.Zed, verify that Flathub exists and is enabled at the same scope used for installation:
flatpak remotes --show-disabled --columns=name,optionsRe-add Flathub when the remote is missing:
sudo flatpak remote-add --if-not-exists flathub https://dl.flathub.org/repo/flathub.flatpakrepoCheck Graphics Support for Zed Startup Issues
Zed’s Linux build needs a working graphical desktop and GPU stack. If the app exits immediately or reports a renderer or Vulkan problem, confirm that Ubuntu can report Vulkan support before changing Zed’s install method:
sudo apt update
sudo apt install vulkan-tools -y
vulkaninfo --summary
If vulkaninfo fails, fix the Ubuntu graphics driver or virtual GPU configuration first. Reinstalling Zed will not repair a missing Vulkan stack.
Conclusion
Zed is ready on Ubuntu with the source that matches your update model: upstream installer for current stable or preview builds, community APT for package-manager tracking, or Flathub for Flatpak-managed desktops. Open a project from the terminal, then compare adjacent editor workflows with Visual Studio Code on Ubuntu or Cursor on Ubuntu if your setup needs a different extension or AI workflow.

Formatting tips for your comment
You can use basic HTML to format your comment. Useful tags currently allowed in published comments:
<code>command</code>command<strong>bold</strong><em>italic</em><a href="https://example.com">link</a><blockquote>quote</blockquote>