
An AI assistant is more useful when you can reach it from WhatsApp, Telegram, Discord, or a browser dashboard instead of pinning it to one terminal session. That makes it worth it to install OpenClaw on Ubuntu when you want a self-hosted gateway that keeps agent sessions, tools, memory, and channel routing on hardware you control.
OpenClaw works on Ubuntu 26.04 LTS, 24.04 LTS, and 22.04 LTS, including server and minimal installs, but smaller images usually still need the curl command in Linux and a sudo-capable account for the bootstrap method. Ubuntu’s default repositories do not publish an openclaw package, so the practical paths are the upstream installer, the local-prefix installer, or a manual npm install when you already manage Node.js yourself.
Install OpenClaw on Ubuntu
Three installation paths cover the real Ubuntu use cases. The official installer is the fastest route for most systems, the local-prefix installer keeps everything under ~/.openclaw, and the manual npm path fits people who already manage their own Node.js runtime.
| Method | Channel | Version | Updates | Best For |
|---|---|---|---|---|
| Official installer | OpenClaw install docs | Latest stable release | Built-in via openclaw update | Most Ubuntu systems |
| Local-prefix installer | Installer internals | Latest stable release with bundled Node runtime | Built-in via openclaw update | No system Node dependency, contained user-space install |
| Manual npm | Node setup docs | Latest npm release | openclaw update or npm install -g openclaw@latest | Existing Node.js workflows |
- Use the official installer if you want OpenClaw to install Git and a supported Node runtime for you.
- Use the local-prefix installer if you want everything under
~/.openclawand you would rather not depend on a system Node.js package. - Use manual npm if Node.js already comes from your own nvm, NodeSource, or other developer workflow and you only need the OpenClaw package.
OpenClaw dependencies on Ubuntu are curl for the bootstrap command, Git for installer and dev-channel work, and Node.js as a manual prerequisite only when you choose npm yourself. The official installer can add Git and Node 24 automatically, while the local-prefix install-cli.sh script bundles its own Node 22 runtime under ~/.openclaw.
Ubuntu Server and minimal Ubuntu installs use the same OpenClaw commands as Ubuntu Desktop. Install curl first, then use the tokenized dashboard URL or an SSH tunnel when the server has no local browser.
If you searched for apt install openclaw, Ubuntu 26.04, 24.04, and 22.04 all return no output for apt-cache policy openclaw. Searches for Open Claw usually mean the same project, but the install command, npm package, and launcher all use openclaw without a space.
These instructions target Ubuntu 26.04 LTS, 24.04 LTS, and 22.04 LTS. On current Ubuntu LTS releases, OpenClaw’s installer scripts satisfy the runtime automatically when Node is missing. The local-prefix installer currently bundles a supported Node 22 build, while the manual npm path works best when you already manage Node 24 or Node 22.14+ yourself.
Prepare Ubuntu for OpenClaw Installer Scripts
The official and local-prefix installer methods both download a shell script with curl. Install curl once before either installer path; skip this step if you are using manual npm and your system already has the runtime you need.
sudo apt update
sudo apt install curl
These commands use
sudofor the package steps that need root privileges. If your account is not in the sudoers file yet, follow the guide on how to add a new user to sudoers on Ubuntu before continuing.
Install OpenClaw on Ubuntu with the Official Installer
The official installer is the quickest Ubuntu path because it can install Git and the supported Node runtime for you, move npm’s global prefix into your home directory, and leave future maintenance in the openclaw update workflow.
The bare installer can jump straight into onboarding, but skipping onboarding here makes the bootstrap repeatable and keeps the install section usable from SSH, cloud, and minimal Ubuntu sessions. Finish onboarding after the binary is on your PATH.
curl -fsSL --proto '=https' --tlsv1.2 https://openclaw.ai/install.sh | bash -s -- --no-prompt --no-onboardRelevant output includes:
Install plan
OS: linux
Install method: npm
Requested version: latest
Onboarding: skipped

[1/3] Preparing environment
Node.js not found, installing it now
Installing Node.js via NodeSource
Node.js v24 installed
Active Node.js: v24.x.x (/usr/bin/node)
Active npm: 11.x.x (/usr/bin/npm)

[2/3] Installing OpenClaw
Git not found, installing it now
Git installed
Configuring npm for user-local installs
npm configured for user installs
Installing OpenClaw v2026.x.x
OpenClaw npm package installed

[3/3] Finalizing setup
PATH missing npm global bin dir: /home/linuxcapable/.npm-global/bin

OpenClaw installed successfully (OpenClaw 2026.x.x (short-hash))!
Skipping onboard (requested); run openclaw onboard later
The installer exports the npm bin directory for the current process and may append it to existing Bash or zsh profile files, but custom shells or missing profile files can still leave new terminals without openclaw. Add the line manually if your install output warns that the npm global bin directory is missing from PATH. The guard uses the grep command in Linux with -qxF to avoid appending the same PATH line twice if you rerun the command later.
grep -qxF 'export PATH="$HOME/.npm-global/bin:$PATH"' ~/.bashrc || printf '%s\n' 'export PATH="$HOME/.npm-global/bin:$PATH"' >> ~/.bashrc
export PATH="$HOME/.npm-global/bin:$PATH"
hash -r
Swap in ~/.zshrc if zsh is your login shell. Once the current shell knows about the new path, verify the launcher:
openclaw --versionOpenClaw 2026.x.x (short-hash)
Install OpenClaw on Ubuntu with the Local-Prefix Installer
OpenClaw’s install-cli.sh local-prefix installer keeps the CLI, bundled Node runtime, and related files under ~/.openclaw. This is the cleanest choice when you want a user-space install without extra system Node.js changes beyond any packages the script needs for Git.
curl -fsSL --proto '=https' --tlsv1.2 https://openclaw.ai/install-cli.sh | bashRelevant output includes:
Installing Node 22.22.0 (user-space)...
Installing OpenClaw (latest)...

added 459 packages in 38s
OpenClaw installed (OpenClaw 2026.x.x (short-hash)).
This method writes the launcher to ~/.openclaw/bin/openclaw and the bundled runtime under a versioned directory such as ~/.openclaw/tools/node-v22.22.0. Add that bin directory to your shell before you expect openclaw to resolve from a fresh terminal.
grep -qxF 'export PATH="$HOME/.openclaw/bin:$PATH"' ~/.bashrc || printf '%s\n' 'export PATH="$HOME/.openclaw/bin:$PATH"' >> ~/.bashrc
export PATH="$HOME/.openclaw/bin:$PATH"
hash -r
Verify that the prefix install is now on your PATH:
openclaw --versionOpenClaw 2026.x.x (short-hash)
Install OpenClaw on Ubuntu with npm
Choose manual npm only if you already manage Node.js yourself and you want the package without the bootstrap scripts. OpenClaw recommends Node 24 for self-managed installs and currently requires Node 22.14 or newer, so use a current runtime before you continue.
If your Ubuntu host still needs the runtime, use the guide to install Node.js on Ubuntu first. If you plan to switch this install to the dev channel later, make sure you also install Git on Ubuntu, because the dev channel converts a package install into a git checkout.
A plain npm install -g openclaw@latest fails for normal Ubuntu users because npm’s default global prefix points into /usr. Move the global prefix into your home directory first:
mkdir -p "$HOME/.npm-global"
npm config set prefix "$HOME/.npm-global"
Now export that bin directory for the current shell and for future login sessions:
grep -qxF 'export PATH="$HOME/.npm-global/bin:$PATH"' ~/.bashrc || printf '%s\n' 'export PATH="$HOME/.npm-global/bin:$PATH"' >> ~/.bashrc
export PATH="$HOME/.npm-global/bin:$PATH"
hash -r
With the writable prefix in place, install OpenClaw globally through npm:
npm install -g openclaw@latestRelevant output includes:
added 459 packages in 30s

84 packages are looking for funding
  run npm fund for details
Confirm the package is on your PATH and responding:
openclaw --versionOpenClaw 2026.x.x (short-hash)
Get Started with OpenClaw on Ubuntu
Installing the CLI only gives you the binary. OpenClaw becomes useful after onboarding writes ~/.openclaw/openclaw.json, builds ~/.openclaw/workspace, and installs the gateway service that keeps the dashboard reachable between terminal sessions.
Complete OpenClaw Onboarding on Ubuntu
Run onboarding from the same shell where openclaw now resolves. The interactive flow asks for your provider credentials, gateway auth mode, and whether the gateway should be installed as a background service. The gateway status command verifies the user service, port, and dashboard URL after those prompts finish.
openclaw onboard --install-daemonIf you want the local dashboard online before you connect any channels, this non-interactive path handles the first-run setup without asking for provider credentials. It writes the config, installs the user service, and brings up the Overview page so you can confirm the dashboard is working before you add WhatsApp, Telegram, Discord, or another channel later.
openclaw onboard --non-interactive --accept-risk --skip-channels --skip-skills --skip-search --skip-ui --install-daemon --gateway-bind loopback --gateway-auth token --gateway-token your-local-dashboard-tokenOn Ubuntu, onboarding installs a systemd user service and can request sudo so systemd keeps that user service alive after logout. If the gateway stops when your desktop session ends, enable lingering manually:
sudo loginctl enable-linger "$USER"Keep the OpenClaw gateway bound to loopback for normal use. For remote access, prefer an SSH tunnel, VPN, or a tailnet such as Tailscale on Ubuntu. Only bind OpenClaw to a LAN or publicly reachable interface when you also control authentication, firewall scope, TLS, and any reverse-proxy access.
Verify the OpenClaw Gateway Service on Ubuntu
The quickest post-onboarding check is the gateway status command. It shows the user service, the active port, whether the RPC probe succeeds, and the local dashboard URL.
openclaw gateway statusRelevant output includes:
Service: systemd (enabled)
Service file: ~/.config/systemd/user/openclaw-gateway.service

Config (cli): ~/.openclaw/openclaw.json
Config (service): ~/.openclaw/openclaw.json

Gateway: bind=loopback (127.0.0.1), port=18789 (service args)
Dashboard: http://127.0.0.1:18789/

Runtime: running (pid 23042, state active, sub running, last exit 0, reason 0)
RPC probe: ok

Listening: 127.0.0.1:18789
The exact Command: line differs between the npm-backed and local-prefix installs, but the service state, config path, bind address, dashboard URL, and running status are the stable fields to check. Run openclaw status when you want the broader snapshot with the dashboard URL, active channel, session counts, and security warnings in one report.
Open the OpenClaw Dashboard on Ubuntu
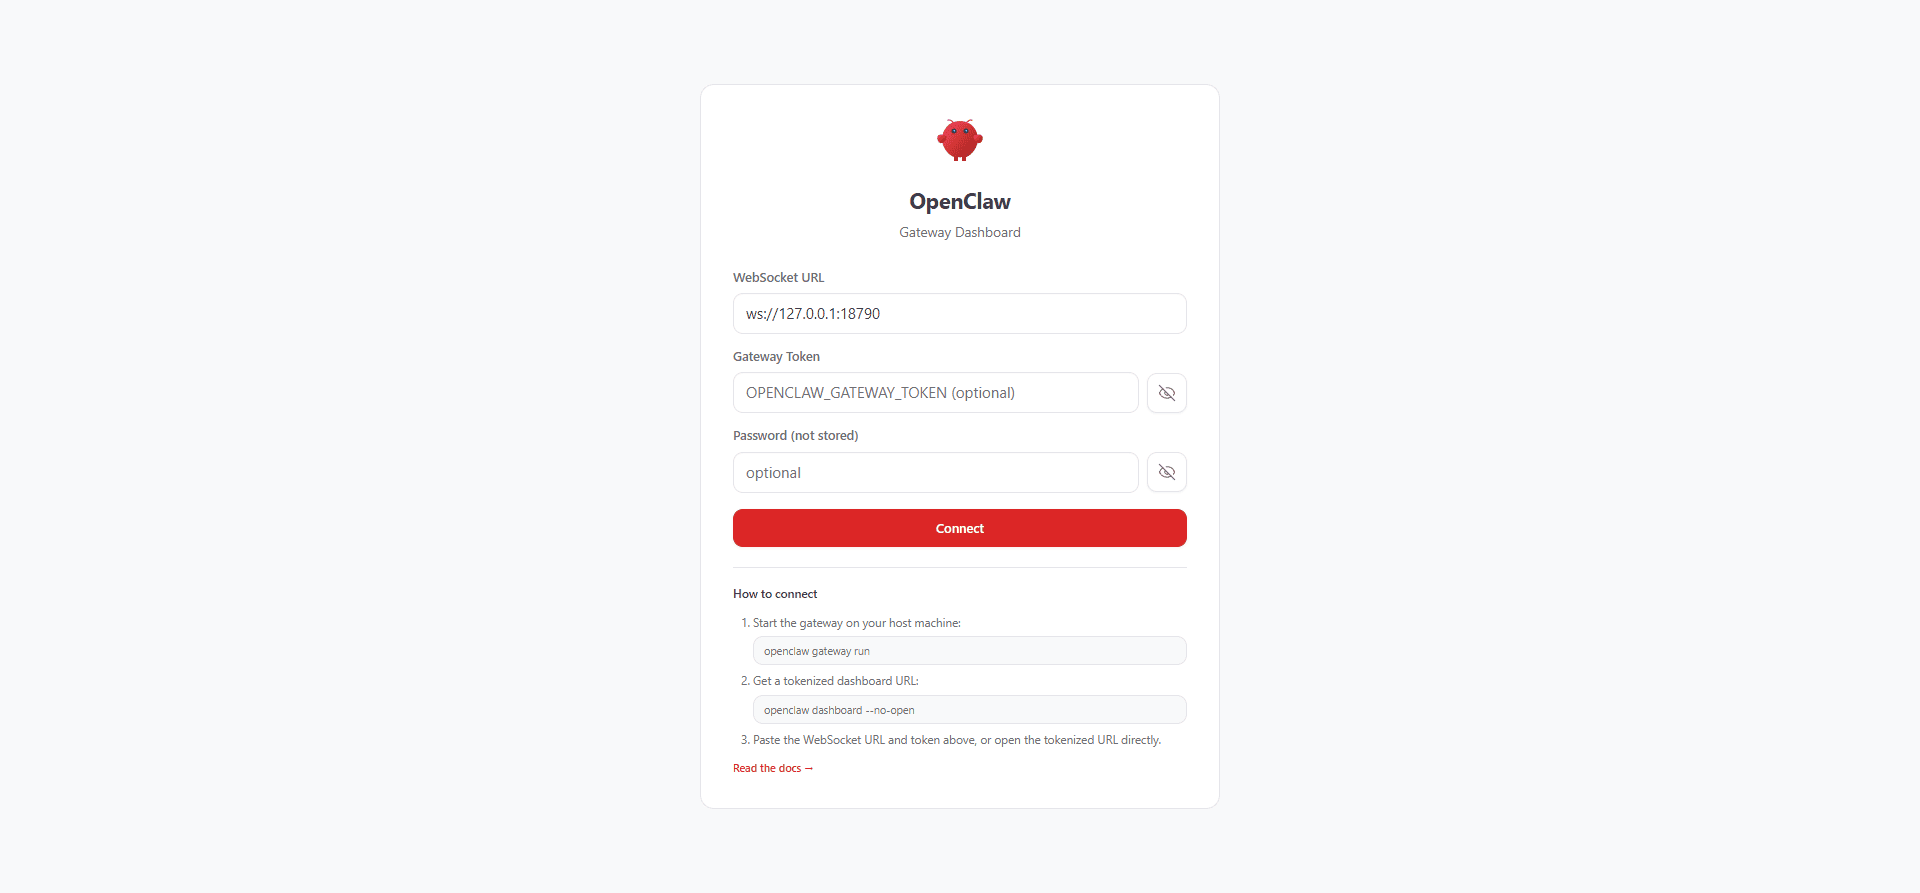
Once the gateway is live, print the tokenized dashboard URL instead of guessing which credentials the Control UI expects. This is also the easiest way to open the dashboard from another machine through an SSH tunnel while the gateway itself stays bound to 127.0.0.1.
openclaw dashboard --no-openRelevant output includes:
Dashboard URL: http://127.0.0.1:18789/#token=your-local-dashboard-token
Copy to clipboard unavailable.
Browser launch disabled (--no-open). Use the URL above.
For a remote Ubuntu server, leave the gateway bound to loopback and forward the dashboard port from your local machine. The -N flag keeps SSH open for tunneling without starting a remote shell:
ssh -N -L 18789:127.0.0.1:18789 user@serverReplace user@server with your SSH login and keep that terminal open while you use the dashboard. Then open the tokenized URL locally: http://127.0.0.1:18789/#token=your-local-dashboard-token.
If you browse to the bare loopback URL first, the Control UI opens on the connect screen and waits for the gateway token. Opening the tokenized URL instead drops you straight into the authenticated dashboard.
A fresh no-channel install still brings up the Overview page, including gateway access details, uptime, tick interval, and a zero-session snapshot. That gives you a quick proof that the gateway and dashboard are working before you spend time linking any real channels.

Know Where OpenClaw Stores Its Files on Ubuntu
Keeping your custom prompts, memories, and skills outside the upstream package makes updates much less painful. These are the locations worth learning first on Ubuntu:
| Path | Purpose |
|---|---|
~/.openclaw/openclaw.json | Main config file for gateway mode, auth, models, and update settings |
~/.openclaw/workspace/ | Your private workspace for prompts, memories, and agent-facing files |
~/.openclaw/agents/main/sessions/sessions.json | Session state for the default agent |
/tmp/openclaw/openclaw-*.log | Gateway log files for quick troubleshooting |
If you plan to tailor OpenClaw heavily, treat ~/.openclaw/workspace as your private working area instead of editing files inside the installed package path.
Use Your First OpenClaw Commands on Ubuntu
These commands cover the useful first hour after installation, when you are checking service health, watching logs, and making sure the gateway responds the way you expect.
| Command | What It Does |
|---|---|
openclaw status | Shows the dashboard URL, gateway reachability, active channel, sessions, and security summary |
openclaw gateway status | Checks the user service, the active port, and the RPC probe state |
openclaw health | Fetches the running gateway’s agent and session state |
openclaw doctor | Runs health checks and suggests or applies fixes for configuration problems |
openclaw logs --follow | Streams the live gateway logs so you can watch onboarding, auth, or channel issues as they happen |
Enable OpenClaw Shell Completion on Ubuntu
OpenClaw can generate shell completion after the CLI is installed. Ubuntu’s default shell is Bash, while zsh users can install Zsh on Ubuntu before enabling the zsh completion block. Use the Bash command for Bash, or use the zsh command to enable zsh shell completion for OpenClaw.
openclaw completion --shell bash --install --yesopenclaw completion --shell zsh --install --yesIf a later shell startup says ~/.openclaw/completions/openclaw.bash: No such file or directory, regenerate completion with the matching openclaw completion command after reinstalling OpenClaw, or remove the old OpenClaw completion block from your shell profile after uninstalling it.
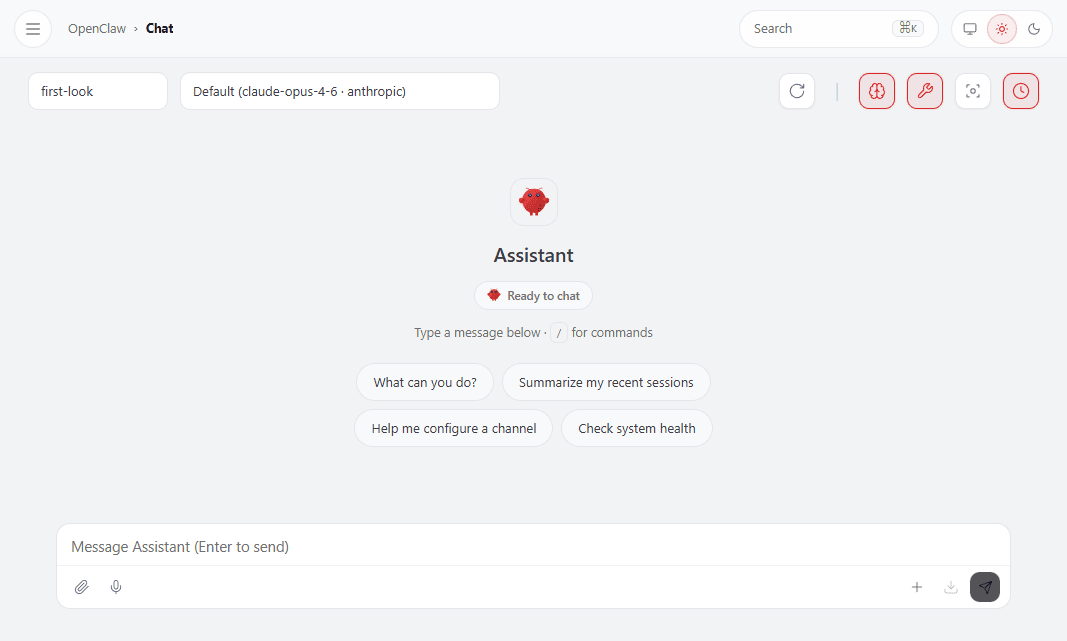
Use the OpenClaw Assistant in the Browser on Ubuntu
After the dashboard connects, the Chat page gives you the browser workspace for the built-in assistant. It is the easiest place to work with the session picker, model selector, quick actions, and message box in one view, while real replies start once you add provider credentials for the agent.
Update OpenClaw on Ubuntu
OpenClaw already includes its own updater, so start there instead of mixing package-manager commands after the install. The dry-run mode is the easiest way to see what will change before the gateway restarts.
If this gateway already has provider credentials, channels, sessions, or workspace files you care about, create a backup before updating. The archive covers OpenClaw state, config, credentials, sessions, and workspace data.
openclaw backup create --verifyPreview and Apply OpenClaw Updates on Ubuntu
Preview the update first, then run the real update command once you are happy with the target version and the planned actions:
openclaw update --dry-run
openclaw update
Relevant output includes:
Update dry-run
No changes were applied.

  Install kind: package
  Mode: npm
  Channel: stable
  Tag/spec: openclaw@latest
  Current version: 2026.x.x
  Target version: 2026.x.x

Planned actions:
  - Run global package manager update with spec openclaw@latest
  - Run plugin update sync after core update
  - Refresh shell completion cache (if needed)
  - Restart gateway service and run doctor checks
Switch OpenClaw Channels on Ubuntu
Stable and beta stay on the package-install path, while the dev channel switches a package install into a git checkout. Preview the change before you commit to it, especially on a machine where you want predictable updates.
openclaw update --channel beta --dry-run
openclaw update --channel dev --dry-run
Relevant output includes:
Update dry-run
No changes were applied.

  Install kind: package
  Mode: git
  Channel: dev
  Tag/spec: dev

Planned actions:
  - Persist update.channel=dev in config
  - Switch install mode from package to git checkout (dev channel)
  - Run plugin update sync after core update
  - Refresh shell completion cache (if needed)
  - Restart gateway service and run doctor checks
Beta can resolve to the same published build as stable when OpenClaw does not currently have a separate beta package queued.
Troubleshoot OpenClaw on Ubuntu
Most first-day Ubuntu issues come from missing PATH entries, npm permission errors, or needing a quicker way to inspect the gateway. These checks solve the early problems that matter most after the install finishes.
Fix OpenClaw Command Not Found on Ubuntu
The official installer and manual npm method place the launcher under the npm global prefix, while the local-prefix installer uses ~/.openclaw/bin. If you used the local-prefix installer, skip the npm prefix check and use the local-prefix export command instead.
npm prefix -g
echo "$PATH"
Relevant output includes:
/home/linuxcapable/.npm-global
The warning PATH missing npm global bin dir means the install finished, but a new terminal may not find the launcher yet. Add the matching export line for your install method and reload the shell command cache.
grep -qxF 'export PATH="$HOME/.npm-global/bin:$PATH"' ~/.bashrc || printf '%s\n' 'export PATH="$HOME/.npm-global/bin:$PATH"' >> ~/.bashrc
export PATH="$HOME/.npm-global/bin:$PATH"
hash -r
grep -qxF 'export PATH="$HOME/.openclaw/bin:$PATH"' ~/.bashrc || printf '%s\n' 'export PATH="$HOME/.openclaw/bin:$PATH"' >> ~/.bashrc
export PATH="$HOME/.openclaw/bin:$PATH"
hash -rVerify the fix in the same terminal once the correct bin directory is active:
openclaw --versionOpenClaw 2026.x.x (short-hash)
Fix npm EACCES Errors for OpenClaw on Ubuntu
A plain global npm install tries to write under /usr on Ubuntu, which is why manual installs fail for normal users until you move the prefix into your home directory.
npm install -g openclaw@latestRelevant output includes:
npm error code EACCES
npm error syscall mkdir
npm error path /usr/lib/node_modules/openclaw
npm error errno -13
npm error Error: EACCES: permission denied, mkdir '/usr/lib/node_modules/openclaw'
Move the prefix into your home directory, then rerun the install from the same shell:
mkdir -p "$HOME/.npm-global"
npm config set prefix "$HOME/.npm-global"
npm install -g openclaw@latest
Fix OpenClaw Dashboard Token Errors on Ubuntu
If the Control UI opens but refuses to connect, you probably opened the bare dashboard URL instead of the tokenized URL that onboarding created. Print a fresh dashboard URL, then open it directly or paste only the token value into the Gateway Token field before you click Connect.
openclaw dashboard --no-openRelevant output includes:
Dashboard URL: http://127.0.0.1:18789/#token=your-local-dashboard-token
Copy to clipboard unavailable.
Browser launch disabled (--no-open). Use the URL above.
If you reach the dashboard through an SSH tunnel or another forwarded port, keep the same #token=... value and use it with the browser URL you actually opened locally.
Fix OpenClaw No API Key Found for Provider on Ubuntu
If the Chat page opens but the first prompt fails with a No API key found for provider message, the dashboard itself is already working and the missing piece is agent auth. This is normal after the quick no-channel setup, so rerun onboarding and complete the provider credential prompts before you try the browser assistant again.
openclaw onboard --install-daemonThe exact provider name in the error depends on the model you selected. After onboarding stores the credentials, send the same prompt again from the Chat page and the auth error should disappear.
Inspect OpenClaw Health and Logs on Ubuntu
When the dashboard is unavailable, the gateway will not start, or a channel setup goes sideways, these commands give you the fastest read on what changed and where the logs live.
openclaw status
openclaw gateway status
openclaw doctor
openclaw logs --follow
The status commands tell you whether the service is running, which URL and auth mode the dashboard expects, and whether the RPC probe still works. openclaw logs --follow tails the live gateway file logs, while openclaw doctor is the quickest way to catch missing config, token, or workspace problems.
If the OpenClaw CLI cannot reach the service, check Ubuntu’s user-service view directly. Use these as fallback diagnostics after the OpenClaw commands above, and look for the Active: line or recent startup errors:
systemctl --user status openclaw-gateway.service --no-pager
journalctl --user -u openclaw-gateway.service -n 100 --no-pager
Remove OpenClaw from Ubuntu
Remove OpenClaw with the same install style you used in the first place. The npm-backed installs separate user data from the package, while the local-prefix installer keeps almost everything under ~/.openclaw.
These cleanup commands remove OpenClaw, not shared prerequisites. Keep Git, Node.js, and any NodeSource package source if other tools use them; remove those separately only when they were installed solely for OpenClaw.
Remove npm-Backed OpenClaw on Ubuntu
Create one last backup before removing a real setup, especially if the gateway has credentials, active channels, sessions, or workspace files you may need later.
openclaw backup create --verifyAfter the backup finishes, start with the built-in uninstaller so the gateway service, config, sessions, and workspace disappear before you touch the npm package itself.
openclaw uninstall --all --yes --non-interactiveRelevant output includes:
Recommended first: openclaw backup create
Stopped systemd service: openclaw-gateway.service
Removed systemd service: /home/linuxcapable/.config/systemd/user/openclaw-gateway.service
Removed ~/.openclaw
Removed ~/.openclaw/workspace
CLI still installed. Remove via npm/pnpm if desired.
The first line is a generic reminder, not a sign that your earlier backup failed. The message CLI still installed. Remove via npm/pnpm if desired. means the uninstaller removed OpenClaw’s service and state, but the global npm package is still present. Remove that package separately after the state directory is gone:
npm rm -g openclawVerify that both the package and the user service are gone:
test -x ~/.npm-global/bin/openclaw && echo CLI_STILL_PRESENT || echo CLI_REMOVED
systemctl --user status openclaw-gateway.service --no-pager 2>&1 | sed -n '1p'
CLI_REMOVED Unit openclaw-gateway.service could not be found.
Remove
~/.npm-global,~/.npmrc, and the matching PATH export from~/.bashrconly if that user-local npm prefix existed just for OpenClaw. Keep those files if other global npm tools still depend on them.
Remove Local-Prefix OpenClaw on Ubuntu
The local-prefix installer keeps the CLI inside ~/.openclaw, so the built-in uninstaller removes the whole prefix in one pass instead of leaving a separate package behind.
~/.openclaw/bin/openclaw uninstall --all --yes --non-interactiveThe generic message still says the CLI remains, but on the local-prefix install the command disappears because the entire ~/.openclaw tree is removed.
Verify the final local-prefix cleanup state:
test -x ~/.openclaw/bin/openclaw && echo CLI_STILL_PRESENT || echo CLI_REMOVED
test -d ~/.openclaw && echo PREFIX_STILL_PRESENT || echo PREFIX_REMOVED
CLI_REMOVED PREFIX_REMOVED
Conclusion
OpenClaw is installed on Ubuntu with a local gateway, a browser dashboard, and a workspace you can keep under your own control instead of handing the whole workflow to a hosted service. If you want adjacent terminal-agent workflows, install Claude Code on Ubuntu or install Codex CLI on Ubuntu, and install Node.js on Ubuntu when you would rather manage the runtime yourself.

Formatting tips for your comment
You can use basic HTML to format your comment. Useful tags currently allowed in published comments:
<code>command</code>command<strong>bold</strong><em>italic</em><a href="https://example.com">link</a><blockquote>quote</blockquote>